2014 FIAT 500L ECO mode
[x] Cancel search: ECO modePage 16 of 116

Installing The Child Restraint Using The LATCH Lower Anchors
NOTE:
Never“share” a LATCH anchorage with two or more child restraints.
1.Loosen the adjusters on the lower straps and on the tether strap of the child seat
so that you can more easily attach the hooks or connectors to the vehicle
anchorages.
2.Attach the lower hooks or connectors of the child restraint to the lower anchorages
in the selected seating position.
3.If the child restraint has a tether strap, connect it to the top tether anchorage.See
below for directions to attach a tether anchor.
4.Tighten all of the straps as you push the child restraint rearward and downward into
the seat.Remove slack in the straps according to the child restraint manufacturer’s
instructions.
5.
Test that the child restraint is installed tightly by pulling back and forth on the child seat at
the belt path.It should not move more than 1 inch (25.4 mm) in any direction.
Installing The Child Restraint Using The Vehicle Seat Belts
The seat belt in the passenger seating position are equipped with a Switchable Automatic
Locking Retractor (ALR) that is designed to keep the lap portion of the seat belt tight
around the child restraint.Any seat belt system will loosen with time, so check the belt
occasionally, and pull it tight if necessary.
Always use the tether anchor when using the seat belt to install a forward facing child
restraint, up to the recommended weight limit of the child restraint.
To Install A Child Seat Using An ALR:
1.Pull enough of the seat belt webbing from the retractor to pass it through the belt
path of the child restraint.Do not twist the belt webbing in the belt path.
2.Slide the latch plate into the buckle until you hear a “click.”
3.Pull on the webbing to make the lap portion tight against the child seat.
4.To lock the seat belt, pull down on the shoulder part of the belt until you have pulled
all the seat belt webbing out of the retractor.Then, allow the webbing to retract back
into the retractor.As the webbing retracts, you will hear a clicking sound.This means
the seat belt is now in the Automatic Locking mode.
5.Try to pull the webbing out of the retractor.If it is locked, you should not be able to
pull out any webbing.If the retractor is not locked, repeat the last step.
6.
Finally, pull up on any extra webbing to tighten the lap portion around the child restraint
while you push the child restraint rearward and downward into the vehicle seat.
GETTING STARTED
14
Page 21 of 116

ENGINE BREAK-IN RECOMMENDATIONS
A long break-in period is not required for the engine and drivetrain (transmission and
axle) in your vehicle.
Drive moderately during the first 300 miles (500 km).After the initial 60 miles (100 km),
speeds up to 50 or 55 mph (80 or 90 km/h) are desirable.
While cruising, brief full-throttle acceleration within the limits of local traffic laws contrib-
utes to a good break-in.Wide-open throttle acceleration in low gear can be detrimental
and should be avoided.
The engine oil installed in the engine at the factory is a high-quality energy conserving
type lubricant.Oil changes should be consistent with anticipated climate conditions under
which vehicle operations will occur.For the recommended viscosity and quality grades,
refer to “Maintaining Your Vehicle.”
NOTE:
A new engine may consume some oil during its first few thousand miles (kilometers) of
operation.This should be considered a normal part of the break-in and not interpreted
as an indication of an engine problem or malfunction.
CAUTION!
Never use Non-Detergent Oil or Straight Mineral Oil in the engine or damage may result.
TURN SIGNAL/LIGHTS/HIGH BEAM LEVER
Turn Signal/Lane Change Assist
•Tap the lever up or down once and the
turn signal (right or left) will flash three
times to indicate a lane change and auto-
matically turn off.
Headlights/Parking Lights
•Rotate the end of the lever to the first
detent for parking lights and headlight
operation.
NOTE:
The ignition switch must be in the ON/RUN position for the headlights to operate.
OPERATING YOUR VEHICLE
19
Page 30 of 116

Shifting The Transmission
•The transmission shift lever position (PRND) is displayed both on the shift lever and in
the Electronic Vehicle Information Center (EVIC).
•To drive, depress the brake pedal, press the button on the front of the shift lever and
move the shift lever from PARK or NEUTRAL to the DRIVE position.
•Manual shifts can also be made using the AutoStick® shift control.
•This transmission is programmed to prevent shifting from REVERSE to DRIVE or
DRIVE to REVERSE, if vehicle speed is above 6 mph (10 km/h).This safety feature
helps protect your transmission from damage.
NOTE:
•When stopped on an incline, it is recommended that you always hold the vehicle in
place using the brakes.On steep inclines, Hill Start Assist (HSA) will temporarily hold
the car in position when the brake pedal is released.If the accelerator pedal is not
applied after a short time, the car will roll back.Either reapply the brake (to hold the
vehicle) or press the accelerator to climb the hill.
•During acceleration, gear changes will feel smooth compared to a vehicle with a tradi-
tional manual transmission.This is a benefit of the Euro Twin Clutch Transmission de-
sign that avoids power loss during up-shifts.
Instrument Cluster Messages
•Messages will be displayed in the instrument cluster (if equipped with an EVIC) to alert
the driver when certain conditions occur.These messages are described below.
MESSAGE DESCRIPTION
GEAR NOT AVAILABLE In AutoStick® mode, the gear selected by the driver is
not available due to a fault condition.See your autho-
rized dealer for diagnosis and service.
SHIFT NOT ALLOWED
The gear position requested by the driver is currently
blocked.This occurs if NEUTRAL is requested while mov-
ing, if REVERSE is requested while moving (at 6 mph
[10 km/h] or faster), if DRIVE is requested while moving
backwards (at 6 mph [10 km/h] or faster), or if 3rd gear
or higher is requested at a stop.Make sure the vehicle is
stopped before engaging DRIVE or REVERSE.
SHIFT TO NEUTRAL THEN
DorRThe transmission has shifted itself into NEUTRAL (due
to a fault condition, or overheat due to excessive idling
when stopped in DRIVE with the brakes released), but
the shift lever remains in gear.Shift into NEUTRAL and
then back into gear for continued driving.If the trans-
mission will not reengage, see your authorized dealer.
OPERATING YOUR VEHICLE
28
Page 38 of 116

Equalizer, Balance And Fade
1.Press the MORE hard-key below the display then press the “Setting” soft-key.
2.Scroll down and press the “Audio” soft-key to open the Audio menu.
3.
The Audio Menu shows the following options for you to customize your audio settings.
Equalizer
•Touch the “Equalizer” soft-key to adjust the Bass, Mid and Treble.Use the “+” or “-”
soft-key to adjust the equalizer to your desired settings.
Balance/Fade
•
Touch the “Balance/Fade” soft-key to adjust the sound from the speakers.Use the arrow
soft-keys to adjust the sound level from the front and rear or right and left side speakers.
Touch the Center “C” soft-key to reset the balance and fade to the factory setting.
Speed Adjusted Volume — If Equipped
•Touch the “Speed Adjusted Volume” soft-key to select between OFF, 1, 2 or 3.This will
decrease the radio volume relative to a decrease in vehicle speed.
Loudness
•Touch the “Loudness” soft-key to select the Loudness feature.When this feature is
activated it improves sound quality at lower volumes.
Surround Sound — If Equipped
•
Touch the “Surround Sound” soft-key, select On or Off followed by pressing the back arrow
soft-key.When this feature is activated, it provides simulated surround sound mode.
Radio Operation
Seek Up/Down Buttons
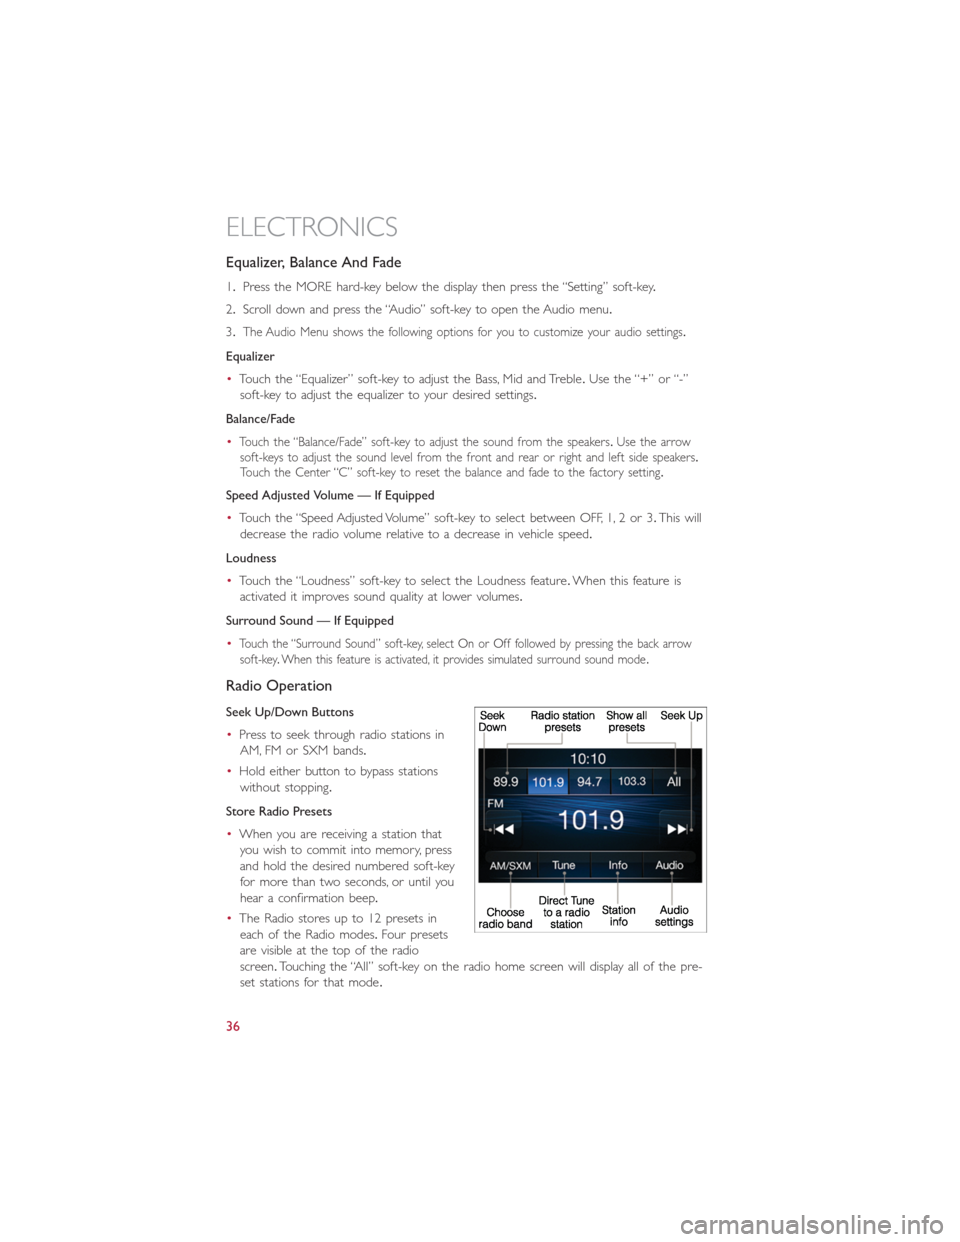
•Press to seek through radio stations in
AM, FM or SXM bands.
•Hold either button to bypass stations
without stopping.
Store Radio Presets
•When you are receiving a station that
you wish to commit into memory, press
and hold the desired numbered soft-key
for more than two seconds, or until you
hear a confirmation beep.
•The Radio stores up to 12 presets in
each of the Radio modes.Four presets
are visible at the top of the radio
screen.Touching the “All” soft-key on the radio home screen will display all of the pre-
set stations for that mode.
ELECTRONICS
36
Page 49 of 116

Radio
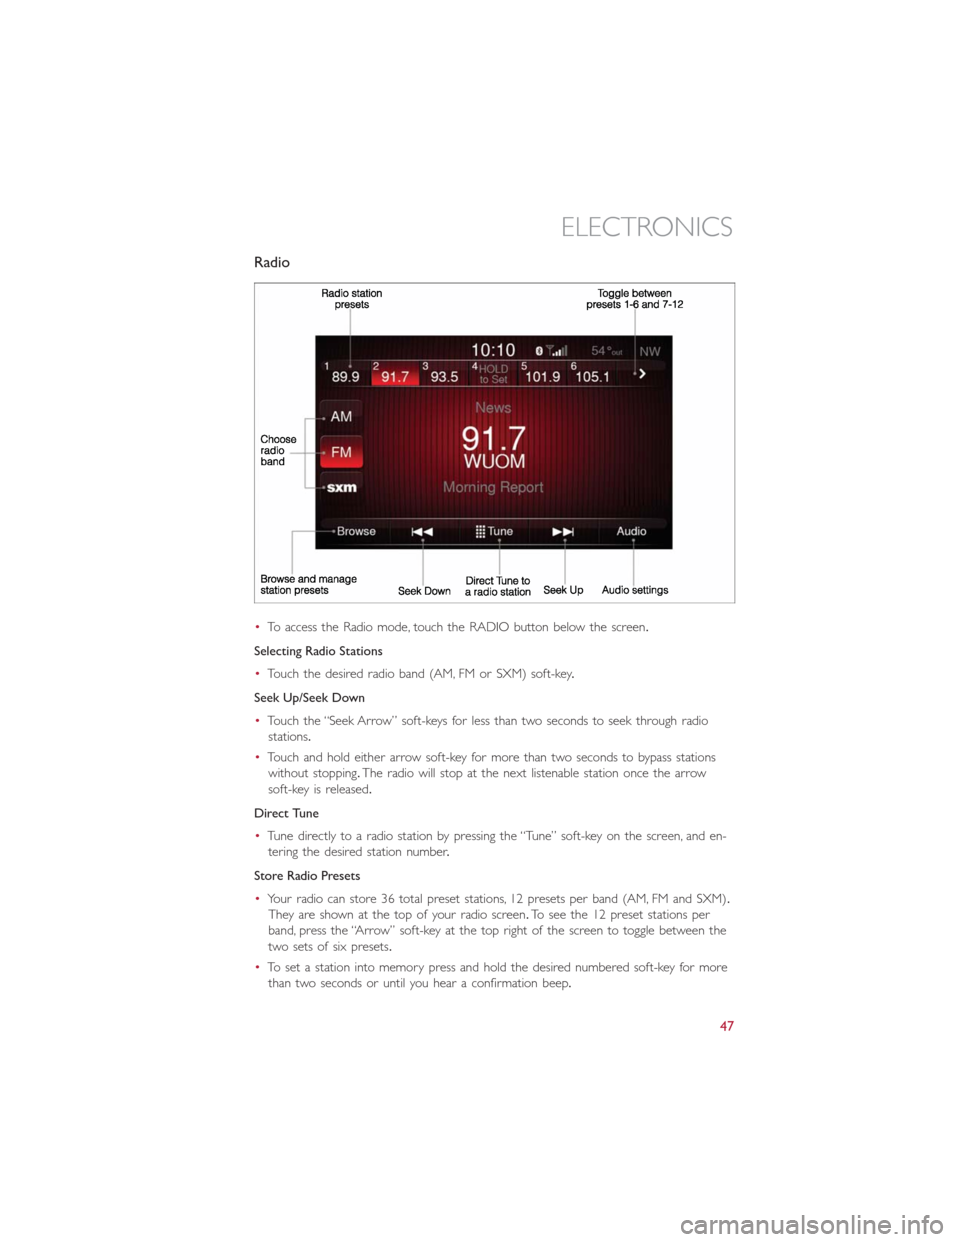
•To access the Radio mode, touch the RADIO button below the screen.
Selecting Radio Stations
•Touch the desired radio band (AM, FM or SXM) soft-key.
Seek Up/Seek Down
•Touch the “Seek Arrow” soft-keys for less than two seconds to seek through radio
stations.
•Touch and hold either arrow soft-key for more than two seconds to bypass stations
without stopping.The radio will stop at the next listenable station once the arrow
soft-key is released.
Direct Tune
•Tune directly to a radio station by pressing the “Tune” soft-key on the screen, and en-
tering the desired station number.
Store Radio Presets
•Your radio can store 36 total preset stations, 12 presets per band (AM, FM and SXM).
They are shown at the top of your radio screen.To see the 12 preset stations per
band, press the “Arrow” soft-key at the top right of the screen to toggle between the
two sets of six presets.
•To set a station into memory press and hold the desired numbered soft-key for more
than two seconds or until you hear a confirmation beep.
ELECTRONICS
47
Page 50 of 116

SiriusXM Premier Over 160 Channels
Get every channel available on your satellite radio, and enjoy all you want, all in one place.
Hear commercial-free music plus sports, news, talk and entertainment.Get all the pre-
mium programming, including Howard Stern, every NFL game, Oprah Radio®, every
MLB® and NHL® game, every NASCAR® race and more.And get 20+ Xtra channels,
including SiriusXM Latino, a selection of channels dedicated to Spanish language program-
ming.
•To access SiriusXM Satellite Radio, touch the “SXM” soft-key on the main Radio screen.
The following describes features that are available when in SiriusXM Satellite Radio mode.
Seek Up/Seek Down
•Touch the “Seek Arrow” soft-keys for less than two seconds to seek through channels
in SXM mode.
•Touch and hold either arrow soft-key for more than two seconds to bypass channels
without stopping.The radio will stop at the next listenable channel once the arrow
soft-key is released.
Direct Tune
•Tune directly to a SXM channel by pressing the “Tune” soft-key on the screen, and
entering the desired station number.
Traffic & Weather
Automatically tells you when Traffic & Weather for a favorite city is available, and gives
you the option to switch to that channel.
Fav
Activates the favorites menu.You can add up to 50 favorite artists or songs.Just touch
Add Fav Artist or Add Fav Song while the song is playing.You will then be alerted any
time one of these songs, or works by these artists, is playing on other SiriusXM channels.
SiriusXM Parental Controls
•You can skip or hide certain channels from view if you do not want access to them.
Touch the SETTINGS hard-key, touch the “SiriusXM Setup” soft-key, then select Chan-
nel Skip.Touch the box, check-mark, next to the channel you want skipped.They will
not show up in normal usage.
•SiriusXM also offers the option to permanently block selected channels.Call
(1-888-601-6297 for U.S.customers, 1-877-438-9677 for Canadian customers) and
request the Family-Friendly Package.
ELECTRONICS
48
Page 72 of 116

WARNING!
A hot engine cooling system is dangerous.You or others could be badly burned by
steam or boiling coolant.
- Electronic Throttle Control (ETC) Indicator Light
This light informs you of a problem with the system.
If a problem is detected, the light will come on while the engine is running.Cycle the
ignition when the vehicle has completely stopped and the shift lever is placed in the
PARK position; the light should turn off.
If the light remains lit with the engine running, your vehicle will usually be drivable; how-
ever, see an authorized dealer immediately.If the light is flashing when the engine is run-
ning, immediate service is required and you may experience reduced performance, an
elevated/rough idle or engine stall and your vehicle may require towing.
- Electronic Stability Control (ESC) OFF Indicator Light
This light indicates the ESC system has been turned off by the driver.
Partial Off
This mode is entered by momentarily pressing the ESC Off switch.This mode is intended
for times when a more spirited driving experience is desired.It is also intended for driv-
ing in deep snow, sand or gravel conditions, when more wheel spin than ESC would nor-
mally allow is required to gain traction.To turn ESC on again, momentarily press the
switch again.This will restore the normal ESC On mode of operation.
Full Off
This mode is intended for off-highway or off-road use only and should not be used on
public roadways.In this mode, all TCS and ESC stability features are turned OFF, except
for the limited slip feature described in the TCS section.To enter the “Full Off ” mode,
depress and hold the ESC OFF switch for five seconds.After five seconds, the ESC OFF
Indicator Light will illuminate, and the “ESC OFF” message will display in the EVIC.To turn
ESC ON again, momentarily press the ESC OFF switch.
- Electronic Stability Control (ESC) Activation / Malfunction
Indicator Light
The “ESC Activation/Malfunction Indicator Light” in the instrument cluster will come on
for four seconds when the ignition switch is turned to the ON/RUN position.If the
“ESC Activation/Malfunction Indicator Light” comes on continuously with the engine run-
ning, a malfunction has been detected in the ESC system.If this light remains on, see your
authorized dealer as soon as possible to have the problem diagnosed and corrected.
WHAT TO DO IN EMERGENCIES
70
Page 76 of 116

IF YOUR ENGINE OVERHEATS
•In any of the following situations, you can reduce the potential for overheating by
taking the appropriate action.
•On the highways — slow down.
•In city traffic — while stopped, shift transmission into NEUTRAL, but do not increase
engine idle speed.
NOTE:
There are steps that you can take to slow down an overheat condition:
•If your air conditioner (A/C) is on, turn it off.The A/C system adds heat to the engine
cooling system and turning the A/C off can help remove this heat.
•You can also turn the Temperature control to maximum heat, the Mode control to
floor and the Fan control to high.This allows the heater core to act as a supplement
to the radiator and aids in removing heat from the engine cooling system.
•If the temperature reading does not return to normal, turn the engine off immediately.
•We recommend that you do not operate the vehicle or engine damage will occur.
Have the vehicle serviced immediately.
CAUTION!
Driving with a hot cooling system could damage your vehicle.If the temperature gauge
reads hot, pull over and stop the vehicle.Idle the vehicle with the air conditioner
turned off until the pointer drops back into the normal range.If the pointer remains
on hot, turn the engine off immediately and call for service.
WARNING!
You or others can be badly burned by hot engine coolant (antifreeze) or steam from
your radiator.If you see or hear steam coming from under the hood, do not open the
hood until the radiator has had time to cool.Never try to open a cooling system pres-
sure cap when the radiator or coolant bottle is hot.
WHAT TO DO IN EMERGENCIES
74