2014 FIAT 500L change time
[x] Cancel search: change timePage 4 of 116

WELCOME FROM FIAT
Congratulations on selecting your new FIAT vehicle.Be assured that it represents preci-
sion workmanship, distinctive styling, and high quality - all essentials that are traditional to
our vehicles.
Your new FIAT vehicle has characteristics to enhance the driver's control under some
driving conditions.These are to assist the driver and are never a substitute for attentive
driving.They can never take the driver's place.Always drive carefully.
Your new vehicle has many features for the comfort and convenience of you and your
passengers.Some of these should not be used when driving because they take your eyes
from the road or your attention from driving.Never text while driving or take your
eyes more than momentarily off the road.
This guide illustrates and describes the operation of features and equipment that are
either standard or optional on this vehicle.This guide may also include a description of
features and equipment that are no longer available or were not ordered on this vehicle.
Please disregard any features and equipment described in this guide that are not available
on this vehicle.Chrysler Group LLC reserves the right to make changes in design and
specifications and/or make additions to or improvements to its products without imposing
any obligation upon itself to install them on products previously manufactured.
This User Guide has been prepared to help you quickly become acquainted with the
important features of your vehicle.It contains most things you will need to operate and
maintain the vehicle, including emergency information.
The DVD includes a computer application containing detailed owner's information which
can be viewed on a personal computer or MAC computer.The multimedia DVD also
includes videos which can be played on any standard DVD player.Additional DVD opera-
tional information is located on the back of the DVD sleeve.
For complete owner information, refer to your Owner's Manual on the DVD in the
owner’s kit provided at the time of new vehicle purchase.For your convenience, the
information contained on the DVD may also be printed and saved for future reference.
We are committed to protecting our environment and natural resources.By converting
from paper to electronic delivery for the majority of the user information for your
vehicle, together we greatly reduce the demand for tree-based products and lessen the
stress on our environment.
VEHICLES SOLD IN CANADA
With respect to any vehicles sold in Canada, the name Chrysler Group LLC shall be
deemed to be deleted and the name Chrysler Canada Inc.used in substitution.
INTRODUCTION/WELCOME
2
Page 21 of 116

ENGINE BREAK-IN RECOMMENDATIONS
A long break-in period is not required for the engine and drivetrain (transmission and
axle) in your vehicle.
Drive moderately during the first 300 miles (500 km).After the initial 60 miles (100 km),
speeds up to 50 or 55 mph (80 or 90 km/h) are desirable.
While cruising, brief full-throttle acceleration within the limits of local traffic laws contrib-
utes to a good break-in.Wide-open throttle acceleration in low gear can be detrimental
and should be avoided.
The engine oil installed in the engine at the factory is a high-quality energy conserving
type lubricant.Oil changes should be consistent with anticipated climate conditions under
which vehicle operations will occur.For the recommended viscosity and quality grades,
refer to “Maintaining Your Vehicle.”
NOTE:
A new engine may consume some oil during its first few thousand miles (kilometers) of
operation.This should be considered a normal part of the break-in and not interpreted
as an indication of an engine problem or malfunction.
CAUTION!
Never use Non-Detergent Oil or Straight Mineral Oil in the engine or damage may result.
TURN SIGNAL/LIGHTS/HIGH BEAM LEVER
Turn Signal/Lane Change Assist
•Tap the lever up or down once and the
turn signal (right or left) will flash three
times to indicate a lane change and auto-
matically turn off.
Headlights/Parking Lights
•Rotate the end of the lever to the first
detent for parking lights and headlight
operation.
NOTE:
The ignition switch must be in the ON/RUN position for the headlights to operate.
OPERATING YOUR VEHICLE
19
Page 28 of 116

REAR PARK ASSIST
If an object is detected behind the rear bumper while the vehicle is in REVERSE, a chime
will sound.The chime rate will change depending on the distance of the object, getting
faster as the object gets closer to the bumper.The chime will become continuous when
the distance between the vehicle and the obstacle is less than 12 inches (30 cm).
POWER SUNROOF
The power sunroof roof switch is located in the overhead console.
To Open
•Press and hold the POWER SUNROOF
switch rearward for approximately two
seconds and the sunroof will stop at the
vented position.Press the switch a sec-
ond time and hold for approximately
one second and release, the sunroof will
open fully, then stop automatically.This is
called “Express Open.” During Express
Open operation, any movement of the
sunroof switch will stop the sunroof.
To Close
•With the sunroof in the full open posi-
tion, pull the power sunroof button and
hold it for approximately one second, the
sunroof will return to the vented position.Pull the switch a second time and hold for
approximately one second to completely close the sunroof.
Power Sun Blind
•Pull the power sun blind switch and the blind will move towards the rear part of the
car, until it is fully open.With the blind fully open pull the power sun blind switch and
the blind will move towards the front part of the car, until it is fully closed.
NOTE:
During the automatic opening and closing stages, if the power sun blind switch is pulled
again it will stop the blind movement.
Power Sunroof Switch
OPERATING YOUR VEHICLE
26
Page 29 of 116

WARNING!
•Do not let children play with the sunroof, or leave children unattended in the ve-
hicle, and do not leave the key in or near the vehicle (or in a location accessible
to children).Occupants, particularly unattended children, can become entrapped by
the power sunroof while operating the power sunroof switch.Such entrapment
may result in serious injury or death.
•In a collision, there is a greater risk of being thrown from a vehicle with an open
sunroof.You could also be seriously injured or killed.Always fasten your seat belt
properly and make sure all passengers are properly secured.
•Do not allow small children to operate the sunroof.Never allow your fingers,
other body parts, or any object to project through the sunroof opening.Injury
may result.
WIND BUFFETING
Wind buffeting can be described as a helicopter-type percussion sound.If buffeting
occurs with the rear windows open, adjust the front and rear windows together.
If buffeting occurs with the sunroof open, adjust the sunroof opening, or adjust any
window.This will minimize buffeting.
EURO TWIN CLUTCH SIX-SPEED TRANSMISSION
•This vehicle may be equipped with a fuel efficient Euro Twin Clutch Six Speed Trans-
mission.This transmission offers a sportier driving experience with faster AutoStick®
shifting.
•During low-speed driving conditions in first gear, vehicle momentum changes may feel
exaggerated in response to changes in accelerator pedal position.This behavior is nor-
mal and is similar to vehicles equipped with a manual transmission.
NOTE:
•Very aggressive driving may result in some clutch odor similar to a manual transmission.
An active warning message will display in the Instrument Cluster if cool down actions
are needed.
•The first few shifts on a new vehicle may be somewhat abrupt.This is a normal condi-
tion, and precision shifts will develop within a few hundred miles (kilometers).
•
At low speeds you may hear mechanical noises similar to a manual transmission as the
transmission changes gears.These noises are normal and will not damage the transmission.
•Before and after the engine is started, you may hear a hydraulic pump for a short
period of time.This noise is normal and will not damage the transmission.
OPERATING YOUR VEHICLE
27
Page 30 of 116

Shifting The Transmission
•The transmission shift lever position (PRND) is displayed both on the shift lever and in
the Electronic Vehicle Information Center (EVIC).
•To drive, depress the brake pedal, press the button on the front of the shift lever and
move the shift lever from PARK or NEUTRAL to the DRIVE position.
•Manual shifts can also be made using the AutoStick® shift control.
•This transmission is programmed to prevent shifting from REVERSE to DRIVE or
DRIVE to REVERSE, if vehicle speed is above 6 mph (10 km/h).This safety feature
helps protect your transmission from damage.
NOTE:
•When stopped on an incline, it is recommended that you always hold the vehicle in
place using the brakes.On steep inclines, Hill Start Assist (HSA) will temporarily hold
the car in position when the brake pedal is released.If the accelerator pedal is not
applied after a short time, the car will roll back.Either reapply the brake (to hold the
vehicle) or press the accelerator to climb the hill.
•During acceleration, gear changes will feel smooth compared to a vehicle with a tradi-
tional manual transmission.This is a benefit of the Euro Twin Clutch Transmission de-
sign that avoids power loss during up-shifts.
Instrument Cluster Messages
•Messages will be displayed in the instrument cluster (if equipped with an EVIC) to alert
the driver when certain conditions occur.These messages are described below.
MESSAGE DESCRIPTION
GEAR NOT AVAILABLE In AutoStick® mode, the gear selected by the driver is
not available due to a fault condition.See your autho-
rized dealer for diagnosis and service.
SHIFT NOT ALLOWED
The gear position requested by the driver is currently
blocked.This occurs if NEUTRAL is requested while mov-
ing, if REVERSE is requested while moving (at 6 mph
[10 km/h] or faster), if DRIVE is requested while moving
backwards (at 6 mph [10 km/h] or faster), or if 3rd gear
or higher is requested at a stop.Make sure the vehicle is
stopped before engaging DRIVE or REVERSE.
SHIFT TO NEUTRAL THEN
DorRThe transmission has shifted itself into NEUTRAL (due
to a fault condition, or overheat due to excessive idling
when stopped in DRIVE with the brakes released), but
the shift lever remains in gear.Shift into NEUTRAL and
then back into gear for continued driving.If the trans-
mission will not reengage, see your authorized dealer.
OPERATING YOUR VEHICLE
28
Page 51 of 116

Browse
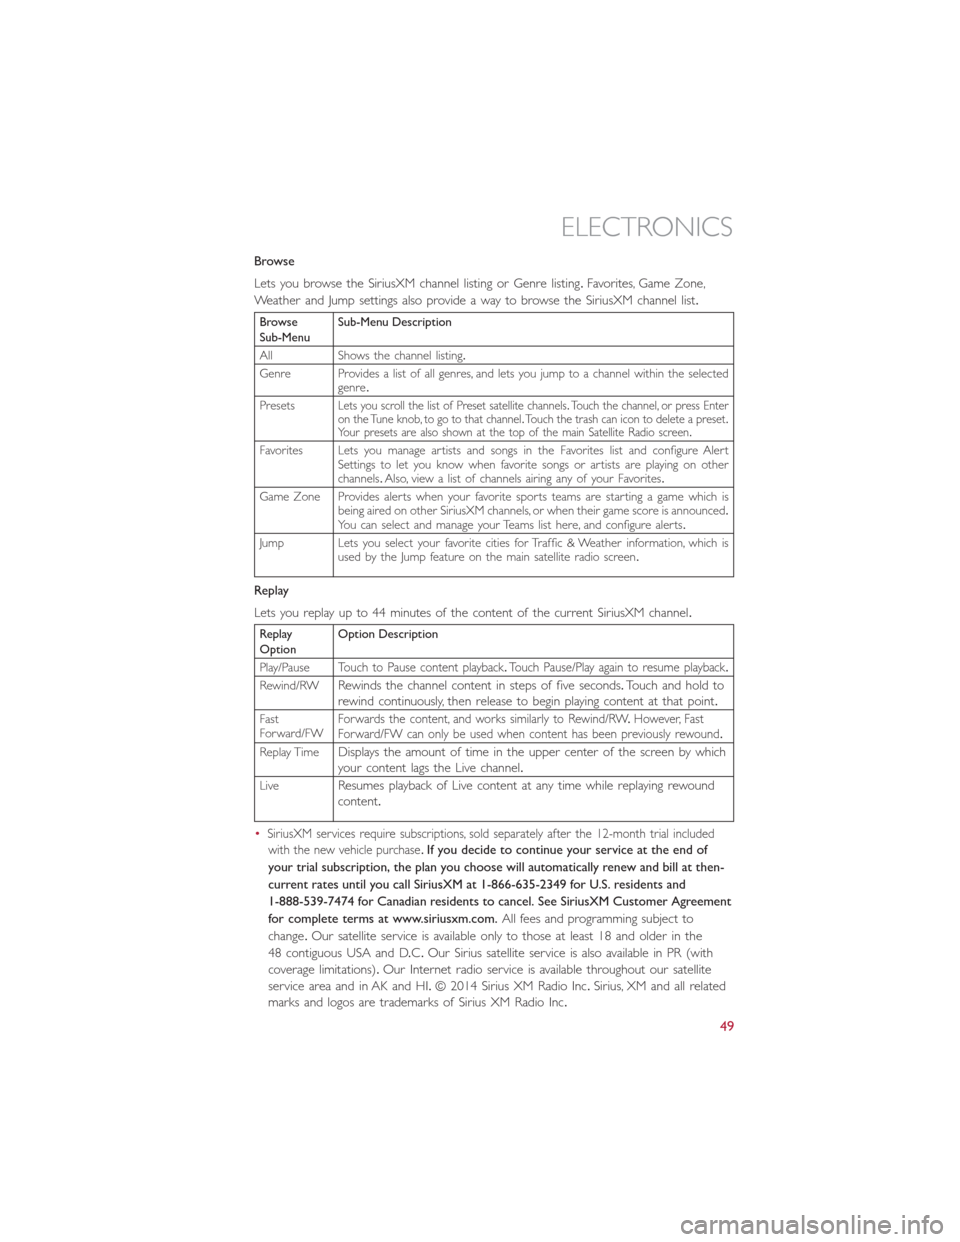
Lets you browse the SiriusXM channel listing or Genre listing.Favorites, Game Zone,
Weather and Jump settings also provide a way to browse the SiriusXM channel list.
Browse
Sub-MenuSub-Menu Description
All Shows the channel listing.
Genre Provides a list of all genres, and lets you jump to a channel within the selected
genre.
Presets
Lets you scroll the list of Preset satellite channels.Touch the channel, or press Enter
on the Tune knob, to go to that channel.Touch the trash can icon to delete a preset.
Your presets are also shown at the top of the main Satellite Radio screen.
Favorites Lets you manage artists and songs in the Favorites list and configure Alert
Settings to let you know when favorite songs or artists are playing on other
channels.Also, view a list of channels airing any of your Favorites.
Game Zone Provides alerts when your favorite sports teams are starting a game which is
being aired on other SiriusXM channels, or when their game score is announced.
You can select and manage your Teams list here, and configure alerts.
Jump Lets you select your favorite cities for Traffic & Weather information, which is
used by the Jump feature on the main satellite radio screen.
Replay
Lets you replay up to 44 minutes of the content of the current SiriusXM channel.
Replay
OptionOption Description
Play/Pause
Touch to Pause content playback.Touch Pause/Play again to resume playback.
Rewind/RWRewinds the channel content in steps of five seconds.Touch and hold to
rewind continuously, then release to begin playing content at that point.
Fast
Forward/FWForwards the content, and works similarly to Rewind/RW.However, Fast
Forward/FW can only be used when content has been previously rewound.
Replay TimeDisplays the amount of time in the upper center of the screen by which
your content lags the Live channel.
LiveResumes playback of Live content at any time while replaying rewound
content.
•
SiriusXM services require subscriptions, sold separately after the 12-month trial included
with the new vehicle purchase.
If you decide to continue your service at the end of
your trial subscription, the plan you choose will automatically renew and bill at then-
current rates until you call SiriusXM at 1-866-635-2349 for U.S. residents and
1-888-539-7474 for Canadian residents to cancel. See SiriusXM Customer Agreement
for complete terms at www.siriusxm.com.All fees and programming subject to
change.Our satellite service is available only to those at least 18 and older in the
48 contiguous USA and D.C.Our Sirius satellite service is also available in PR (with
coverage limitations).Our Internet radio service is available throughout our satellite
service area and in AK and HI.© 2014 Sirius XM Radio Inc.Sirius, XM and all related
marks and logos are trademarks of Sirius XM Radio Inc.
ELECTRONICS
49
Page 52 of 116

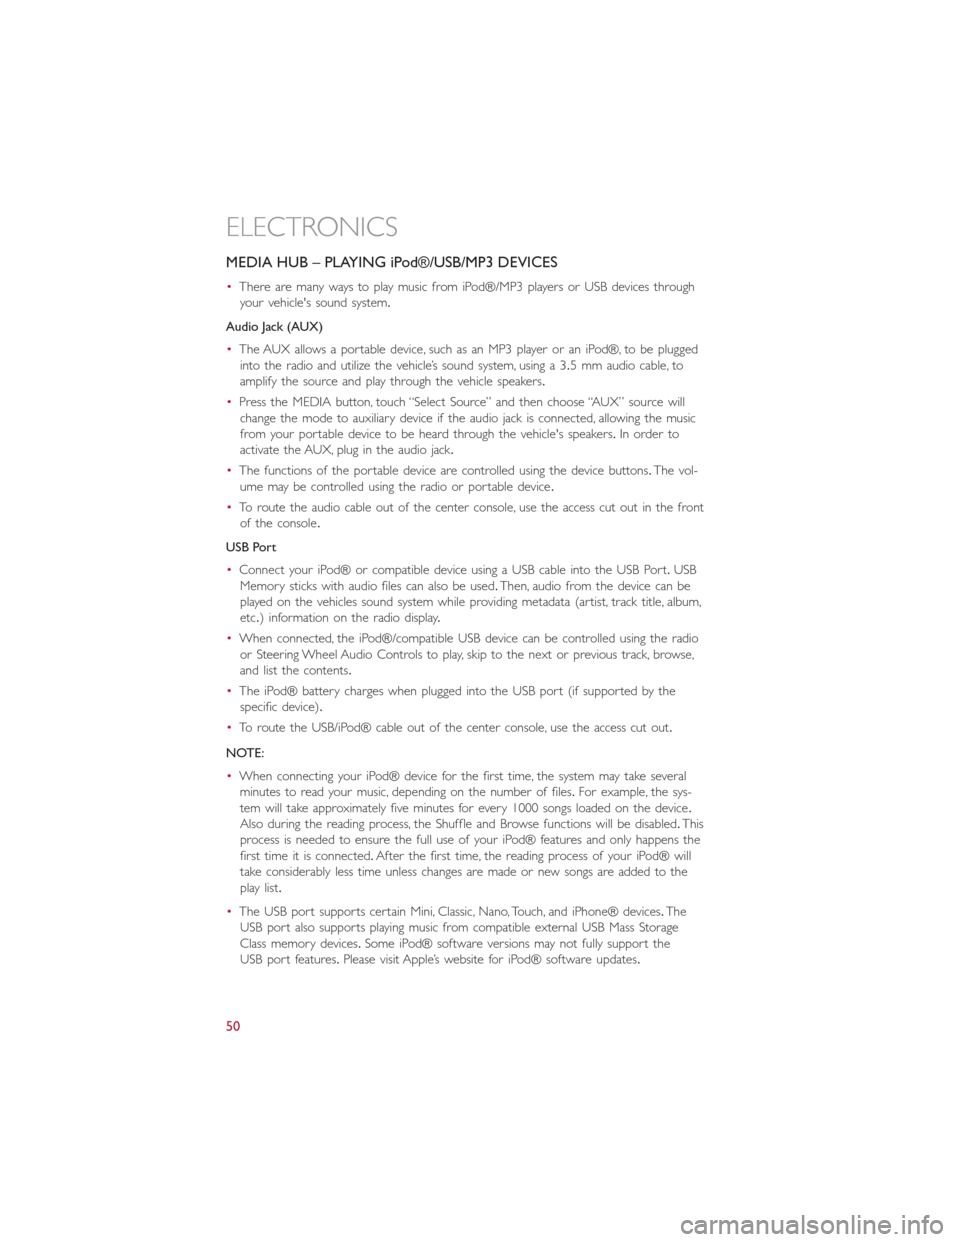
MEDIA HUB – PLAYING iPod®/USB/MP3 DEVICES
•There are many ways to play music from iPod®/MP3 players or USB devices through
your vehicle's sound system.
Audio Jack (AUX)
•The AUX allows a portable device, such as an MP3 player or an iPod®, to be plugged
into the radio and utilize the vehicle’s sound system, using a 3.5 mm audio cable, to
amplify the source and play through the vehicle speakers.
•Press the MEDIA button, touch “Select Source” and then choose “AUX” source will
change the mode to auxiliary device if the audio jack is connected, allowing the music
from your portable device to be heard through the vehicle's speakers.In order to
activate the AUX, plug in the audio jack.
•The functions of the portable device are controlled using the device buttons.The vol-
ume may be controlled using the radio or portable device.
•To route the audio cable out of the center console, use the access cut out in the front
of the console.
USB Port
•Connect your iPod® or compatible device using a USB cable into the USB Port.USB
Memory sticks with audio files can also be used.Then, audio from the device can be
played on the vehicles sound system while providing metadata (artist, track title, album,
etc.) information on the radio display.
•When connected, the iPod®/compatible USB device can be controlled using the radio
or Steering Wheel Audio Controls to play, skip to the next or previous track, browse,
and list the contents.
•The iPod® battery charges when plugged into the USB port (if supported by the
specific device).
•To route the USB/iPod® cable out of the center console, use the access cut out.
NOTE:
•When connecting your iPod® device for the first time, the system may take several
minutes to read your music, depending on the number of files.For example, the sys-
tem will take approximately five minutes for every 1000 songs loaded on the device.
Also during the reading process, the Shuffle and Browse functions will be disabled.This
process is needed to ensure the full use of your iPod® features and only happens the
first time it is connected.After the first time, the reading process of your iPod® will
take considerably less time unless changes are made or new songs are added to the
play list.
•The USB port supports certain Mini, Classic, Nano, Touch, and iPhone® devices.The
USB port also supports playing music from compatible external USB Mass Storage
Class memory devices.Some iPod® software versions may not fully support the
USB port features.Please visit Apple’s website for iPod® software updates.
ELECTRONICS
50
Page 64 of 116

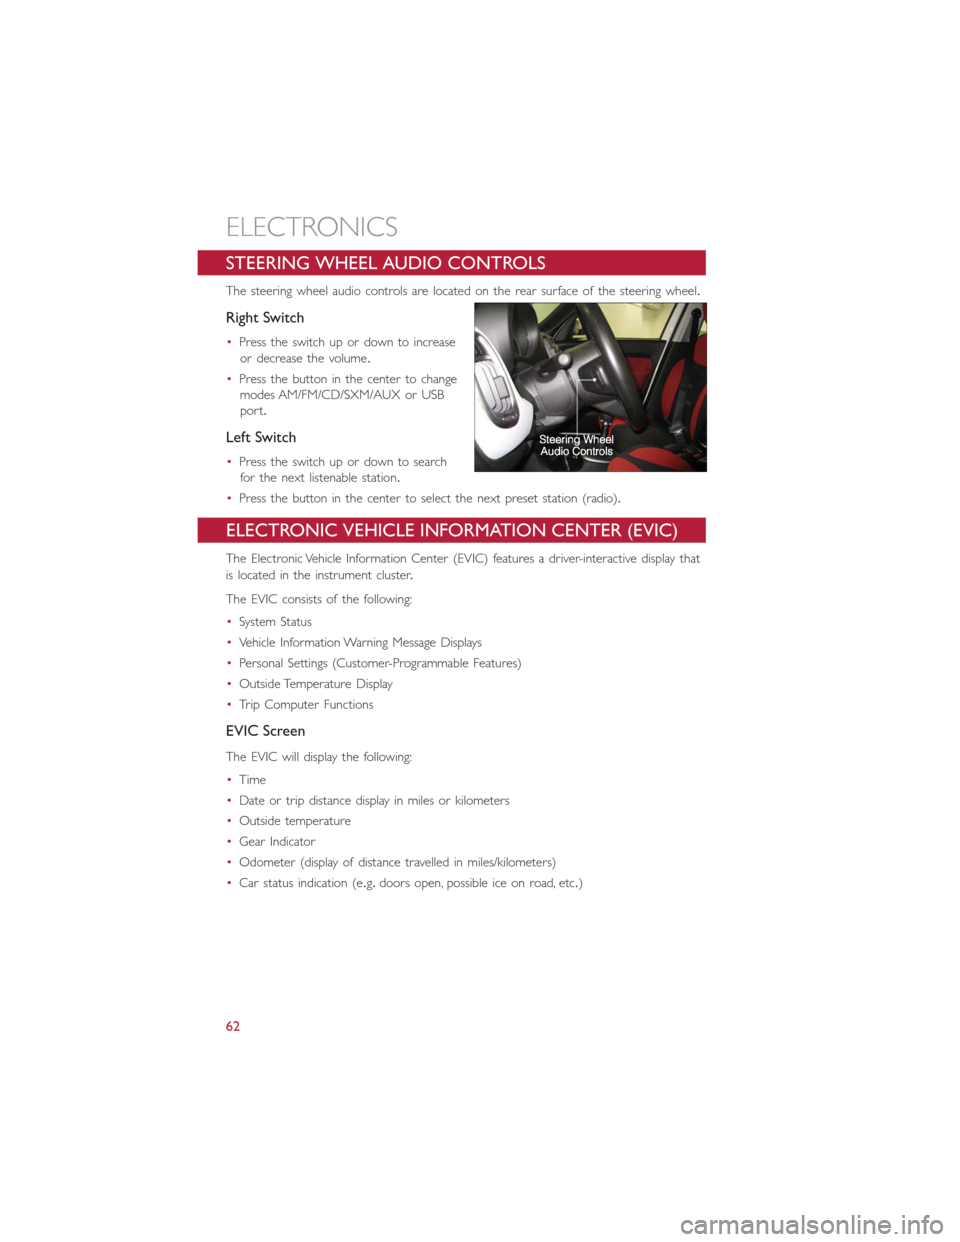
STEERING WHEEL AUDIO CONTROLS
The steering wheel audio controls are located on the rear surface of the steering wheel.
Right Switch
•Press the switch up or down to increase
or decrease the volume.
•Press the button in the center to change
modes AM/FM/CD/SXM/AUX or USB
port.
Left Switch
•Press the switch up or down to search
for the next listenable station.
•Press the button in the center to select the next preset station (radio).
ELECTRONIC VEHICLE INFORMATION CENTER (EVIC)
The Electronic Vehicle Information Center (EVIC) features a driver-interactive display that
is located in the instrument cluster.
The EVIC consists of the following:
•System Status
•Vehicle Information Warning Message Displays
•Personal Settings (Customer-Programmable Features)
•Outside Temperature Display
•Trip Computer Functions
EVIC Screen
The EVIC will display the following:
•Time
•Date or trip distance display in miles or kilometers
•Outside temperature
•Gear Indicator
•Odometer (display of distance travelled in miles/kilometers)
•Car status indication (e.g.doors open, possible ice on road, etc.)
ELECTRONICS
62