2014 FIAT 500L LIVING low beam
[x] Cancel search: low beamPage 67 of 420
AUTOMATIC LIGHT CONTROL
(AUTOLIGHT)
(Dusk sensor)
(for versions/markets, where provided)
This infrared LED sensor, combined with the rain
sensor and located on the windscreen, detects the
variations in outside brightness depending on the
light sensitivity set with the Setup Menu: the greater
the sensitivity, the less external light is required to
activate the exterior lights.
Activation
The dusk sensor activates when ring nut A fig. 45 is
turned to
. In this way the side lights and dipped
headlights are activated automatically according to
the external light level.
Following automatic light activation, the fog lights
(for versions/markets, where provided) and rear fog
light may still be switched on. When the lights are
automatically switched off, the front and rear fog
lights (if activated) are also switched off. The next
time the lights are switched on automatically, the fog
lights must be reactivated manually (if required).
With dusk sensor active, it is not possible to keep
the main beam headlights on constantly; only flashing
is permitted. To switch these lights on constantly,
turn ring nut A to
and pull the stalk towards the
steering wheel.On automatic sensor controlled deactivation, the
dipped headlights are deactivated first, followed
by the side lights a few seconds later.
If the sensor is activated but is malfunctioning, the
side lights and dipped beam headlights are switched
on irrespective of the outside light level: the sensor
failure is indicated on the display. It is also possible to
deactivate the sensor and switch on the desired
lights, if necessary.
IMPORTANT The sensor cannot detect the presence
of fog. These lights must therefore be switched on
manually in these circumstances.
MAIN BEAM HEADLIGHTS
To activate the main beam headlights, with ring nut A
at
, pull the stalk towards the steering wheel
beyond the end of travel position.
Thewarning light switches on in the instrument
panel.
When the stalk is pulled towards the steering wheel
again, beyond the end of travel position, the main
beam headlights deactivate, the dipped beam
headlights reactivate and the warning light
switches off.
It is not possible to switch on the main beam
headlights in fixed mode if the automatic lighting
control system is active.
63GETTING TO
KNOW YOUR CARSAFETY
STARTING AND
DRIVING
WARNING LIGHTS
AND MESSAGES
IN AN EMERGENCY
SERVICING AND
MAINTENANCE
TECHNICAL
SPECIFICATIONS
INDEX
Page 128 of 420
Sensor operation may also be
compromised by the presence of dust ,
condensation, dirt or ice on the
windscreen, by traffic conditions (e.g. vehicles
that are driving not aligned with you car, vehicle
driving in a transverse or opposite way on the
same lane, bend with a small radius of curvature),
by road surface conditions and by driving
conditions (e.g. off-road driving). Make sure the
windscreen is always clean. Use specific
detergents and clean cloths to avoid scratching
the windscreen.The sensor operation may also be
limited or absent in some driving, traffic and
road surface conditions.Projecting loads on the roof of the car
may interfere with the correct operation
of the sensor. Before starting make sure
the load is correctly positioned, in order not to
cover the sensor operating range.If the windscreen must be replaced due to
scratches, chipping or breakage, contact
exclusively a Fiat Dealership. Do not
replace the windscreen on your own, risk of
malfunction! It is advisable to replace the
windscreen if it is damaged in the laser sensor
area.
Do not tamper nor operate on the laser
sensor. Do not close the openings in the
aesthetic cover located under the interior
rear view mirror. In the event of a sensor failure,
contact a Fiat Dealership.
IMPORTANT If you are driving on roads close to
trees with protruding branches it is advisable to
deactivate the system to prevent the branches at the
height of the bonnet or the windscreen from
interfering with the system.Do not cover the operating range of the
sensor with stickers or other objects.
Also pay attention to other objects on the
bonnet (e.g. a layer of snow) and make sure they
do not interfere with the light emitted by the
laser.
WARNING
The laser beam is not visible at the
naked eye. Do not look directly, or with
optical instruments (e.g. lenses), at the laser
beam from a distance lower than 10 cm: this
may cause damage to the sight .The laser beam
is also present when the key is at MAR-ON
but its operation is off, not available or
manually deactivated with the display Setup
Menu (see paragraph “Menu items” in this
chapter).
124GETTING TO
KNOW YOUR CAR
SAFETY
STARTING AND
DRIVING
WARNING LIGHTS
AND MESSAGES
IN AN EMERGENCY
SERVICING AND
MAINTENANCE
TECHNICAL
SPECIFICATIONS
INDEX
Page 197 of 420
HEATED REAR WINDOW (amber)
The warning light turns on when switching the
heated rear window on.HEATED WINDSCREEN (amber)
(for versions/markets where provided)
The warning light switches on by activating the
heated windscreen (see "Automatic dual-zone
climate control system" paragraph in "Knowing your
car" chapter).SIDE LIGHTS AND DIPPED
HEADLAMPS (green)/FOLLOW ME
HOME (green)
SIDE LIGHTS AND DIPPED HEADLAMPS
The warning light comes on when side/tail lights or
dipped headlamps are turned on.
FOLLOW ME HOME
The warning light switches on (on some versions,
together with a message and a symbol in the display)
when this device is used (see the "Follow Me Home"
paragraph in the "Knowing your car" chapter).
MAIN BEAMS (blue)
The warning light switches on when the main beams
are turned on.LEFT-HAND DIRECTION
INDICATOR (green) (intermittent)
The warning light switches on when the direction
indicator control stalk is moved downwards or,
together with the right indicator, when the hazard
warning light button is pressed.RIGHT-HAND DIRECTION
INDICATOR (green) (intermittent)
The warning light turns on when the direction
indicator control stalk is moved upwards or, together
with the left indicator, when the hazard warning
light button is pressed.
193GETTING TO KNOW
YOUR CAR
SAFETY
STARTING AND
DRIVINGWARNING LIGHTS
AND MESSAGESIN AN EMERGENCY
SERVICING AND
MAINTENANCE
TECHNICAL
SPECIFICATIONS
INDEX
Page 213 of 420
CHANGING A BULBGENERAL INSTRUCTIONS
❒Before changing a bulb check the contacts for
oxidation;
❒burnt bulbs must be replaced by others of the
same type and power;
❒after replacing a headlight bulb, always check the
correct alignment of the light beam;
❒when a light is not working, check that the
corresponding fuse is intact before changing a bulb.
For the location of fuses, refer to the paragraph
“If a fuse blows” in this section;
WARNING
Modifications or repairs to the electric
system that are not carried out properly
or do not take the system technical
specifications into account can cause
malfunctions leading to the risk of fire.
WARNING
Halogen bulbs contain pressurised gas,
in the case of breakage they may burst
causing glass fragments to be projected
outwards.
Halogen bulbs must be handled holding
the metal part only.Touching the
transparent part of the bulb with your
fingers may reduce the intensity of the emitted
light and even reduce the lifespan of the bulb. In
the event of accidental contact , wipe the bulb
with a cloth moistened with alcohol and let the
bulb dry.Where possible, it is advisable to have
bulbs changed at a Fiat Dealership.The
correct operation and direction of the
external lights are absolutely essential for the
safety of the car and of compliance with the law.
IMPORTANT When the weather is cold or damp
or after heavy rain or washing, the surface of
headlights or rear lights, may steam up and/or form
drops of condensation on the inside. This is a natural
phenomenon due to the difference in temperature
and humidity between the inside and the outside
of the glass which does not indicate a fault and does
not compromise the normal operation of lighting
devices. The mist disappears quickly when the lights
are turned on, starting from the centre of the
diffuser, extending progressively towards the edges.
209GETTING TO KNOW
YOUR CAR
SAFETY
STARTING AND
DRIVING
WARNING LIGHTS
AND MESSAGESIN AN
EMERGENCYSERVICING AND
MAINTENANCE
TECHNICAL
SPECIFICATIONS
INDEX
Page 216 of 420
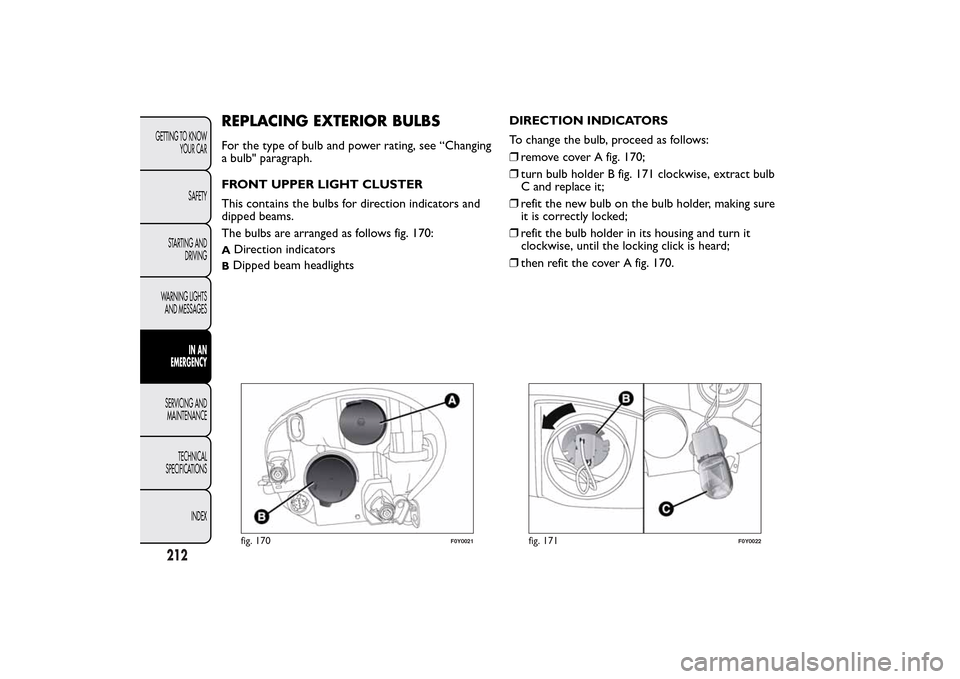
REPLACING EXTERIOR BULBSFor the type of bulb and power rating, see “Changing
a bulb" paragraph.
FRONT UPPER LIGHT CLUSTER
This contains the bulbs for direction indicators and
dipped beams.
The bulbs are arranged as follows fig. 170:A
Direction indicators
BDipped beam headlightsDIRECTION INDICATORS
To change the bulb, proceed as follows:
❒remove cover A fig. 170;
❒turn bulb holder B fig. 171 clockwise, extract bulb
C and replace it;
❒refit the new bulb on the bulb holder, making sure
it is correctly locked;
❒refit the bulb holder in its housing and turn it
clockwise, until the locking click is heard;
❒then refit the cover A fig. 170.fig. 170
F0Y0021
fig. 171
F0Y0022
212GETTING TO KNOW
YOUR CAR
SAFETY
STARTING AND
DRIVING
WARNING LIGHTS
AND MESSAGES
IN AN
EMERGENCY
SERVICING AND
MAINTENANCE
TECHNICAL
SPECIFICATIONS
INDEX
Page 217 of 420
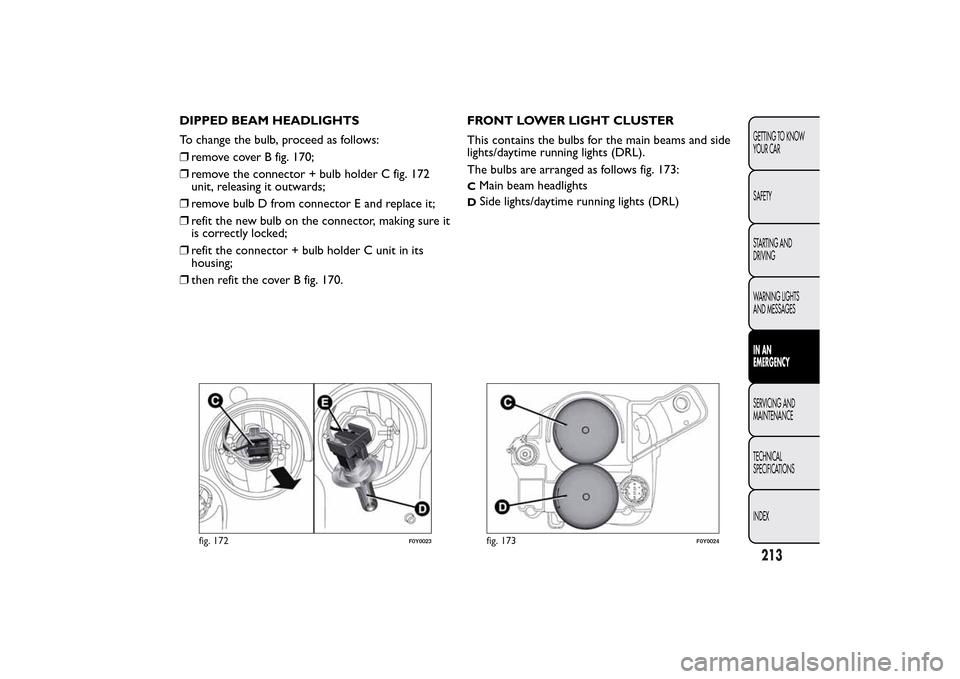
DIPPED BEAM HEADLIGHTS
To change the bulb, proceed as follows:
❒remove cover B fig. 170;
❒remove the connector + bulb holder C fig. 172
unit, releasing it outwards;
❒remove bulb D from connector E and replace it;
❒refit the new bulb on the connector, making sure it
is correctly locked;
❒refit the connector + bulb holder C unit in its
housing;
❒then refit the cover B fig. 170.FRONT LOWER LIGHT CLUSTER
This contains the bulbs for the main beams and side
lights/daytime running lights (DRL).
The bulbs are arranged as follows fig. 173:
C
Main beam headlights
D
Side lights/daytime running lights (DRL)
fig. 172
F0Y0023
fig. 173
F0Y0024
213GETTING TO KNOW
YOUR CAR
SAFETY
STARTING AND
DRIVING
WARNING LIGHTS
AND MESSAGESIN AN
EMERGENCYSERVICING AND
MAINTENANCE
TECHNICAL
SPECIFICATIONS
INDEX
Page 218 of 420
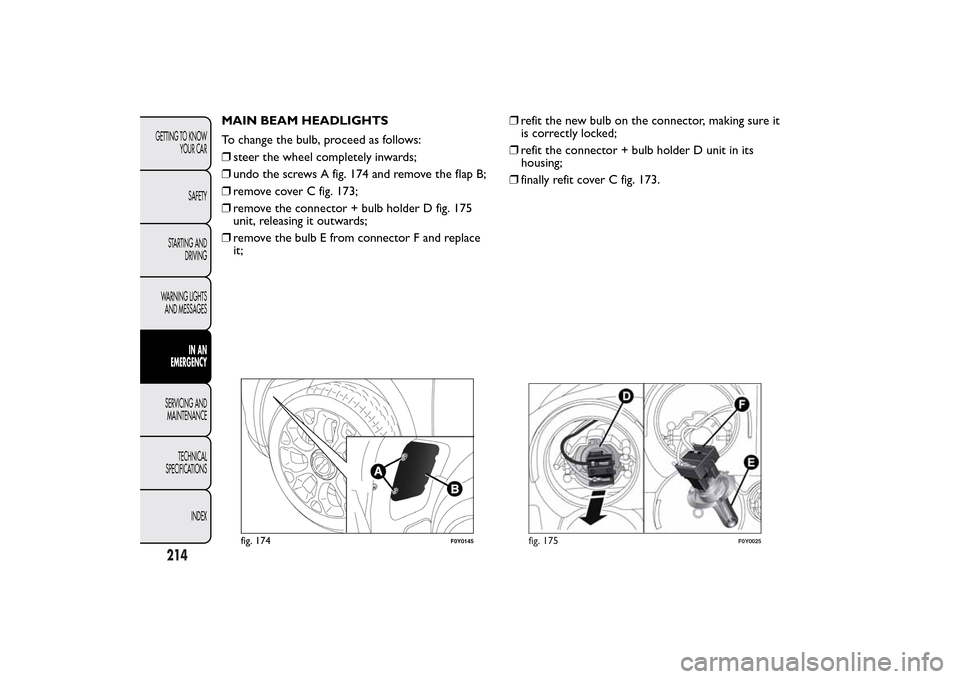
MAIN BEAM HEADLIGHTS
To change the bulb, proceed as follows:
❒steer the wheel completely inwards;
❒undo the screws A fig. 174 and remove the flap B;
❒remove cover C fig. 173;
❒remove the connector + bulb holder D fig. 175
unit, releasing it outwards;
❒remove the bulb E from connector F and replace
it;❒refit the new bulb on the connector, making sure it
is correctly locked;
❒refit the connector + bulb holder D unit in its
housing;
❒finally refit cover C fig. 173.
fig. 174
F0Y0145
fig. 175
F0Y0025
214GETTING TO KNOW
YOUR CAR
SAFETY
STARTING AND
DRIVING
WARNING LIGHTS
AND MESSAGES
IN AN
EMERGENCY
SERVICING AND
MAINTENANCE
TECHNICAL
SPECIFICATIONS
INDEX
Page 273 of 420
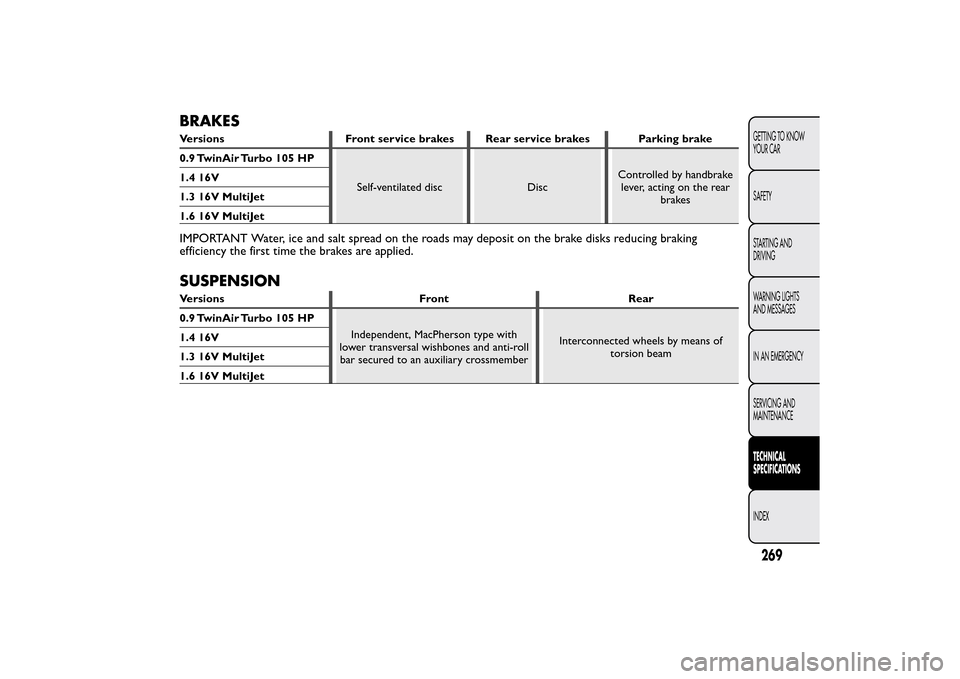
BRAKESVersions Front service brakes Rear service brakes Parking brake
0.9 TwinAir Turbo 105 HP
Self-ventilated disc DiscControlled by handbrake
lever, acting on the rear
brakes 1.4 16V
1.3 16V MultiJet
1.6 16V MultiJetIMPORTANT Water, ice and salt spread on the roads may deposit on the brake disks reducing braking
efficiency the first time the brakes are applied.SUSPENSIONVersions Front Rear
0.9 TwinAir Turbo 105 HP
Independent, MacPherson type with
lower transversal wishbones and anti-roll
bar secured to an auxiliary crossmemberInterconnected wheels by means of
torsion beam 1.4 16V
1.3 16V MultiJet
1.6 16V MultiJet
269GETTING TO KNOW
YOUR CAR
SAFETY
STARTING AND
DRIVING
WARNING LIGHTS
AND MESSAGES
IN AN EMERGENCY
SERVICING AND
MAINTENANCETECHNICAL
SPECIFICATIONSINDEX