2014 FIAT 500L LIVING instrument panel
[x] Cancel search: instrument panelPage 63 of 420
When the function is activated, the LED on the
AUTO button switches off. With the function
activated the only possible manual adjustments are
adjusting the fan speed and turning the heated rear
window off.
When the B, C, or AUTO buttons are pressed, the
climate control system will deactivate the MAX-DEF
function.
Selecting the footwell/windscreen or only windscreen
distribution activates the climate control system
compressor (LED on A/C button on) and the air
recirculation is set to "outside air" intake (LED on
button off ).
This logic guarantees optimum visibility at the
windows. It is, however, always possible to manage
air recirculation and the climate control system
compressor manually.
HEATED REAR WINDOW
DEMISTING/DEFROSTING
Press the
button to activate heated rear window
demisting/defrosting.
The effective activation of the function is indicated by
the
warning light on the instrument panel
switching on.
This function switches off automatically after about
20 minutes or when the engine is turned off. It is not
switched on automatically the next time the engine
is started.For versions/markets where provided, press the
button to activate demisting/defrosting of door
mirrors and heated nozzles (for versions/markets,
where provided).
IMPORTANT Do not affix stickers to the inside of
the heated rear window over the heating filaments,
to avoid damage that might cause them to stop
working properly.
Heated windscreen
(for versions/markets, where provided)
Press button C
to activate this function.
When the function is active, a warning light
on
the instrument panel is on.
For versions/markets where provided, press the C
button to activate also demisting/defrosting of
windscreen (with engine running only) and heated
door mirrors (for versions/markets, where provided).
This function is timed and switches off automatically
after 4 minutes for the windscreen and 20 minutes
for the rear window and door mirrors. Press button
C again to disable the function in advance.
59GETTING TO
KNOW YOUR CARSAFETY
STARTING AND
DRIVING
WARNING LIGHTS
AND MESSAGES
IN AN EMERGENCY
SERVICING AND
MAINTENANCE
TECHNICAL
SPECIFICATIONS
INDEX
Page 64 of 420
Press button C to activate the heated windscreen
again:
❒pressing the button once the
warning light
switches on in the instrument panel;
❒pressing the button twice thewarning light
switches on in the instrument panel (the heated
rear window warning light stays on);
❒pressing the button a third time the warning lights
e
switch off.
IMPORTANT Do not apply stickers on the inside of
the rear window over the heating filaments to avoid
damage.
SWITCHING OFF THE CLIMATE
CONTROL SYSTEM
Press button
.
With climate control system off:
❒air recirculation is on, thus isolating the passenger
compartment from the outside;
❒the compressor is off;
❒the fan is off;
❒the heated rear window can be activated/
deactivated.IMPORTANT The climate control system control
unit stores the temperatures set before the system
was switched off and restores them when any button
of the system is pressed (except for button D).
To restart the climate control system in fully
automatic mode press the AUTO button.
START&STOP
Automatic dual zone climate control system
The automatic dual zone climate control system
manages the Start&Stop function (engine off when
car speed is zero) to ensure adequate comfort inside
the car.
The Start&Stop function is disabled until a suitable
comfort level in the passenger compartment is
ensured; thus the engine does not turn off during
these temporary stages, even if car speed is zero.
When the Start&Stop function is active (engine off at
zero car speed), the climate control system will
request the reactivation of the engine if the inside
temperature conditions rapidly deteriorate or if
maximum cooling ("LO") or quick demisting
(MAX-DEF) are requested.
With the Start&Stop function active (engine off at
zero car speed), air flow is reduced in order to
maintain comfort conditions inside the passenger
compartment as long as possible when the system is
in AUTO mode (LED on button on).
60GETTING TO
KNOW YOUR CAR
SAFETY
STARTING AND
DRIVING
WARNING LIGHTS
AND MESSAGES
IN AN EMERGENCY
SERVICING AND
MAINTENANCE
TECHNICAL
SPECIFICATIONS
INDEX
Page 66 of 420
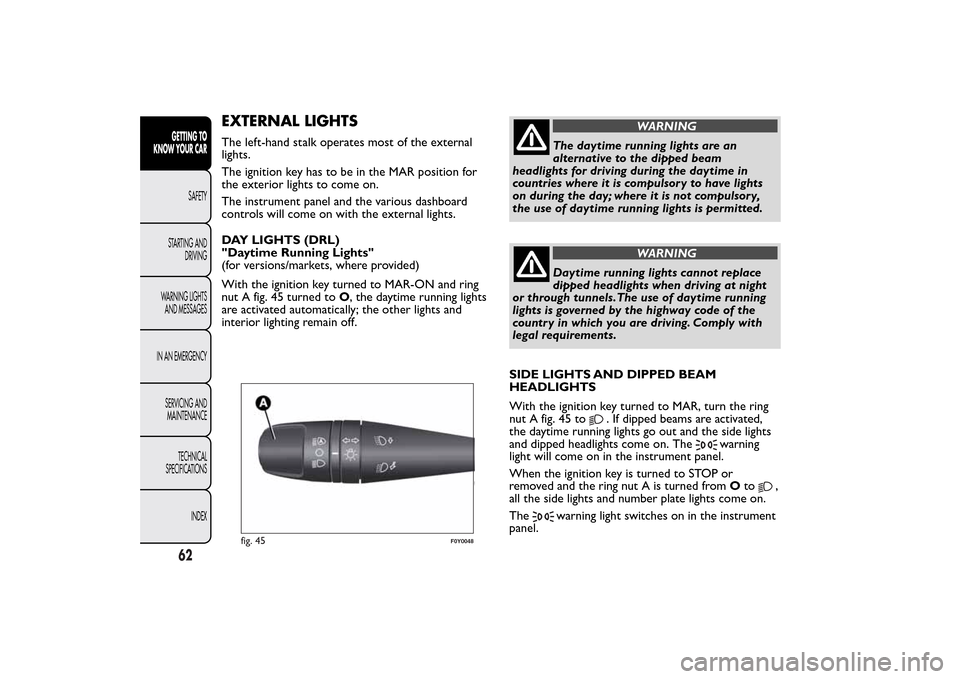
EXTERNAL LIGHTSThe left-hand stalk operates most of the external
lights.
The ignition key has to be in the MAR position for
the exterior lights to come on.
The instrument panel and the various dashboard
controls will come on with the external lights.
DAY LIGHTS (DRL)
"Daytime Running Lights"
(for versions/markets, where provided)
With the ignition key turned to MAR-ON and ring
nut A fig. 45 turned toO, the daytime running lights
are activated automatically; the other lights and
interior lighting remain off.
WARNING
The daytime running lights are an
alternative to the dipped beam
headlights for driving during the daytime in
countries where it is compulsory to have lights
on during the day; where it is not compulsory,
the use of daytime running lights is permitted.
WARNING
Daytime running lights cannot replace
dipped headlights when driving at night
or through tunnels.The use of daytime running
lights is governed by the highway code of the
country in which you are driving. Comply with
legal requirements.
SIDE LIGHTS AND DIPPED BEAM
HEADLIGHTS
With the ignition key turned to MAR, turn the ring
nut A fig. 45 to
. If dipped beams are activated,
the daytime running lights go out and the side lights
and dipped headlights come on. The
warning
light will come on in the instrument panel.
When the ignition key is turned to STOP or
removed and the ring nut A is turned fromOto
,
all the side lights and number plate lights come on.
The
warning light switches on in the instrument
panel.
fig. 45
F0Y0048
62GETTING TO
KNOW YOUR CAR
SAFETY
STARTING AND
DRIVING
WARNING LIGHTS
AND MESSAGES
IN AN EMERGENCY
SERVICING AND
MAINTENANCE
TECHNICAL
SPECIFICATIONS
INDEX
Page 67 of 420
AUTOMATIC LIGHT CONTROL
(AUTOLIGHT)
(Dusk sensor)
(for versions/markets, where provided)
This infrared LED sensor, combined with the rain
sensor and located on the windscreen, detects the
variations in outside brightness depending on the
light sensitivity set with the Setup Menu: the greater
the sensitivity, the less external light is required to
activate the exterior lights.
Activation
The dusk sensor activates when ring nut A fig. 45 is
turned to
. In this way the side lights and dipped
headlights are activated automatically according to
the external light level.
Following automatic light activation, the fog lights
(for versions/markets, where provided) and rear fog
light may still be switched on. When the lights are
automatically switched off, the front and rear fog
lights (if activated) are also switched off. The next
time the lights are switched on automatically, the fog
lights must be reactivated manually (if required).
With dusk sensor active, it is not possible to keep
the main beam headlights on constantly; only flashing
is permitted. To switch these lights on constantly,
turn ring nut A to
and pull the stalk towards the
steering wheel.On automatic sensor controlled deactivation, the
dipped headlights are deactivated first, followed
by the side lights a few seconds later.
If the sensor is activated but is malfunctioning, the
side lights and dipped beam headlights are switched
on irrespective of the outside light level: the sensor
failure is indicated on the display. It is also possible to
deactivate the sensor and switch on the desired
lights, if necessary.
IMPORTANT The sensor cannot detect the presence
of fog. These lights must therefore be switched on
manually in these circumstances.
MAIN BEAM HEADLIGHTS
To activate the main beam headlights, with ring nut A
at
, pull the stalk towards the steering wheel
beyond the end of travel position.
Thewarning light switches on in the instrument
panel.
When the stalk is pulled towards the steering wheel
again, beyond the end of travel position, the main
beam headlights deactivate, the dipped beam
headlights reactivate and the warning light
switches off.
It is not possible to switch on the main beam
headlights in fixed mode if the automatic lighting
control system is active.
63GETTING TO
KNOW YOUR CARSAFETY
STARTING AND
DRIVING
WARNING LIGHTS
AND MESSAGES
IN AN EMERGENCY
SERVICING AND
MAINTENANCE
TECHNICAL
SPECIFICATIONS
INDEX
Page 68 of 420
FLASHING
To do this, pull the stalk towards the steering wheel
(unstable position) regardless of the position of
ring nut A.
The
warning light switches on in the instrument
panel.
DIRECTION INDICATORS
Bring the stalk to the (stable) position:
upwards:right-hand direction indicator activation;
downwards:left-hand direction indicator activation.
Theor
warning light will flash on the
instrument panel.
Direction indicators are switched off automatically
when the steering wheel is straightened.
Lane change function
If you wish to signal a lane change, put the left stalk
in the unstable position for less than half a second.
The direction indicator on the side selected will
be activated for 5 flashes and then go out
automatically.
“Cornering lights”
When the dipped headlamps are on and the speed is
below 40 km/h, if the steering wheel rotation angle
is large or the direction indicators are on, a light
(incorporated in the fog light) will switch on on the
relevant side to improve visibility at nighttime.“FOLLOW ME HOME” DEVICE
This allows the space in front of the car to be lit up
for a certain period of time.
Activation: with the ignition key turned to STOP or
removed, pull the stalk towards the steering wheel
within 2 minutes from when the engine is turned off.
Each time the stalk is moved, the lights stay on for
an extra 30 seconds up to a maximum of 210
seconds; then the lights are switched off
automatically.
Also, each time the stalk is operated, the
warning light on the instrument panel switches
on. The display shows a message and the time set for
the function.
The
warning light switches on when the stalk is
first moved and stays on until the function is
automatically deactivated. Each movement of the
stalk only increases the amount of time the lights
stay on.
Deactivation: keep the stalk pulled towards the
steering wheel for more than two seconds.
64GETTING TO
KNOW YOUR CAR
SAFETY
STARTING AND
DRIVING
WARNING LIGHTS
AND MESSAGES
IN AN EMERGENCY
SERVICING AND
MAINTENANCE
TECHNICAL
SPECIFICATIONS
INDEX
Page 73 of 420
CRUISE CONTROL(for versions/markets, where provided)
This is an electronically controlled driving assistance
device that allows the desired car speed to be
maintained, without having to press the accelerator
pedal.
This device can be used at a speed above 30 km/h on
long stretches of dry, straight roads with few
variations (e.g. motorways).
The use of this device on extra-urban roads with
traffic is not therefore recommended. Do not use
the device in town.
ACTIVATING THE DEVICE
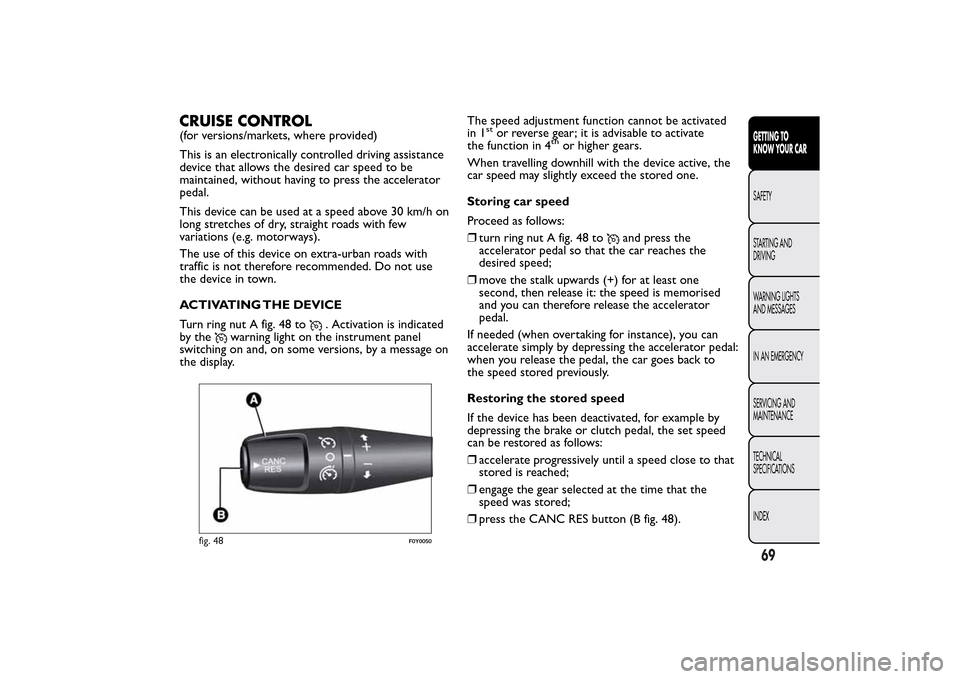
Turn ring nut A fig. 48 to
. Activation is indicated
by the
warning light on the instrument panel
switching on and, on some versions, by a message on
the display.The speed adjustment function cannot be activated
in 1
stor reverse gear; it is advisable to activate
the function in 4
th
or higher gears.
When travelling downhill with the device active, the
car speed may slightly exceed the stored one.
Storing car speed
Proceed as follows:
❒turn ring nut A fig. 48 to
and press the
accelerator pedal so that the car reaches the
desired speed;
❒move the stalk upwards (+) for at least one
second, then release it: the speed is memorised
and you can therefore release the accelerator
pedal.
If needed (when overtaking for instance), you can
accelerate simply by depressing the accelerator pedal:
when you release the pedal, the car goes back to
the speed stored previously.
Restoring the stored speed
If the device has been deactivated, for example by
depressing the brake or clutch pedal, the set speed
can be restored as follows:
❒accelerate progressively until a speed close to that
stored is reached;
❒engage the gear selected at the time that the
speed was stored;
❒press the CANC RES button (B fig. 48).
fig. 48
F0Y0050
69GETTING TO
KNOW YOUR CARSAFETY
STARTING AND
DRIVING
WARNING LIGHTS
AND MESSAGES
IN AN EMERGENCY
SERVICING AND
MAINTENANCE
TECHNICAL
SPECIFICATIONS
INDEX
Page 75 of 420
Automatic deactivation
The device deactivates automatically in the following
cases:
❒intervention of the ABS or ESC systems;
❒with the car speed below the set limit
❒in the event of system failure.
WARNING
When travelling with the device active,
never move the gear lever to neutral.
WARNING
In the event of device faults or failures,
turn knob A toOand contact a Fiat
Dealership.
SPEED LIMITER
This device allows the speed of the car to be limited
to values which can be set by the driver.
The maximum speed can be set both with car
stationary and in motion. The minimum speed that
can be set is 30 km/h.
When the device is active, the car speed depends on
the pressure at the accelerator pedal, until the
programmed speed limit is reached (see "Speed limit
programming" paragraph).If necessary (in the event of overtaking for example),
the programmed speed limit can be exceeded by
fully depressing the accelerator pedal.
By gradually reducing the pressure on the accelerator
pedal, the function will be reactivated as soon as
the car speed drops below the programmed speed.
Activating the device
To activate the device, turn ring nut A fig. 48 to
.
Activation of the device is indicated by the
warning light on the instrument panel switching
on and, on some versions, by a message on the
display plus last programmed speed value.
Speed limit programming
The speed limit can be programmed without
necessarily activating the device.
To store a speed value higher than that displayed,
move stalk A upwards (+). Each movement of the
stalk corresponds to an increase in speed of about 1
km/h, while keeping the stalk held upwards will
increase the speed with an increment of 5 km/h.
To store a value lower than that displayed, move
stalk A downwards (–). Each movement of the stalk
corresponds to a decrease in speed of about 1
km/h, while keeping the stalk held downwards a
decrease of 5 km/h is obtained.
71GETTING TO
KNOW YOUR CARSAFETY
STARTING AND
DRIVING
WARNING LIGHTS
AND MESSAGES
IN AN EMERGENCY
SERVICING AND
MAINTENANCE
TECHNICAL
SPECIFICATIONS
INDEX
Page 76 of 420
Activating/deactivating the device
Press the CANC RES button to activate/deactivate
the device.
The activation of the device is indicated by the
warning light on the instrument panel switching
on.
The deactivation of the function is instead indicated
by the
symbol on the display.
Exceeding the programmed speed
By fully depressing the accelerator pedal, the
programmed speed can be exceeded even with the
device active.
In this case the device is deactivated temporarily and
the set speed flashes on the display.
Reducing the speed below the programmed value
reactivates the device automatically.Flashing of programmed speed
The programmed speed flashes in the following
cases:
❒when the accelerator pedal has been fully
depressed and the car speed has exceeded
programmed speed;
❒when the device cannot reduce the speed of the
car due to the gradient of the road;
❒in the event of sharp acceleration.
Deactivating the device
To deactivate the device, turn ring nut A toO.
The deactivation of the device is indicated by the
warning light switching off on the instrument
panel and, on some versions, by a message andsymbol on the display.
Automatic deactivation of device
The device deactivates automatically in the event of
fault in the system.
72GETTING TO
KNOW YOUR CAR
SAFETY
STARTING AND
DRIVING
WARNING LIGHTS
AND MESSAGES
IN AN EMERGENCY
SERVICING AND
MAINTENANCE
TECHNICAL
SPECIFICATIONS
INDEX
IMPORTANT A jerk and increased load is perceived
when the accelerator pedal end of travel is reached.
This, to signal to the driver that the speed control
system is being deactivating.
IMPORTANT With the device deactivated, the car
maximum speed is reached before the end of travel
with a jerk and the load hardening. The jerk is also
present with the device deactivated.