2014 DODGE DURANGO mirror
[x] Cancel search: mirrorPage 3 of 188

INTRODUCTION/WELCOME
WELCOME FROM CHRYSLER GROUP LLC . . . 2
CONTROLS AT A GLANCE
DRIVER COCKPIT................6
INSTRUMENT CLUSTER .............8
GETTING STARTED
KEYFOB ....................10
REMOTE START.................11
KEYLESS ENTER-N-GO™ ............11
VEHICLE SECURITY ALARM ..........14
SEATBELT ...................15
SUPPLEMENTAL RESTRAINT SYSTEM (SRS) —
AIRBAGS ....................16
CHILD RESTRAINTS ..............17
FRONT SEATS ..................21
REARSEATS ..................24
POWER FOLDING THIRD ROW HEAD
RESTRAINTS ..................26
HEATED/VENTILATED SEATS .........26
HEATED STEERING WHEEL ..........28
TILT/TELESCOPING STEERING COLUMN . . . 29
OPERATING YOUR VEHICLE
ENGINE BREAK-IN RECOMMENDATIONS . . . 30
HEADLIGHT SWITCH ..............30
TURN SIGNAL/WIPER/WASHER/HIGH BEAM
LEVER ......................31
AUTOMATIC DIMMING MIRRORS .......33
SPEED CONTROL ................33
ADAPTIVE CRUISE CONTROL (ACC) ......35
FORWARD COLLISION WARNING (FCW)
WITHMITIGATION ...............37
ELECTRONIC SHIFTER .............39
AUTOSTICK® ..................40
FUEL ECONOMY (ECO) MODE .........41
AUTOMATIC CLIMATE CONTROLS WITH
TOUCHSCREEN .................42
PARKSENSE® REAR PARK ASSIST ......45
PARKVIEW® REAR BACK-UP CAMERA ....45
BLIND SPOT MONITORING ...........46
POWER SUNROOF ...............46
WIND BUFFETING ................47
ELECTRONICS
YOUR VEHICLE'S SOUND SYSTEM ......48
IDENTIFYING YOUR RADIO ...........50
Uconnect® ACCESS ..............51
Uconnect® 5.0 .................66
Uconnect® 8.4A .................74
Uconnect® 8.4AN ...............94
STEERING WHEEL AUDIO CONTROLS ....115
ELECTRONIC VEHICLE INFORMATION
CENTER (EVIC) .................115
PROGRAMMABLE FEATURES .........116UNIVERSAL GARAGE DOOR OPENER
(HomeLink®)
..................118
POWER INVERTER ..............120
POWER OUTLET ................121
OFF-ROAD CAPABILITIES
ALL-WHEEL DRIVE OPERATION .......123
UTILITY
ROOF LUGGAGE RACK............125
TRAILER TOWING WEIGHTS
(MAXIMUM TRAILER WEIGHT RATINGS) . . 125
RECREATIONAL TOWING
(BEHIND MOTORHOME, ETC.) ........126
WHAT TO DO IN EMERGENCIES
ROADSIDE ASSISTANCE...........131INSTRUMENT CLUSTER WARNING LIGHTS . . . 131IF YOUR ENGINE OVERHEATS .........137
JACKING AND TIRE CHANGING .......138
BATTERY LOCATION ..............147
JUMP-STARTING ...............147
MANUAL PARK RELEASE 8-SPEED .....150
TOWING A DISABLED VEHICLE ........151
FREEING A STUCK VEHICLE .........152
EVENT DATA RECORDER (EDR) ........153
CAP-LESS FUEL FILL FUNNEL ........153
MAINTAINING YOUR VEHICLE
OPENING THE HOOD.............154
ADDING FUEL .................155
ENGINE COMPARTMENT ...........157
FLUIDS AND CAPACITIES ...........159
MAINTENANCE SCHEDULE —
GASOLINE ENGINE ...............161
MAINTENANCE RECORD ...........164
FUSES .....................165
TIRE PRESSURES ...............168
WHEEL AND WHEEL TRIM CARE ......169
EXTERIOR BULBS ..............169
CUSTOMER ASSISTANCE
CHRYSLER GROUP LLC
CUSTOMER CENTER .............170
CHRYSLER CANADA INC.
CUSTOMER CENTER .............170
ASSISTANCE FOR THE HEARING IMPAIRED..170
PUBLICATIONS ORDERING ..........170
REPORTING SAFETY DEFECTS IN THE
UNITEDSTATES ................171
MOPAR® ACCESSORIES
AUTHENTIC ACCESSORIES BY MOPAR® . . . 172
FREQUENTLY ASKED QUESTIONS
FREQUENTLY ASKED QUESTIONS ......173
INDEX....................175
TABLE OF CONTENTS
Page 8 of 188

DRIVER COCKPIT
1. Power Mirror Controls
2. Headlight Switch pg. 30
3. Paddle Shifter’s (AutoStick®) pg. 40
4. Instrument Cluster pg. 8
5. Electronic Vehicle Information Center (EVIC) Display
6. Engine Start/Stop Button (Behind Steering Wheel) pg. 13
7. Audio System (Touchscreen Radio Shown) pg. 48
8. Passenger Power Window Controls
9. Glove Compartment
10. Audio System Control Knob pg. 66
CONTROLS AT A GLANCE
6
Page 23 of 188

FRONT SEATS
Power Seats
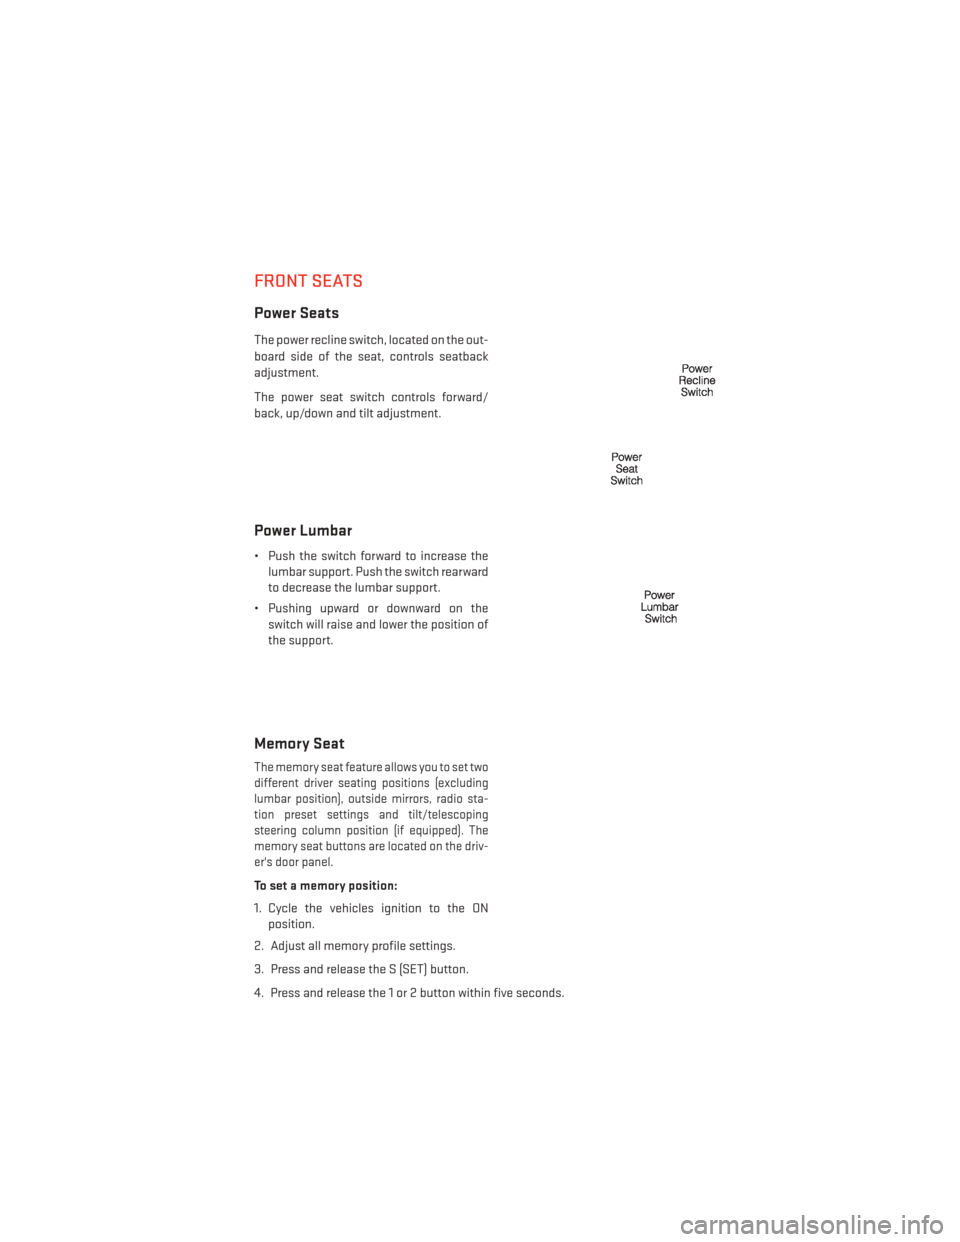
The power recline switch, located on the out-
board side of the seat, controls seatback
adjustment.
The power seat switch controls forward/
back, up/down and tilt adjustment.
Power Lumbar
• Push the switch forward to increase thelumbar support. Push the switch rearward
to decrease the lumbar support.
• Pushing upward or downward on the switch will raise and lower the position of
the support.
Memory Seat
The memory seat feature allows you to set two
different driver seating positions (excluding
lumbar position), outside mirrors, radio sta-
tion preset settings and tilt/telescoping
steering column position (if equipped). The
memory seat buttons are located on the driv-
er's door panel.
To set a memory position:
1. Cycle the vehicles ignition to the ONposition.
2. Adjust all memory profile settings.
3. Press and release the S (SET) button.
4. Press and release the 1 or 2 button within five seconds.
GETTING STARTED
21
Page 33 of 188

Automatic High Beams
The Automatic High Beams system provides increased forward lighting at night by auto-
mating high beam control through the use of a digital camera mounted on the inside
rearview mirror. This camera detects vehicle specific light and automatically switches from
high beams to low beams until the approaching vehicle is out of view. This feature is
programmable through the Uconnect® system. Refer to “Uconnect® Settings ” in “Under-
standing Your Instrument Panel” in the Owner's Manual on the DVD for further details.
Instrument Panel Dimmer
• Rotate the dimmer control to the extreme bottom position to fully dim the instrumentpanel lights and prevent the interior lights from illuminating when a door is opened.
• Rotate the dimmer control up to increase the brightness of the instrument panel when the parking lights or headlights are on.
• Rotate the dimmer control up to the next detent position to fully brighten the odometer and radio when the parking lights or headlights are on.
• Rotate the dimmer control up to the last detent position to turn on the interior lighting.
• If your vehicle is equipped with a touchscreen, the dimming is programmable through the Uconnect® system. Refer to “Uconnect® Settings ” in “Understanding Your Instru-
ment Panel” in the Owner's Manual on the DVD for further details.
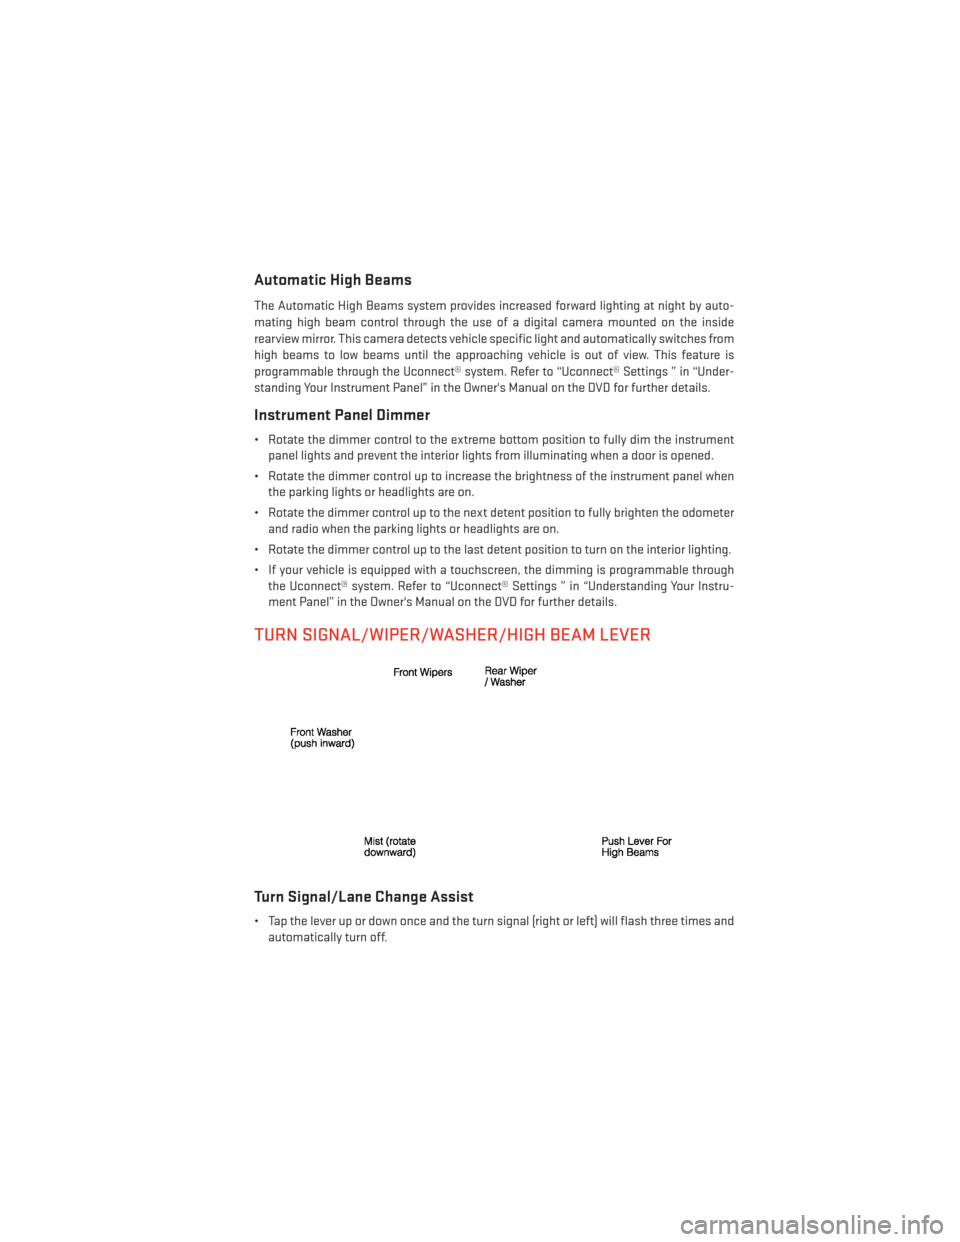
TURN SIGNAL/WIPER/WASHER/HIGH BEAM LEVER
Turn Signal/Lane Change Assist
• Tap the lever up or down once and the turn signal (right or left) will flash three times andautomatically turn off.
OPERATING YOUR VEHICLE
31
Page 35 of 188

AUTOMATIC DIMMING MIRRORS
• The rearview and driver side exterior mirror automatically adjusts for headlight glarefrom vehicles behind you.
• You can turn the feature on or off when the Automatic Dimming Mirror feature is selected through the programmable features in the Uconnect® system. Refer to “Uconnect®
Settings” in “Understanding Your Instrument Panel” in the Owner's Manual on the DVD for
further details.
SPEED CONTROL
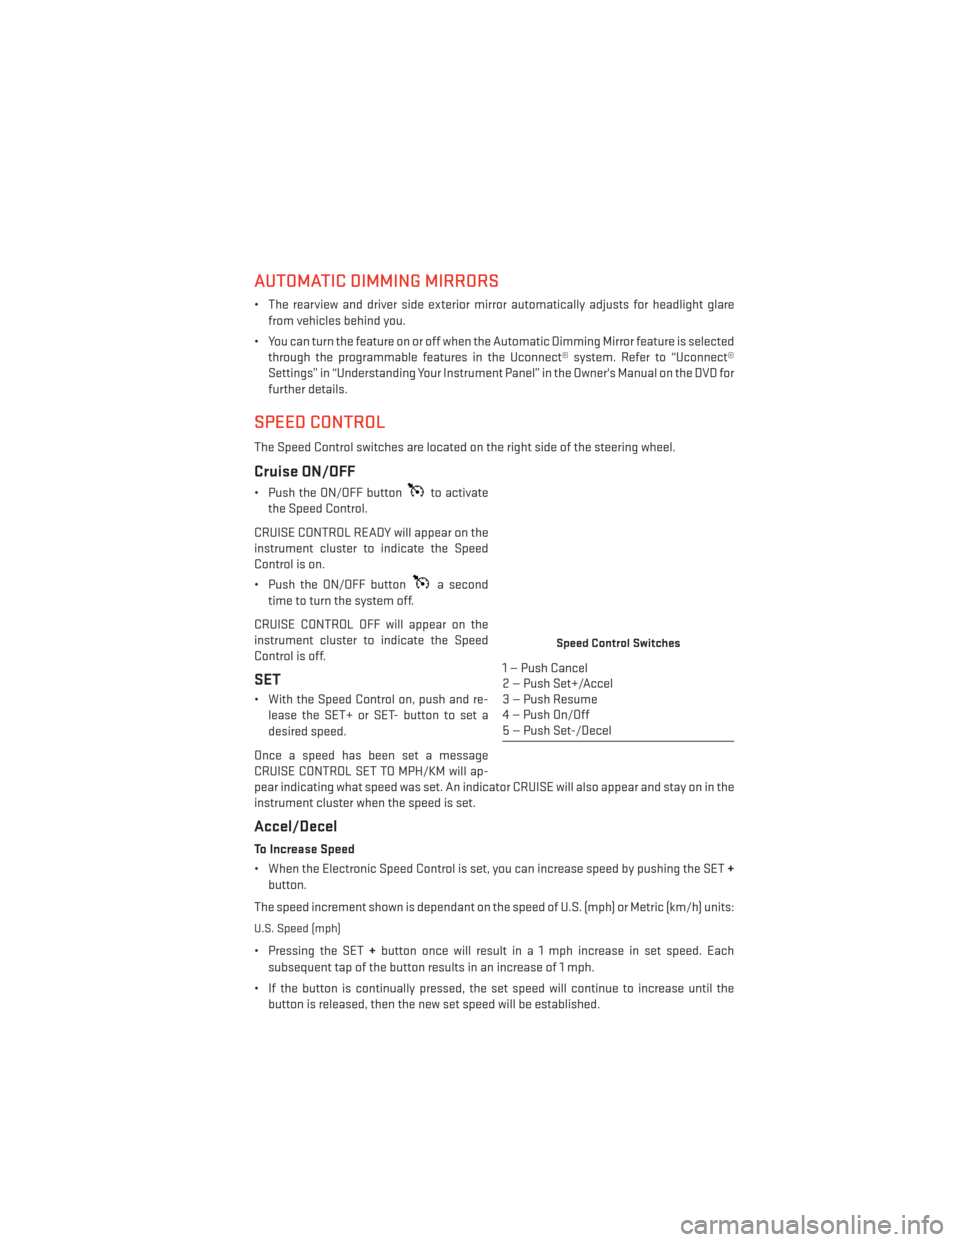
The Speed Control switches are located on the right side of the steering wheel.
Cruise ON/OFF
• Push the ON/OFF buttonto activate
the Speed Control.
CRUISE CONTROL READY will appear on the
instrument cluster to indicate the Speed
Control is on.
• Push the ON/OFF button
a second
time to turn the system off.
CRUISE CONTROL OFF will appear on the
instrument cluster to indicate the Speed
Control is off.
SET
• With the Speed Control on, push and re- lease the SET+ or SET- button to set a
desired speed.
Once a speed has been set a message
CRUISE CONTROL SET TO MPH/KM will ap-
pear indicating what speed was set. An indicator CRUISE will also appear and stay on in the
instrument cluster when the speed is set.
Accel/Decel
To Increase Speed
• When the Electronic Speed Control is set, you can increase speed by pushing the SET +
button.
The speed increment shown is dependant on the speed of U.S. (mph) or Metric (km/h) units:
U.S. Speed (mph)
• Pressing the SET +button once will result i n a 1 mph increase in set speed. Each
subsequent tap of the button results in an increase of 1 mph.
• If the button is continually pressed, the set speed will continue to increase until the button is released, then the new set speed will be established.
Speed Control Switches
1 — Push Cancel
2 — Push Set+/Accel
3 — Push Resume
4 — Push On/Off
5 — Push Set-/Decel
OPERATING YOUR VEHICLE
33
Page 45 of 188

• Press the AUTO button or AUTO soft-key.
• Select the desired temperature by pushing the up or down temperature buttons for thedriver or passenger.
• The system will maintain the set temperature automatically.
Air Conditioning (A/C)
• If the air conditioning button is pressed while in AUTO mode, the system will exit AUTO mode and stay in A/C. The mode and blower will be set at the closest mode and blower
position that the system was operating in AUTO.
MAX A/C
• MAX A/C sets the control for maximum cooling performance.
• Touch and release to toggle between MAX A/C and the prior settings. The soft-key illuminates when MAX A/C is ON.
• In MAX A/C, the blower level and mode position can be adjusted to desired user settings. Pressing other settings will cause the MAX A/C operation to switch to the prior settings
and the MAX A/C indicator will turn off.
SYNC Temperature Soft-Key
• Touch the “SYNC” soft-key on the Uconnect® radio to control the driver and passengertemperatures simultaneously. Touch the “SYNC” soft-key a second time to control the
temperatures individually.
Air Recirculation
• Use Recirculation for maximum A/C operation.
• For window defogging, turn the Recirculation button off.
• If the Recirculation button is pressed while in front defrost mode, the indicator will flashthree times to indicate that recirculation state is not allowed in front defrost mode.
Heated Mirrors
The mirrors are heated to melt frost or ice. This feature is activated whenever you turn on
the rear window defroster.
OPERATING YOUR VEHICLE
43
Page 48 of 188

BLIND SPOT MONITORING
The Blind Spot Monitoring (BSM) system uses two radar-based sensors, located inside the
rear bumper fascia, to detect Highway licensable vehicles (automobiles, trucks, motor-
cycles etc.) that enter the blind spot zones from the rear/front/side of the vehicle.
The Blind Spot Monitoring (BSM) system warning light, located in the outside mirrors, will
illuminate if a vehicle moves into a blind spot zone.
The BSM system can also be configured to sound an audible (chime) alert and mute the
radio to notify you of objects that have entered the detection zones.
Refer to your Owner's Manual on the DVD for further details.
POWER SUNROOF
The power sunroof switch is located on the overhead console.
Opening Sunroof
Express Open
• Press the switch rearward and release itwithin one-half second. The sunroof will
fully open and stop automatically.
Manual Open
• Press and hold the switch rearward to open the sunroof. Any release of the
switch will stop the movement, and the
sunroof will remain in a partially open
position until the switch is pressed again.
Venting Sunroof
• Press and release the button and the sun-roof will open to the vent position.
This is called “Express Vent” and will occur
regardless of sunroof position. During Ex-
press Vent operation, any movement of the
switch will stop the sunroof.
Power Sunroof Switch
1 — Opening Sunroof
2 — Venting Sunroof
3 — Closing Sunroof
OPERATING YOUR VEHICLE
46
Page 54 of 188

• Search for places to eat, shop, relax and play with Yelp®, using your voice or on-screenmenu. Then navigate to them (navigation standard on Uconnect® 8.4AN, optional on
Uconnect® 8.4A).
• Get operator assistance using the Assist button on your mirror.
Before you drive, familiarize yourself with the easy-to-use Uconnect® System.
1. The ASSIST and 9-1-1 buttons are located on your rearview mirror. The ASSIST Button is used for contacting Roadside Assistance, Vehicle Care and Uconnect® Care. The 9-1-1
Button connects you to emergency services.
NOTE:
Vehicles sold in Canada and Mexico DO NOT have 9-1-1 Call system capabilities. 9-1-1 or
other emergency line operators in Canada and Mexico may not answer or respond to 9-1-1
system calls.
2. The Uconnect® “Apps” button on the menu bar at the bottom right corner of the radio touchscreen. This is where you can begin your registration process, manage your Apps
and purchase WiFi on demand.
3. The Uconnect® Voice Command and Uconnect® Phone buttons are located on the left side of your steering wheel. These buttons let you use your voice to give commands,
make phone calls, send and receive text messages hands-free, enter navigation desti-
nations, and control your radio and media devices.
Included Trial Period For New Vehicles
Your new vehicle may come with an included trial period for use of the Uconnect® Access
Services starting at the date of vehicle purchase (date based on vehicle sales notification
from your dealer). To activate the trial, you must first register with Uconnect® Access .
After the trial period, if you wish to continue your Uconnect® Access Services you can
choose to purchase a subscription.
Features And Packages
•
After the trial period, you can subscribe to continue your service by visiting the Uconnect®
Store located within the Mopar Owner Connect website (moparownerconnect.com). If you
need assistance, U.S. residents can call Uconnect® Care at 855-792-4241.
• For the latest information on packages and pricing information: U.S. residents visit DriveUconnect.com.
ELECTRONICS
52