2014 DODGE CHARGER rear view mirror
[x] Cancel search: rear view mirrorPage 172 of 635

without terminating the call. To transfer an ongoing call
from your connected mobile phone to the Uconnect®
Phone or vice versa, press the “Transfer” button on the
Phone main screen.
Connect Or Disconnect Link Between The
Uconnect® Phone And Mobile Phone
If you would like to connect or disconnect the Bluetooth®
connection between a Uconnect® Phone paired mobile
phone and the Uconnect® Phone, follow the instructions
described in your mobile phone User’s Manual.
Things You Should Know About Your Uconnect®
Phone
Voice Command
•For best performance, adjust the rearview mirror to
provide at least ½ inch (1 cm) gap between the
overhead console (if equipped) and the mirror. •
Always wait for the beep before speaking.
• Speak normally, without pausing, just as you would
speak to a person sitting a few feet/meters away from
you.
• Ensure that no one other than you is speaking during
a voice command period.
Performance is maximized under:
• Low-To-Medium Blower Setting
• Low-To-Medium Vehicle Speed
• Low Road Noise
• Smooth Road Surface
• Fully Closed Windows
• Dry Weather Condition
170 UNDERSTANDING THE FEATURES OF YOUR VEHICLE
Page 220 of 635

Automatic Headlights — If Equipped
This system automatically turns the headlights on or off
according to ambient light levels. To turn the system on,
rotate the headlight switch counterclockwise to the
AUTO position. When the system is on, the headlight
time delay feature is also on. This means the headlights
will stay on for up to 90 seconds after you place the
ignition into the OFF position. To turn the automatic
system off, move the headlight switch out of the AUTO
position.
NOTE:The engine must be running before the headlights
will come on in the automatic mode.
Headlights On With Wipers (Available With
Automatic Headlights Only)
When this feature is active, the headlights will turn on
approximately 10 seconds after the wipers are turned on
if the headlight switch is placed in the AUTO position. In addition, the headlights will turn off when the wipers are
turned off if they were turned on by this feature.
NOTE:
The Headlights On with Wipers feature can be
turned on or off using the Uconnect® System. Refer to
“Uconnect® Settings/Customer Programmable Fea-
tures” in “Understanding Your Instrument Panel” for
further information.
Automatic High Beam Headlamp Control — If
Equipped
The Automatic High Beam Headlamp Control system
provides increased forward lighting at night by automat-
ing high beam control through the use of a digital camera
mounted on the inside rearview mirror. This camera
detects vehicle specific light and automatically switches
from high beams to low beams until the approaching
vehicle is out of view.
218 UNDERSTANDING THE FEATURES OF YOUR VEHICLE
Page 346 of 635

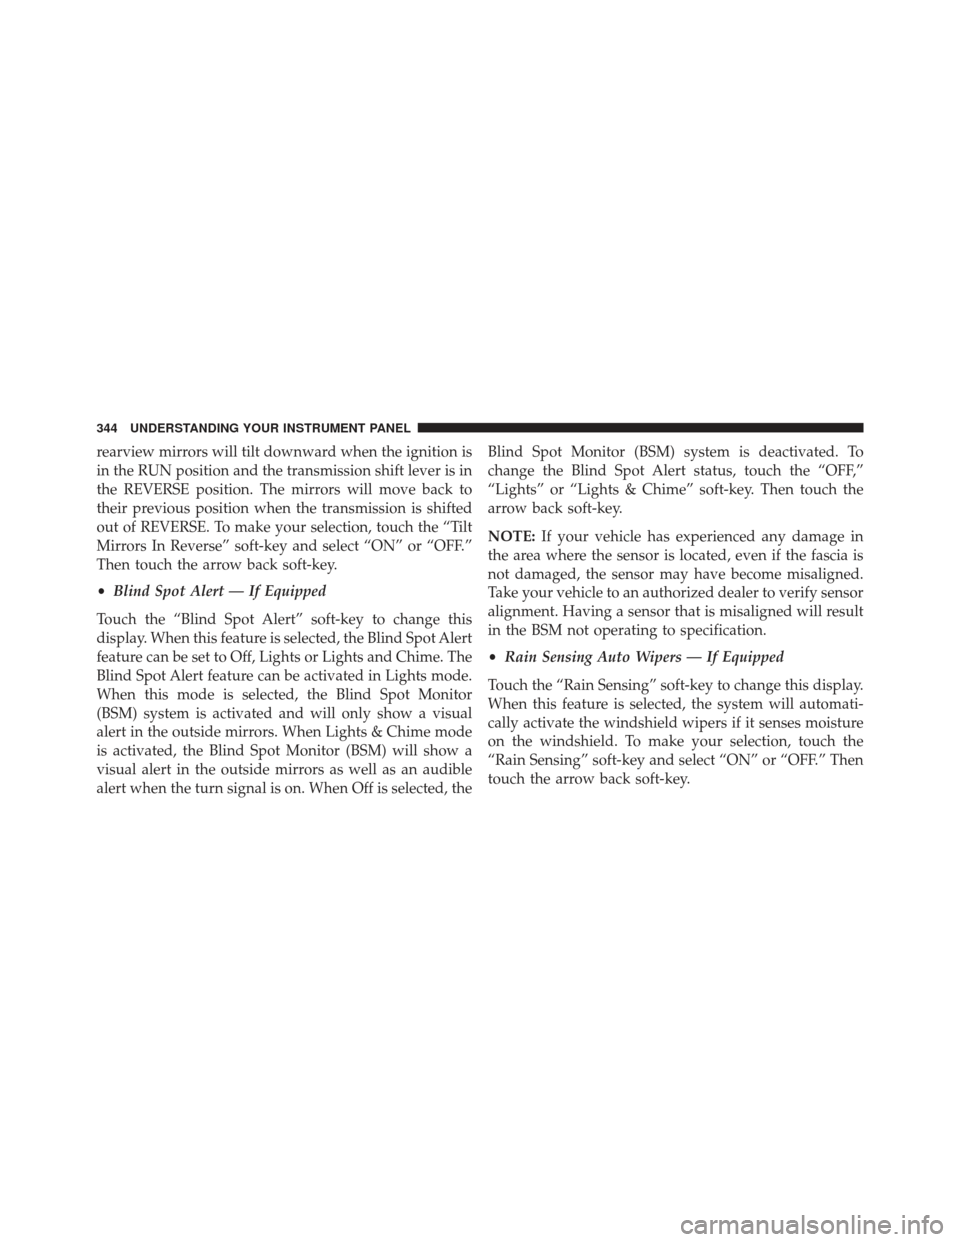
rearview mirrors will tilt downward when the ignition is
in the RUN position and the transmission shift lever is in
the REVERSE position. The mirrors will move back to
their previous position when the transmission is shifted
out of REVERSE. To make your selection, touch the “Tilt
Mirrors In Reverse” soft-key and select “ON” or “OFF.”
Then touch the arrow back soft-key.
•Blind Spot Alert — If Equipped
Touch the “Blind Spot Alert” soft-key to change this
display. When this feature is selected, the Blind Spot Alert
feature can be set to Off, Lights or Lights and Chime. The
Blind Spot Alert feature can be activated in Lights mode.
When this mode is selected, the Blind Spot Monitor
(BSM) system is activated and will only show a visual
alert in the outside mirrors. When Lights & Chime mode
is activated, the Blind Spot Monitor (BSM) will show a
visual alert in the outside mirrors as well as an audible
alert when the turn signal is on. When Off is selected, the Blind Spot Monitor (BSM) system is deactivated. To
change the Blind Spot Alert status, touch the “OFF,”
“Lights” or “Lights & Chime” soft-key. Then touch the
arrow back soft-key.
NOTE:
If your vehicle has experienced any damage in
the area where the sensor is located, even if the fascia is
not damaged, the sensor may have become misaligned.
Take your vehicle to an authorized dealer to verify sensor
alignment. Having a sensor that is misaligned will result
in the BSM not operating to specification.
• Rain Sensing Auto Wipers — If Equipped
Touch the “Rain Sensing” soft-key to change this display.
When this feature is selected, the system will automati-
cally activate the windshield wipers if it senses moisture
on the windshield. To make your selection, touch the
“Rain Sensing” soft-key and select “ON” or “OFF.” Then
touch the arrow back soft-key.
344 UNDERSTANDING YOUR INSTRUMENT PANEL
Page 361 of 635

•Blind Spot Alert — If Equipped
When this feature is selected, the Blind Spot Alert feature
can be set to Off, Lights or Lights and Chime. The Blind
Spot Alert feature can be activated in “Lights” mode.
When this mode is selected, the Blind Spot Monitor
(BSM) system is activated and will only show a visual
alert in the outside mirrors. When “Lights & Chime”
mode is activated, the Blind Spot Monitor (BSM) will
show a visual alert in the outside mirrors as well as an
audible alert when the turn signal is on. When “Off” is
selected, the Blind Spot Monitor (BSM) system is deacti-
vated. To change the Blind Spot Alert status, touch the
Off, Lights or Lights & Chime soft-key. Then touch the
arrow back soft-key. NOTE:
If your vehicle has experienced any damage in
the area where the sensor is located, even if the fascia is
not damaged, the sensor may have become misaligned.
Take your vehicle to an authorized dealer to verify sensor
alignment. Having a sensor that is misaligned will result
in the BSM not operating to specification.
• ParkView® Backup Camera — If Equipped
Your vehicle may be equipped with the ParkView® Rear
Back Up Camera that allows you to see an on-screen
image of the rear surroundings of your vehicle whenever
the shift lever is put into REVERSE. The image will be
displayed on the radio touchscreen display along with a
caution note to “check entire surroundings” across the
top of the screen. After five seconds, this note will
disappear. The ParkView® camera is located on the rear
of the vehicle above the rear License plate. To make your
selection, touch the ParkView® Backup Camera soft-key,
4
UNDERSTANDING YOUR INSTRUMENT PANEL 359
Page 571 of 635

CAUTION!
Do not use Alcohol and Alcohol-based and/or Keton
based cleaning products to clean leather seats, as
damage to the seat may result.
Cleaning Headlights
Your vehicle is equipped with plastic headlights and fog
lights that are lighter and less susceptible to stone break-
age than glass headlights.
Plastic is not as scratch resistant as glass and therefore
different lens cleaning procedures must be followed.
To minimize the possibility of scratching the lenses and
reducing light output, avoid wiping with a dry cloth. To
remove road dirt, wash with a mild soap solution fol-
lowed by rinsing.
Do not use abrasive cleaning components, solvents, steel
wool or other aggressive material to clean the lenses.
Glass Surfaces
All glass surfaces should be cleaned on a regular basis
with MOPAR® Glass Cleaner, or any commercial
household-type glass cleaner. Never use an abrasive type
cleaner. Use caution when cleaning the inside rear win-
dow equipped with electric defrosters or the right rear
quarter window equipped with the radio antenna. Do
not use scrapers or other sharp instrument that may
scratch the elements.
When cleaning the rear view mirror, spray cleaner on the
towel or rag that you are using. Do not spray cleaner
directly on the mirror.
Cleaning Plastic Instrument Cluster Lenses
The lenses in front of the instruments in this vehicle are
molded in clear plastic. When cleaning the lenses, care
must be taken to avoid scratching the plastic.
7
MAINTAINING YOUR VEHICLE 569
Page 582 of 635

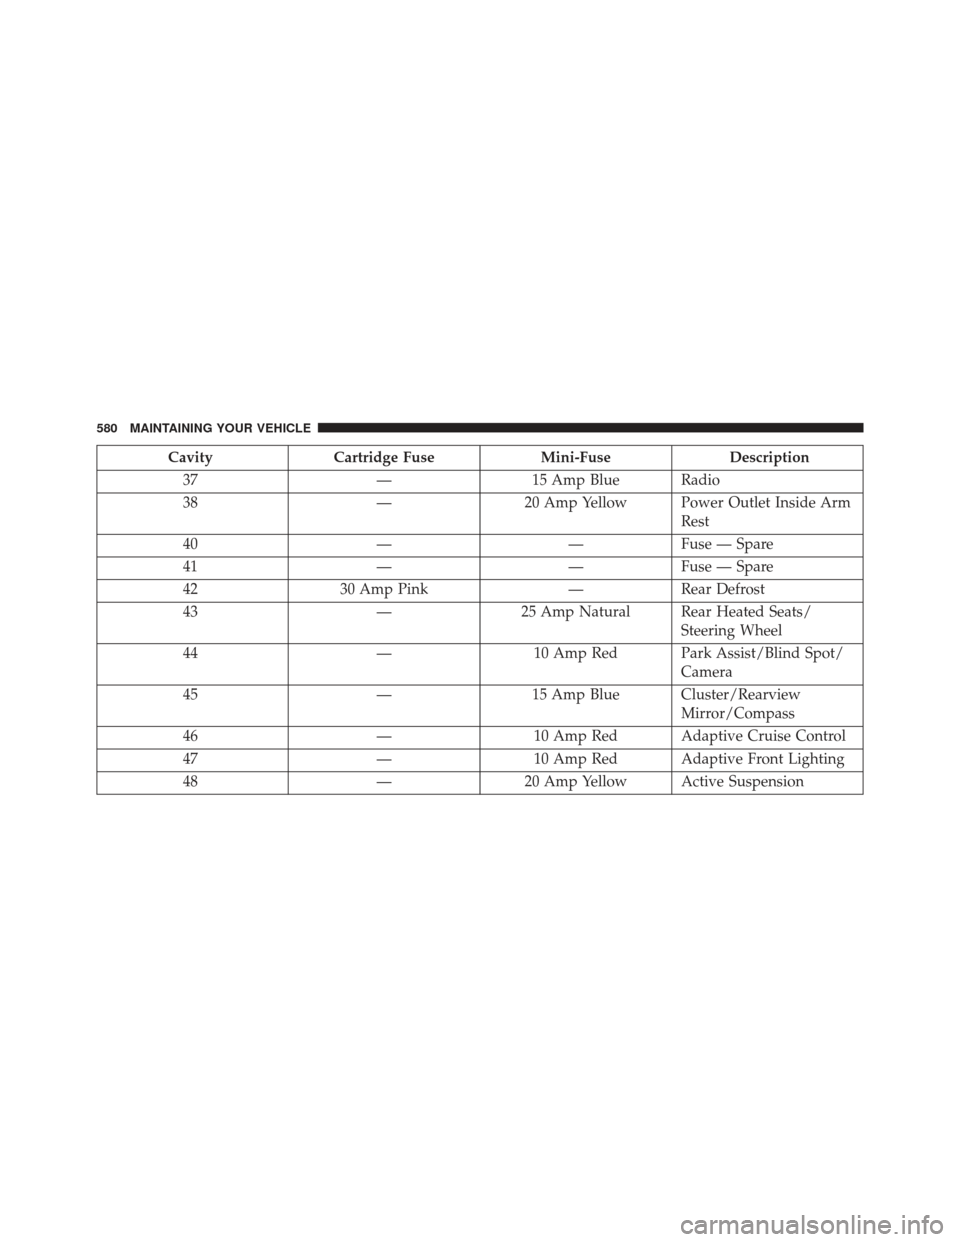
CavityCartridge Fuse Mini-FuseDescription
37 —15 Amp Blue Radio
38 —20 Amp Yellow Power Outlet Inside Arm
Rest
40 ——Fuse — Spare
41 ——Fuse — Spare
42 30 Amp Pink —Rear Defrost
43 —25 Amp Natural Rear Heated Seats/
Steering Wheel
44 —10 Amp Red Park Assist/Blind Spot/
Camera
45 —15 Amp Blue Cluster/Rearview
Mirror/Compass
46 —10 Amp Red Adaptive Cruise Control
47 —10 Amp Red Adaptive Front Lighting
48 —20 Amp Yellow Active Suspension
580 MAINTAINING YOUR VEHICLE
Page 621 of 635

Illuminated Entry..........................21
Immobilizer (Sentry Key) ....................16
Infant Restraint ...........................73
Information Center, Vehicle ..................324
Inside Rearview Mirror .....................108
Instrument Cluster ....................... .314
Instrument Panel and Controls ................311
Instrument Panel Lens Cleaning ...............569
Interior Appearance Care ....................568
Interior Lights .......................... .225
Intermittent Wipers (Delay Wipers) .............227
Introduction ..............................4
iPod®/USB/MP3 Control ...................369
Bluetooth® Streaming Audio ...............153
Jack Location ........................... .509
Jack Operation .......................... .508
Jump Starting ........................... .517KeyFob.................................13
Arm The Alarm .........................19
Lock The Doors .........................23
Panic Alarm ............................24
Programming Additional Key Fobs ...........18
Programming Additional Transmitters .........18
Remote Battery Replacement ................25
Unlatch The Trunk .......................24
Unlock The Doors .......................23
Key-In Reminder ..........................15
Keyless Enter-N-Go ........................34
Keyless Enter-N-Go™ Enter The Trunk .........................24
Lock The Vehicle’s Doors ..................23
Passive Entry Programming .................34
Unlock From The Passenger Side .............23
Keyless Enter-N-Go™™ Keyless Enter-N-Go™™ ...................34
Passive Entry ...........................34
10
INDEX 619
Page 624 of 635

Maintenance Procedures....................538
Maintenance Schedule ..................... .592
Malfunction Indicator Light (Check Engine) .......317
Manual, Service ......................... .605
Master Cylinder (Brakes) ....................559
Memory Feature (Memory Seat) ...............211
Memory Seat ............................211
Memory Seats and Radio ....................211
Methanol .............................. .478
Mini-Trip Computer ...................... .337
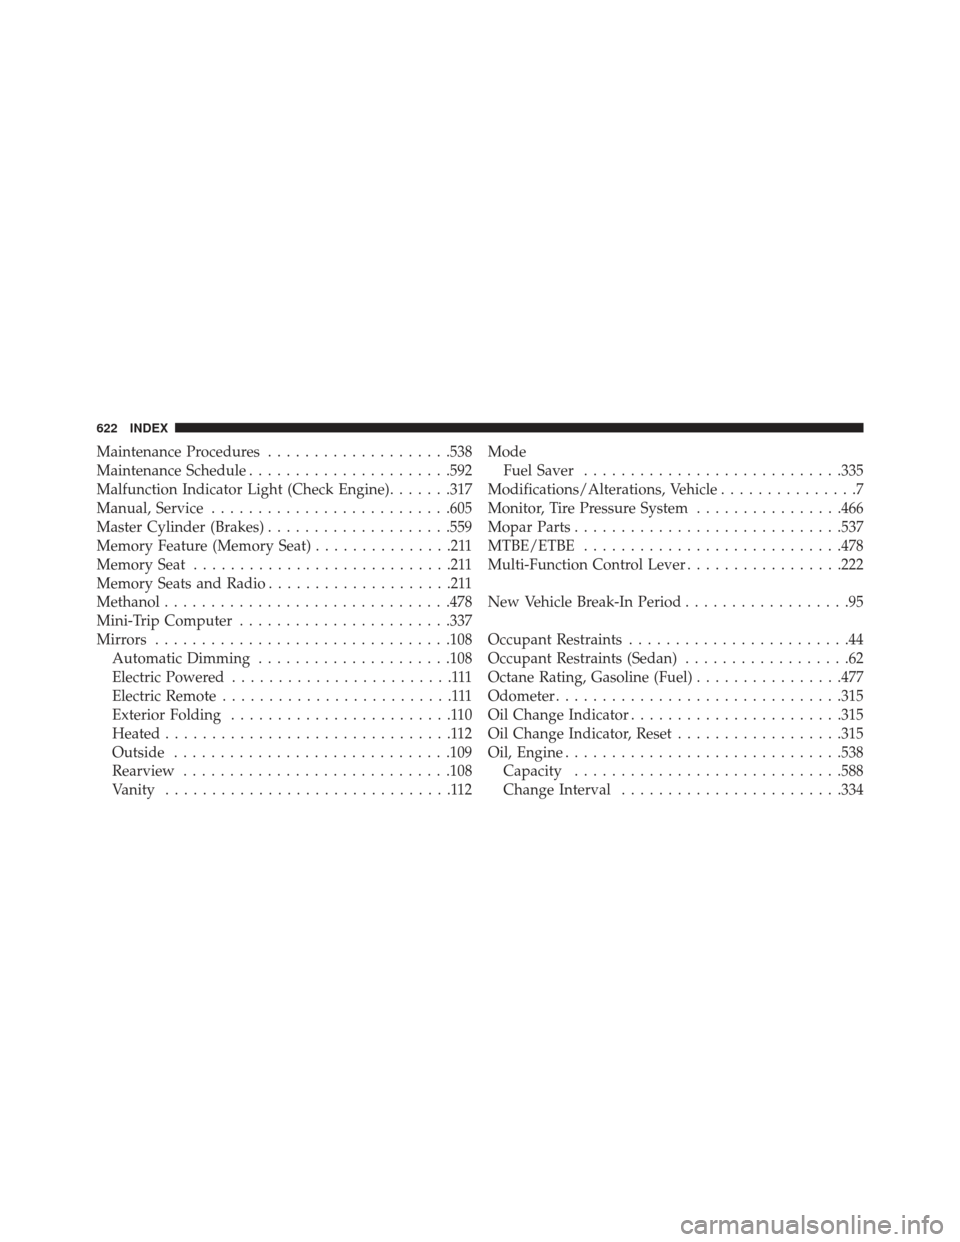
Mirrors ............................... .108
Automatic Dimming .....................108
Electric Powered ........................111
Electric Remote .........................111
Exterior Folding ........................110
Heated ...............................112
Outside ............................. .109
Rearview ............................ .108
Vanity ...............................112 Mode
Fuel Saver ........................... .335
Modifications/Alterations, Vehicle ...............7
Monitor, Tire Pressure System ................466
Mopar Parts ............................ .537
MTBE/ETBE ........................... .478
Multi-Function Control Lever .................222
New Vehicle Break-In Period ..................95
Occupant Restraints ........................44
Occupant Restraints (Sedan) ..................62
Octane Rating, Gasoline (Fuel) ................477
Odometer .............................. .315
Oil Change Indicator ...................... .315
Oil Change Indicator, Reset ..................315
Oil, Engine ............................. .538
Capacity ............................ .588
Change Interval ....................... .334
622 INDEX