Page 81 of 148

Engine/
Transmission Frontal Area Max. GTW (Gross
Trailer Wt.)Max. Tongue Wt.
3.6L Automatic 12 sq ft (1.11 sq m) 1,000 lbs (454 kg) 100 lbs (45")
TRAILER TOWING WEIGHTS (MAXIMUM TRAILER WEIGHT
RATINGS)
Engine/
Transmission Frontal Area Max. GTW (Gross
Trailer Wt.)Max. Tongue Wt.
3.6L Automatic 12 sq ft (1.11 sq m) 1,000 lbs (454 kg) 100 lbs (45 kg)
5.7L Automatic 12 sq ft (1.11 sq m) 1,000 lbs (454 kg) 100 lbs (45 kg)
Refer to local laws for maximum trailer towing speeds
RECREATIONAL TOWING (BEHIND MOTORHOME, ETC.)
Towing This Vehicle Behind Another Vehicle
Towing Condition Wheels OFF the
Ground Manual Transmission Automatic Transmission
Flat Tow NONE• Transmission in
NEUTRAL
• 65 mph (105 km/h)
maximum speed NOT ALLOWED
Dolly Tow Front
Not Recommended NOT ALLOWED
Rear Not Recommended Not Recommended
Dolly Tow ALL OK OK
Towing This Vehicle Behind Another Vehicle — Manual Transmission
• Flat towing of vehicles equipped with a manual transmission is permitted within the
following limitations:• The transmission must be in NEUTRAL
• There is no limitation on the distance to be traveled
• The towing speed must not exceed 65 mph (105 km/h)
NOTE:
Manual transmission vehicles may also be towed using a vehicle trailer (with all four wheels
off the ground). Use of a towing dolly is not recommended, as vehicle damage may occur.
CAUTION!
• Exceeding these towing limits may cause severe transmission damage. Such dam- age is not covered by the New Vehicle Limited Warranty.
• Towing this vehicle in violation of the above requirements can cause severe trans-
mission damage. Damage from improper towing is not covered under the New
Vehicle Limited Warranty.
Towing This Vehicle Behind Another Vehicle — Automatic Transmission
• Recreational towing (with all four wheels on the ground, or using a tow dolly) is NOT
ALLOWED. The only acceptable method for towing this vehicle (behind another vehicle) is
on a vehicle trailer with all four wheels OFFthe ground.
UTILITY
79
Page 82 of 148

AUTOSTICK®
Steering Wheel Mounted Paddle Shifters Or Console Mounted Shifter
• AutoStick® is a driver-interactive trans-
mission feature that offers manual gear
shifting to provide you with more control
of the vehicle. AutoStick® allows you to
maximize engine braking, and improve
overall vehicle performance.
• This system can also provide you with more control during passing, city driving,
cold slippery conditions, mountain driv-
ing, trailer towing, and many other
situations.
Operation
• When the shift lever is in the DRIVE posi-tion, the transmission will operate auto-
matically, shifting between the five avail-
able gears. To engage AutoStick®, simply move the shift lever to the right or left (+/-)
while in the DRIVE position, or press one of the steering wheel mounted shift paddles
(+/-). When AutoStick® is active, the current transmission gear is displayed in the
Electronic Vehicle Information Center (EVIC) portion of the instrument cluster. In
AutoStick® mode, the transmission will shift when manually selected by the driver (using
the shift lever, or the shift paddles), unless an engine lugging or overspeed condition
would result. It will remain in the selected gear until another upshift or downshift is
chosen, except as described below:• The transmission will automatically downshift as the vehicle slows (to prevent engine
lugging) and will display the current gear.
• The transmission will automatically downshift to first gear when coming to a stop.
• You can start out in first or second gear. Tapping (+) (at a stop) will allow starting in second gear. Starting out in second gear is helpful in snowy or icy conditions.
• The system will ignore attempts to upshift at too low of a vehicle speed.
• Transmission shifting will be more noticeable when AutoStick® is engaged. To disen- gage AutoStick® mode, hold the shift lever to the right or press and hold the (+) shift
paddle until “D” is once again displayed in the instrument cluster. You can shift in or
out of the AutoStick® mode at any time without taking your foot off the accelerator
pedal.
SRT
80
Page 83 of 148

ELECTRONIC CONTROL DAMPING SYSTEM
• This vehicle may be equipped with an electronic controlled dampening system. Thissystem reduces body roll and pitch in many driving situations including cornering,
acceleration and braking. There are three modes of operation:
Automatic (Auto) Mode
• This is the default position when vehicle ignition is first turned on. Auto mode will give asporty, but comfortable ride. Within this mode, the suspension will adapt to the vehicle
inputs, including road surfaces, vehicle speed, steering inputs, braking, and accelera-
tion.
• If AutoStick® is engaged while in “Auto” mode, the transmission will automatically shift up if maximum engine speed is reached.
• Heavily pressing the accelerator pedal may generate an automatic downshift for im- proved acceleration.
• This mode should be used for most driving situations.
Sport ModeSPORT
• This mode is driver selectable when the vehicle is placed in SPORT mode (press the SPORT button on the center console). This mode will set suspension for maximum
performance handling and is intended for spirited driving.
• When SPORT mode is enabled, a “ SPORT” message will display in the in-
strument cluster.
NOTE:
The SPORT setting will provide a firmer ride.
Track Mode (Automatic Transmission Only)
• This mode is selected when the SPORT button is pushed a second time. This mode combines maximum performance suspension and aggressive transmission calibration.
• When Track mode is enabled and the transmission is in AutoStick® the transmission will not automatically upshift at maximum engine speed. It will remain in gear until the driver
selects an upshift. When slowing to a stop it will automatically down shift to prevent
engine lugging.
• When Track mode is enabled a “Track” message will display in the instrument cluster.
SRT
81
Page 84 of 148

• The EVIC can be used to program the fol-lowing Performance Features. Press and
release the MENU
button until Perfor-
mance Fea")
SRT PERFORMANCE FEATURES
Electronic Vehicle Information Center (EVIC)
• The EVIC can be used to program the fol-lowing Performance Features. Press and
release the MENU
button until Perfor-
mance Features displays, then press the
UP
or DOWN buttonbuttons to
scroll through the settings. Press the SE-
LECT
button to change or reset the
setting.
• 0-60 mph (0-100 km/h) • Instantaneous G-Force
• Braking Distance • Peak G-Force
• 1/8 Mile • Digital Speedometer
• 1/4 Mile
0-60 mph (0-100 km/h)
• When selected, this screen displays the time it takes for the vehicle to go from 0 to 60 mph (0 to 100 km/h) within 10 seconds.
Braking Distance
• When selected, this screen displays the vehicle's braking distance and the speed at which the brake pedal was depressed.
1/8 Mile, 1/4 Mile
• When selected, this screen displays the time it takes the vehicle to travel 1/8 mile (1/4 mile) within 30 seconds and the vehicle's speed when it reaches 1/8 mile (1/4 mile).
Instantaneous G-Force
• When selected, this screen displays the current G-Force (lateral and longitudinal) along with a friction circle that displays the directions of the forces.
Peak G-Force
• When selected, this screen displays all four G-Force values (two lateral and two longitudinal).
1 — EVIC Controls
SRT
82
Page 85 of 148

Digital Speedometer
• When selected, this screen displays vehicle speed and records top speed.
WARNING!
Measurement of vehicle statistics with the Performance Features is intended for off-
highway or off-road use only and should not be done on any public roadways. It is
recommended that these features be used in a controlled environment and within the
limits of the law. The capabilities of the vehicle as measured by the performance pages
must never be exploited in a reckless or dangerous manner, which can jeopardize the
user’s safety or the safety of others. Only a safe, attentive, and skillful driver can prevent
accidents.
SUMMER/THREE-SEASON TIRES
• This vehicle may be equipped with wheels and tires to enhance traction in both wet anddry conditions.
• Summer tires are not intended to be driven in snow or on ice.
• Summer tires have significantly reduced grip in temperatures below 50°F (10°C)
• Use summer tires only in sets of four.
NOTE:
Summer tires will not contain the all season designation or mountain/snowflake symbol on
the sidewall of the tire.
WARNING!
Do not use summer tires in snow/ice conditions. You could lose control, resulting in
severe injury or death. Driving too fast for conditions also creates the possibility of loss
of vehicle control.
SRT
83
Page 86 of 148

ROADSIDE ASSISTANCE
Dial toll-free 1-800-521-2779 for U.S. Residents or 1-800-363-4869 for Canadian Resi-
dents.
• Provide your name, vehicle identification number, license plate number, and your loca-tion, including the telephone number from which you are calling.
• Briefly describe the nature of the problem and answer a few simple questions.
• You will be given the name of the service provider and an estimated time of arrival. If you feel you are in an “unsafe situation”, please let us know. With your consent, we will
contact local police or safety authorities.
INSTRUMENT CLUSTER WARNING LIGHTS
- Electronic Stability Control (ESC) Activation/Malfunction
Indicator Light
The “ESC Activation/Malfunction Indicator Light” in the instrument cluster will come on
when the ignition switch is turned to the ON/RUN position. It should go out with the engine
running. If the “ESC Activation/Malfunction Indicator Light” comes on continuously with
the engine running, a malfunction has been detected in the ESC system.
If this light remains on after several ignition cycles, and the vehicle has been driven several
miles (kilometers) at speeds greater than 30 mph (48 km/h), we recommend you drive to the
nearest service center and have the vehicle serviced immediately.
- Tire Pressure Monitoring System (TPMS) Light
Each tire, including the spare (if provided), should be checked monthly when cold and
inflated to the inflation pressure recommended by the vehicle manufacturer on the vehicle
placard or tire inflation pressure label. (If your vehicle has tires of a different size than the
size indicated on the vehicle placard or tire inflation pressure label, you should determine
the proper tire inflation pressure for those tires.)
As an added safety feature, your vehicle has been equipped with a tire pressure monitoring
system (TPMS) that illuminates a low tire pressure telltale when one or more of your tires is
significantly under-inflated. Accordingly, when the low tire pressure telltale illuminates, you
should stop and check your tires as soon as possible, and inflate them to the proper
pressure. Driving on a significantly under-inflated tire causes the tire to overheat and can
lead to tire failure. Under-inflation also reduces fuel efficiency and tire tread life, and may
affect the vehicle’s handling and stopping ability.
IF THE LIGHT STARTS FLASHING INDICATING A LOW TIRE PRESSURE, ADJUST THE AIR
PRESSURE IN THE LOW TIRE TO THE AIR PRESSURE SHOWN ON THE VEHICLE PLACARD
OR TIRE INFLATION PRESSURE LABEL LOCATED ON THE DRIVER'S DOOR.
WHAT TO DO IN EMERGENCIES
84
Page 87 of 148

NOTE:
AFTER INFLATION, THE VEHICLE MAY NEED TO BE DRIVEN FOR 20 MINUTES BEFORE THE
FLASHING LIGHT WILL TURN OFF.
Please note that the TPMS is not a substitute for proper tire maintenance, and it is the
driver’s responsibility to maintain correct tire pressure, even if under-inflation has not
reached the level to trigger illumination of the TPMS low tire pressure telltale.
Your vehicle has also been equipped with a TPMS malfunction indicator to indicate when
the system is not operating properly. The TPMS malfunction indicator is combined with the
low tire pressure telltale.
When the system detects a malfunction, the telltale will flash for approximately one minute
and then remain continuously illuminated. This sequence will continue upon subsequent
vehicle start-ups as long as the malfunction exists. When the malfunction indicator is
illuminated, the system may not be able to detect or signal low tire pressure as intended.
TPMS malfunctions may occur for a variety of reasons, including the installation of replace-
ment or alternate tires or wheels on the vehicle that prevent the TPMS from functioning
properly. Always check the TPMS malfunction telltale after replacing one or more tires or
wheels on your vehicle to ensure that the replacement or alternate tires and wheels allow
the TPMS to continue to function properly.
NOTE:
Tire pressures change by approximately 1 psi (7 kPa) per 12° F (7° C) of air temperature
change. Keep this in mind when checking tire pressure inside a garage, especially in the
Winter. Example: If garage temperature is 68°F (20°C) and the outside temperature is 32°F
(0°C), then the cold tire inflation pressure should be increased by 3 psi (21 kPa), which equals
1 psi (7 kPa) for every 12°F (7°C) for this outside temperature condition.
CAUTION!
The TPMS has been optimized for the original equipment tires and wheels. TPMS
pressures and warning have been established for the tire size equipped on your vehicle.
Undesirable system operation or sensor damage may result when using replacement
equipment that is not of the same size, type, and/or style. Aftermarket wheels can cause
sensor damage. Do not use tire sealant from a can, or balance beads if your vehicle is
equipped with a TPMS, as damage to the sensors may result.
WHAT TO DO IN EMERGENCIES
85
Page 88 of 148

- Engine Temperature Warning Light
This light warns of an overheated engine condition.
If the light turns on or flashes continuously while driving, safely pull over and stop the
vehicle. If the A/C system is on, turn it off. Also, shift the transmission into NEUTRAL and
idle the vehicle. If the temperature reading does not return to normal, turn the engine off
immediately.
We recommend that you do not operate the vehicle or engine damage will occur. Have the
vehicle serviced immediately.
WARNING!
A hot engine cooling system is dangerous. You or others could be badly burned by steam
or boiling coolant.
BRAKE- Brake Warning Light
The Brake Warning light illuminates when there is either a system malfunction or the
parking brake is applied. If the light is on and the parking brake is not applied, it indicates a
possible brake hydraulic malfunction, brake booster problem or an Anti-Lock Brake System
problem.
Please have your vehicle serviced immediately.
WARNING!
Driving a vehicle with the red brake light on is dangerous. Part of the brake system may
have failed. It will take longer to stop the vehicle. You could have a collision. Have the
vehicle checked immediately.
- Malfunction Indicator Light (MIL)
Certain conditions, such as a loose or missing gas cap, poor fuel quality, etc., may
illuminate the MIL after engine start. The vehicle should be serviced if the light stays on
through several typical driving cycles. In most situations, the vehicle will drive normally and
not require towing.
If the MIL flashes when the engine is running, serious conditions may exist that could lead
to immediate loss of power or severe catalytic converter damage. We recommend you do
not operate the vehicle. Have the vehicle serviced immediately.
- Electronic Stability Control (ESC) OFF Indicator Light
This light indicates the Electronic Stability Control (ESC) is off.
– Sport Shifting
This light will illuminate whenSPORT MODEis selected. This mode provides performance
based transmission shifting depending on the driver requested throttle position.
WHAT TO DO IN EMERGENCIES
86
 1
1 2
2 3
3 4
4 5
5 6
6 7
7 8
8 9
9 10
10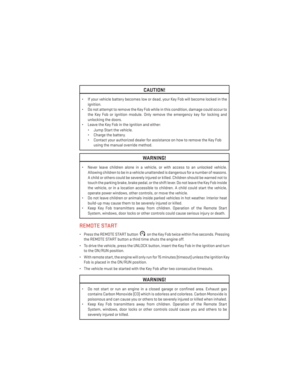 11
11 12
12 13
13 14
14 15
15 16
16 17
17 18
18 19
19 20
20 21
21 22
22 23
23 24
24 25
25 26
26 27
27 28
28 29
29 30
30 31
31 32
32 33
33 34
34 35
35 36
36 37
37 38
38 39
39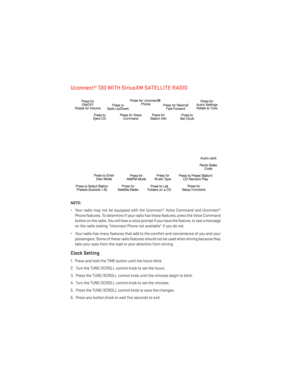 40
40 41
41 42
42 43
43 44
44 45
45 46
46 47
47 48
48 49
49 50
50 51
51 52
52 53
53 54
54 55
55 56
56 57
57 58
58 59
59 60
60 61
61 62
62 63
63 64
64 65
65 66
66 67
67 68
68 69
69 70
70 71
71 72
72 73
73 74
74 75
75 76
76 77
77 78
78 79
79 80
80 81
81 82
82 83
83 84
84 85
85 86
86 87
87 88
88 89
89 90
90 91
91 92
92 93
93 94
94 95
95 96
96 97
97 98
98 99
99 100
100 101
101 102
102 103
103 104
104 105
105 106
106 107
107 108
108 109
109 110
110 111
111 112
112 113
113 114
114 115
115 116
116 117
117 118
118 119
119 120
120 121
121 122
122 123
123 124
124 125
125 126
126 127
127 128
128 129
129 130
130 131
131 132
132 133
133 134
134 135
135 136
136 137
137 138
138 139
139 140
140 141
141 142
142 143
143 144
144 145
145 146
146 147
147