2014 Citroen DS3 ESP
[x] Cancel search: ESPPage 170 of 376

Lateral airbags
System which protects the driver and front passenger in the event of a serious side impact
i
n order to limit the risk of injury to the chest,
b
etween the hip and the shoulder.
Each
lateral airbag is fitted in the seat backrest
f
rame, door side.
deployment Impact detection zones
A. Front impact zone.
B. S ide impact zone.
A
lateral
airbag
is
deployed
unilaterally
in
the
e
vent
of
a
serious
side
impact
applied
to
all
or
p
art
of
the
side
impact
zone
B, perpendicular
to
the
longitudinal
centreline
of
the
vehicle
on
a
h
orizontal
plane
and
directed
from
the
outside
t
owards
the
inside
of
the
vehicle.
The
lateral
airbag
inflates
between
the
hip
and
s
houlder of the front occupant of the vehicle
and
the
corresponding
door
trim
panel.
Page 171 of 376

169
DS3_en_Chap08_securite_ed01-2014
curtain airbags
System which contributes towards improving the protection of the driver and passengers
(
with the exception of the rear centre
p
assenger) in the event of a serious side
i
mpact in order to limit the risk of injury to the
s
ide of the head.
Each
curtain airbag is built into the pillars and
t
he upper passenger compartment area.
deployment
The curtain airbag is deployed at the same time as the corresponding lateral airbag in the
e
vent of a serious side impact applied to all or
p
art of the side impact zone B, perpendicular
to
the longitudinal centreline of the vehicle on a
h
orizontal plane and directed from the outside
t
owards the inside of the vehicle.
The
curtain airbag inflates between the front or
r
ear occupant of the vehicle and the windows.
Operating fault
In the event of a minor impact or bump on the side of the vehicle or if the
vehicle
rolls over, the airbag may not be
d
eployed.
In the event of a rear or front collision,
the
airbag is not deployed.
If
this warning lamp comes on in the
i
nstrument panel, accompanied by
a
n audible signal and a message
i
n the screen, contact a CITR
oË
N dealer
or
a
qualified workshop to have the system
c
hecked. The airbags may no longer be
d
eployed in the event of a serious impact.
Safety
Page 180 of 376

aR
b
G
НИКОГА НЕ инсталирайте детско столче на седалка с АКТИВИРАНА предна ВЪЗДУШНА ВЪЗГЛАВНИЦ А. Това може да причини С МЪРТ или СЕРИОЗНО НАРАНЯВАНЕ на детето.
CSNIKDY neumisťujte dětské zádržné zařízení orientované směrem dozadu na sedadlo chráněné AKTIVOVANÝM čelním AIRBAGEM. Hrozí nebezpečí SMRTI DÍTĚTE nebo VÁ ŽNÉHO ZR ANĚNÍ.
DaBrug ALDRIG en bagudvendt barnestol på et sæde, der er beskyttet af en AKTIV AIRBAG. BARNET risikerer at blive ALVORLIGT KVÆSTET eller DR ÆBT.
DEMontieren Sie auf einem Sitz mit AKTIVIERTEM Front-Airbag NIEMALS einen Kindersitz oder eine Babyschale entgegen der Fahr trichtung, das Kind könnte schwere oder sogar tödliche Verletzungen erleiden.
ELΜη χρησιμοποιείτε ΠΟΤΕ παιδικό κάθισμα με την πλάτη του προς το εμπρός μέρος του αυτοκινήτου, σε μια θέση που προστατεύεται από ΜΕΤΩΠΙΚΟ αερόσακο που είναι ΕΝΕΡΓΟΣ. Αυτό μπορεί να έχει σαν συνέπεια το ΘΑΝΑΤΟ ή το ΣΟΒΑΡΟ ΤΡΑΥΜΑΤΙΣΜΟ του ΠΑΙΔΙΟΥ
ENNEVER use a rear ward facing child restraint on a seat protected by an ACTIVE AIRBAG in front of it, DEATH or SERIOUS INJURY to the CHILD can occur
ESNO INSTALAR NUNCA un sistema de retención para niños de espaldas al sentido de la marcha en un asiento protegido mediante un AIRBAG frontal ACTIVADO, ya que podría causar lesiones GR AVES o incluso la MUERTE del niño.
ETÄrge MITTE KUNAGI paigaldage "seljaga sõidusuunas" lapseistet juhi kõr valistmele, mille ESITURVAPADI on AKTIVEERITUD. Tur vapadja avanemine võib last TÕSISELT või ELUOHTLIKULT vigastada.
FIÄLÄ KOSK A AN aseta lapsen tur vaistuinta selkä ajosuuntaan istuimelle, jonka edessä suojana on käyttöön aktivoitu TURVAT Y YNY. Sen laukeaminen voi aiheuttaa LAPSEN KUOLEMAN tai VAK AVAN LOUKK A ANTUMISEN.
FRNE JAMAIS installer de système de retenue pour enfants faisant face vers l’arrière sur un siège protégé par un COUSSIN GONFLABLE frontal ACTIVÉ.
Cela peut provoquer la M
oR
T de l’ENF
aN
T ou le b
L
ESSER GR
aV
EMENT
HRNIK ADA ne postavljati dječju sjedalicu leđima u smjeru vožnje na sjedalo zaštićeno UKLJUČENIM prednjim ZR AČNIM JASTUKOM. To bi moglo uzrokovati SMRT ili TEŠKU OZLJEDU djeteta.
HUSOHA ne használjon menetiránynak háttal beszerelt gyermekülést AKTIVÁLT (BEK APCSOLT) FRONTLÉGZSÁKK AL védett ülésen. Ez a gyermek HALÁLÁT vagy SÚLYOS SÉRÜLÉSÉT okozhatja.
ITNON installare MAI seggiolini per bambini posizionati in senso contrario a quello di marcia su un sedile protetto da un AIRBAG frontale ATTIVATO. Ciò potrebbe provocare la MORTE o FERITE GR AVI al bambino.
LTNIEK ADA neįrenkite vaiko prilaikymo priemonės su atgal atgręžtu vaiku ant sėdynės, kuri saugoma VEIKIANČIOS priekinės ORO PAGALVĖS. Išsiskleidus oro pagalvei vaikas gali būti MIRTINAI arba SUNKIAI TR AUMUOTAS.
DS3_en_Chap09_securite-enfants_ed01-2014
Page 196 of 376

DS3_en_Chap10_info-pratiques_ed01-2014
adblue® additive and SCR system
f
or
Blue
HDi Diesel engines
To assure respect for the environment and c
onformity with the new Euro 6 emissions
s
tandard, without adversely affecting the
p
er formance or fuel consumption of Diesel
e
ngines, CITROËN has taken the decision to
e
quip its vehicles with an effective system that
a
ssociates SCR (Selective Catalytic Reduction)
with
a particle filter (FAP) for the treatment of
e
xhaust gases.
Presentation of the ScR s ystem
Using an additive called AdBlue® containing u
rea, a catalytic converter turns up to
85% of
nitrous
oxides
(NOx)
into
nitrogen
a
nd
water,
which
are
harmless
to health and
t
he environment. The
a d
blu
e
® additive is held in a special
tank
located
under the boot at the rear of
t
he
vehicle.
It has a capacity of 17 litres: this
p
rovides
a
driving range of about 12 500 miles
(
20
000
km),
after which an alert is triggered
w
arning
you
when the reserve remaining is
e
nough
for
just 1 500 miles (2 400 km).
During
each
scheduled service of your vehicle
b
y
a
CITROËN dealer or a qualified workshop,
t
he
a
d
blu
e
® additive tank is refilled in order to a
llow
normal operation of the SCR system.
If
the
estimated mileage between two services
i
s
greater
than 12 500 miles (20 000 km), we
r
ecommend
that you go to a CITROËN dealer
o
r
a
qualified workshop to have the necessary
t
op-up
carried out.
on
ce the a
dbl
ue
® tank is empty, a
system
required
by regulations
p
revents
starting
of the engine.
If the SCR
is faulty, the level of
emissions
from
your vehicle will no
l
onger
meet
the
Euro 6 standard: you
v
ehicle
becomes
polluting.
In
the
event
of
a
confirmed fault
w
ith
the
SCR
system, you must go
t
o a CITR
oË
N dealer or a qualified
workshop
as
soon as possible: after
a
running
distance of 650 miles
(
1 100
km),
a
system will be triggered
a
utomatically
to
prevent engine
s
tarting.
Page 222 of 376

DS3_en_Chap10_info-pratiques_ed01-2014
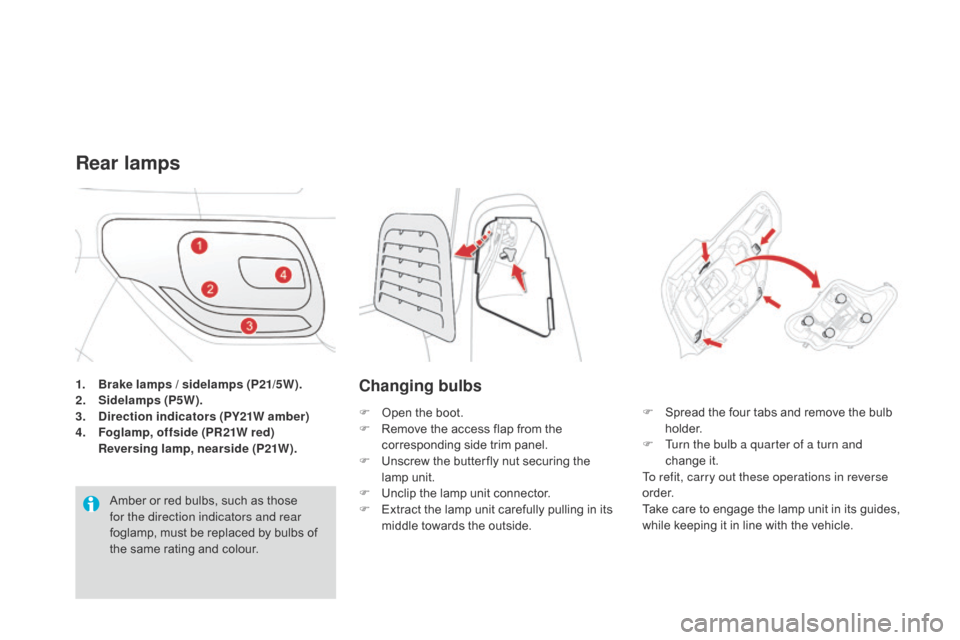
1. Brake lamps / sidelamps (P21/5W).
2. Sidelamps (P5W).
3.
di
rection indicators (PY21W amber)
4.
F
oglamp, offside (PR21W red)
R
eversing lamp, nearside (P21W).
Rear lamps
Amber or red bulbs, such as those for the direction indicators and rear
foglamp,
must be replaced by bulbs of
t
he same rating and colour.
changing bulbs
F Open the boot.
F R emove the access flap from the
c
orresponding side trim panel.
F
U
nscrew the butter fly nut securing the
lam
p
u
nit.
F
U
nclip the lamp unit connector.
F
E
xtract the lamp unit carefully pulling in its
m
iddle towards the outside. F
S pread the four tabs and remove the bulb h
o l d e r.
F
T
urn the bulb a quarter of a turn and
change
it
.
To refit, carry out these operations in reverse
o r d e r.
Take
care to engage the lamp unit in its guides,
w
hile keeping it in line with the vehicle.
Page 223 of 376

221
DS3_en_Chap10_info-pratiques_ed01-2014
changing direction indicator (4)
and foglamp or reversing
lamp
(5) bulbs
F Turn the bulb a quarter turn and change it.
changing LEd sidelamps and
brake lamps (LEds )
For the replacement of this type of LED lamp, c
ontact a CITRoË N dealer or a qualified
workshop.
3d rear lamps
Access to the bulbs
F Open the boot.
F R emove the access flap from the
c
orresponding side trim panel.
F
U
nscrew the butter fly nut securing the
lam
p
u
nit.
F
U
nclip the lamp unit connector.
F
E
xtract the lamp unit carefully pulling it in
l
ine towards the outside.
To
refit, carry out these operations in reverse order.
Take
care to engage the lamp unit in its guides,
w
hile keeping it in line with the vehicle.
1.
3
d
L
E
d
s
idelamps (LE
d
s).
2. L
Ed
brake lamps / sidelamps (LEds
).
3. L
E
d la
teral sidelamps (LE
d
s).
4.
di
rection indicators (PY21W amber)
5.
F
oglamp, offside (H21W red)
R
eversing lamp, nearside (H21W).
Amber
or
red
bulbs,
such
as
those
f
or the direction indicators and rear
foglamp,
must
be
replaced
by
bulbs
of
t
he
same
rating
and
colour.
Practical information
Page 226 of 376

DS3_en_Chap10_info-pratiques_ed01-2014
Changing a fuse
Installing electrical
accessories
Your vehicle's electrical system is designed to operate with standard or
o
ptional
e
quipment.
Before
installing other electrical
e
quipment or accessories on your
v
ehicle, contact a CITR
oË
N dealer or a
qualified
w
orkshop.
CITR
oË
N will not accept responsibility
for
the cost incurred in repairing your
v
ehicle or for rectifying malfunctions
r
esulting from the installation of
a
ccessories not supplied and not
recommended
by CITROËN and
n
ot installed in accordance with its
instructions, in particular when the
combined
consumption of all of the
a
dditional equipment connected
e
xceeds
1
0
mil
liamperes.
The
extraction
tweezer
and
the
spare
fuse
l
ocations
are
on
the
back
of
the
dashboard
f
usebox
cover.
For
access
to
them:
F
u
nclip
the
cover
by
pulling
on
the
side,
F
r
emove
the
cover
completely,
F
r
emove
the
tweezer.
Access to the tools
Before changing a fuse, the cause of the failure m ust be identified and rectified.
F
I
dentify the faulty fuse by checking the
c
ondition of its filament.
changing a fuse
Good Failed
F
U
se
the special tweezer to extract the fuse
f
rom
its housing.
F
a
l
ways replace the failed fuse with a fuse
of
the same rating.
F
C
heck that the number marked on the
b
ox,
the rating marked on the fuse and the
t
ables below all agree.
Page 229 of 376

227
DS3_en_Chap10_info-pratiques_ed01-2014
Engine compartment
fusebox
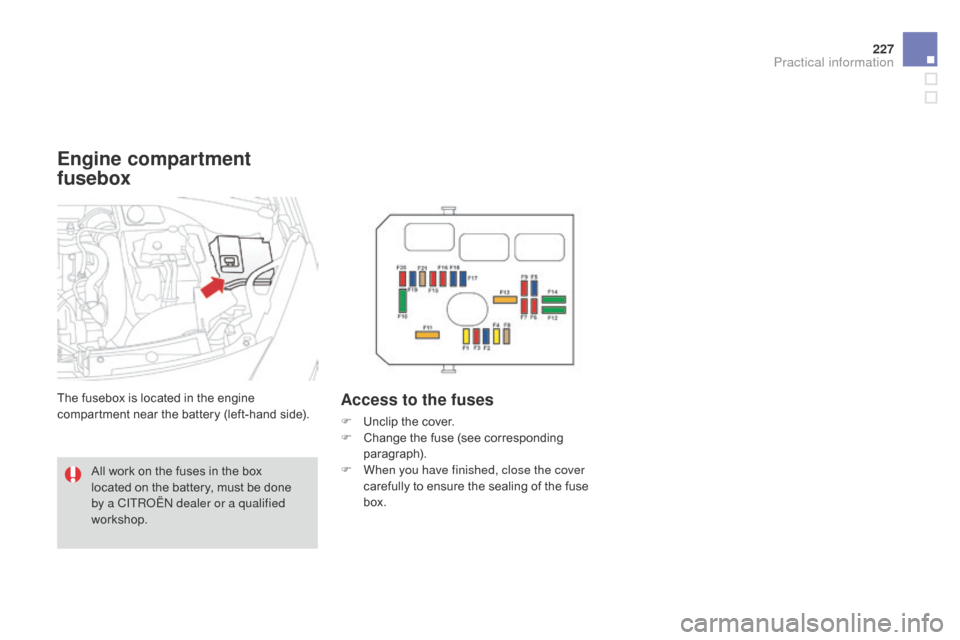
The fusebox is located in the engine compartment near the battery (left-hand side).Access to the fuses
F Unclip the cover.
F C hange the fuse (see corresponding
par
agraph).
F
W
hen you have finished, close the cover
carefully
to ensure the sealing of the fuse
b
ox.
All
work
on
the
fuses
in
the
box
l
ocated
on
the
battery,
must
be
done
b
y a CITR
oË
N dealer or a qualified
workshop.
Practical information