2014 Citroen C3 PICASSO ESP
[x] Cancel search: ESPPage 13 of 292

11
C3Picasso_en_Chap01_controle-de-marche_ed01-2014
Indicator and warning lamps
Visual indicators informing the driver that a system is in operation (operation or deactivation indicator lamps) or of the occurrence of a fault (warning
lamp).
Associated warnings
The illumination of certain warning lamps may
be accompanied by an audible signal and a
message in the multifunction screen.
The warning lamps may come on continuously
(fixed) or flash.
When the ignition is switched on
Certain warning lamps come on for a few
seconds when the vehicle's ignition is switched
on.
When the engine is started, these same
warning lamps should go off.
If they remain on, before moving off, refer to the
information on the warning lamp concerned.Certain warning lamps may come on
in one of two different modes. Only by
relating the type of illumination to the
operating status of the vehicle can it
be ascertained whether the situation is
normal or whether a fault has occurred.
Operation indicator lamps
If one of the following indicator lamps comes on, this confirms that the corresponding system has come into operation.
Warning
/indicator lampis on Cause Action / Observations
Left-hand
direction indicatorflashing with buzzer.The lighting stalk is pushed down.
Right-hand
direction indicatorflashing with buzzer.The lighting stalk is pushed up.
Sidelamps fixed. The lighting stalk is in the
"Sidelamps" position.
Dipped beam
headlamps fixed.
The lighting stalk is in the "
di
pped
beam headlamps" position.
Main beam
headlamps fixed.
The lighting stalk is pulled towards you. Pull the stalk to return to dipped beam headlamps.
1
Monitoring
Page 14 of 292

12
C3Picasso_en_Chap01_controle-de-marche_ed01-2014
Warning/indicator lampis on Cause Action / Observations
Front foglamps fixed. The front foglamps are switched on
using the ring on the lighting control
stalk. Turn the ring on the lighting control stalk rear wards
twice to switch off the front foglamps.
Rear foglamps fixed. The rear foglamps are switched on. Turn the ring on the stalk rear wards to switch off the
rear foglamps.
Diesel engine
pre-heating fixed.
The ignition switch is at the
2nd
position (ignition on).
Wait until the warning lamp has switched off before starting.
The duration for which the warning lamp is on is determined
by the climatic conditions.
Parking brakefixed. The parking brake is applied or not
properly released. Release the parking brake to switch off the warning
lamp, keeping your foot on the brake pedal.
ob
serve the safety recommendations.
For more information on the parking brake, refer to the
corresponding section.
Engine coolant
temperature fixed blue
on s
tarting the engine, it indicates
that the engine is cold. After a few minutes driving, it swiches off to indicate
that the engine temperature is normal.
In order to protect your engine, avoid driving too hard
until the warning lamp has switched off.
Stop & Star t fixed. When the vehicle stops (red lights,
traffic jams,...) the Stop & Start system
has put the engine into ST
oP m
ode.The warning lamp goes off and the engine restarts
automatically in START mode, as soon as you want to
move off.
flashes for a few
seconds, then goes
of f. ST
oP m
ode is temporarily
unavailable.
or
ST
aR
T mode is invoked
automatically. For more information on special cases with STOP
mode and ST
aR
T mode, refer to the "Stop & Start"
section.
Monitoring
Page 16 of 292

14
C3Picasso_en_Chap01_controle-de-marche_ed01-2014
Deactivation indicator lamps
If one of the following indicator lamps comes on, this confirms that the corresponding system has been switched off intentionally.
This is may be accompanied by an audible signal and a message on the multifunction screen.Warning /indicator lampis on Cause Action / Observations
Passenger's
airbag system fixed.
The control switch, located at the
passenger's end of the dashboard, is
set to the "OFF" position.
The passenger's front airbag is
deactivated.
In this case you can install a "rear
facing" child seat. Set the control switch to the "ON"
position to activate
the passenger's front airbag. In this case, do not fit a
child seat in the rear-facing position.
Dynamic
stability control
DSC/ASR fixed.
The button, located in the middle
of the dashboard, is pressed. Its
indicator lamp is on.
The
d
S
C/
aS
R is deactivated.
dSC
: dynamic stability control.
aS
R: anti-skid regulation.Press the button to activate the
d
S
C/
aS
R. Its
indicator lamp switches off.
The DSC/ASR system is activated automatically when
the vehicle is started.
If deactivated, the system is reactivated automatically
from approximately 30 mph (50 km/h).
Monitoring
Page 18 of 292

16
C3Picasso_en_Chap01_controle-de-marche_ed01-2014
Warning/indicator lampis on Cause Action / Observations
Anti-lock
Braking System
(ABS) fixed.
The anti-lock braking system has a
fault. The vehicle retains conventional braking.
dr
ive carefully at reduced speed and contact a
CITROËN dealer or a qualified workshop without
d e l ay.
Electronic
stability
programme
(ESP/ASR) flashing.
The ESP/
aS
R regulation is operating. The system optimises traction and improves the directional stability of the vehicle.
fixed. Unless it has been deactivated
(button pressed and its indicator lamp
on) the ESP/
aS
R system has a fault.Have it checked by a CITR
oËn
or a qualified
workshop.
Engine
autodiagnosis
system flashing.
The engine management system has
a fault. Risk of destruction of the catalytic converter.
Have it checked by a CITR
oËn
dealer or a qualified
workshop.
fixed. The emission control system has a
fault.
The warning lamp should go off when the engine is started.
If it does not go off, contact a CITRoËn
dealer or qualified
workshop without delay.
Braking fixed, associated with
the STOP warning
lamp. The braking system fluid level is too
low.
You must stop as soon as it is safe to do so.
Top up with brake fluid recommended by CITROËN.
If the problem persists, have the system checked by a
CITROËN dealer or a qualified workshop.
+ fixed, associated with
the ST
oP a
nd ab
S
w
arning lamp. The electronic brake force distribution
(E
bFd) s
ystem has a fault.You must stop as soon as it is safe to do so.
Have it checked by a CITR
oËn
dealer or a qualified
workshop.
Monitoring
Page 29 of 292

27
C3Picasso_en_Chap02_ecran-multifonction_ed01-2014
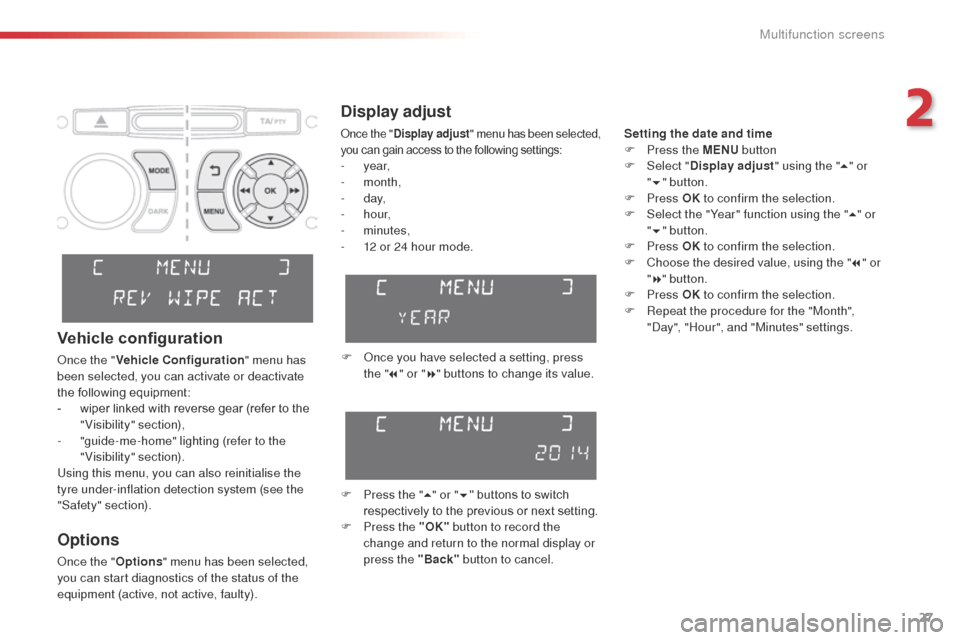
Display adjust
Setting the date and time
F P ress the MENU button
F
Sel
ect "Display adjust " using the "5" or
" 6 "
button.
F
Press OK to confirm the selection.
F
S
elect the "Year" function using the " 5" or
" 6 " button.
F
Press OK to confirm the selection.
F
C
hoose the desired value, using the " 7" or
" 8 " button.
F
Press OK to confirm the selection.
F
R
epeat the procedure for the "Month",
"
da
y", "Hour", and "Minutes" settings.
F
o
n
ce you have selected a setting, press
the " 7" or " 8" buttons to change its value.
F
P
ress the " 5" or " 6" buttons to switch
respectively to the previous or next setting.
F
P
ress the "OK" button to record the
change and return to the normal display or
press the "Back" button to cancel.
Options
once the "Options" menu has been selected,
you can start diagnostics of the status of the
equipment (active, not active, faulty).
Vehicle configuration
once the " Vehicle Configuration " menu has
been selected, you can activate or deactivate
the following equipment:
-
w
iper linked with reverse gear (refer to the
"Visibility" section),
-
"
guide-me-home" lighting (refer to the
"Visibility" section).
Using this menu, you can also reinitialise the
tyre under-inflation detection system (see the
"Safety" section).
once the " Display adjust " menu has been selected,
you can gain access to the following settings:
- year,
- month,
-
d ay,
-
h o u r,
-
minutes,
-
1
2 or 24 hour mode.
2
Multifunction screens
Page 47 of 292

45
C3Picasso_en_Chap03_confort_ed01-2014
The air conditioning only operates when the engine is running.The driver and front passenger can
each adjust the temperature to their
requirements.
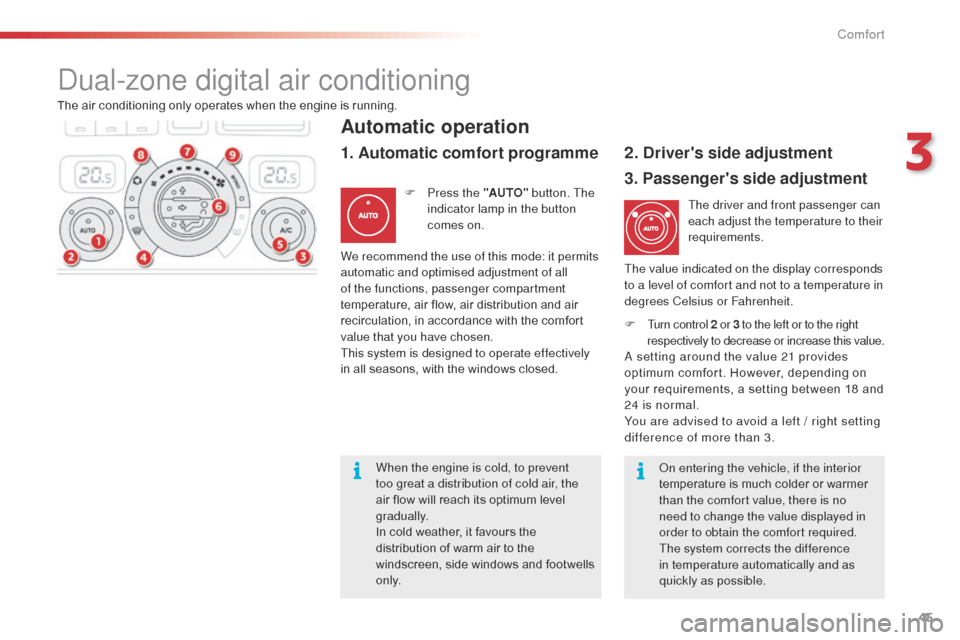
F
T
urn control 2 or 3 to the left or to the right
respectively to decrease or increase this value.
a
setting around the value 21 provides
optimum comfort. However, depending on
your requirements, a setting between 18 and
24 is normal.
You are advised to avoid a left / right setting
difference of more than 3.
Automatic operation
F Press the "AUTO" button. The
indicator lamp in the button
comes on.
2. Driver's side adjustment
dual-zone digital air conditioning
We recommend the use of this mode: it permits
automatic and optimised adjustment of all
of the functions, passenger compartment
temperature, air flow, air distribution and air
recirculation, in accordance with the comfort
value that you have chosen.
This system is designed to operate effectively
in all seasons, with the windows closed. The value indicated on the display corresponds
to a level of comfort and not to a temperature in
degrees Celsius or Fahrenheit.
1. Automatic comfort programme
3. Passenger's side adjustment
on entering the vehicle, if the interior
temperature is much colder or warmer
than the comfort value, there is no
need to change the value displayed in
order to obtain the comfort required.
The system corrects the difference
in temperature automatically and as
quickly as possible.
When the engine is cold, to prevent
too great a distribution of cold air, the
air flow will reach its optimum level
gradually.
In cold weather, it favours the
distribution of warm air to the
windscreen, side windows and footwells
o n l y.
3
Comfort
Page 55 of 292

53
C3Picasso_en_Chap03_confort_ed01-2014
Fully-folded position
F Move the corresponding front seat for ward if necessary.
F
P
ut the rear seat in the fully back position.
F
P
lace the head restraints in the low
position.
F
P
ull control A , to release the seat back
which folds easily onto the seat cushion.
The seat fits into the floor, providing a
continuous level floor.
To put the seat back in position:
F
P
ull the seat back backwards until it locks
in place.
F
R
eturn the seat cushion to the desired
position. When putting back in position, take care
not to jam the seat belts.
3
Comfort
Page 56 of 292

54
C3Picasso_en_Chap03_confort_ed01-2014
Mirrors
The mirror glass is electrically adjustable.a lamp located under the mirror shell provides
lighting for the driver's and front passenger's
entry and exit.
This exterior lighting comes on when the
vehicle is unlocked or a door is opened and
stays on for a timed period.
Folding
F From outside: lock the vehicle using the remote control or the key.
F
F
rom inside: with the ignition on, pull the
control A in the central position rear wards.
Unfolding
F From outside: unlock the vehicle using the remote control or the key.
F
F
rom inside: with the ignition on, pull the
control A in the central position rear wards.
Adjustment
F Move control A to the right or to the left to select the corresponding mirror.
F
M
ove control B in all four directions to
adjust.
F
R
eturn control A to the central position. If the mirrors are folded using control A
,
they will not unfold when the vehicle is
unlocked. Pull again on control A .
The folding and unfolding of the door
mirrors using the remote control can be
deactivated by a CITR
oËn
dealer or a
qualified workshop.
ne
ver fold or unfold the electric folding
mirrors manually.
The objects observed are, in reality,
closer than they appear.
Take this into account in order to
correctly judge the distance of vehicles
approaching from behind.
Door mirrors
Comfort