Page 122 of 522
EVIC
Message�EVIC
Message
Display
Time�Odometer
Message
(<5mph
[8 km/h])��Odometer
Message
Display
Time��Odometer
Message
(>5mph
[8 km/h])��Odometer
Message
Display
Time��ChimeConditionOperator
Action
Required
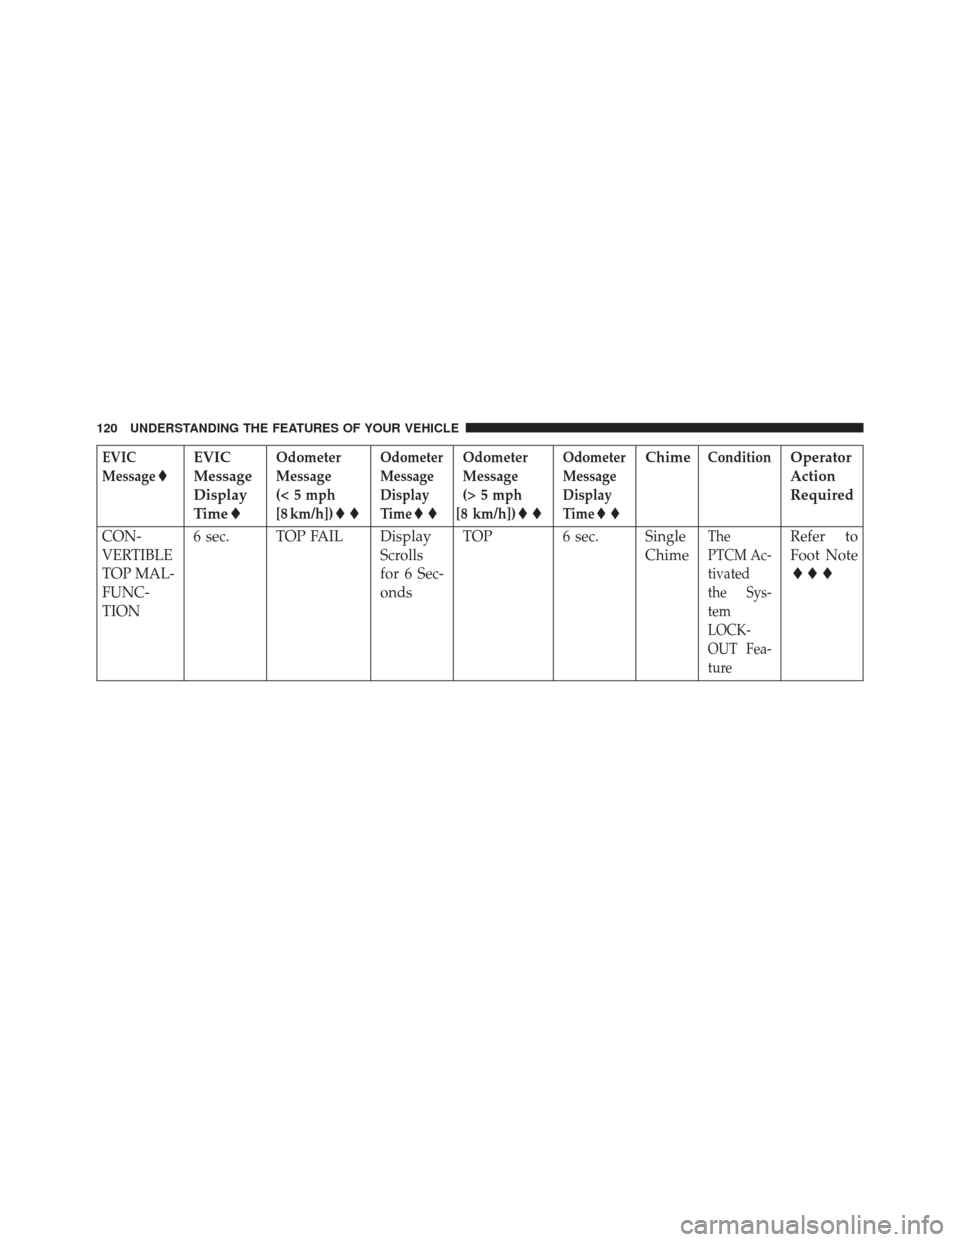
CON-
VERTIBLE
TOP MAL-
FUNC-
TION 6 sec. TOP FAIL Display
Scrolls
for 6 Sec-
ondsTOP 6 sec. Single
Chime
The
PTCM Ac-
tivated
the Sys-
tem
LOCK-
OUT Fea-
tureRefer to
Foot Note
���
120 UNDERSTANDING THE FEATURES OF YOUR VEHICLE
Page 123 of 522
![CHRYSLER 200 CONVERTIBLE 2014 1.G Owners Manual EVIC
Message�EVIC
Message
Display
Time�Odometer
Message
(<5mph
[8 km/h])��Odometer
Message
Display
Time��Odometer
Message
(>5mph
[8 km/h])��Odometer
Message
Display
Time��ChimeConditionOperator
Action](/manual-img/25/8450/w960_8450-122.png "CHRYSLER 200 CONVERTIBLE 2014 1.G Owners Manual EVIC
Message�EVIC
Message
Display
Time�Odometer
Message
(<5mph
[8 km/h])��Odometer
Message
Display
Time��Odometer
Message
(>5mph
[8 km/h])��Odometer
Message
Display
Time��ChimeConditionOperator
Action")
EVIC
Message�EVIC
Message
Display
Time�Odometer
Message
(<5mph
[8 km/h])��Odometer
Message
Display
Time��Odometer
Message
(>5mph
[8 km/h])��Odometer
Message
Display
Time��ChimeConditionOperator
Action
Required
CON-
VERTIBLE
TOP MAL-
FUNC-
TION Until
Fault is
No Lon-
ger De-
tected or
RepairedTOP FAIL
Display
Scrolls un-
til Fault is
No Lon-
ger De-
tected or
RepairedTOPDisplay
Flashes
until Fault
is No Lon-
ger De-
tected or
RepairedSingle
ChimeThe
PTCM Ac-
tivated
the Sys-
tem
LOCK-
OUT Fea-
tureSee your
autho-
rized
dealer for
service
� If so equipped.
�� For vehicles not equipped with the EVIC.
���
The PTCM will lockout the power convertible top system if the vehicle charging system is malfunctioning, or the
battery is run down, or the hydraulic pump is overheating. In addition, the system prohibits lowering the top when
ambient temperature is at 0°F (-18°C) or lower and raising the top when ambient temperature is below -40°F (-40°C).
3
UNDERSTANDING THE FEATURES OF YOUR VEHICLE 121
Page 132 of 522

laws, including laws regarding phone use. Your at-
tention should be focused on safely operating the
vehicle. Failure to do so may result in a collision
causing serious injury or d")
WARNING!(Continued)
laws, including laws regarding phone use. Your at-
tention should be focused on safely operating the
vehicle. Failure to do so may result in a collision
causing serious injury or death.
Uconnect® Phone Button The radio or steering wheel controls (if
equipped) will contain the two control buttons
(Uconnect® Phone
button and Voice Com-
mand
button) that will enable you to
access the system. When you press the button you will
hear the word Uconnect® followed by a BEEP. The beep
is your signal to give a command. Voice Command Button
Actual button location may vary with the ra-
dio. The individual buttons are described in the
“Operation” section.
The Uconnect® Phone can be used with any Hands-Free
Profile certified Bluetooth® mobile phone. See the
Uconnect® website for supported phones. Refer to your
mobile service provider or the phone manufacturer for
details.
The Uconnect® Phone is fully integrated with the vehi-
cle’s audio system. The volume of the Uconnect® Phone
can be adjusted either from the radio volume control
knob or from the steering wheel radio control (right
switch), if so equipped.
The radio display will be used for visual prompts from
the Uconnect® Phone such as “CELL” or caller ID on
certain radios.
130 UNDERSTANDING THE FEATURES OF YOUR VEHICLE
Page 135 of 522

•For identification purposes, you will be prompted to
give the Uconnect® Phone a name for your mobile
phone. Each mobile phone that is paired should be
given a unique phone name.
• You will then be asked to give your mobile phone a
priority level between one and seven, with one being
the highest priority. You can pair up to seven mobile
phones to your Uconnect® Phone. However, at any
given time, only one mobile phone can be in use,
connected to your Uconnect® System. The priority
allows the Uconnect® Phone to know which mobile
phone to use if multiple mobile phones are in the
vehicle at the same time. For example, if priority three
and priority five phones are present in the vehicle, the
Uconnect® Phone will use the priority three mobile
phone when you make a call. You can select to use a
lower priority mobile phone at any time (refer to
“Advanced Phone Connectivity” in this section).Dial By Saying A Number
• Press thebutton to begin.
• After the “Ready” prompt and the following beep, say
“Dial.”
• The system will prompt you to say the number you
want to call.
• For example, you can say “151-1234 -5555.”
• The Uconnect® Phone will confirm the phone number
and then dial. The number will appear in the display
of certain radios.
Call By Saying A Name
• Press thebutton to begin.
• After the “Ready” prompt and the following beep, say
“Call.”
3
UNDERSTANDING THE FEATURES OF YOUR VEHICLE 133
Page 136 of 522

•The system will prompt you to say the name of the
person you want to call.
• After the “Ready” prompt and the following beep, say
the name of the person you want to call. For example,
you can say “John Doe,” where John Doe is a previ-
ously stored name entry in the Uconnect® phonebook
or downloaded phonebook. To learn how to store a
name in the phonebook, refer to “Add Names to Your
Uconnect® Phonebook.”
• The Uconnect® system will confirm the name and then
dial the corresponding phone number, which may
appear in the display of certain radios.
Phonebook Download – Automatic Phonebook
Transfer From Mobile Phone
If equipped and specifically supported by your phone,
Uconnect® Phone automatically downloads names (text
names) and number entries from your mobile phone’s phonebook. Specific Bluetooth® Phones with Phone
Book Access Profile may support this feature. See
Uconnect® website for supported phones.
•
To call a name from the Uconnect® Phonebook or
downloaded Phonebook, follow the procedure in “Call
by Saying a Name” section.
• Automatic download and update, if supported, begins
as soon as the Bluetooth® wireless phone connection is
made to the Uconnect® Phone, for example, after you
start the vehicle.
• A maximum of 1000 entries per phone will be down-
loaded and updated every time a phone is connected
to the Uconnect® Phone.
• Depending on the maximum number of entries down-
loaded, there may be a short delay before the latest
134 UNDERSTANDING THE FEATURES OF YOUR VEHICLE
Page 147 of 522

•Some paging and voice mail systems have system time
out settings that are too short and may not allow the
use of this feature.
Barge In — Overriding Prompts
The “Voice Command” button can be used when you
wish to skip part of a prompt and issue your voice
command immediately. For example, if a prompt is
asking “Would you like to pair a phone, clear a...,” you
could press the
button and say, “Pair a Phone” to
select that option without having to listen to the rest of
the voice prompt.
Turning Confirmation Prompts ON/OFF
Turning confirmation prompts off will stop the system
from confirming your choices (e.g., the Uconnect® Phone
will not repeat a phone number before you dial it).
• Press the
button to begin. •
After the “Ready” prompt and the following beep, say
one of the following:
– “Setup Confirmation Prompts On”
– “Setup Confirmation Prompts Off”
Phone And Network Status Indicators
If available on the radio and/or on a premium display
such as the instrument panel cluster, and supported by
your mobile phone, the Uconnect® Phone will provide
notification to inform you of your phone and network
status when you are attempting to make a phone call
using Uconnect® Phone. The status is given for network
signal strength, phone battery strength, etc.
Dialing Using The Mobile Phone Keypad
You can dial a phone number with your mobile phone
keypad and still use the Uconnect® Phone (while dialing
via the mobile phone keypad, the user must exercise
caution and take precautionary safety measures). By
3
UNDERSTANDING THE FEATURES OF YOUR VEHICLE 145
Page 215 of 522
UNDERSTANDING YOUR INSTRUMENT PANEL
CONTENTS
�INSTRUMENT PANEL FEATURES ..........216
� INSTRUMENT CLUSTER .................217
� INSTRUMENT CLUSTER DESCRIPTIONS .....218
� MINI-TRIP COMPUTER — IF EQUIPPED .....233
▫ Control Buttons ...................... .233
� ELECTRONIC VEHICLE INFORMATION CENTER
(EVIC) — IF EQUIPPED ..................235
▫ Electronic Vehicle Information Center (EVIC)
Displays ........................... .237
▫ Oil Change Required — If Equipped .......238▫
EVIC Main Menu .....................239
▫ Compass Display .....................239
▫ Average Fuel Economy ..................242
▫ Distance To Empty (DTE) ................242
▫ TirePSI............................ .243
▫ Elapsed Time ....................... .243
▫ EVIC Units Selection (UNITS IN Display) . . . .244
▫ System Status ....................... .244
▫ Personal Settings (Customer-Programmable
Features) .......................... .244
4
Page 224 of 522

off unless the parking brake is applied or a brake fault is
detected. If the light does not illuminate, have the light
inspected by an authorized dealer.
The light also will turn on when the parking brake is
applied with the ignition switch in the ON/RUN posi-
tion.
NOTE:This light shows only that the parking brake is
applied. It does not show the degree of brake application.
12. Tachometer
The silver area of the scale shows the permissible engine
revolutions-per-minute (RPM x 1000) for each gear range.
Before reaching the red area, ease up on the accelerator to
prevent engine damage.
13. Shift Lever Indicator
The Shift Lever Indicator is self-contained within the
instrument cluster. It displays the gear position of the
automatic transmission. NOTE:
You must apply the brakes before shifting from
PARK.
14. Odometer / Trip Odometer Display Area
The odometer display shows the total distance the ve-
hicle has been driven.
U.S. Federal regulations require that upon transfer of
vehicle ownership, the seller certify to the purchaser the
correct mileage that the vehicle has been driven. If your
odometer needs to be repaired or serviced, the repair
technician should leave the odometer reading the same
as it was before the repair or service. If s/he cannot do so,
then the odometer must be set at zero, and a sticker must
be placed in the door jamb stating what the mileage was
before the repair or service. It is a good idea for you to
make a record of the odometer reading before the repair/
service, so that you can be sure that it is properly reset, or
that the door jamb sticker is accurate if the odometer
must be reset at zero.
222 UNDERSTANDING YOUR INSTRUMENT PANEL