2014 CHEVROLET SILVERADO change wheel
[x] Cancel search: change wheelPage 349 of 546
Black plate (81,1)Chevrolet Silverado Owner Manual (GMNA-Localizing-U.S./Canada/Mexico-
5853506) - 2014 - crc 2nd - 5/15/13
Driving and Operating 9-81
{Caution
Pulling a trailer improperly can
damage the vehicle and result in
costly repairs not covered by the
vehicle warranty. To pull a trailer
correctly, follow the advice in this
section and see your dealer for
important information about
towing a trailer with the vehicle.
To identify the trailering capacity of
the vehicle, read the information in
“Weight of the Trailer” later in this
section.
Trailering is different than just
driving the vehicle by itself.
Trailering means changes in
handling, acceleration, braking,
durability, and fuel economy.
Successful, safe trailering takes
correct equipment, and it has to be
used properly.
The following information has many
time-tested, important trailering tips
and safety rules. Many of these are important for your safety and that of
your passengers. Read this section
carefully before pulling a trailer.
Weight of the Trailer
How heavy can a trailer safely be?
It depends on how the rig is used.
Speed, altitude, road grades,
outside temperature, and how much
the vehicle is used to pull a trailer
are all important. It can depend on
any special equipment on the
vehicle, and the amount of tongue
weight the vehicle can carry. See
“Weight of the Trailer Tongue”
later
in this section for more information.
Trailer weight rating (TWR) is
calculated assuming the tow vehicle
has only the driver but all required
trailering equipment. Weight of
additional optional equipment,
passengers, and cargo in the tow
vehicle must be subtracted from the
trailer weight rating. For kingpin weight and trailer
tongue weight information, see
“Weight of the Trailer Tongue”
later
in this section.
Use the following chart to determine
how much the vehicle can weigh,
based upon the vehicle model and
options.
Weights listed apply for
conventional trailers and fifth-wheel
trailers unless otherwise noted.
Page 367 of 546
Black plate (99,1)Chevrolet Silverado Owner Manual (GMNA-Localizing-U.S./Canada/Mexico-
5853506) - 2014 - crc 2nd - 5/15/13
Driving and Operating 9-99
.A trailer with electric brakes has
become disconnected (a
CHECK TRAILER WIRING
message will also display on
the DIC).
.There is a fault present in the
wiring to the trailer brakes (a
CHECK TRAILER WIRING
message will also display on
the DIC).
.The ITBC system is not working
due to a fault (a SERVICE
TRAILER BRAKE SYSTEM
message will also display in
the DIC).
Manual Trailer Brake Apply
The Manual Trailer Brake Apply
Lever is used to apply the trailer ’s
electric brakes independent of the
vehicle’s brakes. Sliding the lever to
the left will apply only the trailer
brakes. Use this lever to adjust
Trailer Gain to properly adjust the
power output to the trailer brakes. The trailer's and the vehicle's brake
lamps will come on when either
vehicle brakes or manual trailer
brakes are applied.
Trailer Gain Adjustment Procedure
Trailer Gain should be set for a
specific trailering condition and must
be adjusted any time vehicle
loading, trailer loading, or road
surface conditions change.
{Warning
Trailer brakes that are
over-gained or under-gained may
not stop the vehicle and the trailer
as intended and can result in a
crash. Always follow the
instructions to set the Trailer Gain
for the proper trailer stopping
performance.
Use the following to adjust Trailer
Gain for each towing condition:
1. Drive the vehicle with the trailer
attached on a level road surface
representative of the towing
condition and free of traffic at
about 32 to 40 km/h (20 to
25 mph) and fully apply the
Manual Trailer Brake Apply
Lever.
Adjusting Trailer Gain at speeds
lower than 32 to 40 km/h (20 to
25 mph) may result in an
incorrect gain setting.
2. Adjust the Trailer Gain, using the Trailer Gain Adjustment Buttons,
to just below the point of trailer
wheel lock-up, indicated by
trailer wheel squeal or tire
smoke when a trailer wheel
locks.
Trailer wheel lock-up may not
occur if towing a heavily loaded
trailer. In this case, adjust the
Trailer Gain to the highest
allowable setting for the towing
condition.
Page 368 of 546
Black plate (100,1)Chevrolet Silverado Owner Manual (GMNA-Localizing-U.S./Canada/Mexico-
5853506) - 2014 - crc 2nd - 5/15/13
9-100 Driving and Operating
3. Readjust Trailer Gain any timevehicle loading, trailer loading,
or road surface conditions
change or if trailer wheel lock-up
is noticed at any time while
towing.
Other ITBC-Related DIC Messages
In addition to displaying TRAILER
GAIN and OUTPUT through the
DIC, trailer connection and ITBC
system status are displayed on
the DIC.
TRAILER CONNECTED: This
message will briefly display when a
trailer with electric brakes is first
connected to the vehicle. This
message will automatically turn off
in about 10 seconds. This message
can be acknowledged before it
automatically turns off. CHECK TRAILER WIRING: This
message will display if:
1. The ITBC system first
determines connection to a
trailer with electric brakes and
then the trailer harness becomes
disconnected from the vehicle.
If the disconnect occurs while
the vehicle is stationary, this
message will automatically turn
off in about 30 seconds. This
message will also turn off if it is
acknowledged or if the trailer
harness is reconnected.
If the disconnect occurs while
the vehicle is moving, this
message will continue until the
ignition is turned off. This
message will also turn off if it is
acknowledged or if the trailer
harness is reconnected.
2. There is an electrical fault in the wiring to the trailer brakes. This
message will continue as long
as there is an electrical fault in the trailer wiring. This message
will also turn off if it is
acknowledged.
To determine if the electrical fault is
on the vehicle side or trailer side of
the trailer wiring harness
connection:
1. Disconnect the trailer wiring harness from the vehicle.
2. Turn the ignition off.
3. Wait 10 seconds, then turn the ignition back to RUN.
4. If the CHECK TRAILER WIRING message reappears, the
electrical fault is on the
vehicle side.
If the CHECK TRAILER WIRING
message only reappears when
connecting the trailer wiring
harness to the vehicle, the
electrical fault is on the
trailer side.
Page 403 of 546
Black plate (29,1)Chevrolet Silverado Owner Manual (GMNA-Localizing-U.S./Canada/Mexico-
5853506) - 2014 - crc 2nd - 5/15/13
Vehicle Care 10-29
Brakes
This vehicle has front and rear disc
brakes.
Disc brake pads have built-in wear
indicators that make a high-pitched
warning sound when the brake pads
are worn and new pads are needed.
The sound can come and go or be
heard all the time the vehicle is
moving, except when applying the
brake pedal firmly.
{Warning
The brake wear warning sound
means that soon the brakes will
not work well. That could lead to
a crash. When the brake wear
warning sound is heard, have the
vehicle serviced.
{Caution
Continuing to drive with worn-out
brake pads could result in costly
brake repair.
Some driving conditions or climates
can cause a brake squeal when the
brakes are first applied or lightly
applied. This does not mean
something is wrong with the brakes.
Properly torqued wheel nuts are
necessary to help prevent brake
pulsation. When tires are rotated,
inspect brake pads for wear and
evenly tighten wheel nuts in the
proper sequence to torque
specifications in Capacities and
Specifications on page 12-2.
Brake linings should always be
replaced as complete axle sets.
Brake Pedal Travel
See your dealer if the brake pedal
does not return to normal height,
or if there is a rapid increase in pedal travel. This could be a sign
that brake service might be
required.
Brake Adjustment
Every time the brakes are applied,
with or without the vehicle moving,
the brakes adjust for wear.
Replacing Brake System Parts
The braking system on a vehicle is
complex. Its many parts have to be
of top quality and work well together
if the vehicle is to have really good
braking. The vehicle was designed
and tested with top-quality brake
parts. When parts of the braking
system are replaced, be sure to get
new, approved replacement parts.
If this is not done, the brakes might
not work properly. For example,
installing disc brake pads that are
wrong for the vehicle, can change
the balance between the front and
rear brakes
—for the worse. The
braking performance expected can
Page 429 of 546
Black plate (55,1)Chevrolet Silverado Owner Manual (GMNA-Localizing-U.S./Canada/Mexico-
5853506) - 2014 - crc 2nd - 5/15/13
Vehicle Care 10-55
All-Season Tires
This vehicle may come with
all-season tires. These tires are
designed to provide good overall
performance on most road surfaces
and weather conditions. Original
equipment tires designed to GM's
specific tire performance criteria
have a TPC specification code
molded onto the sidewall. Original
equipment all-season tires can be
identified by the last two characters
of this TPC code, which will
be“MS.”
Consider installing winter tires on
the vehicle if frequent driving on
snow or ice-covered roads is
expected. All-season tires provide
adequate performance for most
winter driving conditions, but they
may not offer the same level of
traction or performance as winter
tires on snow or ice-covered roads.
See Winter Tires on page 10-55.
Winter Tires
This vehicle was not originally
equipped with winter tires. Winter
tires are designed for increased
traction on snow and ice-covered
roads. Consider installing winter
tires on the vehicle if frequent
driving on snow or ice-covered
roads is expected. See your dealer
for details regarding winter tire
availability and proper tire selection.
Also, see Buying New Tires on
page 10-73.
With winter tires, there may be
decreased dry road traction,
increased road noise, and shorter
tread life. After changing to winter
tires, be alert for changes in vehicle
handling and braking. If using winter tires:.Use tires of the same brand and
tread type on all four wheel
positions.
.Use only radial ply tires of the
same size, load range, and
speed rating as the original
equipment tires.
Winter tires with the same speed
rating as the original equipment tires
may not be available for H, V, W, Y,
and ZR speed rated tires. If winter
tires with a lower speed rating are
chosen, never exceed the tire's
maximum speed capability.
Page 445 of 546
Black plate (71,1)Chevrolet Silverado Owner Manual (GMNA-Localizing-U.S./Canada/Mexico-
5853506) - 2014 - crc 2nd - 5/15/13
Vehicle Care 10-71
Loading Information label after
the tires have been rotated. See
Tire Pressure on page 10-63
andVehicle Load Limits on
page 9-16.
Check that all wheel nuts are
properly tightened. See “Wheel
Nut Torque” underCapacities
and Specifications on
page 12-2.
{Warning
Rust or dirt on a wheel, or on the
parts to which it is fastened, can
make wheel nuts become loose
after time. The wheel could come
off and cause an accident. When
changing a wheel, remove any
rust or dirt from places where the
wheel attaches to the vehicle. In
an emergency, a cloth or a paper
towel can be used; however, use
a scraper or wire brush later to
remove all rust or dirt.
Lightly coat the center of the
wheel hub with wheel bearing
grease after a wheel change or
tire rotation to prevent corrosion
or rust build-up. Do not get
grease on the flat wheel
mounting surface or on the
wheel nuts or bolts.
Reset the Tire Pressure Monitor
System (TPMS), if the vehicle
has one. See Tire Pressure
Monitor Operation on
page 10-66.
Check that the spare tire, if the
vehicle has one, is stored
properly. Push, pull, and then try
to rotate or turn the tire. If it
moves, tighten the cable. See
“Storing a Flat or Spare Tire and
Tools” underTire Changing on
page 10-80.Dual Tire Rotation
When the vehicle is new,
or whenever a wheel, wheel bolt,
or wheel nut is replaced, check the
wheel nut torque after
160, 1 600, and 10 000 km
(100, 1,000, and 6,000 mi) of driving.
For proper torque and wheel nut
tightening information, see
“Removing the Flat Tire and
Installing the Spare Tire” underTire
Changing on page 10-80.
The outer tire on a dual wheel setup
generally wears faster than the
inner tire. Tires last longer and wear
more evenly if they are rotated. See
Tire Inspection on page 10-69 and
Tire Rotation on page 10-69. Also
see Maintenance Schedule on
page 11-3.
Page 454 of 546
Black plate (80,1)Chevrolet Silverado Owner Manual (GMNA-Localizing-U.S./Canada/Mexico-
5853506) - 2014 - crc 2nd - 5/15/13
10-80 Vehicle Care
{Warning
Changing a tire can be
dangerous. The vehicle can slip
off the jack and roll over or fall
causing injury or death. Find a
level place to change the tire. To
help prevent the vehicle from
moving:1. Set the parking brake firmly.
2. Put an automatic transmission in P (Park) or a
manual transmission in
1 (First) or R (Reverse).
3. For four-wheel-drive vehicles, be sure the
transfer case is in a drive
gear– not in N (Neutral).
4. Turn off the engine and do not restart while the vehicle
is raised.
5. Do not allow passengers to remain in the vehicle.
(Continued)
Warning (Continued)
6. Place wheel blocks on bothsides of the tire at the
opposite corner of the tire
being changed.
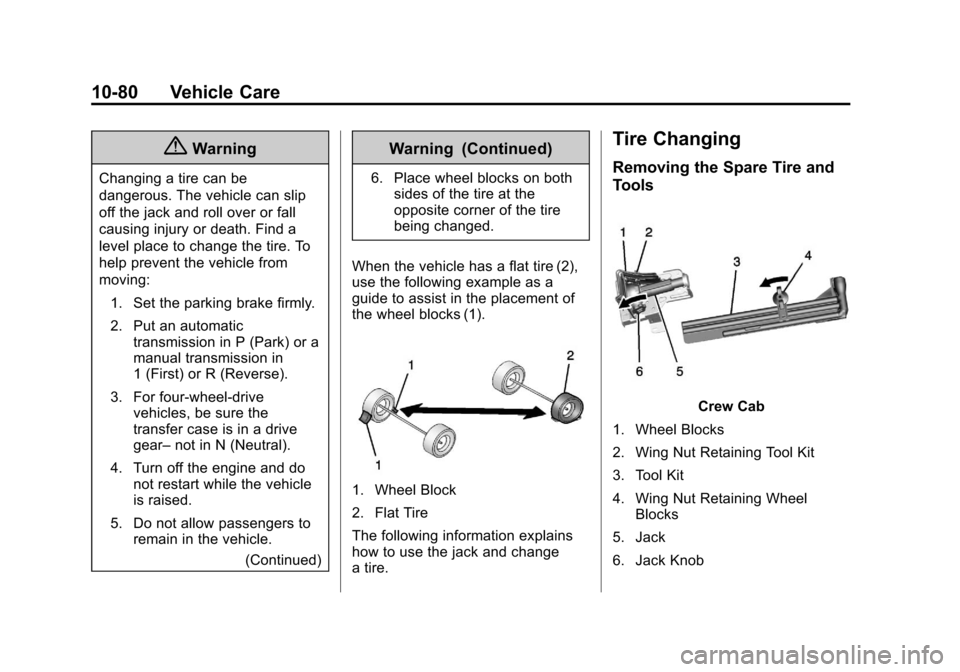
When the vehicle has a flat tire (2),
use the following example as a
guide to assist in the placement of
the wheel blocks (1).
1. Wheel Block
2. Flat Tire
The following information explains
how to use the jack and change
a tire.
Tire Changing
Removing the Spare Tire and
Tools
Crew Cab
1. Wheel Blocks
2. Wing Nut Retaining Tool Kit
3. Tool Kit
4. Wing Nut Retaining Wheel Blocks
5. Jack
6. Jack Knob
Page 538 of 546

Black plate (6,1)Chevrolet Silverado Owner Manual (GMNA-Localizing-U.S./Canada/Mexico-
5853506) - 2014 - crc 2nd - 5/15/13
i-6 INDEX
Gauges (cont'd)Speedometer . . . . . . . . . . . . . . . . . 5-13
Tachometer . . . . . . . . . . . . . . . . . . . 5-13
Trip Odometer . . . . . . . . . . . . . . . . 5-13
Voltmeter . . . . . . . . . . . . . . . . . . . . . 5-16
Warning Lights and
Indicators . . . . . . . . . . . . . . . . . . . . 5-9
General Information Service and Maintenance . . . . . 11-1
Towing . . . . . . . . . . . . . . . . . . . . . . . . 9-77
Vehicle Care . . . . . . . . . . . . . . . . . . 10-2
Glass Replacement . . . . . . . . . . . 10-39
Glove Box . . . . . . . . . . . . . . . . . . . . . . 4-2
GM Mobility Reimbursement Program . . . . . . . . . . . . . . . . . . . . . . 13-5
H
Halogen Bulbs . . . . . . . . . . . . . . . . 10-39
Hazard Warning Flashers . . . . . . . 6-4
Head Restraints . . . . . . . . . . . . . . . . 3-2
HeadlampsAiming . . . . . . . . . . . . . . . . . . . . . . 10-39
Automatic . . . . . . . . . . . . . . . . . . . . . . 6-3
Bulb Replacement . . . . . . . . . . 10-39
Daytime RunningLamps (DRL) . . . . . . . . . . . . . . . . . 6-3 Headlamps (cont'd)
Flash-to-Pass . . . . . . . . . . . . . . . . . . 6-3
Headlamps, Front Turn
Signal, Sidemarker, and
Parking Lamps . . . . . . . . . . . . 10-40
High-Beam On Light . . . . . . . . . . 5-29
High/Low Beam Changer . . . . . . 6-2
Lamps On Reminder . . . . . . . . . 5-29
Heated
Steering Wheel . . . . . . . . . . . . . . . . 5-4
Heated and Cooled Front Seats . . . . . . . . . . . . . . . . . . . . . . . . . 3-8
Heated Mirrors . . . . . . . . . . . . . . . . . 2-16
Heater Engine Coolant . . . . . . . . . . . . . . . 9-30
Heating and Air Conditioning . . . . . . . . . . . . . . . 8-1, 8-3
High-Beam On Light . . . . . . . . . . . 5-29
Highway Hypnosis . . . . . . . . . . . . . 9-12
Hill and Mountain Roads . . . . . . . 9-12
Hill Descent Control (HDC) . . . . 9-59
Hill Descent Control Light . . . . . . 5-26
Hill Start Assist (HSA) . . . . . . . . . 9-57
Home Page . . . . . . . . . . . . . . . . . . . . . 7-5
Hood . . . . . . . . . . . . . . . . . . . . . . . . . . 10-4
Horn . . . . . . . . . . . . . . . . . . . . . . . . . . . . 5-4 How to Wear Safety Belts
Properly . . . . . . . . . . . . . . . . . . . . . . 3-13
Hydraulic Clutch . . . . . . . . . . . . . . 10-18
I
Idle System Fast . . . . . . . . . . . . . . . . . . . . . . . . . . 9-28
Ignition Positions . . . . . . . . . . . . . . 9-25
Ignition Transmission Lock Check . . . . . . . . . . . . . . . . . . . . . . . 10-37
Immobilizer . . . . . . . . . . . . . . . . . . . . 2-13
Indicator Vehicle Ahead . . . . . . . . . . . . . . . . 5-26
Infants and Young Children, Restraints . . . . . . . . . . . . . . . . . . . . 3-39
Infotainment . . . . . . . . . . . . . . . . . . . . 7-1
Infotainment System . . . . . . . . . . 13-15
Instrument Cluster . . . . . . . . . . . . . 5-10
Instrument Panel Storage Area . . . . . . . . . . . . . . . . . . 4-1
Interior Rearview Mirrors . . . . . . . 2-18
Internet Radio Pandora . . . . . . . . . . . . . . . . . . . . . . 7-12
Introduction . . . . . . . . . . . . . . . . . . . . . . . iii