2014 CHEVROLET ORLANDO buttons
[x] Cancel search: buttonsPage 4 of 98
Black plate (4,1)Chevrolet Orlando Infotainment System (GMNA-Localizing-Canada-
6081467) - 2014 - CRC - 6/13/13
4 Infotainment System
Overview
Read the following pages to
become familiar with the
infotainment system features.
The infotainment system has built-in
features intended to help with this
by disabling some functions when
driving. A grayed-out function is not
available when the vehicle is
moving.
All functions are available when the
vehicle is parked. Before driving:
.Become familiar with the
infotainment system operation,
buttons on the faceplate, and
touch-sensitive screen buttons.
.Set up the audio by presetting
favorite stations, setting the
tone, and adjusting the
speakers.
.Set up phone numbers in
advance so they can be called
easily by pressing a single
button or by using a single voice
command for vehicles equipped
with phone capability.
{Warning
Taking your eyes off the road for
too long or too often while using
the infotainment or navigation
system could cause a crash.
You or others could be injured or
killed. Do not give extended
attention to these tasks while
driving. Limit glances at the
vehicle displays and focus your
attention on driving. Use voice
commands whenever possible.See
“Defensive Driving” in the
owner manual.
The vehicle has Retained
Accessory Power (RAP). With RAP,
the audio system can be played
even after the ignition is turned off.
See “Retained Accessory Power
(RAP)” in the owner manual.Customer Assistance
Assistance is available to help with
Bluetooth pairing, application
downloading and installation,
other mobile device interface,
and operation support of the
infotainment system. Specialists
are available when calling this
Customer Assistance number:
Customer Care Centre
1-800-263-7854 (French) or
1-800-263-3777 (English).
Page 5 of 98
Black plate (5,1)Chevrolet Orlando Infotainment System (GMNA-Localizing-Canada-
6081467) - 2014 - CRC - 6/13/13
Infotainment System 5
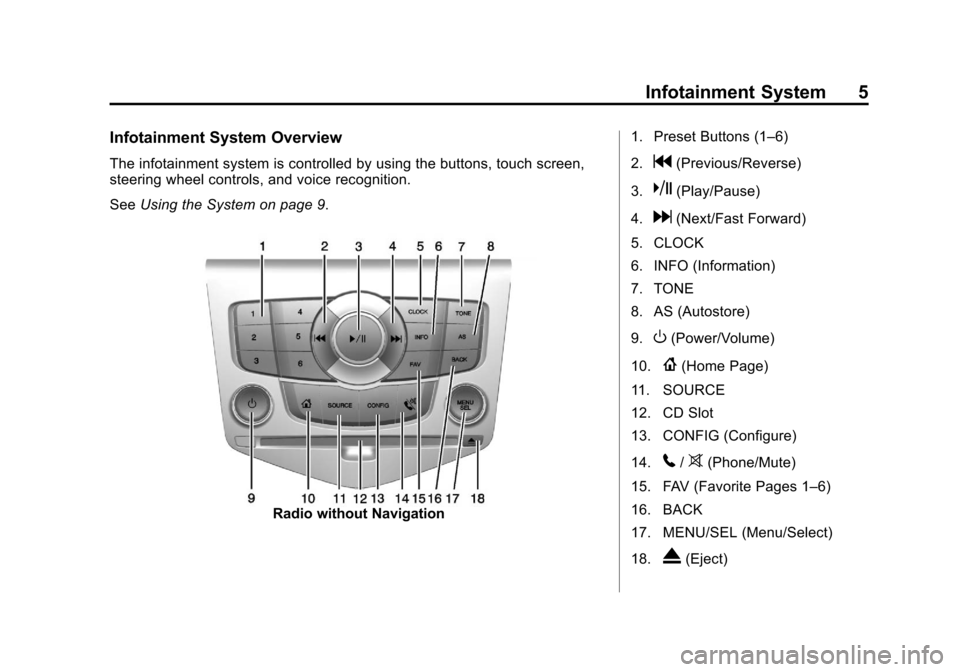
Infotainment System Overview
The infotainment system is controlled by using the buttons, touch screen,
steering wheel controls, and voice recognition.
SeeUsing the System on page 9.
Radio without Navigation 1. Preset Buttons (1–6)
2.
g(Previous/Reverse)
3.
k(Play/Pause)
4.
d(Next/Fast Forward)
5. CLOCK
6. INFO (Information)
7. TONE
8. AS (Autostore)
9.
O(Power/Volume)
10.
{(Home Page)
11. SOURCE
12. CD Slot
13. CONFIG (Configure)
14.
5/>(Phone/Mute)
15. FAV (Favorite Pages 1–6)
16. BACK
17. MENU/SEL (Menu/Select)
18.
X(Eject)
Page 6 of 98
Black plate (6,1)Chevrolet Orlando Infotainment System (GMNA-Localizing-Canada-
6081467) - 2014 - CRC - 6/13/13
6 Infotainment System
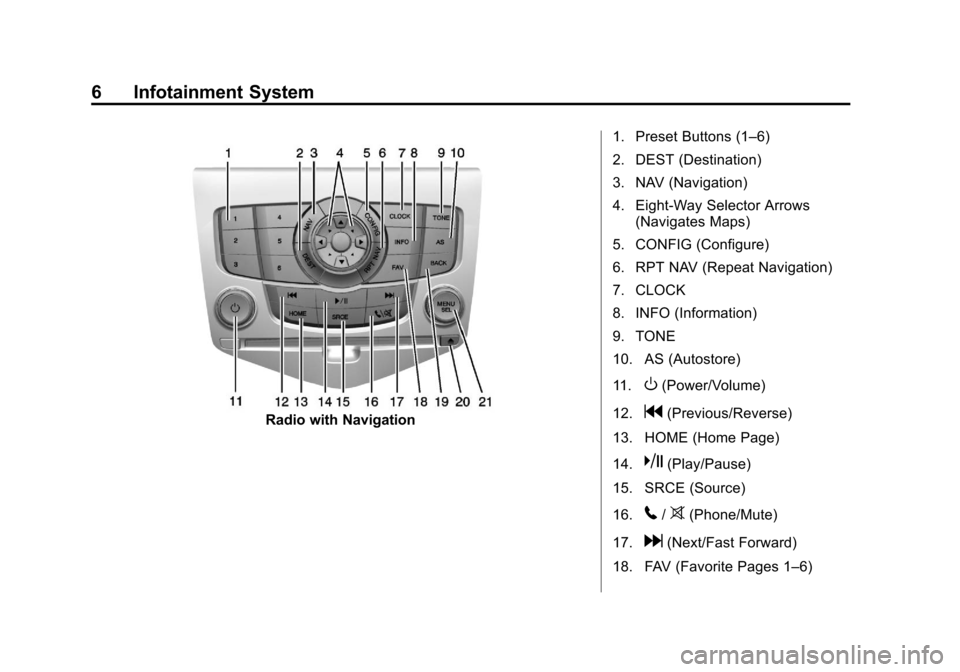
Radio with Navigation1. Preset Buttons (1–6)
2. DEST (Destination)
3. NAV (Navigation)
4. Eight-Way Selector Arrows
(Navigates Maps)
5. CONFIG (Configure)
6. RPT NAV (Repeat Navigation)
7. CLOCK
8. INFO (Information)
9. TONE
10. AS (Autostore)
11.
O(Power/Volume)
12.
g(Previous/Reverse)
13. HOME (Home Page)
14.
k(Play/Pause)
15. SRCE (Source)
16.
5/>(Phone/Mute)
17.
d(Next/Fast Forward)
18. FAV (Favorite Pages 1–6)
Page 7 of 98
Black plate (7,1)Chevrolet Orlando Infotainment System (GMNA-Localizing-Canada-
6081467) - 2014 - CRC - 6/13/13
Infotainment System 7
19. BACK
20.
X(Eject)
21. MENU/SEL (Menu/Select)
Infotainment Control Buttons
The buttons on the faceplate are
used to start primary functions while
using the infotainment system.
O(Power/Volume):
1. Press to turn the system on and off.
2. Turn to adjust the volume.
k(Play/Pause): Presskto start,
pause, and resume playback. See
CD Player on page 36.
SOURCE or SRCE (Source):
Press to change the audio sources
such as AM-FM Radio, SiriusXM
®(if
equipped), CD, and AUX.
TONE: Press to access the sound
menu screen to adjust bass,
midrange, and treble. See AM-FM
Radio on page 15. AS (Autostore):
Autostore
searches and stores FM and AM
stations with the strongest signal.
Autostore does not function with
SiriusXM radio stations.
INFO (Information): Press to
toggle through an audio or
navigation information screen.
CONFIG (Configure): Press to
adjust features for radio, navigation,
display, phone, vehicle, and time.
See Configure Menu on page 63.
{or HOME: See“Home Page”
later in this section.
MENU/SEL (Menu/Select): Turn to
highlight a feature. Press to activate
the highlighted feature.
5/>(Phone/Mute): See
Bluetooth on page 79.
NAV (Navigation):
1. Press to view the vehicle's current position on the map
screen. 2. Continue pressing to cycle
through the full map and split
screens.
RPT NAV (Repeat Navigation):
Press to repeat the last voice
guidance prompt.
DEST (Destination):
.Press to enter a destination.
.If a destination has already been
entered, press to access the
Destination Menu. See
Destination on page 52.
BACK: Press to return to the
previous screen in a menu.
If on a page accessed directly by a
faceplate button or Home Page
screen button, pressing BACK will
go to the Home Page.
FAV (Favorite Pages 1–6): Press
to display the current page number
above the preset buttons. The
stored stations for each list display
on the touch-sensitive preset
buttons at the bottom of the screen.
Page 8 of 98
Black plate (8,1)Chevrolet Orlando Infotainment System (GMNA-Localizing-Canada-
6081467) - 2014 - CRC - 6/13/13
8 Infotainment System
The number of preset FAV lists can
be changed in the
Configuration Menu.
d(Next/Fast Forward):
1. Press to seek the next track.
2. Press and hold to fast forward through a track.
3. Release the button to return to playing speed. See CD Player
on page 36.
4. For AM, FM, or SiriusXM (if equipped), press to seek to the
next strong station.
g(Previous/Reverse):
1. Press to seek to the beginning of the current or previous track.
If the track has been playing for
less than five seconds, it seeks
the previous track. If longer than
five seconds, the current track
starts from the beginning. 2. Press and hold to quickly
reverse through a track. Release
the button to return to playing
speed. See CD Player on
page 36.
3. For AM, FM, or SiriusXM (if equipped), press to seek to the
previous strong station.
Preset Buttons (1–6): The preset
buttons numbered one through six
can be used to select stored AM,
FM, and SiriusXM (if equipped)
stations.
Eight-Way Selector Arrows:
Press the arrows to navigate
the map.
CLOCK: Press to set the time.
X(Eject):Press to eject a disc
from the CD player. See CD Player
on page 36.
Touch Screen Buttons
Touch screen buttons are on the
screen and highlighted when a
feature is available. Some toggle
screen buttons highlight when active
and gray out when inactive.
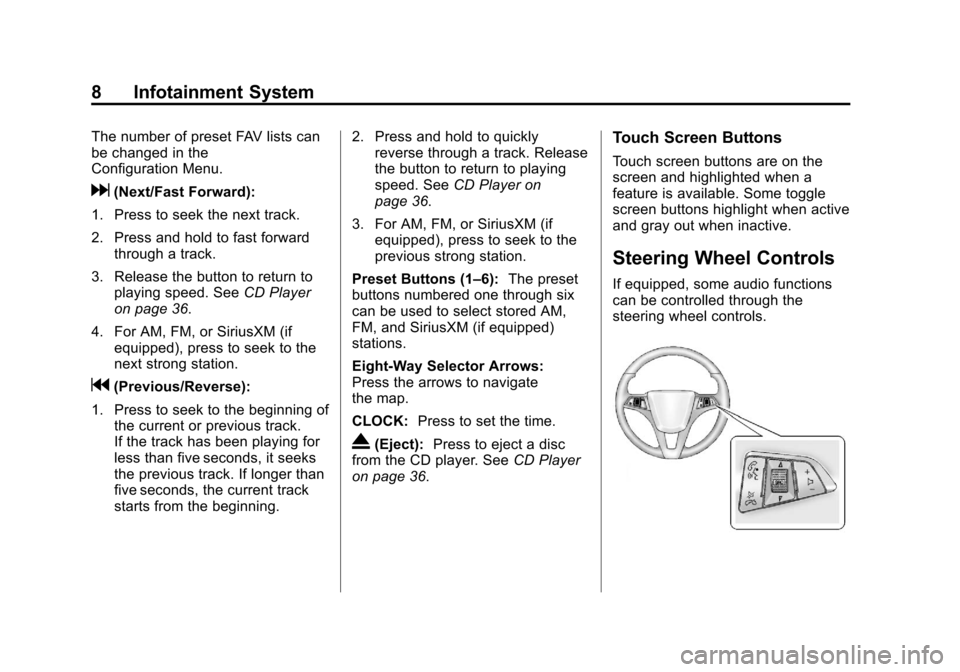
Steering Wheel Controls
If equipped, some audio functions
can be controlled through the
steering wheel controls.
Page 9 of 98
Black plate (9,1)Chevrolet Orlando Infotainment System (GMNA-Localizing-Canada-
6081467) - 2014 - CRC - 6/13/13
Infotainment System 9
b/g(Push to Talk):Press to
interact with Bluetooth or voice
recognition. See Bluetooth on
page 79 orVoice Recognition on
page 72.
$/i(Mute/End Call): Press to
decline an incoming call, or to end a
current call. Press to silence the
vehicle speakers while using the
infotainment system. Press again to
turn the sound on. Press to cancel
voice recognition.
_SRC^(Thumbwheel Control):
Press to select an audio source.
Use the thumbwheel to select the
next or previous favorite radio
station, CD, MP3 track, USB, and
Bluetooth Audio.
Use
_SRC to skip to the next song
or show using Pandora (if equipped)
or Stitcher. See Pandora Internet
Radio on page 25 orStitcher
Internet Radio on page 30. +
x−
(Volume): Press + to
increase the volume. Press −to
decrease.
See “Steering Wheel Controls” in
the owner manual.
Using the System
The infotainment system is
controlled by touching the screen,
and by using the knobs and other
buttons.
Voice recognition, through the
steering wheel controls, can be
used to control the infotainment
features.
Press
b/gon the steering wheel
controls to begin voice recognition.
See Voice Recognition on page 72.
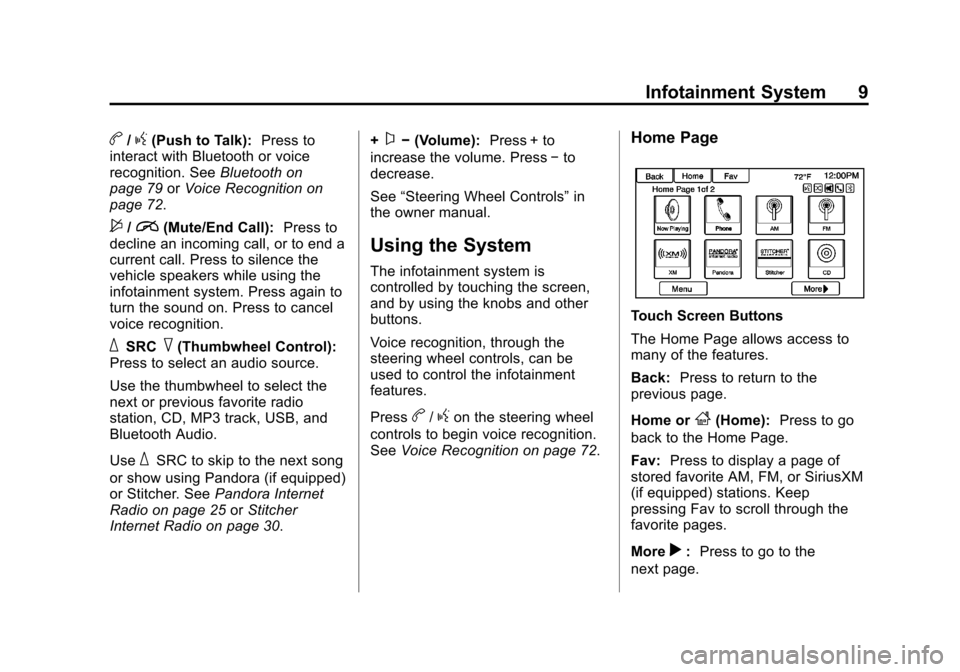
Home Page
Touch Screen Buttons
The Home Page allows access to
many of the features.
Back: Press to return to the
previous page.
Home or
F(Home): Press to go
back to the Home Page.
Fav: Press to display a page of
stored favorite AM, FM, or SiriusXM
(if equipped) stations. Keep
pressing Fav to scroll through the
favorite pages.
More
r: Press to go to the
next page.
Page 10 of 98
Black plate (10,1)Chevrolet Orlando Infotainment System (GMNA-Localizing-Canada-
6081467) - 2014 - CRC - 6/13/13
10 Infotainment System
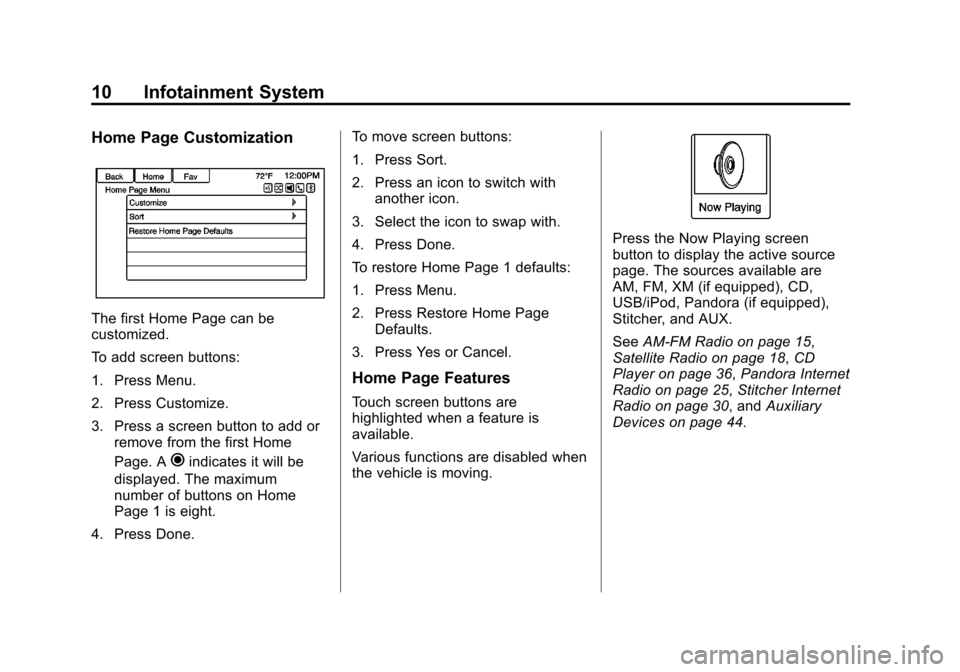
Home Page Customization
The first Home Page can be
customized.
To add screen buttons:
1. Press Menu.
2. Press Customize.
3. Press a screen button to add orremove from the first Home
Page. A
hindicates it will be
displayed. The maximum
number of buttons on Home
Page 1 is eight.
4. Press Done. To move screen buttons:
1. Press Sort.
2. Press an icon to switch with
another icon.
3. Select the icon to swap with.
4. Press Done.
To restore Home Page 1 defaults:
1. Press Menu.
2. Press Restore Home Page Defaults.
3. Press Yes or Cancel.
Home Page Features
Touch screen buttons are
highlighted when a feature is
available.
Various functions are disabled when
the vehicle is moving.
Press the Now Playing screen
button to display the active source
page. The sources available are
AM, FM, XM (if equipped), CD,
USB/iPod, Pandora (if equipped),
Stitcher, and AUX.
See AM-FM Radio on page 15,
Satellite Radio on page 18, CD
Player on page 36, Pandora Internet
Radio on page 25, Stitcher Internet
Radio on page 30, and Auxiliary
Devices on page 44.
Page 11 of 98
Black plate (11,1)Chevrolet Orlando Infotainment System (GMNA-Localizing-Canada-
6081467) - 2014 - CRC - 6/13/13
Infotainment System 11
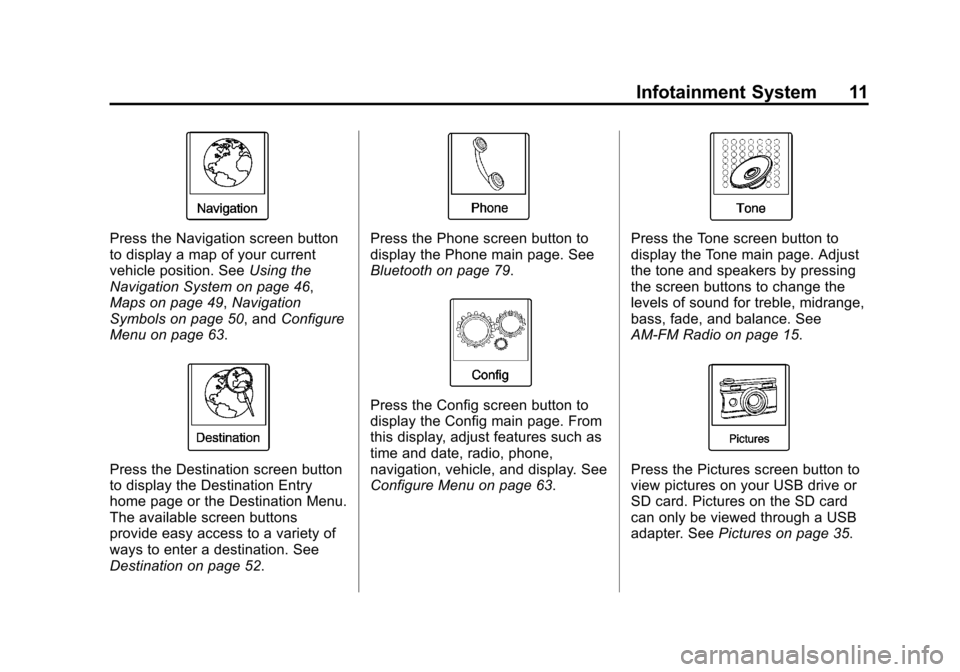
Press the Navigation screen button
to display a map of your current
vehicle position. SeeUsing the
Navigation System on page 46,
Maps on page 49, Navigation
Symbols on page 50, and Configure
Menu on page 63.
Press the Destination screen button
to display the Destination Entry
home page or the Destination Menu.
The available screen buttons
provide easy access to a variety of
ways to enter a destination. See
Destination on page 52.
Press the Phone screen button to
display the Phone main page. See
Bluetooth on page 79.
Press the Config screen button to
display the Config main page. From
this display, adjust features such as
time and date, radio, phone,
navigation, vehicle, and display. See
Configure Menu on page 63.
Press the Tone screen button to
display the Tone main page. Adjust
the tone and speakers by pressing
the screen buttons to change the
levels of sound for treble, midrange,
bass, fade, and balance. See
AM-FM Radio on page 15.
Press the Pictures screen button to
view pictures on your USB drive or
SD card. Pictures on the SD card
can only be viewed through a USB
adapter. See Pictures on page 35.