2014 CHEVROLET MALIBU brake
[x] Cancel search: brakePage 353 of 428
Black plate (91,1)Chevrolet Malibu Owner Manual (GMNA-Localizing-U.S./Canada/Mexico-
6081487) - 2014 - CRC - 11/19/13
Vehicle Care 10-91
Jump Starting
Jump Starting (On-board
with eAssist Only)
If the vehicle fails to crank, it may
be jump started by using the eAssist
battery to charge the 12-volt battery.
Use the following procedure to
activate the on-board jump start
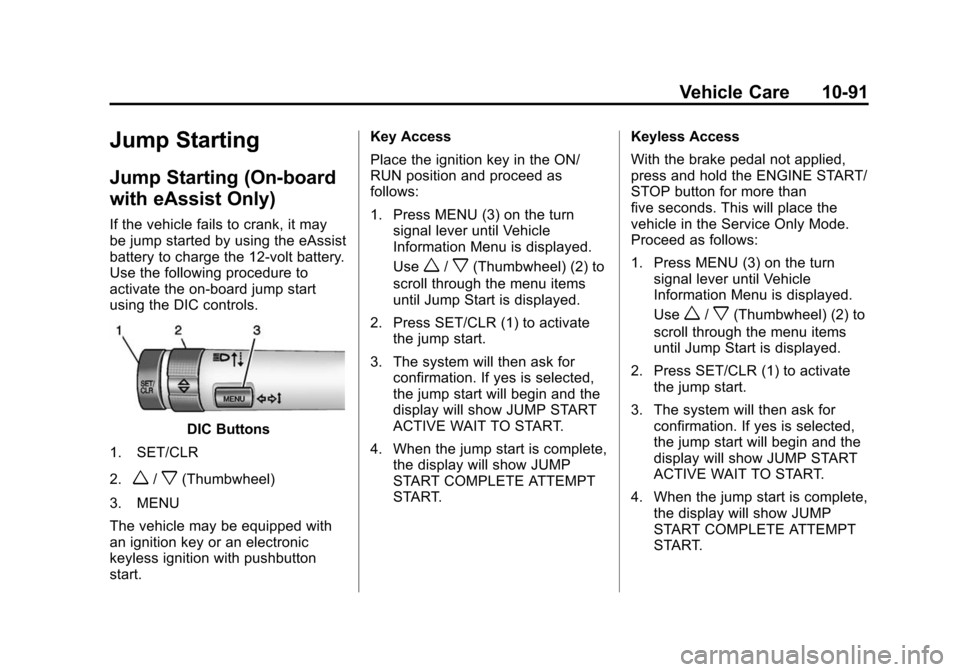
using the DIC controls.
DIC Buttons
1. SET/CLR
2.
w/x(Thumbwheel)
3. MENU
The vehicle may be equipped with
an ignition key or an electronic
keyless ignition with pushbutton
start. Key Access
Place the ignition key in the ON/
RUN position and proceed as
follows:
1. Press MENU (3) on the turn
signal lever until Vehicle
Information Menu is displayed.
Use
w/x(Thumbwheel) (2) to
scroll through the menu items
until Jump Start is displayed.
2. Press SET/CLR (1) to activate the jump start.
3. The system will then ask for confirmation. If yes is selected,
the jump start will begin and the
display will show JUMP START
ACTIVE WAIT TO START.
4. When the jump start is complete, the display will show JUMP
START COMPLETE ATTEMPT
START. Keyless Access
With the brake pedal not applied,
press and hold the ENGINE START/
STOP button for more than
five seconds. This will place the
vehicle in the Service Only Mode.
Proceed as follows:
1. Press MENU (3) on the turn
signal lever until Vehicle
Information Menu is displayed.
Use
w/x(Thumbwheel) (2) to
scroll through the menu items
until Jump Start is displayed.
2. Press SET/CLR (1) to activate the jump start.
3. The system will then ask for confirmation. If yes is selected,
the jump start will begin and the
display will show JUMP START
ACTIVE WAIT TO START.
4. When the jump start is complete, the display will show JUMP
START COMPLETE ATTEMPT
START.
Page 355 of 428
Black plate (93,1)Chevrolet Malibu Owner Manual (GMNA-Localizing-U.S./Canada/Mexico-
6081487) - 2014 - CRC - 11/19/13
Vehicle Care 10-93
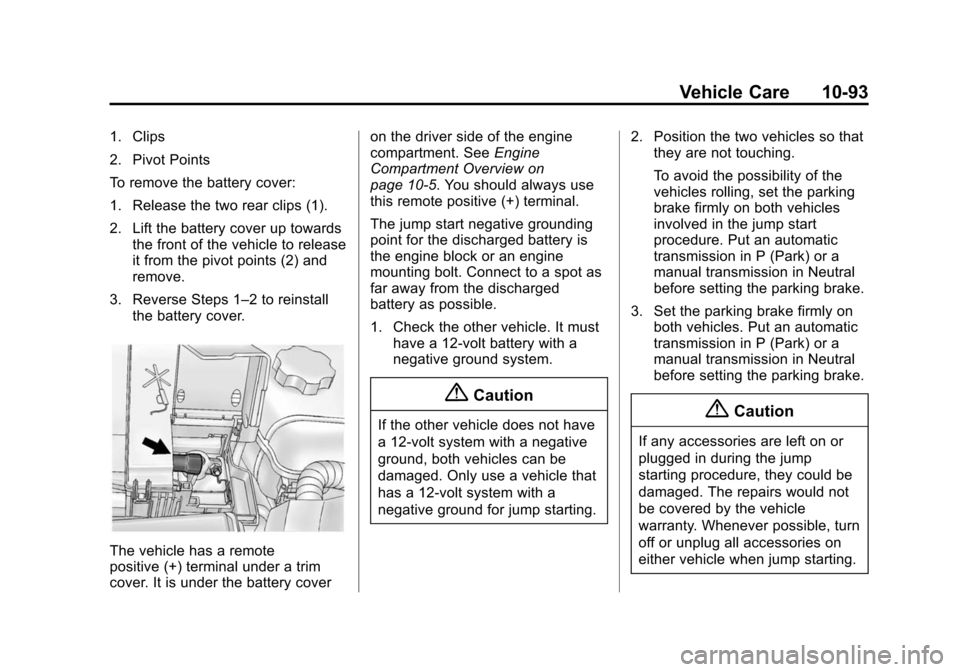
1. Clips
2. Pivot Points
To remove the battery cover:
1. Release the two rear clips (1).
2. Lift the battery cover up towardsthe front of the vehicle to release
it from the pivot points (2) and
remove.
3. Reverse Steps 1–2 to reinstall the battery cover.
The vehicle has a remote
positive (+) terminal under a trim
cover. It is under the battery cover on the driver side of the engine
compartment. See
Engine
Compartment Overview on
page 10-5. You should always use
this remote positive (+) terminal.
The jump start negative grounding
point for the discharged battery is
the engine block or an engine
mounting bolt. Connect to a spot as
far away from the discharged
battery as possible.
1. Check the other vehicle. It must have a 12-volt battery with a
negative ground system.
{Caution
If the other vehicle does not have
a 12-volt system with a negative
ground, both vehicles can be
damaged. Only use a vehicle that
has a 12-volt system with a
negative ground for jump starting. 2. Position the two vehicles so that
they are not touching.
To avoid the possibility of the
vehicles rolling, set the parking
brake firmly on both vehicles
involved in the jump start
procedure. Put an automatic
transmission in P (Park) or a
manual transmission in Neutral
before setting the parking brake.
3. Set the parking brake firmly on both vehicles. Put an automatic
transmission in P (Park) or a
manual transmission in Neutral
before setting the parking brake.{Caution
If any accessories are left on or
plugged in during the jump
starting procedure, they could be
damaged. The repairs would not
be covered by the vehicle
warranty. Whenever possible, turn
off or unplug all accessories on
either vehicle when jump starting.
Page 369 of 428
Black plate (1,1)Chevrolet Malibu Owner Manual (GMNA-Localizing-U.S./Canada/Mexico-
6081487) - 2014 - CRC - 11/19/13
Service and Maintenance 11-1
Service and
Maintenance
General Information
General Information . . . . . . . . . . 11-1
Maintenance Schedule
Maintenance Schedule . . . . . . . 11-3
Special Application Services
Special ApplicationServices . . . . . . . . . . . . . . . . . . . . 11-8
Additional Maintenance
and Care
Additional Maintenanceand Care . . . . . . . . . . . . . . . . . . . 11-8
Recommended Fluids,
Lubricants, and Parts
Recommended Fluids andLubricants . . . . . . . . . . . . . . . . . 11-12
Maintenance Replacement Parts . . . . . . . . . . . . . . . . . . . . . . 11-13
Maintenance Records
Maintenance Records . . . . . . 11-14
General Information
Your vehicle is an important
investment. This section describes
the required maintenance for the
vehicle. Follow this schedule to help
protect against major repair
expenses resulting from neglect or
inadequate maintenance. It may
also help to maintain the value of
the vehicle if it is sold. It is the
responsibility of the owner to have
all required maintenance performed.
Your dealer has trained technicians
who can perform required
maintenance using genuine
replacement parts. They have
up-to-date tools and equipment for
fast and accurate diagnostics. Many
dealers have extended evening and
Saturday hours, courtesy
transportation, and online
scheduling to assist with service
needs. Your dealer recognizes the
importance of providing
competitively priced maintenance
and repair services. With trained
technicians, the dealer is the place
for routine maintenance such as oil
changes and tire rotations and
additional maintenance items like
tires, brakes, batteries, and wiper
blades.
{Caution
Damage caused by improper
maintenance can lead to costly
repairs and may not be covered
by the vehicle warranty.
Maintenance intervals, checks,
inspections, recommended fluids,
and lubricants are important to
keep the vehicle in good working
condition.
Page 371 of 428
Black plate (3,1)Chevrolet Malibu Owner Manual (GMNA-Localizing-U.S./Canada/Mexico-
6081487) - 2014 - CRC - 11/19/13
Service and Maintenance 11-3
Maintenance
Schedule
Owner Checks and Services
At Each Fuel Stop
.Check the engine oil level. See
Engine Oil on page 10-10.
Once a Month
.Check the tire inflation
pressures. See Tire Pressure on
page 10-53.
.Inspect the tires for wear. See
Tire Inspection on page 10-59.
.Check the windshield washer
fluid level. See Washer Fluid on
page 10-21.
Engine Oil Change
When the CHANGE ENGINE OIL
SOON message displays, have the
engine oil and filter changed within
the next 1 000 km/600 mi. If driven
under the best conditions, the
engine oil life system might not
indicate the need for vehicle service for more than a year. The engine oil
and filter must be changed at least
once a year and the oil life system
must be reset. Your trained dealer
technician can perform this work.
If the engine oil life system is reset
accidentally, service the vehicle
within 5 000 km/3,000 mi since the
last service. Reset the oil life
system when the oil is changed.
See
Engine Oil Life System on
page 10-12.
Tire Rotation and Required
Services Every 12 000 km/
7,500 mi
Rotate the tires, if recommended for
the vehicle, and perform the
following services. See Tire
Rotation on page 10-59.
.Check engine oil level and oil
life percentage. If needed,
change engine oil and filter, and
reset oil life system. See Engine
Oil on page 10-10 andEngine
Oil Life System on page 10-12.
.Check engine coolant level. See
Engine Coolant on page 10-17.
.Check windshield washer fluid
level. See Washer Fluid on
page 10-21.
.Visually inspect windshield wiper
blades for wear, cracking,
or contamination. See Exterior
Care on page 10-98. Replace
worn or damaged wiper blades.
See Wiper Blade Replacement
on page 10-27.
.Check tire inflation pressures.
See Tire Pressure on
page 10-53.
.Inspect tire wear. See Tire
Inspection on page 10-59.
.Visually check for fluid leaks.
.Inspect engine air cleaner filter.
See Engine Air Cleaner/Filter on
page 10-13.
.Inspect brake system.
Page 372 of 428

Black plate (4,1)Chevrolet Malibu Owner Manual (GMNA-Localizing-U.S./Canada/Mexico-
6081487) - 2014 - CRC - 11/19/13
11-4 Service and Maintenance
.Visually inspect steering,
suspension, and chassis
components for damaged, loose,
or missing parts or signs of
wear. SeeExterior Care on
page 10-98.
.Check restraint system
components. See Safety System
Check on page 3-17.
.Visually inspect fuel system for
damage or leaks.
.Visually inspect exhaust system
and nearby heat shields for
loose or damaged parts.
.Lubricate body components. See
Exterior Care on page 10-98.
.Check starter switch. See Starter
Switch Check on page 10-26.
.Check automatic transmission
shift lock control function. See
Automatic Transmission Shift
Lock Control Function Check on
page 10-26.
.Check ignition transmission lock
(If equipped with a key type
ignition). See Ignition
Transmission Lock Check on
page 10-27.
.Check parking brake and
automatic transmission park
mechanism. See Park Brake and
P (Park) Mechanism Check on
page 10-27.
.Check accelerator pedal for
damage, high effort, or binding.
Replace if needed.
.Visually inspect gas strut for
signs of wear, cracks, or other
damage. Check the hold open
ability of the strut. See your
dealer if service is required.
.Check tire sealant expiration
date, if equipped. See Tire
Sealant and Compressor Kit
(With Pressure Relief Button) on
page 10-69 orTire Sealant and
Compressor Kit (With Pressure
Deflation Button) on page 10-76.
.Inspect sunroof track and seal,
if equipped. See Sunroof on
page 2-23.
Page 373 of 428

Black plate (5,1)Chevrolet Malibu Owner Manual (GMNA-Localizing-U.S./Canada/Mexico-
6081487) - 2014 - CRC - 11/19/13
Service and Maintenance 11-5
Maintenance Schedule
Additional Required
Services - Normal12 000 km/7,500 mi
24 000 km/15,000 mi
36 000 km/22,500 mi
48 000 km/30,000 mi
60 000 km/37,500 mi
72 000 km/45,000 mi
84 000 km/52,500 mi
96 000 km/60,000 mi
108 000 km/67,500 mi
120 000 km/75,000 mi
132 000 km/82,500 mi
144 000 km/90,000 mi
156 000 km/97,500 mi
168 000 km/105,000 mi 180 000 km/112,500 mi
192 000 km/120,000 mi
204 000 km/127,500 mi
216 000 km/135,000 mi
228 000 km/142,500 mi
240 000 km/150,000 mi
Rotate tires and perform Required Services.
Check engine oil level and oil life percentage.
Change engine oil and filter, if needed.@ @ @ @ @ @ @ @ @ @ @ @ @ @ @ @ @ @ @ @
Replace passenger compartment air filter. (1)@ @@@@@
Inspect evaporative control system. (2)@ @@
Replace engine air cleaner filter. (3)@@@
Except 2.0L Engine: Replace spark plugs. Inspect
spark plug wires.@
2.0L Engine Only: Replace spark plugs. Inspect
spark plug wires.@ @
Change automatic transmission fluid.@
Drain and fill engine cooling system. (4)@
Except with eAssist: Visually inspect accessory
drive belts. (5)@
Vehicles with eAssist: Visually inspect accessory
drive belts. (5)@
Replace brake fluid. (6)@
Page 375 of 428

Black plate (7,1)Chevrolet Malibu Owner Manual (GMNA-Localizing-U.S./Canada/Mexico-
6081487) - 2014 - CRC - 11/19/13
Service and Maintenance 11-7
Maintenance Schedule
Additional Required
Services - Severe12 000 km/7,500 mi
24 000 km/15,000 mi
36 000 km/22,500 mi
48 000 km/30,000 mi
60 000 km/37,500 mi
72 000 km/45,000 mi
84 000 km/52,500 mi
96 000 km/60,000 mi
108 000 km/67,500 mi
120 000 km/75,000 mi
132 000 km/82,500 mi
144 000 km/90,000 mi
156 000 km/97,500 mi
168 000 km/105,000 mi 180 000 km/112,500 mi
192 000 km/120,000 mi
204 000 km/127,500 mi
216 000 km/135,000 mi
228 000 km/142,500 mi
240 000 km/150,000 mi
Rotate tires and perform Required Services.
Check engine oil level and oil life percentage.
Change engine oil and filter, if needed.@ @ @ @ @ @ @ @ @ @ @ @ @ @ @ @ @ @ @ @
Replace passenger compartment air filter. (1)@ @@@@@
Inspect evaporative control system. (2)@ @@
Replace engine air cleaner filter. (3)@@@
Change automatic transmission fluid.@@@
Except 2.0L Engine: Replace spark plugs. Inspect
spark plug wires.@
2.0L Engine Only: Replace spark plugs. Inspect
spark plug wires.@ @
Drain and fill engine cooling system. (4)@
Except with eAssist: Visually inspect accessory
drive belts. (5)@
Vehicles with eAssist: Visually inspect accessory
drive belts. (5)@
Replace brake fluid. (6)@
Page 377 of 428
Black plate (9,1)Chevrolet Malibu Owner Manual (GMNA-Localizing-U.S./Canada/Mexico-
6081487) - 2014 - CRC - 11/19/13
Service and Maintenance 11-9
Battery
The battery supplies power to start
the engine and operate any
additional electrical accessories.
.To avoid break-down or failure to
start the vehicle, maintain a
battery with full cranking power.
.Trained dealer technicians have
the diagnostic equipment to test
the battery and ensure that the
connections and cables are
corrosion-free.
Belts
.Belts may need replacing if they
squeak or show signs of
cracking or splitting.
.Trained dealer technicians have
access to tools and equipment
to inspect the belts and
recommend adjustment or
replacement when necessary. Brakes
Brakes stop the vehicle and are
crucial to safe driving.
.Signs of brake wear may include
chirping, grinding, or squealing
noises, or difficulty stopping.
.Trained dealer technicians have
access to tools and equipment
to inspect the brakes and
recommend quality parts
engineered for the vehicle.
Fluids
Proper fluid levels and approved
fluids protect the vehicle’s systems
and components. See
Recommended Fluids and
Lubricants on page 11-12 for GM
approved fluids.
.Engine oil and windshield
washer fluid levels should be
checked at every fuel fill.
.Instrument cluster lights may
come on to indicate that fluids
may be low and need to be
filled.
Hoses
Hoses transport fluids and should
be regularly inspected to ensure
that there are no cracks or leaks.
With a multi-point inspection, your
dealer can inspect the hoses and
advise if replacement is needed.
Lamps
Properly working headlamps,
taillamps, and brake lamps are
important to see and be seen on
the road.
.Signs that the headlamps need
attention include dimming, failure
to light, cracking, or damage.
The brake lamps need to be
checked periodically to ensure
that they light when braking.