2014 CHEVROLET MALIBU turn signal bulb
[x] Cancel search: turn signal bulbPage 141 of 428
Black plate (31,1)Chevrolet Malibu Owner Manual (GMNA-Localizing-U.S./Canada/Mexico-
6081487) - 2014 - CRC - 11/19/13
Instruments and Controls 5-31
Lamp Messages
AUTOMATIC LIGHT CONTROL
ON/OFF
This message is displayed when the
automatic light control has been
turned on or off. SeeAutomatic
Headlamp System on page 6-3.
CHECK XXX TURN
SIGNAL LAMP
When one of the turn signals is out,
this message displays to show
which bulb needs to be replaced.
See Bulb Replacement on
page 10-29 andReplacement Bulbs
on page 10-36.
TURN SIGNAL ON
This message is displayed if the
turn signal has been left on. Turn off
the turn signal.
Object Detection System
Messages
FORWARD COLLISION
ALERT OFF
If your vehicle has the Forward
Collision Alert (FCA) system, this
message may display if the FCA
system cannot activate due to a
temporary condition. See Forward
Collision Alert (FCA) System on
page 9-37.
FRONT CAMERA BLOCKED,
CLEAN WINDSHIELD
This message displays when the
Lane Departure Warning (LDW) and
Forward Collision Alert (FCA)
systems are disabled because the
camera view is blocked and cannot
operate properly. It may also
activate during heavy rain or due to
road spray. To clean the system,
clean the outside of the windshield
area in front of the LDW/FCA
camera sensor.
LANE DEPARTURE WARNING
UNAVAILABLE
This message may appear if LDW
does not activate due to a
temporary condition.
PARK ASSIST OFF
This message displays when the
park assist system has been turned
off or when there is a temporary
condition causing the system to be
disabled. See Ultrasonic Parking
Assist on page 9-40.
SERVICE FRONT CAMERA
This message displays when the
Lane Departure Warning (LDW) and
Forward Collision Alert (FCA)
systems are disabled and need
service. See your dealer.
Page 158 of 428
Black plate (4,1)Chevrolet Malibu Owner Manual (GMNA-Localizing-U.S./Canada/Mexico-
6081487) - 2014 - CRC - 11/19/13
6-4 Lighting
Turn and Lane-Change
Signals
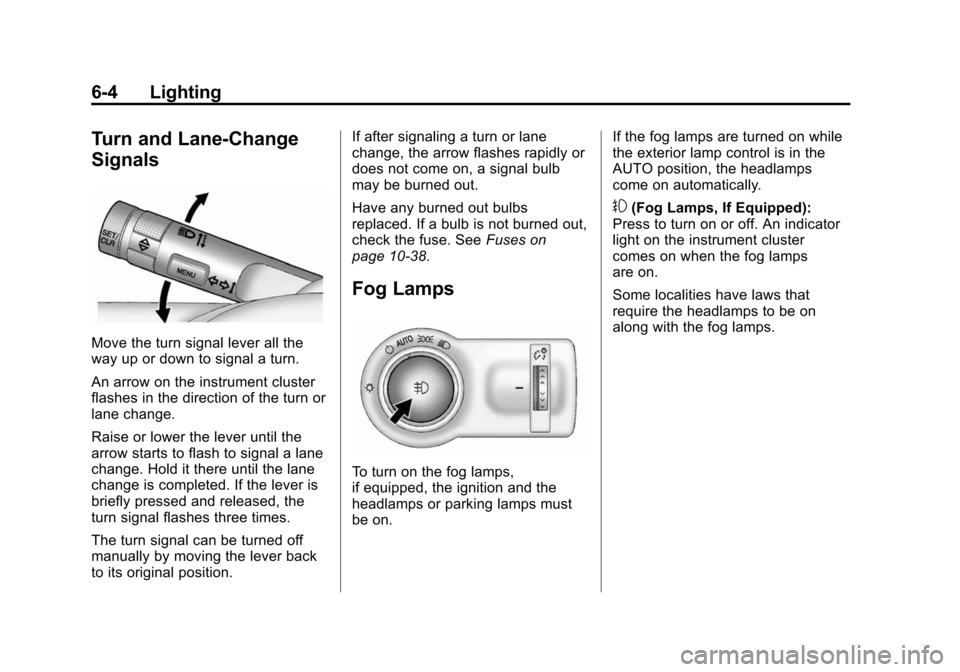
Move the turn signal lever all the
way up or down to signal a turn.
An arrow on the instrument cluster
flashes in the direction of the turn or
lane change.
Raise or lower the lever until the
arrow starts to flash to signal a lane
change. Hold it there until the lane
change is completed. If the lever is
briefly pressed and released, the
turn signal flashes three times.
The turn signal can be turned off
manually by moving the lever back
to its original position.If after signaling a turn or lane
change, the arrow flashes rapidly or
does not come on, a signal bulb
may be burned out.
Have any burned out bulbs
replaced. If a bulb is not burned out,
check the fuse. See
Fuses on
page 10-38.
Fog Lamps
To turn on the fog lamps,
if equipped, the ignition and the
headlamps or parking lamps must
be on. If the fog lamps are turned on while
the exterior lamp control is in the
AUTO position, the headlamps
come on automatically.
#(Fog Lamps, If Equipped):
Press to turn on or off. An indicator
light on the instrument cluster
comes on when the fog lamps
are on.
Some localities have laws that
require the headlamps to be on
along with the fog lamps.
Page 263 of 428
Black plate (1,1)Chevrolet Malibu Owner Manual (GMNA-Localizing-U.S./Canada/Mexico-
6081487) - 2014 - CRC - 11/19/13
Vehicle Care 10-1
Vehicle Care
General Information
General Information . . . . . . . . . . 10-2
California Proposition65 Warning . . . . . . . . . . . . . . . . . 10-2
California Perchlorate Materials Requirements . . . . 10-3
Accessories and Modifications . . . . . . . . . . . . . . . 10-3
Vehicle Checks
Doing Your OwnService Work . . . . . . . . . . . . . . . 10-3
Hood . . . . . . . . . . . . . . . . . . . . . . . . 10-4
Engine Compartment Overview . . . . . . . . . . . . . . . . . . . 10-5
Engine Oil . . . . . . . . . . . . . . . . . . 10-10
Engine Oil Life System . . . . . 10-12
Automatic Transmission Fluid . . . . . . . . . . . . . . . . . . . . . . 10-13
Engine Air Cleaner/Filter . . . . 10-13
Cooling System . . . . . . . . . . . . 10-16
Engine Coolant . . . . . . . . . . . . . 10-17
Engine Overheating . . . . . . . . 10-20
Washer Fluid . . . . . . . . . . . . . . . 10-21
Brakes . . . . . . . . . . . . . . . . . . . . . 10-22
Brake Fluid . . . . . . . . . . . . . . . . . 10-23 Battery . . . . . . . . . . . . . . . . . . . . . 10-24
Starter Switch Check . . . . . . . 10-26
Automatic Transmission Shift
Lock Control Function
Check . . . . . . . . . . . . . . . . . . . . . 10-26
Ignition Transmission Lock Check . . . . . . . . . . . . . . . . . . . . . 10-27
Park Brake and P (Park) Mechanism Check . . . . . . . . 10-27
Wiper Blade Replacement . . . . . . . . . . . . . . 10-27
Headlamp Aiming
Headlamp Aiming . . . . . . . . . . 10-28
Bulb Replacement
Bulb Replacement . . . . . . . . . . 10-29
Halogen Bulbs . . . . . . . . . . . . . . 10-29
High Intensity Discharge(HID) Lighting . . . . . . . . . . . . . 10-29
LED Lighting . . . . . . . . . . . . . . . 10-29
Headlamps, Front Turn Signal, Sidemarker, and
Parking Lamps . . . . . . . . . . . . 10-29
Fog Lamps . . . . . . . . . . . . . . . . . 10-33
Taillamps, Turn Signal, Stoplamps, and Back-Up
Lamps (LS and LT) . . . . . . . . 10-33 Taillamps, Turn Signal,
Stoplamps, and Back-Up
Lamps (LTZ) . . . . . . . . . . . . . . 10-34
License Plate Lamp . . . . . . . . 10-36
Replacement Bulbs . . . . . . . . . 10-36
Electrical System
High Voltage Devices and Wiring . . . . . . . . . . . . . . . . . . . . . 10-37
Electrical System Overload . . . . . . . . . . . . . . . . . . 10-37
Fuses . . . . . . . . . . . . . . . . . . . . . . 10-38
Engine Compartment Fuse Block . . . . . . . . . . . . . . . . . . . . . 10-38
Instrument Panel Fuse Block . . . . . . . . . . . . . . . . . . . . . 10-42
Wheels and Tires
Tires . . . . . . . . . . . . . . . . . . . . . . . . 10-44
All-Season Tires . . . . . . . . . . . . 10-45
Winter Tires . . . . . . . . . . . . . . . . 10-46
Summer Tires . . . . . . . . . . . . . . 10-46
Tire Sidewall Labeling . . . . . . 10-46
Tire Designations . . . . . . . . . . . 10-49
Tire Terminology andDefinitions . . . . . . . . . . . . . . . . 10-50
Tire Pressure . . . . . . . . . . . . . . . 10-53
Tire Pressure for High-Speed Operation . . . . . . . . . . . . . . . . . 10-54
Page 291 of 428
Black plate (29,1)Chevrolet Malibu Owner Manual (GMNA-Localizing-U.S./Canada/Mexico-
6081487) - 2014 - CRC - 11/19/13
Vehicle Care 10-29
Bulb Replacement
For the proper type of replacement
bulbs, seeReplacement Bulbs on
page 10-36.
For any bulb‐changing procedure
not listed in this section, contact
your dealer.
Halogen Bulbs
{Warning
Halogen bulbs have pressurized
gas inside and can burst if you
drop or scratch the bulb. You or
others could be injured. Be sure
to read and follow the instructions
on the bulb package.
High Intensity Discharge
(HID) Lighting
{Warning
The high intensity discharge
lighting system operates at a very
high voltage. If you try to service
any of the system components,
you could be seriously injured.
Have your dealer or a qualified
technician service them.
The vehicle may have HID
headlamps. After an HID headlamp
bulb has been replaced, you may
notice that the beam is a slightly
different shade than it was originally.
This is normal.
LED Lighting
This vehicle has several LED lamps.
For replacement of any LED lighting
assembly, contact your dealer.
Headlamps, Front Turn
Signal, Sidemarker, and
Parking Lamps
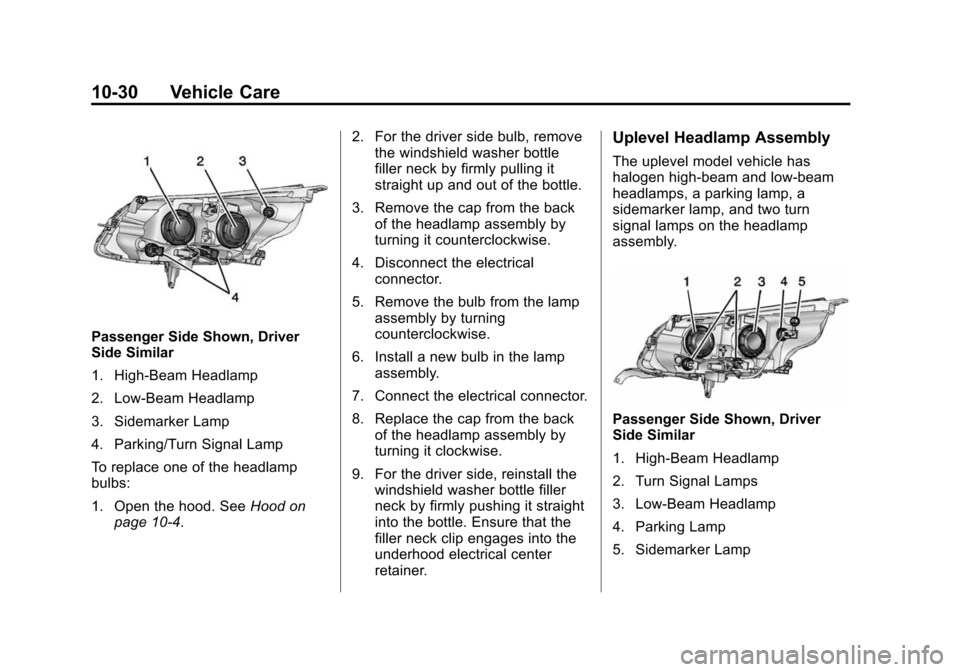
Base Headlamp Assembly
The base model vehicle has
halogen high-beam and low-beam
headlamps, a parking lamp, a
sidemarker lamp, and two turn
signal lamps on the headlamp
assembly.
Page 292 of 428
Black plate (30,1)Chevrolet Malibu Owner Manual (GMNA-Localizing-U.S./Canada/Mexico-
6081487) - 2014 - CRC - 11/19/13
10-30 Vehicle Care
Passenger Side Shown, Driver
Side Similar
1. High-Beam Headlamp
2. Low-Beam Headlamp
3. Sidemarker Lamp
4. Parking/Turn Signal Lamp
To replace one of the headlamp
bulbs:
1. Open the hood. SeeHood on
page 10-4. 2. For the driver side bulb, remove
the windshield washer bottle
filler neck by firmly pulling it
straight up and out of the bottle.
3. Remove the cap from the back of the headlamp assembly by
turning it counterclockwise.
4. Disconnect the electrical connector.
5. Remove the bulb from the lamp assembly by turning
counterclockwise.
6. Install a new bulb in the lamp assembly.
7. Connect the electrical connector.
8. Replace the cap from the back of the headlamp assembly by
turning it clockwise.
9. For the driver side, reinstall the windshield washer bottle filler
neck by firmly pushing it straight
into the bottle. Ensure that the
filler neck clip engages into the
underhood electrical center
retainer.
Uplevel Headlamp Assembly
The uplevel model vehicle has
halogen high-beam and low-beam
headlamps, a parking lamp, a
sidemarker lamp, and two turn
signal lamps on the headlamp
assembly.
Passenger Side Shown, Driver
Side Similar
1. High-Beam Headlamp
2. Turn Signal Lamps
3. Low-Beam Headlamp
4. Parking Lamp
5. Sidemarker Lamp
Page 294 of 428
Black plate (32,1)Chevrolet Malibu Owner Manual (GMNA-Localizing-U.S./Canada/Mexico-
6081487) - 2014 - CRC - 11/19/13
10-32 Vehicle Care
8. For the driver side, reinstall thewindshield washer bottle filler
neck by firmly pushing it straight
into the bottle. Ensure that the
filler neck clip engages into the
underhood electrical center
retainer.
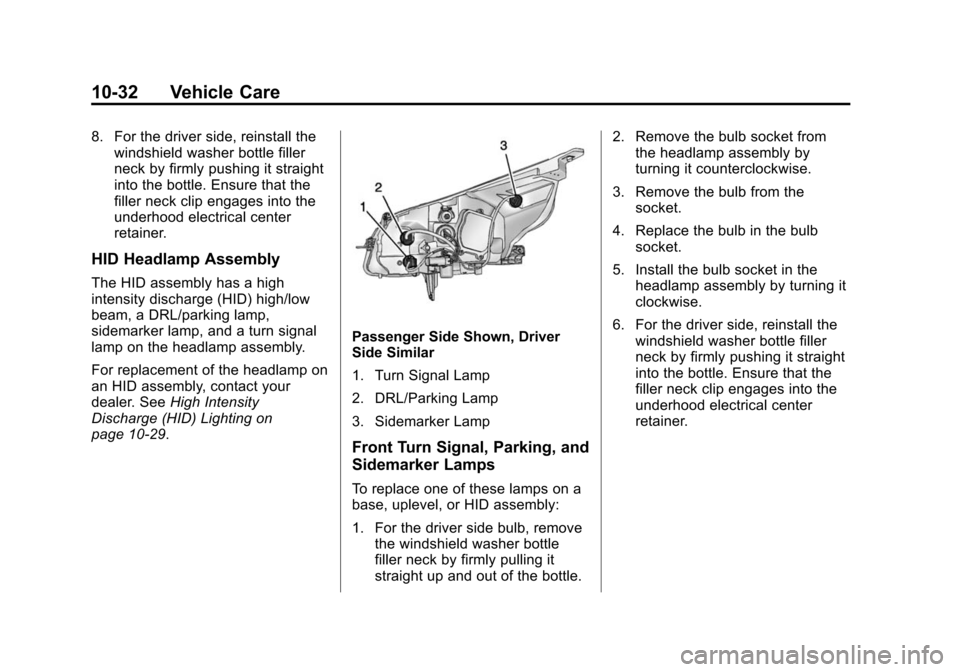
HID Headlamp Assembly
The HID assembly has a high
intensity discharge (HID) high/low
beam, a DRL/parking lamp,
sidemarker lamp, and a turn signal
lamp on the headlamp assembly.
For replacement of the headlamp on
an HID assembly, contact your
dealer. See High Intensity
Discharge (HID) Lighting on
page 10-29.
Passenger Side Shown, Driver
Side Similar
1. Turn Signal Lamp
2. DRL/Parking Lamp
3. Sidemarker Lamp
Front Turn Signal, Parking, and
Sidemarker Lamps
To replace one of these lamps on a
base, uplevel, or HID assembly:
1. For the driver side bulb, remove the windshield washer bottle
filler neck by firmly pulling it
straight up and out of the bottle. 2. Remove the bulb socket from
the headlamp assembly by
turning it counterclockwise.
3. Remove the bulb from the socket.
4. Replace the bulb in the bulb socket.
5. Install the bulb socket in the headlamp assembly by turning it
clockwise.
6. For the driver side, reinstall the windshield washer bottle filler
neck by firmly pushing it straight
into the bottle. Ensure that the
filler neck clip engages into the
underhood electrical center
retainer.
Page 295 of 428
Black plate (33,1)Chevrolet Malibu Owner Manual (GMNA-Localizing-U.S./Canada/Mexico-
6081487) - 2014 - CRC - 11/19/13
Vehicle Care 10-33
Fog Lamps
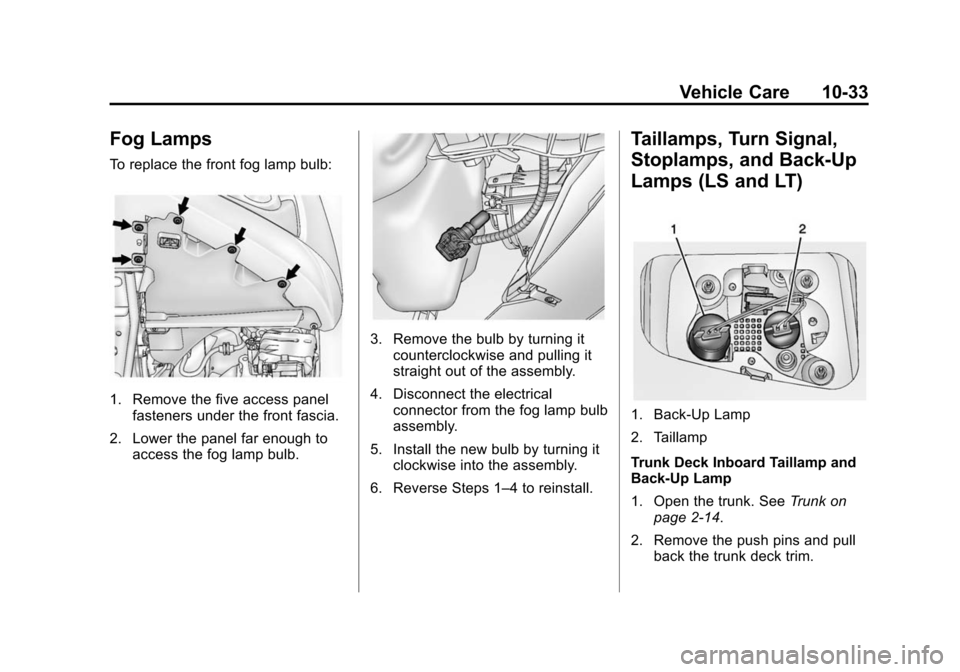
To replace the front fog lamp bulb:
1. Remove the five access panelfasteners under the front fascia.
2. Lower the panel far enough to access the fog lamp bulb.
3. Remove the bulb by turning it
counterclockwise and pulling it
straight out of the assembly.
4. Disconnect the electrical connector from the fog lamp bulb
assembly.
5. Install the new bulb by turning it clockwise into the assembly.
6. Reverse Steps 1–4 to reinstall.
Taillamps, Turn Signal,
Stoplamps, and Back-Up
Lamps (LS and LT)
1. Back-Up Lamp
2. Taillamp
Trunk Deck Inboard Taillamp and
Back-Up Lamp
1. Open the trunk. See Trunk on
page 2-14.
2. Remove the push pins and pull back the trunk deck trim.
Page 296 of 428
Black plate (34,1)Chevrolet Malibu Owner Manual (GMNA-Localizing-U.S./Canada/Mexico-
6081487) - 2014 - CRC - 11/19/13
10-34 Vehicle Care
3. Remove the bulb socket byturning counterclockwise and
pulling straight out.
4. Remove the bulb from the socket.
5. Install the new bulb in the bulb socket.
6. Install the bulb socket by turning clockwise.
7. Install the trunk deck trim.
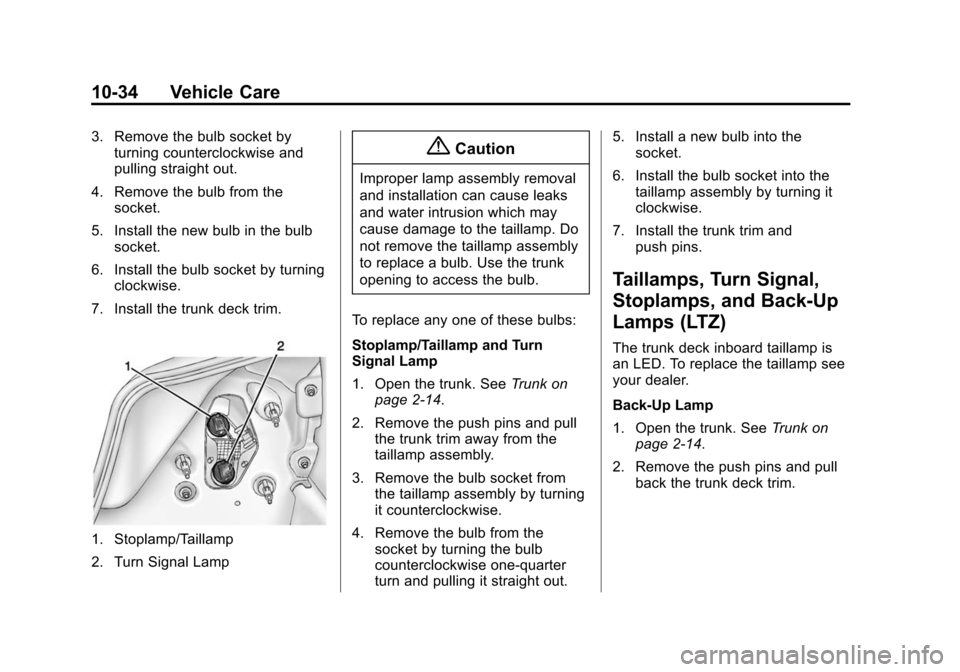
1. Stoplamp/Taillamp
2. Turn Signal Lamp
{Caution
Improper lamp assembly removal
and installation can cause leaks
and water intrusion which may
cause damage to the taillamp. Do
not remove the taillamp assembly
to replace a bulb. Use the trunk
opening to access the bulb.
To replace any one of these bulbs:
Stoplamp/Taillamp and Turn
Signal Lamp
1. Open the trunk. See Trunk on
page 2-14.
2. Remove the push pins and pull the trunk trim away from the
taillamp assembly.
3. Remove the bulb socket from the taillamp assembly by turning
it counterclockwise.
4. Remove the bulb from the socket by turning the bulb
counterclockwise one-quarter
turn and pulling it straight out. 5. Install a new bulb into the
socket.
6. Install the bulb socket into the taillamp assembly by turning it
clockwise.
7. Install the trunk trim and push pins.
Taillamps, Turn Signal,
Stoplamps, and Back-Up
Lamps (LTZ)
The trunk deck inboard taillamp is
an LED. To replace the taillamp see
your dealer.
Back-Up Lamp
1. Open the trunk. See Trunk on
page 2-14.
2. Remove the push pins and pull back the trunk deck trim.