2014 CHEVROLET MALIBU stop start
[x] Cancel search: stop startPage 39 of 428
Black plate (7,1)Chevrolet Malibu Owner Manual (GMNA-Localizing-U.S./Canada/Mexico-
6081487) - 2014 - CRC - 11/19/13
Keys, Doors, and Windows 2-7
Programming with a Recognized
Transmitter (Keyless Access
Vehicles Only)
A new transmitter can be
programmed to the vehicle when
there is one recognized transmitter.
To program, the vehicle must be off
and all of the transmitters, both
currently recognized and new, must
be with you.
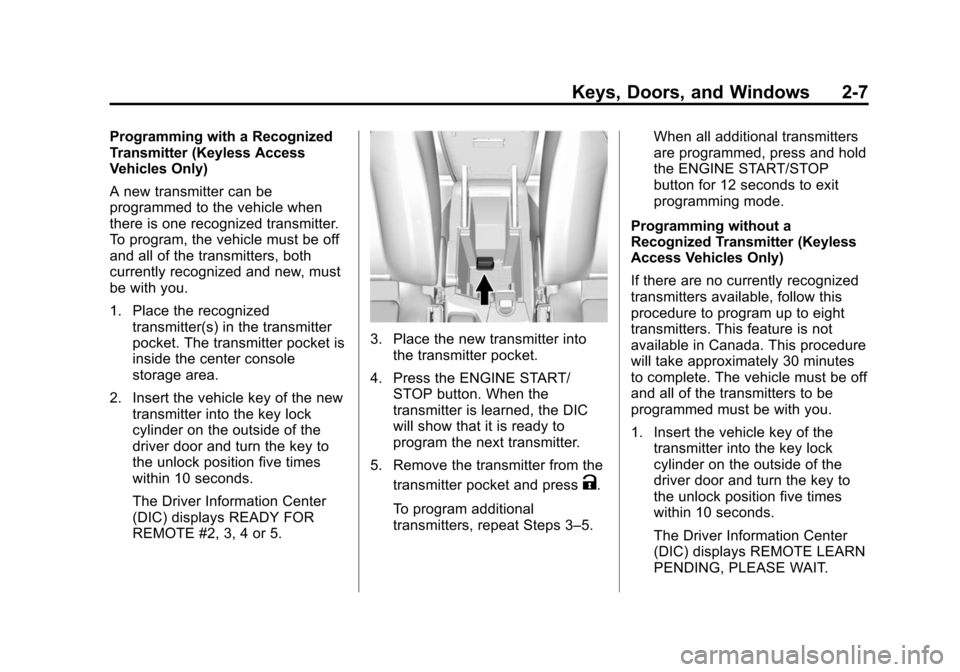
1. Place the recognizedtransmitter(s) in the transmitter
pocket. The transmitter pocket is
inside the center console
storage area.
2. Insert the vehicle key of the new transmitter into the key lock
cylinder on the outside of the
driver door and turn the key to
the unlock position five times
within 10 seconds.
The Driver Information Center
(DIC) displays READY FOR
REMOTE #2, 3, 4 or 5.
3. Place the new transmitter into
the transmitter pocket.
4. Press the ENGINE START/ STOP button. When the
transmitter is learned, the DIC
will show that it is ready to
program the next transmitter.
5. Remove the transmitter from the transmitter pocket and press
K.
To program additional
transmitters, repeat Steps 3–5. When all additional transmitters
are programmed, press and hold
the ENGINE START/STOP
button for 12 seconds to exit
programming mode.
Programming without a
Recognized Transmitter (Keyless
Access Vehicles Only)
If there are no currently recognized
transmitters available, follow this
procedure to program up to eight
transmitters. This feature is not
available in Canada. This procedure
will take approximately 30 minutes
to complete. The vehicle must be off
and all of the transmitters to be
programmed must be with you.
1. Insert the vehicle key of the transmitter into the key lock
cylinder on the outside of the
driver door and turn the key to
the unlock position five times
within 10 seconds.
The Driver Information Center
(DIC) displays REMOTE LEARN
PENDING, PLEASE WAIT.
Page 40 of 428
Black plate (8,1)Chevrolet Malibu Owner Manual (GMNA-Localizing-U.S./Canada/Mexico-
6081487) - 2014 - CRC - 11/19/13
2-8 Keys, Doors, and Windows
2. Wait for 10 minutes until the DICdisplays PRESS ENGINE
START BUTTON TO LEARN
and then press the ENGINE
START/STOP button.
The DIC displays will again
show REMOTE LEARN
PENDING, PLEASE WAIT.
3. Repeat Step 2 two additional times. After the third time, all
previously known transmitters
will no longer work with the
vehicle. Remaining transmitters
can be relearned during the next
steps.
The DIC display should
now show READY FOR
REMOTE # 1.
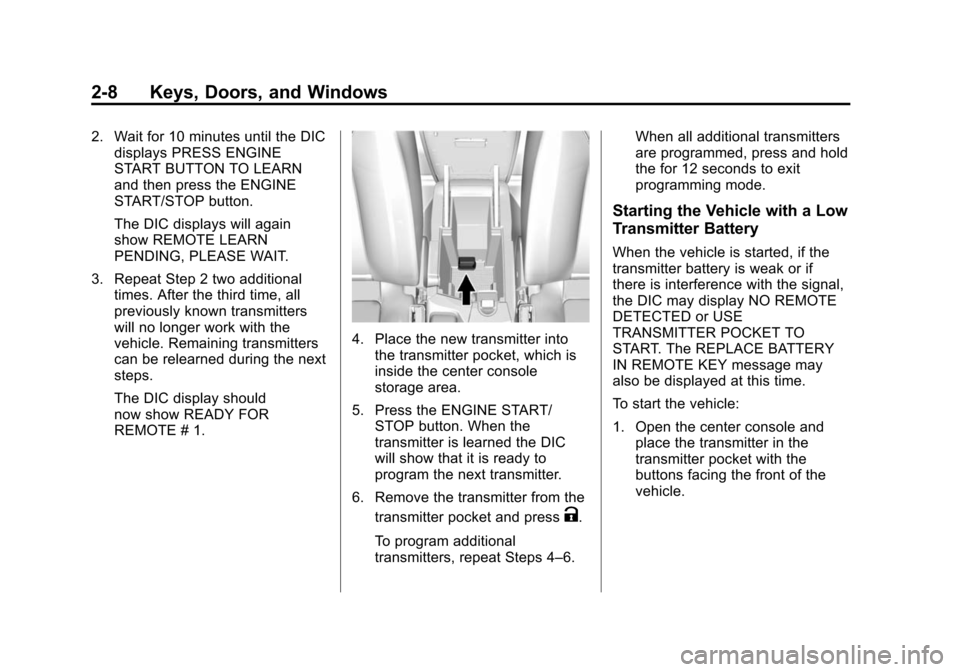
4. Place the new transmitter intothe transmitter pocket, which is
inside the center console
storage area.
5. Press the ENGINE START/ STOP button. When the
transmitter is learned the DIC
will show that it is ready to
program the next transmitter.
6. Remove the transmitter from the transmitter pocket and press
K.
To program additional
transmitters, repeat Steps 4–6. When all additional transmitters
are programmed, press and hold
the for 12 seconds to exit
programming mode.
Starting the Vehicle with a Low
Transmitter Battery
When the vehicle is started, if the
transmitter battery is weak or if
there is interference with the signal,
the DIC may display NO REMOTE
DETECTED or USE
TRANSMITTER POCKET TO
START. The REPLACE BATTERY
IN REMOTE KEY message may
also be displayed at this time.
To start the vehicle:
1. Open the center console and
place the transmitter in the
transmitter pocket with the
buttons facing the front of the
vehicle.
Page 41 of 428
Black plate (9,1)Chevrolet Malibu Owner Manual (GMNA-Localizing-U.S./Canada/Mexico-
6081487) - 2014 - CRC - 11/19/13
Keys, Doors, and Windows 2-9
2. With the vehicle in P (Park) orN (Neutral), press the brake
pedal and press the ENGINE
START/STOP button. See
Starting the Engine on
page 9-19.
Replace the transmitter battery
as soon as possible.
Battery Replacement
Replace the battery if the DIC
indicates that battery replacement is
necessary. See Key and Lock
Messages on page 5-30.
{Caution
When replacing the battery, do
not touch any of the circuitry on
the transmitter. Static from your
body could damage the
transmitter. The battery is not rechargeable. To
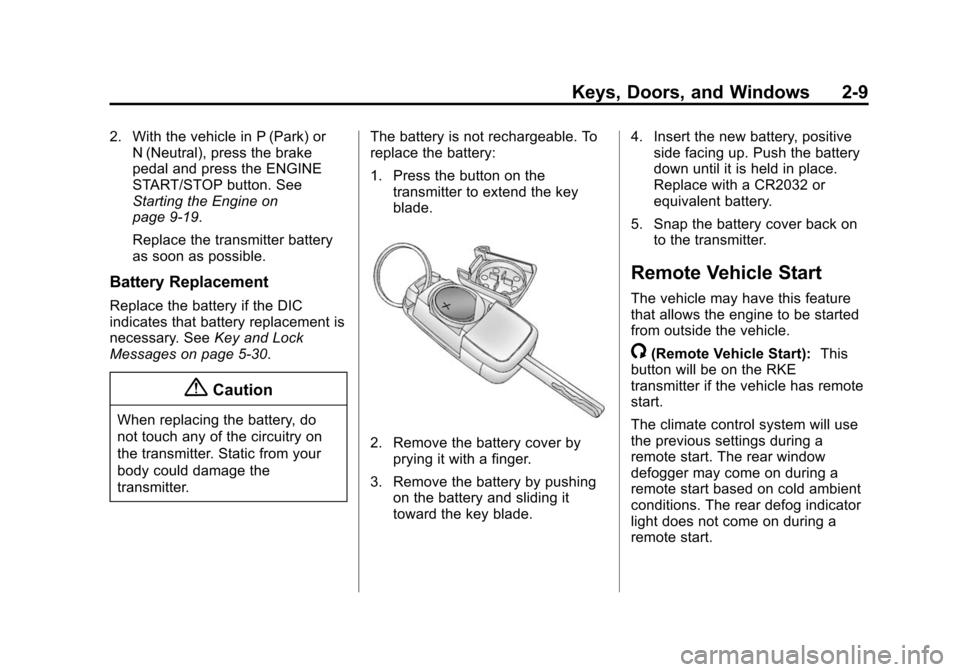
replace the battery:
1. Press the button on the
transmitter to extend the key
blade.
2. Remove the battery cover byprying it with a finger.
3. Remove the battery by pushing on the battery and sliding it
toward the key blade. 4. Insert the new battery, positive
side facing up. Push the battery
down until it is held in place.
Replace with a CR2032 or
equivalent battery.
5. Snap the battery cover back on to the transmitter.
Remote Vehicle Start
The vehicle may have this feature
that allows the engine to be started
from outside the vehicle.
/(Remote Vehicle Start): This
button will be on the RKE
transmitter if the vehicle has remote
start.
The climate control system will use
the previous settings during a
remote start. The rear window
defogger may come on during a
remote start based on cold ambient
conditions. The rear defog indicator
light does not come on during a
remote start.
Page 43 of 428
Black plate (11,1)Chevrolet Malibu Owner Manual (GMNA-Localizing-U.S./Canada/Mexico-
6081487) - 2014 - CRC - 11/19/13
Keys, Doors, and Windows 2-11
.The hazard warning flashers
are on.
.The malfunction indicator lamp
is on.
.The engine coolant temperature
is too high.
.The oil pressure is low.
.Two remote vehicle starts, or a
single remote start with an
extension, have already
been used.
.The vehicle is not in P (Park).
Door Locks
{Warning
Unlocked doors can be
dangerous.
.Passengers, especially
children, can easily open the
doors and fall out of a moving
vehicle. When a door is
locked, the handle will not(Continued)
Warning (Continued)
open it. The chance of being
thrown out of the vehicle in a
crash is increased if the
doors are not locked. So, all
passengers should wear
safety belts properly and the
doors should be locked
whenever the vehicle is
driven.
.Young children who get into
unlocked vehicles may be
unable to get out. A child can
be overcome by extreme heat
and can suffer permanent
injuries or even death from
heat stroke. Always lock the
vehicle whenever leaving it.
.Outsiders can easily enter
through an unlocked door
when you slow down or stop
the vehicle. Locking the doors
can help prevent this from
happening. To lock or unlock the doors from the
outside:
.PressQorKon the Remote
Keyless Entry (RKE) transmitter.
See Remote Keyless Entry
(RKE) System Operation on
page 2-3.
.Use the key in the driver door.
To lock or unlock the doors from the
inside:
.Pushing down the manual lock
knob on the driver door will lock
all doors. Pushing down the
manual lock knob on a
passenger door will lock that
door only.
.Pull the door handle once to
unlock the door. Pulling the
handle again unlatches the door.
.PressQorKon the front door
panels. See Power Door Locks
on page 2-12.
Page 62 of 428
Black plate (6,1)Chevrolet Malibu Owner Manual (GMNA-Localizing-U.S./Canada/Mexico-
6081487) - 2014 - CRC - 11/19/13
3-6 Seats and Restraints
Memory Seats
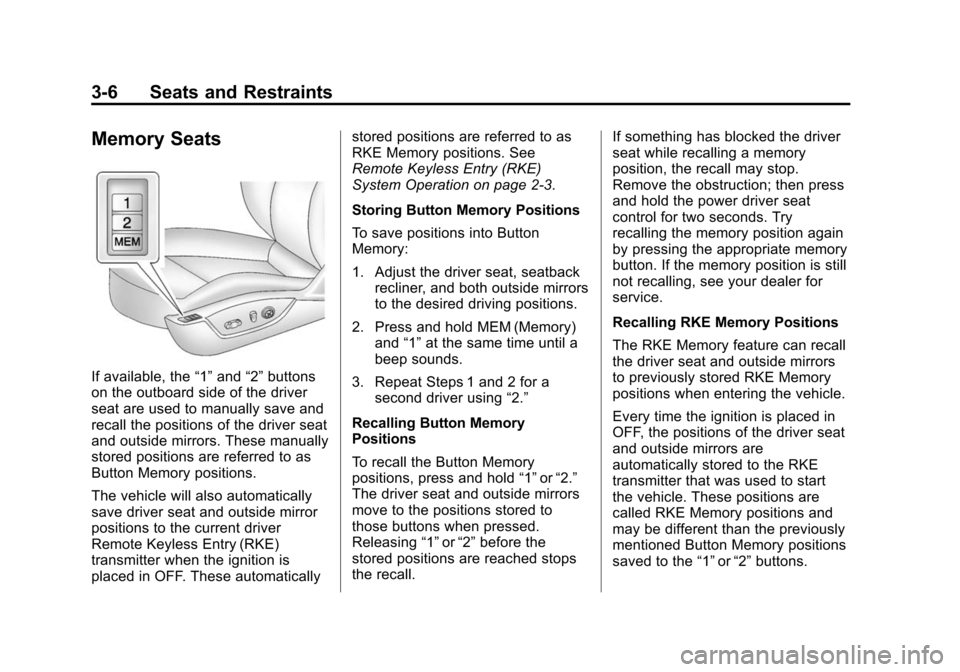
If available, the“1”and “2”buttons
on the outboard side of the driver
seat are used to manually save and
recall the positions of the driver seat
and outside mirrors. These manually
stored positions are referred to as
Button Memory positions.
The vehicle will also automatically
save driver seat and outside mirror
positions to the current driver
Remote Keyless Entry (RKE)
transmitter when the ignition is
placed in OFF. These automatically stored positions are referred to as
RKE Memory positions. See
Remote Keyless Entry (RKE)
System Operation on page 2-3.
Storing Button Memory Positions
To save positions into Button
Memory:
1. Adjust the driver seat, seatback
recliner, and both outside mirrors
to the desired driving positions.
2. Press and hold MEM (Memory) and “1”at the same time until a
beep sounds.
3. Repeat Steps 1 and 2 for a second driver using “2.”
Recalling Button Memory
Positions
To recall the Button Memory
positions, press and hold “1”or“2.”
The driver seat and outside mirrors
move to the positions stored to
those buttons when pressed.
Releasing “1”or“2” before the
stored positions are reached stops
the recall. If something has blocked the driver
seat while recalling a memory
position, the recall may stop.
Remove the obstruction; then press
and hold the power driver seat
control for two seconds. Try
recalling the memory position again
by pressing the appropriate memory
button. If the memory position is still
not recalling, see your dealer for
service.
Recalling RKE Memory Positions
The RKE Memory feature can recall
the driver seat and outside mirrors
to previously stored RKE Memory
positions when entering the vehicle.
Every time the ignition is placed in
OFF, the positions of the driver seat
and outside mirrors are
automatically stored to the RKE
transmitter that was used to start
the vehicle. These positions are
called RKE Memory positions and
may be different than the previously
mentioned Button Memory positions
saved to the
“1”or“2” buttons.
Page 69 of 428
Black plate (13,1)Chevrolet Malibu Owner Manual (GMNA-Localizing-U.S./Canada/Mexico-
6081487) - 2014 - CRC - 11/19/13
Seats and Restraints 3-13
would apply force on your
abdomen. This could cause
serious or even fatal injuries.
.Wear the shoulder belt over the
shoulder and across the chest.
These parts of the body are best
able to take belt restraining
forces. The shoulder belt locks if
there is a sudden stop or crash.
{Warning
You can be seriously injured,
or even killed, by not wearing
your safety belt properly.
.Never allow the lap or
shoulder belt to become
loose or twisted.
.Never wear the shoulder belt
under both arms or behind
your back.
.Never route the lap or
shoulder belt over an
armrest.
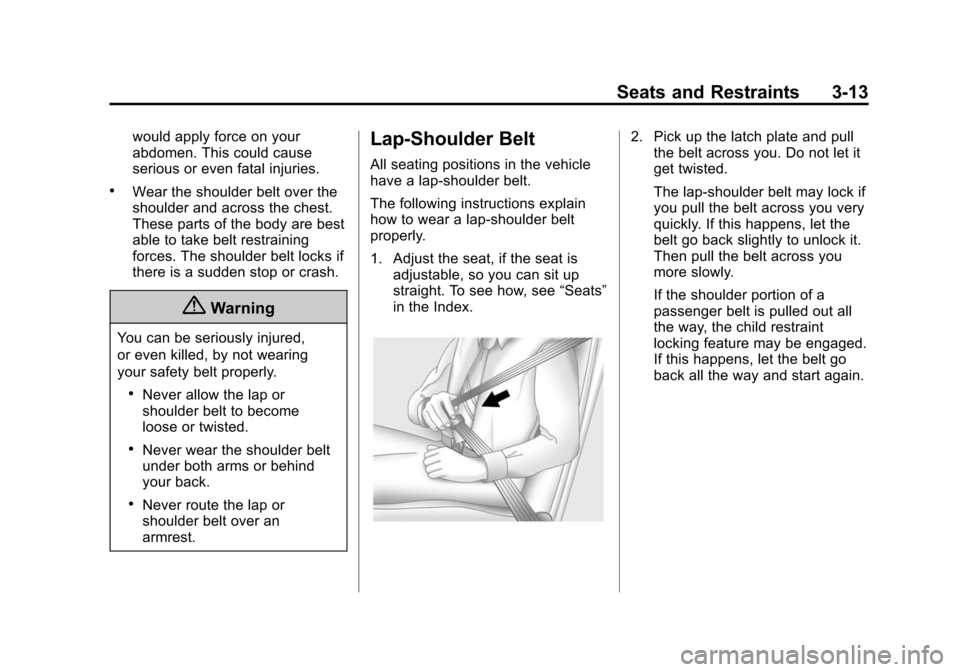
Lap-Shoulder Belt
All seating positions in the vehicle
have a lap-shoulder belt.
The following instructions explain
how to wear a lap-shoulder belt
properly.
1. Adjust the seat, if the seat isadjustable, so you can sit up
straight. To see how, see “Seats”
in the Index.
2. Pick up the latch plate and pull the belt across you. Do not let it
get twisted.
The lap-shoulder belt may lock if
you pull the belt across you very
quickly. If this happens, let the
belt go back slightly to unlock it.
Then pull the belt across you
more slowly.
If the shoulder portion of a
passenger belt is pulled out all
the way, the child restraint
locking feature may be engaged.
If this happens, let the belt go
back all the way and start again.
Page 114 of 428
Black plate (4,1)Chevrolet Malibu Owner Manual (GMNA-Localizing-U.S./Canada/Mexico-
6081487) - 2014 - CRC - 11/19/13
5-4 Instruments and Controls
nL(Windshield Washer): Pull
the windshield wiper lever toward
you to spray windshield washer fluid
and activate the wipers. The wipers
will continue until the lever is
released or the maximum wash time
is reached. When the windshield
wiper lever is released, additional
wipes may occur depending on how
long the windshield washer had
been activated. For more
information on filling the windshield
washer fluid reservoir, see Washer
Fluid on page 10-21.
{Warning
In freezing weather, do not use
the washer until the windshield is
warmed. Otherwise the washer
fluid can form ice on the
windshield, blocking your vision.
Clear snow and ice from the wiper
blades and windshield before using
them. If frozen to the windshield,
carefully loosen or thaw them. Damaged blades should be
replaced. See
Wiper Blade
Replacement on page 10-27.
Heavy snow or ice can overload the
wiper motor.
Wipe Parking
If the ignition is turned to LOCK/
OFF while the wipers are on LO, HI,
or INT, they will immediately stop.
If the windshield wiper lever is then
moved to off before the driver door
is opened or within 10 minutes, the
wipers will restart and move to the
base of the windshield.
If the ignition is turned to LOCK/
OFF while the wipers are performing
wipes due to windshield washing,
the wipers continue to run until they
reach the base of the windshield.
Compass
The vehicle may have a compass
display on the center stack. The
compass receives its heading and
other information from the Global Positioning System (GPS) antenna,
StabiliTrak
®, and vehicle speed
information.
The compass system is designed to
operate for a certain number of
miles or degrees of turn before
needing a signal from the GPS
satellites. When the compass
display shows CAL, drive the
vehicle for a short distance in an
open area where it can receive a
GPS signal. The compass system
will automatically determine when a
GPS signal is restored and provide
a heading again. See Compass
Messages on page 5-28 for the
messages that may be displayed for
the compass.
Clock
The infotainment system controls
are used to access the time and
date settings through the menu
system. The clock menu can only
be used with the radio on while in
ON/RUN or ACC/ACCESSORY.
See Overview on page 7-3 for
Page 120 of 428
Black plate (10,1)Chevrolet Malibu Owner Manual (GMNA-Localizing-U.S./Canada/Mexico-
6081487) - 2014 - CRC - 11/19/13
5-10 Instruments and Controls
Speedometer
The speedometer shows the
vehicle's speed in either kilometers
per hour (km/h) or miles per
hour (mph).
Odometer
The odometer shows how far the
vehicle has been driven, in either
kilometers or miles.
This vehicle has a tamper‐resistant
odometer. The digital odometer will
read 999,999 if it is turned back.
If the vehicle needs a new odometer
installed, it must be set to the
mileage total of the old odometer.
If that is not possible, then it must
be set at zero and a label must be
put on the driver door to show the
old mileage reading when the new
odometer was installed.
Trip Odometer
The trip odometer can show how far
the vehicle has been driven since
the trip odometer was last reset.The trip odometer is accessed and
reset through the Driver Information
Center (DIC). See
Driver
Information Center (DIC) on
page 5-24.
Tachometer
The tachometer displays the engine
speed in revolutions per
minute (rpm).
For eAssist vehicles, when the
ignition is in ON/RUN, the
tachometer indicates the vehicle
status. When pointing to AUTO
STOP, the engine is off but the
vehicle is on and can move. The
engine could auto start at any time.
When the indicator points to OFF,
the vehicle is off.
When the engine is on, the
tachometer will indicate the engine’s
revolutions per minute (rpm). The
tachometer may vary by several
hundred rpm’s, during auto stop
mode, when the engine is shutting
off and restarting. A slight bump may be felt when the
transmission is determining the
most fuel efficient operating range.
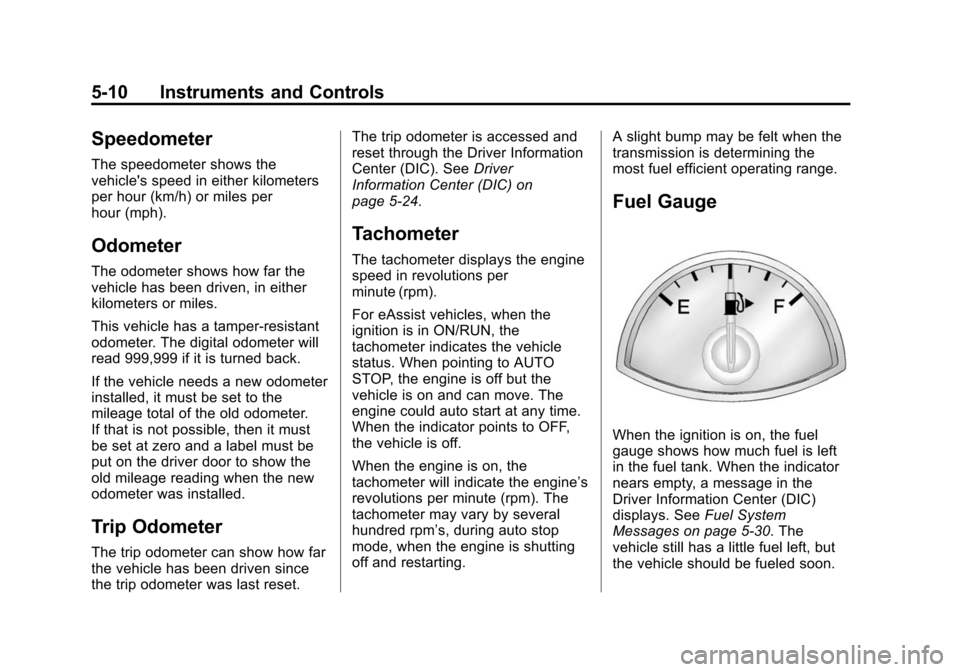
Fuel Gauge
When the ignition is on, the fuel
gauge shows how much fuel is left
in the fuel tank. When the indicator
nears empty, a message in the
Driver Information Center (DIC)
displays. See
Fuel System
Messages on page 5-30. The
vehicle still has a little fuel left, but
the vehicle should be fueled soon.