2014 CHEVROLET EQUINOX headlamp
[x] Cancel search: headlampPage 237 of 390
Black plate (45,1)Chevrolet Equinox Owner Manual (GMNA-Localizing-U.S./Canada-
6081479) - 2014 - crc2 - 10/23/13
Driving and Operating 9-45
Warning (Continued)
can limit visibility such as fog,
rain, or snow, or if the headlamps
or windshield are not cleaned or
in proper condition. Keep the
windshield, headlamps, and
camera sensors clean and in
good repair.
LDW warnings may occur due to tar
marks, shadows, cracks in the road,
or other road imperfections. This is
normal system operation; the
vehicle does not need service.
Fuel
Use of the recommended fuel is an
important part of the proper
maintenance of this vehicle. When
driving in the U.S., to help keep the
engine clean and maintain optimum
vehicle performance, we
recommend using TOP TIER
Detergent Gasolines. See
www.toptiergas.com for a list of TOP
TIER Detergent Gasolines.
If the vehicle has a yellow fuel cap,
E85 or FlexFuel can be used in the
vehicle. See E85 or FlexFuel on
page 9-47.
Recommended Fuel
Use regular unleaded gasoline with
a posted octane rating of 87 or
higher. If the octane rating is less
than 87, an audible knocking noise
may be heard. If this occurs, use a
gasoline rated at 87 octane or
higher as soon as possible. If heavy
knocking is heard when using
gasoline with a higher octane rating,
the engine needs service.
Use of Seasonal Fuels
Use summer and winter fuels in the
appropriate season. Driving or
starting could be affected if the
incorrect fuel is used. Drive the
vehicle with the engine running until
the fuel is a half tank or less, then
refuel with the current seasonal fuel.
Page 249 of 390
Black plate (1,1)Chevrolet Equinox Owner Manual (GMNA-Localizing-U.S./Canada-
6081479) - 2014 - crc2 - 10/23/13
Vehicle Care 10-1
Vehicle Care
General Information
General Information . . . . . . . . . . 10-2
California Proposition65 Warning . . . . . . . . . . . . . . . . . 10-2
California Perchlorate Materials Requirements . . . . 10-2
Accessories and Modifications . . . . . . . . . . . . . . . 10-2
Vehicle Checks
Doing Your OwnService Work . . . . . . . . . . . . . . . 10-3
Hood . . . . . . . . . . . . . . . . . . . . . . . . 10-4
Engine Compartment Overview . . . . . . . . . . . . . . . . . . . 10-5
Engine Cover . . . . . . . . . . . . . . . . 10-8
Engine Oil . . . . . . . . . . . . . . . . . . . 10-8
Engine Oil Life System . . . . . 10-11
Automatic Transmission Fluid . . . . . . . . . . . . . . . . . . . . . . 10-12
Engine Air Cleaner/Filter . . . . 10-12
Cooling System . . . . . . . . . . . . 10-14
Engine Coolant . . . . . . . . . . . . . 10-15
Engine Overheating . . . . . . . . 10-18
Power Steering Fluid (2.4L L4 Engine) . . . . . . . . . . . . . . . . 10-20 Power Steering Fluid (3.6L
V6 Engine) . . . . . . . . . . . . . . . . 10-20
Washer Fluid . . . . . . . . . . . . . . . 10-21
Brakes . . . . . . . . . . . . . . . . . . . . . 10-21
Brake Fluid . . . . . . . . . . . . . . . . . 10-22
Battery . . . . . . . . . . . . . . . . . . . . . 10-24
All-Wheel Drive . . . . . . . . . . . . . 10-24
Starter Switch Check . . . . . . . 10-24
Automatic Transmission Shift Lock Control Function
Check . . . . . . . . . . . . . . . . . . . . . 10-25
Ignition Transmission Lock Check . . . . . . . . . . . . . . . . . . . . . 10-25
Park Brake and P (Park) Mechanism Check . . . . . . . . 10-25
Wiper Blade Replacement . . . . . . . . . . . . . . 10-26
Headlamp Aiming
Headlamp Aiming . . . . . . . . . . 10-27
Bulb Replacement
Bulb Replacement . . . . . . . . . . 10-28
Halogen Bulbs . . . . . . . . . . . . . . 10-28
Headlamps, Front TurnSignal, Sidemarker, and
Parking Lamps . . . . . . . . . . . . 10-28
Fog Lamps . . . . . . . . . . . . . . . . . 10-29 Taillamps, Turn Signal,
Sidemarker, Stoplamps,
and Back-Up Lamps . . . . . . 10-29
License Plate Lamp . . . . . . . . 10-30
Replacement Bulbs . . . . . . . . . 10-31
Electrical System
Fuses . . . . . . . . . . . . . . . . . . . . . . 10-32
Engine Compartment Fuse Block . . . . . . . . . . . . . . . . . . . . . 10-32
Instrument Panel Fuse Block . . . . . . . . . . . . . . . . . . . . . 10-35
Wheels and Tires
Tires . . . . . . . . . . . . . . . . . . . . . . . . 10-38
All-Season Tires . . . . . . . . . . . . 10-39
Winter Tires . . . . . . . . . . . . . . . . 10-39
Summer Tires . . . . . . . . . . . . . . 10-39
Tire Sidewall Labeling . . . . . . 10-40
Tire Designations . . . . . . . . . . . 10-42
Tire Terminology andDefinitions . . . . . . . . . . . . . . . . 10-43
Tire Pressure . . . . . . . . . . . . . . . 10-46
Tire Pressure Monitor System . . . . . . . . . . . . . . . . . . . 10-47
Tire Pressure Monitor Operation . . . . . . . . . . . . . . . . . 10-48
Tire Inspection . . . . . . . . . . . . . . 10-51
Tire Rotation . . . . . . . . . . . . . . . 10-51
Page 275 of 390
Black plate (27,1)Chevrolet Equinox Owner Manual (GMNA-Localizing-U.S./Canada-
6081479) - 2014 - crc2 - 10/23/13
Vehicle Care 10-27
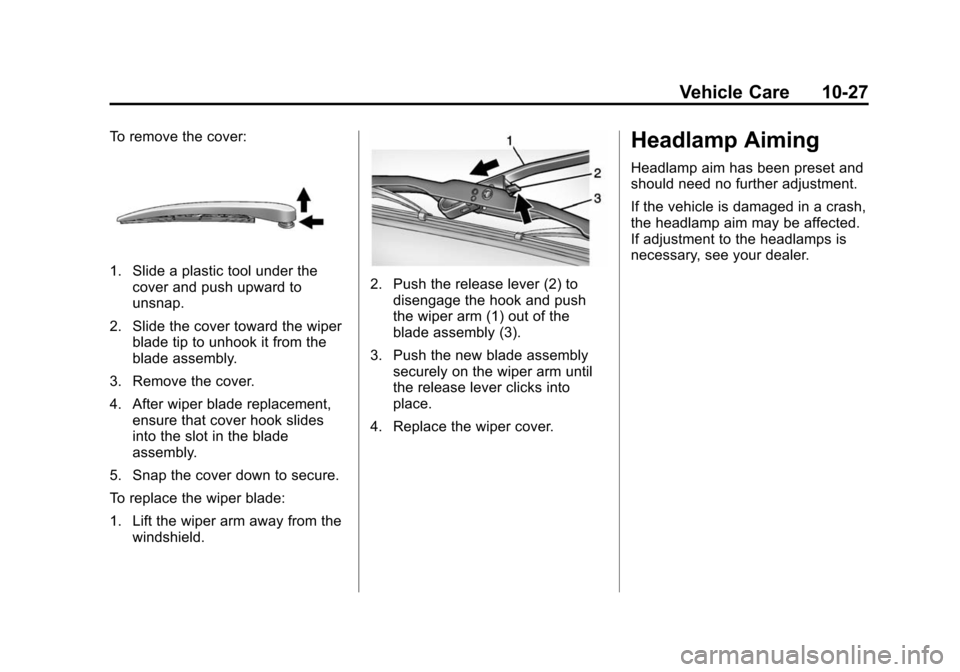
To remove the cover:
1. Slide a plastic tool under thecover and push upward to
unsnap.
2. Slide the cover toward the wiper blade tip to unhook it from the
blade assembly.
3. Remove the cover.
4. After wiper blade replacement, ensure that cover hook slides
into the slot in the blade
assembly.
5. Snap the cover down to secure.
To replace the wiper blade:
1. Lift the wiper arm away from the windshield.2. Push the release lever (2) todisengage the hook and push
the wiper arm (1) out of the
blade assembly (3).
3. Push the new blade assembly securely on the wiper arm until
the release lever clicks into
place.
4. Replace the wiper cover.
Headlamp Aiming
Headlamp aim has been preset and
should need no further adjustment.
If the vehicle is damaged in a crash,
the headlamp aim may be affected.
If adjustment to the headlamps is
necessary, see your dealer.
Page 276 of 390
Black plate (28,1)Chevrolet Equinox Owner Manual (GMNA-Localizing-U.S./Canada-
6081479) - 2014 - crc2 - 10/23/13
10-28 Vehicle Care
Bulb Replacement
For the proper type of replacement
bulbs, seeReplacement Bulbs on
page 10-31.
For any bulb changing procedure
not listed in this section, contact
your dealer.
Halogen Bulbs
{Warning
Halogen bulbs have pressurized
gas inside and can burst if you
drop or scratch the bulb. You or
others could be injured. Be sure
to read and follow the instructions
on the bulb package.
Headlamps, Front Turn
Signal, Sidemarker, and
Parking Lamps
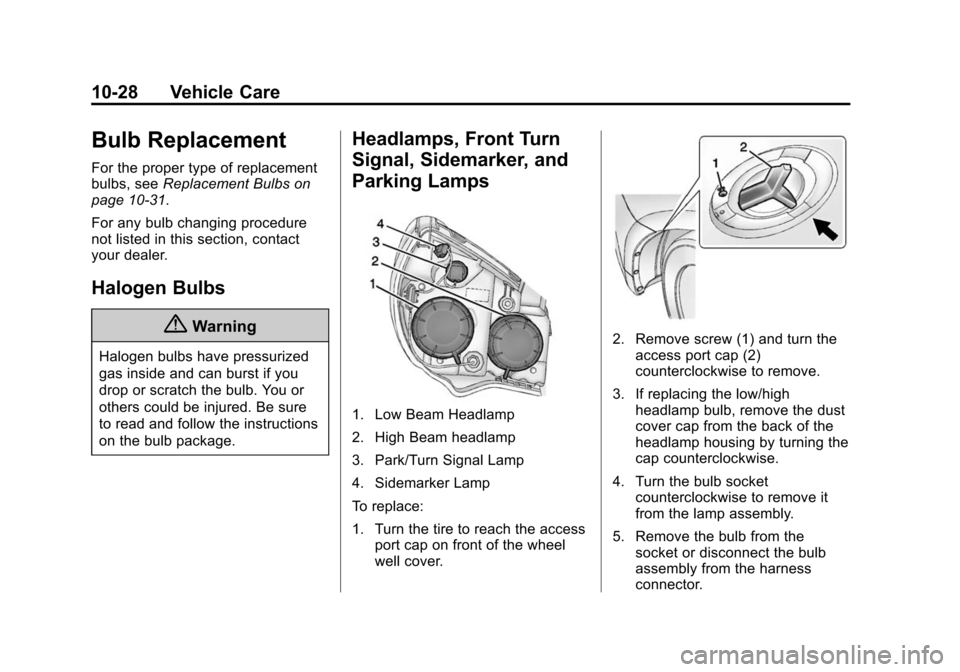
1. Low Beam Headlamp
2. High Beam headlamp
3. Park/Turn Signal Lamp
4. Sidemarker Lamp
To replace:
1. Turn the tire to reach the access
port cap on front of the wheel
well cover.
2. Remove screw (1) and turn theaccess port cap (2)
counterclockwise to remove.
3. If replacing the low/high headlamp bulb, remove the dust
cover cap from the back of the
headlamp housing by turning the
cap counterclockwise.
4. Turn the bulb socket counterclockwise to remove it
from the lamp assembly.
5. Remove the bulb from the socket or disconnect the bulb
assembly from the harness
connector.
Page 279 of 390
Black plate (31,1)Chevrolet Equinox Owner Manual (GMNA-Localizing-U.S./Canada-
6081479) - 2014 - crc2 - 10/23/13
Vehicle Care 10-31
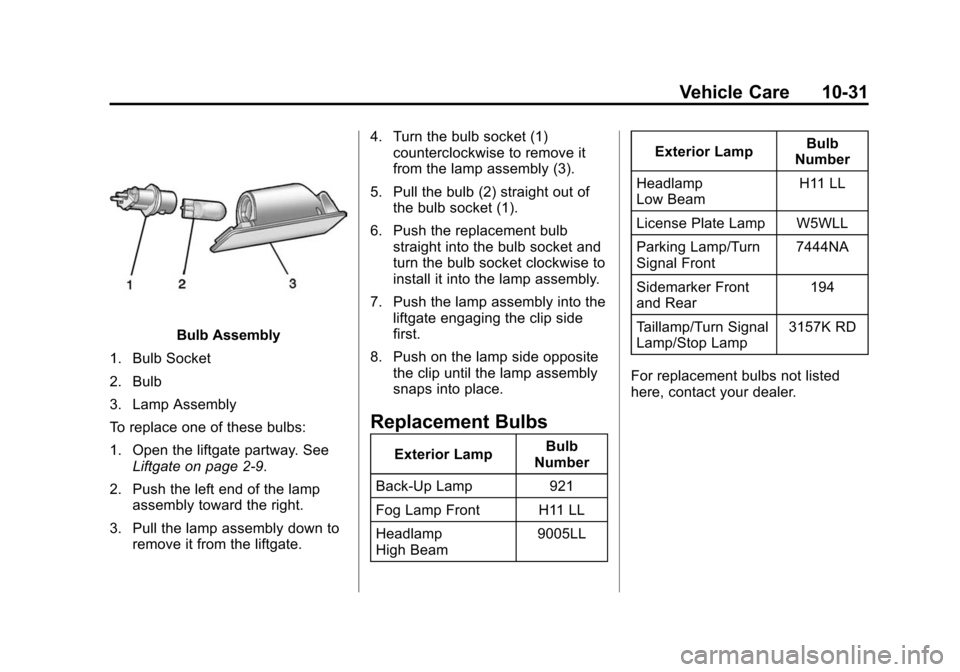
Bulb Assembly
1. Bulb Socket
2. Bulb
3. Lamp Assembly
To replace one of these bulbs:
1. Open the liftgate partway. See Liftgate on page 2-9.
2. Push the left end of the lamp assembly toward the right.
3. Pull the lamp assembly down to remove it from the liftgate. 4. Turn the bulb socket (1)
counterclockwise to remove it
from the lamp assembly (3).
5. Pull the bulb (2) straight out of the bulb socket (1).
6. Push the replacement bulb straight into the bulb socket and
turn the bulb socket clockwise to
install it into the lamp assembly.
7. Push the lamp assembly into the liftgate engaging the clip side
first.
8. Push on the lamp side opposite the clip until the lamp assembly
snaps into place.
Replacement Bulbs
Exterior Lamp Bulb
Number
Back-Up Lamp 921
Fog Lamp Front H11 LL
Headlamp
High Beam 9005LLExterior Lamp
Bulb
Number
Headlamp
Low Beam H11 LL
License Plate Lamp W5WLL
Parking Lamp/Turn
Signal Front 7444NA
Sidemarker Front
and Rear 194
Taillamp/Turn Signal
Lamp/Stop Lamp 3157K RD
For replacement bulbs not listed
here, contact your dealer.
Page 282 of 390
Black plate (34,1)Chevrolet Equinox Owner Manual (GMNA-Localizing-U.S./Canada-
6081479) - 2014 - crc2 - 10/23/13
10-34 Vehicle Care
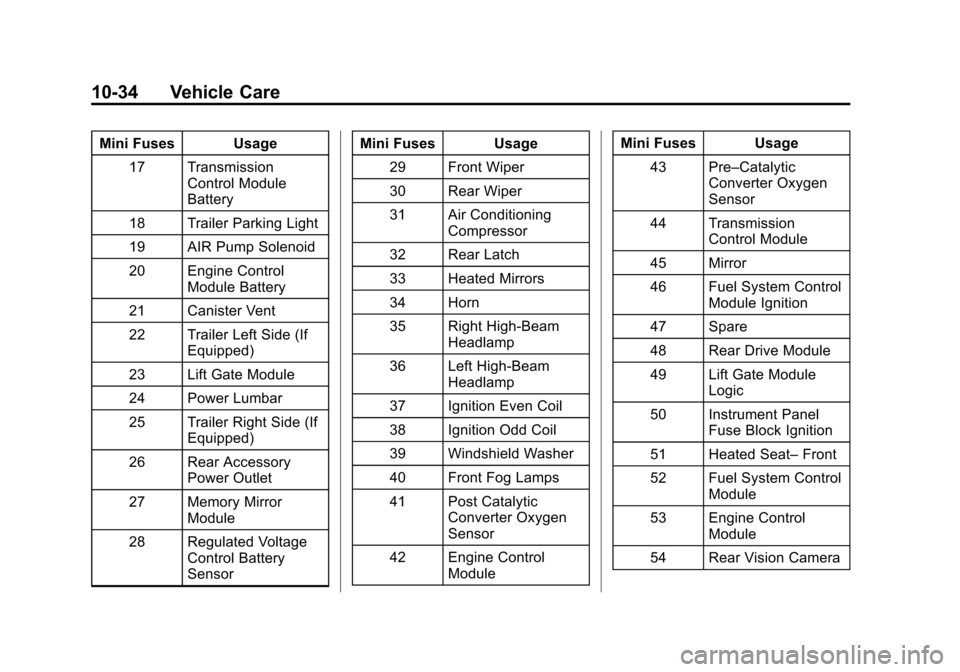
Mini Fuses Usage17 Transmission Control Module
Battery
18 Trailer Parking Light
19 AIR Pump Solenoid
20 Engine Control Module Battery
21 Canister Vent
22 Trailer Left Side (If Equipped)
23 Lift Gate Module
24 Power Lumbar
25 Trailer Right Side (If Equipped)
26 Rear Accessory Power Outlet
27 Memory Mirror Module
28 Regulated Voltage Control Battery
Sensor Mini Fuses Usage
29 Front Wiper
30 Rear Wiper
31 Air Conditioning Compressor
32 Rear Latch
33 Heated Mirrors
34 Horn
35 Right High-Beam Headlamp
36 Left High-Beam Headlamp
37 Ignition Even Coil
38 Ignition Odd Coil
39 Windshield Washer
40 Front Fog Lamps
41 Post Catalytic Converter Oxygen
Sensor
42 Engine Control Module Mini Fuses Usage
43 Pre–Catalytic Converter Oxygen
Sensor
44 Transmission Control Module
45 Mirror
46 Fuel System Control Module Ignition
47 Spare
48 Rear Drive Module
49 Lift Gate Module Logic
50 Instrument Panel Fuse Block Ignition
51 Heated Seat– Front
52 Fuel System Control Module
53 Engine Control Module
54 Rear Vision Camera
Page 283 of 390
Black plate (35,1)Chevrolet Equinox Owner Manual (GMNA-Localizing-U.S./Canada-
6081479) - 2014 - crc2 - 10/23/13
Vehicle Care 10-35
Mini Fuses Usage78 Passenger Power Lumber
Midi Fuse Usage 55 Electric Power Steering
Micro
Relays Usage
56 AIR Pump Solenoid
57 Brake Booster
58 Cooling Fan Low
59 Headlamp High Beam
60 Cooling Fan Control
61 Wiper On/Off Control
62 Air Conditioning Compressor
63 Rear Defogger
64 Wiper Speed Micro
Relays Usage
65 Fog Lamp
66 Engine Control
67 Starter
68 Run/Crank
Mini Relays Usage 69 Cooling Fan High
70 AIR Pump MotorInstrument Panel Fuse
Block
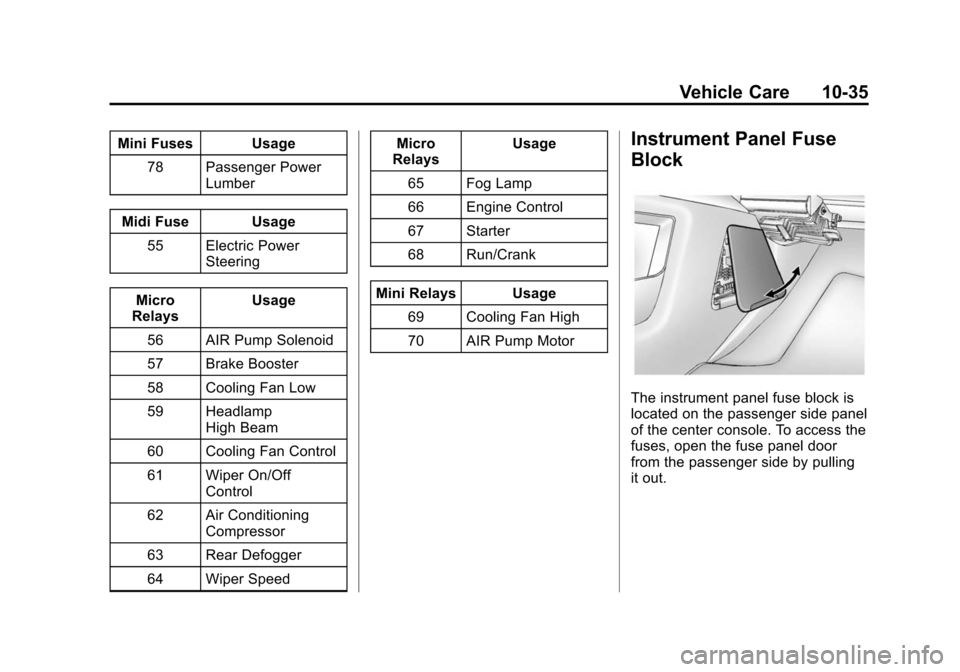
The instrument panel fuse block is
located on the passenger side panel
of the center console. To access the
fuses, open the fuse panel door
from the passenger side by pulling
it out.
Page 306 of 390
Black plate (58,1)Chevrolet Equinox Owner Manual (GMNA-Localizing-U.S./Canada-
6081479) - 2014 - crc2 - 10/23/13
10-58 Vehicle Care
{Caution
The wrong wheel can also cause
problems with bearing life, brake
cooling, speedometer or
odometer calibration, headlamp
aim, bumper height, vehicle
ground clearance, and tire or tire
chain clearance to the body and
chassis.
Used Replacement Wheels
{Warning
Replacing a wheel with a used
one is dangerous. How it has
been used or how far it has been
driven may be unknown. It could
fail suddenly and cause a crash.
When replacing wheels, use a
new GM original equipment
wheel.
Tire Chains
{Warning
Do not use tire chains. There is
not enough clearance. Tire chains
used on a vehicle without the
proper amount of clearance can
cause damage to the brakes,
suspension or other vehicle parts.
The area damaged by the tire
chains could cause you to lose
control of the vehicle and you or
others may be injured in a crash.
A Type S low-profile cable can be
used only if the cable
manufacturer recommends it for
use on the vehicle, the tire size
combination, and road conditions.
Follow the manufacturer's
instructions. To help avoid
damage to the vehicle, drive
slowly, readjust or remove the
cable if it is contacting the vehicle
and do not spin the vehicle's tires.(Continued)
Warning (Continued)
Install the cables on the front tires
only. Cables should not be
installed on the spare tire or on
the optional 19-inch tire.
If a Tire Goes Flat
It is unusual for a tire to blow out
while driving, especially if the tires
are maintained properly. See Tires
on page 10-38. If air goes out of a
tire, it is much more likely to leak
out slowly. But if there ever is a
blowout, here are a few tips about
what to expect and what to do:
If a front tire fails, the flat tire
creates a drag that pulls the vehicle
toward that side. Take your foot off
the accelerator pedal and grip the
steering wheel firmly. Steer to
maintain lane position, and then
gently brake to a stop, well off the
road, if possible.