2014 CHEVROLET CRUZE tow
[x] Cancel search: towPage 1 of 420

Black plate (1,1)Chevrolet Cruze Owner Manual (GMNA-Localizing-U.S./Canada-6007168) -
2014 - 2nd Edition - 7/15/13
2014 Chevrolet Cruze Owner ManualM
In Brief. . . . . . . . . . . . . . . . . . . . . . . . 1-1
Instrument Panel . . . . . . . . . . . . . . 1-2
Initial Drive Information . . . . . . . . 1-4
Vehicle Features . . . . . . . . . . . . . 1-15
Performance and Maintenance . . . . . . . . . . . . . . . . 1-19
Keys, Doors, and Windows . . . . . . . . . . . . . . . . . . . . 2-1
Keys and Locks . . . . . . . . . . . . . . . 2-1
Doors . . . . . . . . . . . . . . . . . . . . . . . . 2-14
Vehicle Security . . . . . . . . . . . . . . 2-16
Exterior Mirrors . . . . . . . . . . . . . . . 2-18
Interior Mirrors . . . . . . . . . . . . . . . . 2-19
Windows . . . . . . . . . . . . . . . . . . . . . 2-20
Roof . . . . . . . . . . . . . . . . . . . . . . . . . . 2-23
Seats and Restraints . . . . . . . . . 3-1
Head Restraints . . . . . . . . . . . . . . . 3-2
Front Seats . . . . . . . . . . . . . . . . . . . . 3-3
Rear Seats . . . . . . . . . . . . . . . . . . . . 3-6
Safety Belts . . . . . . . . . . . . . . . . . . . . 3-8
Airbag System . . . . . . . . . . . . . . . . 3-16
Child Restraints . . . . . . . . . . . . . . 3-30 Storage
. . . . . . . . . . . . . . . . . . . . . . . 4-1
Storage Compartments . . . . . . . . 4-1
Additional Storage Features . . . 4-2
Instruments and Controls . . . . 5-1
Controls . . . . . . . . . . . . . . . . . . . . . . . 5-2
Warning Lights, Gauges, and
Indicators . . . . . . . . . . . . . . . . . . . . 5-7
Information Displays . . . . . . . . . . 5-23
Vehicle Messages . . . . . . . . . . . . 5-27
Vehicle Personalization . . . . . . . 5-35
Lighting . . . . . . . . . . . . . . . . . . . . . . . 6-1
Exterior Lighting . . . . . . . . . . . . . . . 6-1
Interior Lighting . . . . . . . . . . . . . . . . 6-4
Lighting Features . . . . . . . . . . . . . . 6-5
Infotainment System . . . . . . . . . 7-1
Introduction . . . . . . . . . . . . . . . . . . . . 7-1
Radio . . . . . . . . . . . . . . . . . . . . . . . . . . 7-7
Audio Players . . . . . . . . . . . . . . . . 7-14
Phone . . . . . . . . . . . . . . . . . . . . . . . . 7-18
Trademarks and License Agreements . . . . . . . . . . . . . . . . . 7-29 Climate Controls
. . . . . . . . . . . . . 8-1
Climate Control Systems . . . . . . 8-1
Air Vents . . . . . . . . . . . . . . . . . . . . . . . 8-6
Maintenance . . . . . . . . . . . . . . . . . . . 8-7
Driving and Operating . . . . . . . . 9-1
Driving Information . . . . . . . . . . . . . 9-2
Starting and Operating . . . . . . . 9-14
Engine Exhaust . . . . . . . . . . . . . . 9-26
Automatic Transmission . . . . . . 9-33
Manual Transmission . . . . . . . . . 9-37
Brakes . . . . . . . . . . . . . . . . . . . . . . . 9-39
Ride Control Systems . . . . . . . . 9-41
Cruise Control . . . . . . . . . . . . . . . . 9-43
Driver Assistance Systems . . . 9-45
Fuel . . . . . . . . . . . . . . . . . . . . . . . . . . 9-52
Trailer Towing . . . . . . . . . . . . . . . . 9-63
Conversions and Add-Ons . . . 9-69
Vehicle Care . . . . . . . . . . . . . . . . . 10-1
General Information . . . . . . . . . . 10-2
Vehicle Checks . . . . . . . . . . . . . . . 10-3
Headlamp Aiming . . . . . . . . . . . 10-32
Bulb Replacement . . . . . . . . . . 10-32
Electrical System . . . . . . . . . . . . 10-37
Wheels and Tires . . . . . . . . . . . 10-43
Page 2 of 420

Black plate (2,1)Chevrolet Cruze Owner Manual (GMNA-Localizing-U.S./Canada-6007168) -
2014 - 2nd Edition - 7/15/13
2014 Chevrolet Cruze Owner ManualM
Jump Starting . . . . . . . . . . . . . . . 10-82
Towing the Vehicle . . . . . . . . . . 10-85
Appearance Care . . . . . . . . . . . 10-88
Service and Maintenance . . . 11-1
General Information . . . . . . . . . . 11-1
Maintenance Schedule . . . . . . . 11-2
Special Application Services . . . . . . . . . . . . . . . . . . . . 11-8
Additional Maintenance and Care . . . . . . . . . . . . . . . . . . . . 11-9
Recommended Fluids . . . . . . . 11-12
Maintenance Records . . . . . . . 11-15
Technical Data . . . . . . . . . . . . . . . 12-1
Vehicle Identification . . . . . . . . . 12-1
Vehicle Data . . . . . . . . . . . . . . . . . . 12-2 Customer Information
. . . . . . . 13-1
Customer Information . . . . . . . . 13-1
Reporting Safety Defects . . . . 13-12
Vehicle Data Recording and
Privacy . . . . . . . . . . . . . . . . . . . . 13-13
OnStar . . . . . . . . . . . . . . . . . . . . . . . 14-1
OnStar Overview . . . . . . . . . . . . . 14-1
OnStar Services . . . . . . . . . . . . . . 14-2
OnStar Additional
Information . . . . . . . . . . . . . . . . . . 14-5
Index . . . . . . . . . . . . . . . . . . . . . i-1
Page 19 of 420
Black plate (13,1)Chevrolet Cruze Owner Manual (GMNA-Localizing-U.S./Canada-6007168) -
2014 - 2nd Edition - 7/15/13
In Brief 1-13
O:Briefly turn to this position to
turn the automatic lamp control off
or on again.
AUTO: Turns the headlamps on
automatically at normal brightness,
together with the parking lamps,
taillamps, license plate lamps,
instrument panel lights, and
sidemarker lamps.
;: Turns on the parking lamps
including all lamps, except the
headlamps.
5: Turns on the headlamps
together with the parking lamps and
instrument panel lights. A warning
chime sounds if the driver door is
opened when the ignition switch is
off and the headlamps are on.
#: If equipped with fog lamps,
press to turn the lamps on or off.
See:
.Exterior Lamp Controls on
page 6-1
.Daytime Running Lamps (DRL)
on page 6-2
.Front Fog Lamps on page 6-4
Windshield Wiper/Washer
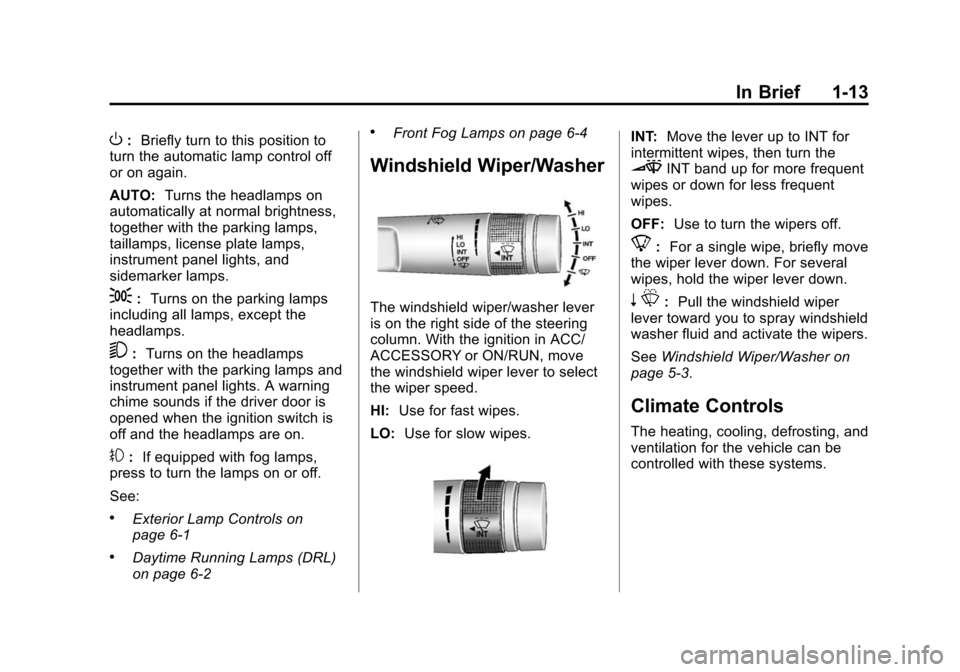
The windshield wiper/washer lever
is on the right side of the steering
column. With the ignition in ACC/
ACCESSORY or ON/RUN, move
the windshield wiper lever to select
the wiper speed.
HI: Use for fast wipes.
LO: Use for slow wipes.
INT: Move the lever up to INT for
intermittent wipes, then turn the
3INT band up for more frequent
wipes or down for less frequent
wipes.
OFF: Use to turn the wipers off.
8:For a single wipe, briefly move
the wiper lever down. For several
wipes, hold the wiper lever down.
n L: Pull the windshield wiper
lever toward you to spray windshield
washer fluid and activate the wipers.
See Windshield Wiper/Washer on
page 5-3.
Climate Controls
The heating, cooling, defrosting, and
ventilation for the vehicle can be
controlled with these systems.
Page 37 of 420
Black plate (7,1)Chevrolet Cruze Owner Manual (GMNA-Localizing-U.S./Canada-6007168) -
2014 - 2nd Edition - 7/15/13
Keys, Doors, and Windows 2-7
Programming with a Recognized
Transmitter (Keyless Access
Vehicles Only)
A new transmitter can be
programmed to the vehicle when
there is one recognized transmitter.
To program, the vehicle must be off
and all of the transmitters, both
currently recognized and new, must
be with you.
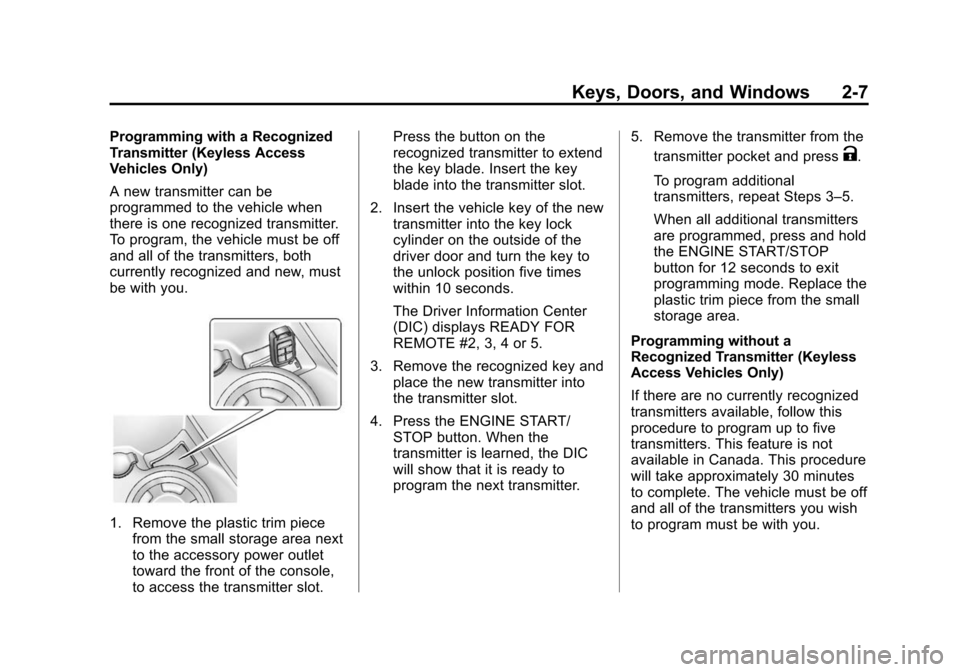
1. Remove the plastic trim piecefrom the small storage area next
to the accessory power outlet
toward the front of the console,
to access the transmitter slot. Press the button on the
recognized transmitter to extend
the key blade. Insert the key
blade into the transmitter slot.
2. Insert the vehicle key of the new transmitter into the key lock
cylinder on the outside of the
driver door and turn the key to
the unlock position five times
within 10 seconds.
The Driver Information Center
(DIC) displays READY FOR
REMOTE #2, 3, 4 or 5.
3. Remove the recognized key and place the new transmitter into
the transmitter slot.
4. Press the ENGINE START/ STOP button. When the
transmitter is learned, the DIC
will show that it is ready to
program the next transmitter. 5. Remove the transmitter from the
transmitter pocket and press
K.
To program additional
transmitters, repeat Steps 3–5.
When all additional transmitters
are programmed, press and hold
the ENGINE START/STOP
button for 12 seconds to exit
programming mode. Replace the
plastic trim piece from the small
storage area.
Programming without a
Recognized Transmitter (Keyless
Access Vehicles Only)
If there are no currently recognized
transmitters available, follow this
procedure to program up to five
transmitters. This feature is not
available in Canada. This procedure
will take approximately 30 minutes
to complete. The vehicle must be off
and all of the transmitters you wish
to program must be with you.
Page 38 of 420
Black plate (8,1)Chevrolet Cruze Owner Manual (GMNA-Localizing-U.S./Canada-6007168) -
2014 - 2nd Edition - 7/15/13
2-8 Keys, Doors, and Windows
1. Insert the vehicle key of thetransmitter into the key lock
cylinder on the outside of the
driver door and turn the key to
the unlock position five times
within 10 seconds.
The Driver Information Center
(DIC) displays REMOTE LEARN
PENDING, PLEASE WAIT.
2. Wait for 10 minutes until the DIC displays PRESS ENGINE
START BUTTON TO LEARN
and then press the ENGINE
START/STOP button.
The DIC displays will again
show REMOTE LEARN
PENDING, PLEASE WAIT.
3. Repeat Step 2 two additional times. After the third time all
previously known transmitters
will no longer work with the
vehicle. Remaining transmitters
can be relearned during the next
steps. The DIC display should now
show READY FOR REMOTE
# 1.
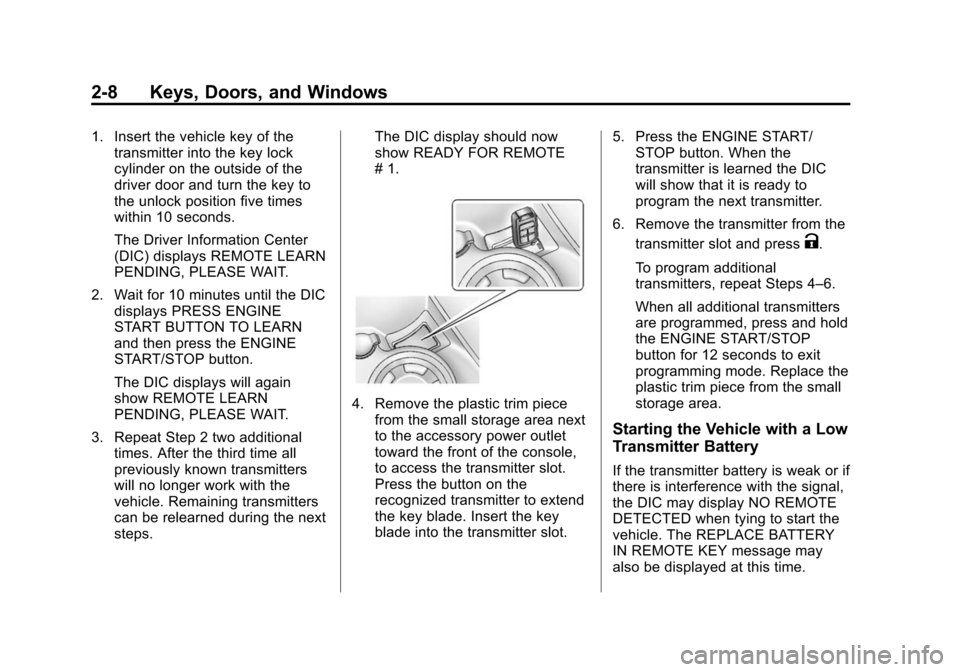
4. Remove the plastic trim piece
from the small storage area next
to the accessory power outlet
toward the front of the console,
to access the transmitter slot.
Press the button on the
recognized transmitter to extend
the key blade. Insert the key
blade into the transmitter slot. 5. Press the ENGINE START/
STOP button. When the
transmitter is learned the DIC
will show that it is ready to
program the next transmitter.
6. Remove the transmitter from the transmitter slot and press
K.
To program additional
transmitters, repeat Steps 4–6.
When all additional transmitters
are programmed, press and hold
the ENGINE START/STOP
button for 12 seconds to exit
programming mode. Replace the
plastic trim piece from the small
storage area.
Starting the Vehicle with a Low
Transmitter Battery
If the transmitter battery is weak or if
there is interference with the signal,
the DIC may display NO REMOTE
DETECTED when tying to start the
vehicle. The REPLACE BATTERY
IN REMOTE KEY message may
also be displayed at this time.
Page 39 of 420

Black plate (9,1)Chevrolet Cruze Owner Manual (GMNA-Localizing-U.S./Canada-6007168) -
2014 - 2nd Edition - 7/15/13
Keys, Doors, and Windows 2-9
To start the vehicle:
1. Remove the plastic trim piecefrom the small storage area next
to the accessory power outlet
toward the front of the console,
to access the transmitter slot.
2. Press the button on the recognized transmitter to extend
the key blade. Insert the key
blade into the transmitter slot. 3. With the vehicle in P (Park) or
N (Neutral), press the brake
pedal and the ENGINE START/
STOP button. See Starting the
Engine on page 9-18 for
additional information about the
vehicle's keyless ignition with
pushbutton start.
Replace the transmitter battery
as soon as possible.
Battery Replacement
Replace the battery if the REPLACE
BATTERY IN REMOTE KEY
message displays in the DIC. See
Key and Lock Messages on
page 5-30.
{Caution
When replacing the battery, do
not touch any of the circuitry on
the transmitter. Static from your
body could damage the
transmitter. The battery is not rechargeable. To
replace the battery:
1. Press the button on the
transmitter to extend the key
blade.
2. Remove the battery cover byprying it with a finger.
3. Remove the battery by pushing on the battery and sliding it
toward the key blade.
Page 49 of 420
Black plate (19,1)Chevrolet Cruze Owner Manual (GMNA-Localizing-U.S./Canada-6007168) -
2014 - 2nd Edition - 7/15/13
Keys, Doors, and Windows 2-19
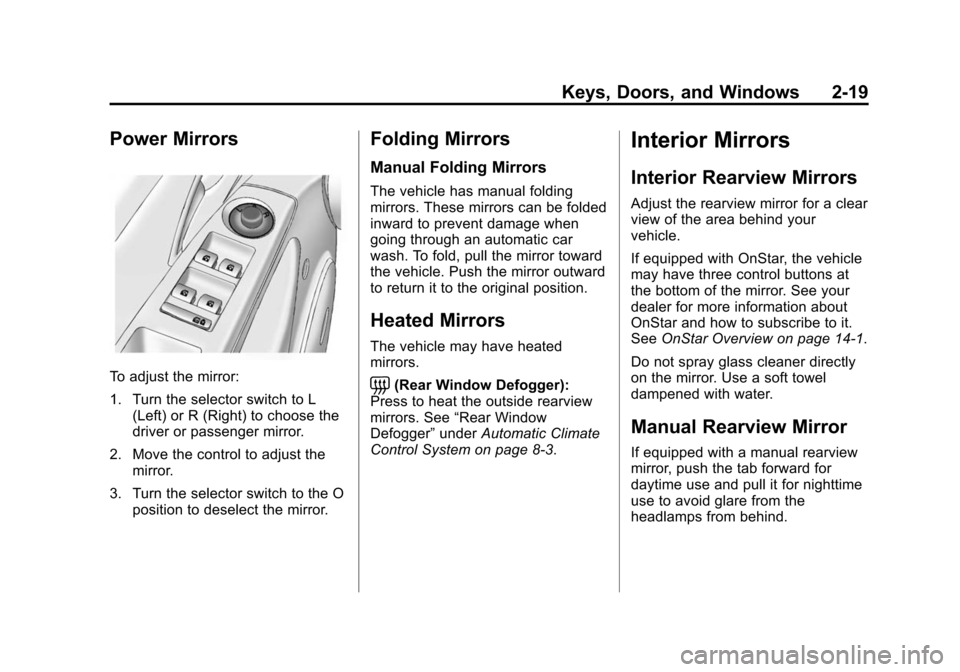
Power Mirrors
To adjust the mirror:
1. Turn the selector switch to L(Left) or R (Right) to choose the
driver or passenger mirror.
2. Move the control to adjust the mirror.
3. Turn the selector switch to the O position to deselect the mirror.
Folding Mirrors
Manual Folding Mirrors
The vehicle has manual folding
mirrors. These mirrors can be folded
inward to prevent damage when
going through an automatic car
wash. To fold, pull the mirror toward
the vehicle. Push the mirror outward
to return it to the original position.
Heated Mirrors
The vehicle may have heated
mirrors.
=(Rear Window Defogger):
Press to heat the outside rearview
mirrors. See “Rear Window
Defogger” underAutomatic Climate
Control System on page 8-3.
Interior Mirrors
Interior Rearview Mirrors
Adjust the rearview mirror for a clear
view of the area behind your
vehicle.
If equipped with OnStar, the vehicle
may have three control buttons at
the bottom of the mirror. See your
dealer for more information about
OnStar and how to subscribe to it.
See OnStar Overview on page 14-1.
Do not spray glass cleaner directly
on the mirror. Use a soft towel
dampened with water.
Manual Rearview Mirror
If equipped with a manual rearview
mirror, push the tab forward for
daytime use and pull it for nighttime
use to avoid glare from the
headlamps from behind.
Page 60 of 420
Black plate (6,1)Chevrolet Cruze Owner Manual (GMNA-Localizing-U.S./Canada-6007168) -
2014 - 2nd Edition - 7/15/13
3-6 Seats and Restraints
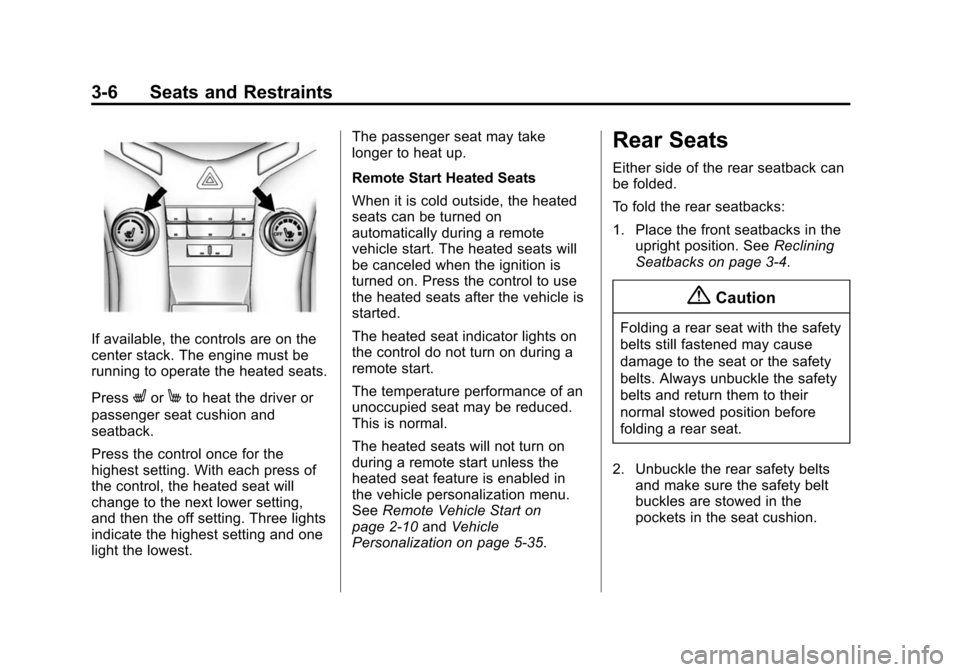
If available, the controls are on the
center stack. The engine must be
running to operate the heated seats.
Press
LorMto heat the driver or
passenger seat cushion and
seatback.
Press the control once for the
highest setting. With each press of
the control, the heated seat will
change to the next lower setting,
and then the off setting. Three lights
indicate the highest setting and one
light the lowest. The passenger seat may take
longer to heat up.
Remote Start Heated Seats
When it is cold outside, the heated
seats can be turned on
automatically during a remote
vehicle start. The heated seats will
be canceled when the ignition is
turned on. Press the control to use
the heated seats after the vehicle is
started.
The heated seat indicator lights on
the control do not turn on during a
remote start.
The temperature performance of an
unoccupied seat may be reduced.
This is normal.
The heated seats will not turn on
during a remote start unless the
heated seat feature is enabled in
the vehicle personalization menu.
See
Remote Vehicle Start on
page 2-10 andVehicle
Personalization on page 5-35.
Rear Seats
Either side of the rear seatback can
be folded.
To fold the rear seatbacks:
1. Place the front seatbacks in the upright position. See Reclining
Seatbacks on page 3-4.
{Caution
Folding a rear seat with the safety
belts still fastened may cause
damage to the seat or the safety
belts. Always unbuckle the safety
belts and return them to their
normal stowed position before
folding a rear seat.
2. Unbuckle the rear safety belts and make sure the safety belt
buckles are stowed in the
pockets in the seat cushion.