2014 CHEVROLET CRUZE ECO mode
[x] Cancel search: ECO modePage 256 of 420
Black plate (64,1)Chevrolet Cruze Owner Manual (GMNA-Localizing-U.S./Canada-6007168) -
2014 - 2nd Edition - 7/15/13
9-64 Driving and Operating
.Do not tow a trailer during the
first 800 km (500 mi), to prevent
damage to the engine, axle or
other parts.
.Then, during the first 800 km
(500 mi) trailer towing, do not
drive over 80 km/h (50 mph) and
do not make starts at full throttle.
.Vehicles with automatic
transmissions can tow in D
(Drive) but M (Manual Mode) is
recommended. SeeManual
Mode on page 9-35. Use a lower
gear if the transmission shifts
too often. For vehicles with a
manual transmission, it is better
not to use the highest gear.
.Turn off Park Assist when
towing.
{Warning
When towing a trailer, exhaust
gases may collect at the rear of
the vehicle and enter if the
liftgate, trunk/hatch, or rear-most
window is open.
When towing a trailer:
.Do not drive with the liftgate,
trunk/hatch, or rear-most
window open.
.Fully open the air outlets on
or under the instrument
panel.
.Also adjust the Climate
Control system to a setting
that brings in only outside air.
See “Climate Control
Systems” in the Index.
For more information about
Carbon Monoxide, see Engine
Exhaust on page 9-26. Towing a trailer requires a certain
amount of experience. The
combination you are driving is
longer and not as responsive as the
vehicle itself. Get acquainted with
the handling and braking of the rig
before setting out for the open road.
Before starting, check all trailer hitch
parts and attachments, safety
chains, electrical connectors, lamps,
tires and mirrors. If the trailer has
electric brakes, start the
combination moving and then apply
the trailer brake controller by hand
to be sure the brakes work.
During the trip, check occasionally
to be sure that the load is secure
and the lamps and any trailer
brakes still work.
Towing with a Stability Control
System
When towing, the sound of the
stability control system might be
heard. The system is reacting to the
vehicle movement caused by the
Page 259 of 420
Black plate (67,1)Chevrolet Cruze Owner Manual (GMNA-Localizing-U.S./Canada-6007168) -
2014 - 2nd Edition - 7/15/13
Driving and Operating 9-67
Trailer Towing (Fuel
Economy Model or Diesel
Engine)
The vehicle is neither designed nor
intended to tow a trailer.
Trailer Towing (Except
Fuel Economy Model or
Diesel Engine)
Before pulling a trailer, there are
three important considerations that
have to do with weight:
.The weight of the trailer.
.The weight of the trailer tongue.
.The total weight on your
vehicle's tires.
Weight of the Trailer
How heavy can a trailer safely be?
It should never weigh more than
454 kg (1,000 lb). But even that can
be too heavy.It depends on how the rig is used.
For example, speed, altitude, road
grades, outside temperature, and
how much the vehicle is used to pull
a trailer are all important. It can
depend on any special equipment
on the vehicle, and the amount of
tongue weight the vehicle can carry.
See
“Weight of the Trailer Tongue”
later in this section.
Maximum trailer weight is calculated
assuming only the driver is in the
tow vehicle and it has all the
required trailering equipment. The
weight of additional optional
equipment, passengers, and cargo
in the tow vehicle must be
subtracted from the maximum trailer
weight.
Ask your dealer for trailering
information or advice.Weight of the Trailer Tongue
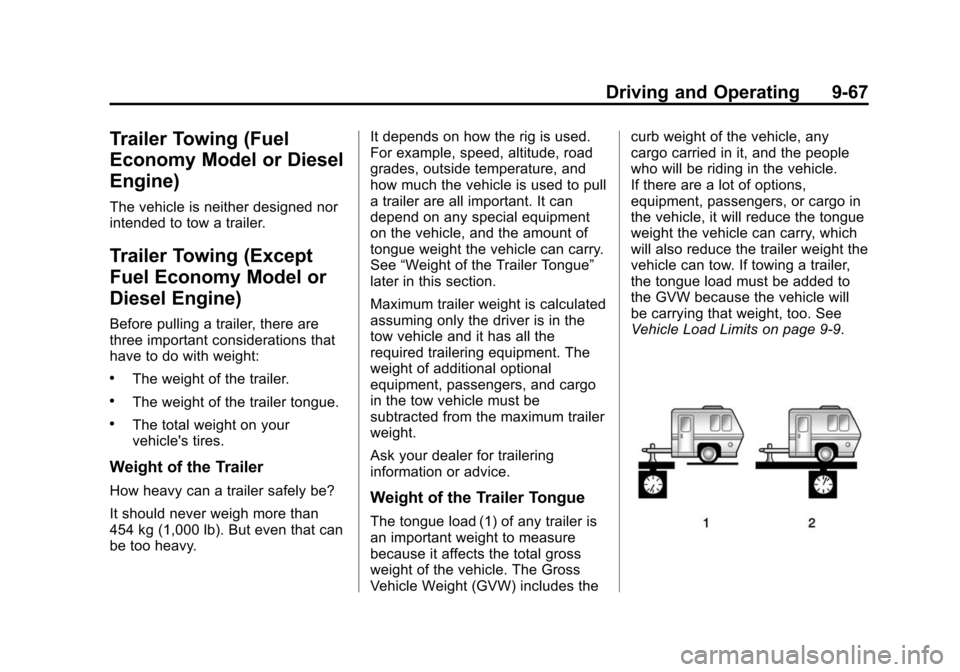
The tongue load (1) of any trailer is
an important weight to measure
because it affects the total gross
weight of the vehicle. The Gross
Vehicle Weight (GVW) includes the curb weight of the vehicle, any
cargo carried in it, and the people
who will be riding in the vehicle.
If there are a lot of options,
equipment, passengers, or cargo in
the vehicle, it will reduce the tongue
weight the vehicle can carry, which
will also reduce the trailer weight the
vehicle can tow. If towing a trailer,
the tongue load must be added to
the GVW because the vehicle will
be carrying that weight, too. See
Vehicle Load Limits on page 9-9.
Page 312 of 420

Black plate (50,1)Chevrolet Cruze Owner Manual (GMNA-Localizing-U.S./Canada-6007168) -
2014 - 2nd Edition - 7/15/13
10-50 Vehicle Care
Maximum Load Rating:The
load rating for a tire at the
maximum permissible inflation
pressure for that tire.
Maximum Loaded Vehicle
Weight
:The sum of curb
weight, accessory weight,
vehicle capacity weight, and
production options weight.
Normal Occupant Weight
:The
number of occupants a vehicle
is designed to seat multiplied by
68 kg (150 lb). See Vehicle Load
Limits on page 9-9.
Occupant Distribution
:
Designated seating positions.
Outward Facing Sidewall
:The
side of an asymmetrical tire that
has a particular side that faces
outward when mounted on a
vehicle. The side of the tire that
contains a whitewall, bears
white lettering, or bears
manufacturer, brand, and/or model name molding that is
higher or deeper than the same
moldings on the other sidewall
of the tire.
Passenger (P-Metric) Tire
:A
tire used on passenger cars and
some light duty trucks and
multipurpose vehicles.
Recommended Inflation
Pressure
:Vehicle
manufacturer's recommended
tire inflation pressure as shown
on the tire placard. See Tire
Pressure on page 10-51 and
Vehicle Load Limits on
page 9-9.
Radial Ply Tire
:A pneumatic
tire in which the ply cords that
extend to the beads are laid at
90 degrees to the centerline of
the tread.
Rim
:A metal support for a tire
and upon which the tire beads
are seated. Sidewall
:The portion of a tire
between the tread and the bead.
Speed Rating
:An
alphanumeric code assigned to
a tire indicating the maximum
speed at which a tire can
operate.
Traction
:The friction between
the tire and the road surface.
The amount of grip provided.
Tread
:The portion of a tire that
comes into contact with
the road.
Treadwear Indicators
:Narrow
bands, sometimes called wear
bars, that show across the tread
of a tire when only 1.6 mm
(1/16 in) of tread remains. See
When It Is Time for New Tires
on page 10-58.
UTQGS (Uniform Tire Quality
Grading Standards)
:A tire
information system that provides
consumers with ratings for a
Page 318 of 420
Black plate (56,1)Chevrolet Cruze Owner Manual (GMNA-Localizing-U.S./Canada-6007168) -
2014 - 2nd Edition - 7/15/13
10-56 Vehicle Care
relearn tool, in the following
order: driver side front tire,
passenger side front tire, passenger
side rear tire, and driver side rear.
See your dealer for service or to
purchase a relearn tool.
There are two minutes to match the
first tire/wheel position, and
five minutes overall to match all four
tire/wheel positions. If it takes
longer, the matching process stops
and must be restarted.
The TPMS sensor matching
process is:
1. Set the parking brake.
2. Turn the ignition to ON/RUN withthe engine off.
3. Use the MENU button to select the Vehicle Information menu in
the Driver Information
Center (DIC).
4. Use the thumbwheel to scroll to the Tire Pressure Menu item
screen. 5. Press the SET/CLR button to
begin the sensor matching
process.
A message requesting
acceptance of the process
should display.
6. Press the SET/CLR button again to confirm the selection.
The horn sounds twice to signal
the receiver is in relearn mode
and the TIRE LEARNING
ACTIVE message displays on
the DIC screen.
7. Start with the driver side front tire.
8. Place the relearn tool against the tire sidewall, near the valve
stem. Then press the button to
activate the TPMS sensor.
A horn chirp confirms that the
sensor identification code has
been matched to this tire and
wheel position.
9. Proceed to the passenger side front tire, and repeat the
procedure in Step 8. 10. Proceed to the passenger side
rear tire, and repeat the
procedure in Step 8.
11. Proceed to the driver side rear tire, and repeat the procedure
in Step 8. The horn sounds two
times to indicate the sensor
identification code has been
matched to the driver side rear
tire, and the TPMS sensor
matching process is no longer
active. The TIRE LEARNING
ACTIVE message on the DIC
display screen goes off.
12. Turn the ignition to LOCK/OFF.
13. Set all four tires to the recommended air pressure
level as indicated on the Tire
and Loading Information label.
Tire Inspection
We recommend that the tires,
including the spare tire, if the
vehicle has one, be inspected
for signs of wear or damage at
least once a month.
Page 337 of 420
Black plate (75,1)Chevrolet Cruze Owner Manual (GMNA-Localizing-U.S./Canada-6007168) -
2014 - 2nd Edition - 7/15/13
Vehicle Care 10-75
If needed, finish loosening them
with your fingers. The plastic nut
caps will not come off.
If needed, use the flat end of the
wheel wrench and pry along the
edge of the cover until it comes off.
The edge of the wheel cover could
be sharp, so do not try to remove it
with your bare hands. Do not drop
the cover or lay it face down, as it
could become scratched or
damaged. Store the wheel cover in
the trunk until the flat tire is repaired
or replaced.
Once you have removed the wheel
cover, use the following procedure
to remove the flat tire and install the
spare tire.
1. Do a safety check beforeproceeding. See If a Tire Goes
Flat on page 10-64 for more
information.
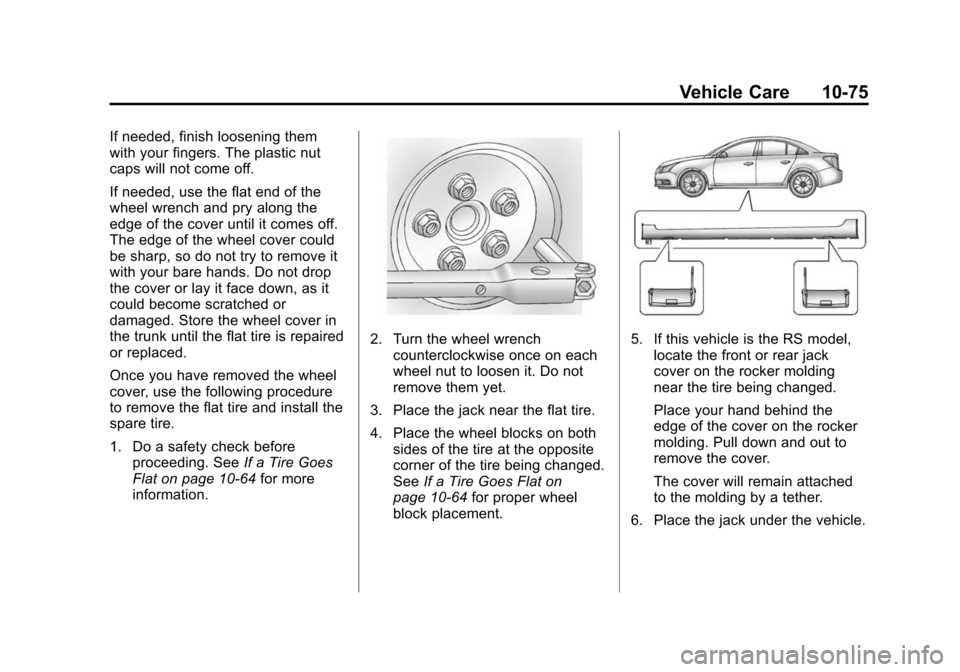
2. Turn the wheel wrench counterclockwise once on each
wheel nut to loosen it. Do not
remove them yet.
3. Place the jack near the flat tire.
4. Place the wheel blocks on both sides of the tire at the opposite
corner of the tire being changed.
See If a Tire Goes Flat on
page 10-64 for proper wheel
block placement.5. If this vehicle is the RS model, locate the front or rear jack
cover on the rocker molding
near the tire being changed.
Place your hand behind the
edge of the cover on the rocker
molding. Pull down and out to
remove the cover.
The cover will remain attached
to the molding by a tether.
6. Place the jack under the vehicle.
Page 392 of 420
Black plate (10,1)Chevrolet Cruze Owner Manual (GMNA-Localizing-U.S./Canada-6007168) -
2014 - 2nd Edition - 7/15/13
13-10 Customer Information
Many insurance policies provide
reduced protection to the GM
vehicle by limiting compensation for
damage repairs by using
aftermarket collision parts. Some
insurance companies will not
specify aftermarket collision parts.
When purchasing insurance, we
recommend that you ensure that the
vehicle will be repaired with GM
original equipment collision parts.
If such insurance coverage is not
available from your current
insurance carrier, consider switching
to another insurance carrier.
If the vehicle is leased, the leasing
company may require you to have
insurance that ensures repairs with
Genuine GM Original Equipment
Manufacturer (OEM) parts or
Genuine Manufacturer replacement
parts. Read the lease carefully, as
you may be charged at the end of
the lease for poor quality repairs.If a Crash Occurs
If there has been an injury, call
emergency services for help. Do not
leave the scene of a crash until all
matters have been taken care of.
Move the vehicle only if its position
puts you in danger, or you are
instructed to move it by a police
officer.
Give only the necessary information
to police and other parties involved
in the crash.
For emergency towing see
Roadside Assistance Program on
page 13-5.
Gather the following information:
.Driver name, address, and
telephone number.
.Driver license number.
.Owner name, address, and
telephone number.
.Vehicle license plate number.
.Vehicle make, model, and
model year.
.Vehicle Identification
Number (VIN).
.Insurance company and policy
number.
.General description of the
damage to the other vehicle.
Choose a reputable repair facility
that uses quality replacement parts.
See “Collision Parts” earlier in this
section.
If the airbag has inflated, see What
Will You See after an Airbag
Inflates? on page 3-22.
Managing the Vehicle Damage
Repair Process
In the event that the vehicle requires
damage repairs, GM recommends
that you take an active role in its
repair. If you have a pre-determined
repair facility of choice, take the
vehicle there, or have it towed there.
Specify to the facility that any
required replacement collision parts
be original equipment parts, either
new Genuine GM parts or recycled
Page 412 of 420

Black plate (4,1)Chevrolet Cruze Owner Manual (GMNA-Localizing-U.S./Canada-6007168) -
2014 - 2nd Edition - 7/15/13
i-4 INDEX
Driving (cont'd)Vehicle Load Limits . . . . . . . . . . . . 9-9
Wet Roads . . . . . . . . . . . . . . . . . . . . 9-5
Winter . . . . . . . . . . . . . . . . . . . . . . . . . 9-7
E
Electrical Equipment,
Add-On . . . . . . . . . . . . . . . . . . . . . . 9-69
Electrical System Engine CompartmentFuse Block . . . . . . . . . . . . . . . . 10-38
Fuses and Circuit Breakers . . . . . . . . . . . . . . . . . . 10-38
Instrument Panel Fuse Block . . . . . . . . . . . . . . . . . . . . . . 10-42
Overload . . . . . . . . . . . . . . . . . . . 10-37
Emergency OnStar
®. . . . . . . . . . . . . . . . . . . . . . 14-2
Engine Air Cleaner/Filter . . . . . . . . . . . 10-17
Check and Service Engine
Soon Light . . . . . . . . . . . . . . . . . . 5-14
Compartment Overview . . . . . . . 10-6
Coolant . . . . . . . . . . . . . . . . . . . . . 10-19
Coolant Temperature Gauge . . . . . . . . . . . . . . . . . . . . . . 5-11 Engine (cont'd)
Cooling System . . . . . . . . . . . . . 10-18
Cooling System Messages . . . 5-28
Drive Belt Routing . . . . . . . . . . . . 12-4
Exhaust . . . . . . . . . . . . . . . . . . . . . . 9-26
Heater . . . . . . . . . . . . . . . . . . . . . . . . 9-22
Oil Life System . . . . . . . . . . . . . 10-15
Oil Messages . . . . . . . . . . . . . . . . . 5-29
Overheated Protection
Operating Mode . . . . . . . . . . . 10-25
Overheating . . . . . . . . . . . . . . . . 10-23
Power Messages . . . . . . . . . . . . . 5-29
Pressure Light . . . . . . . . . . . . . . . . 5-20
Reduced Power Light . . . . . . . . . 5-21
Running While Parked . . . . . . . . 9-33
Starting . . . . . . . . . . . . . . . . . . . . . . . 9-18
Engines Diesel Fuel . . . . . . . . . . . . . . . . . . . 9-54
Entry Lighting . . . . . . . . . . . . . . . . . . . 6-5
Equipment, Towing . . . . . . . . . . . . 9-68
Event Data Recorders . . . . . . . . 13-14
Exit Lighting . . . . . . . . . . . . . . . . . . . . 6-6
Extender, Safety Belt . . . . . . . . . . 3-15
Exterior Lamp Controls . . . . . . . . . 6-1
F
Filter Diesel Particulate . . . . . . . . . . . . . 9-26
Filter, Engine Air Cleaner . . . . . . . . . 10-17
Flash-to-Pass . . . . . . . . . . . . . . . . . . . 6-2
Flashers, Hazard Warning . . . . . . 6-3
Flat Tire . . . . . . . . . . . . . . . . . . . . . . 10-64 Changing . . . . . . . . . . . . . . . . . . . 10-73
Floor Mats . . . . . . . . . . . . . . . . . . . . 10-96
Fluid Automatic Transmission . . . . 10-16
Brakes . . . . . . . . . . . . . . . . . . . . . . 10-27
Diesel Exhaust . . . . . . . . . 1-22, 9-27
Washer . . . . . . . . . . . . . . . . . . . . . 10-25
Fog Lamps
Front . . . . . . . . . . . . . . . . . . . . . . . . . . 6-4
Folding Mirrors . . . . . . . . . . . . . . . . 2-19
Front Fog Lamp Light . . . . . . . . . . . . . . . . . . . . . . . . . . 5-22
Front Seats Adjustment . . . . . . . . . . . . . . . . . . . . 3-3
Heated . . . . . . . . . . . . . . . . . . . . . . . . 3-5
Page 415 of 420

Black plate (7,1)Chevrolet Cruze Owner Manual (GMNA-Localizing-U.S./Canada-6007168) -
2014 - 2nd Edition - 7/15/13
INDEX i-7
Lights (cont'd)High/Low Beam Changer . . . . . . 6-2
Low Fuel Warning . . . . . . . . . . . . 5-20
Reduced Engine Power . . . . . . 5-21
Safety Belt Reminders . . . . . . . . 5-11
Security . . . . . . . . . . . . . . . . . . . . . . 5-21
StabiliTrak
®OFF . . . . . . . . . . . . . 5-18
Tire Pressure . . . . . . . . . . . . . . . . . 5-19
Traction Control System (TCS)/StabiliTrak
®. . . . . . . . . . 5-19
Traction Off . . . . . . . . . . . . . . . . . . . 5-18
Up-Shift . . . . . . . . . . . . . . . . . . . . . . 5-17
Wait to Start . . . . . . . . . . . . . . . . . . 5-19
Warning, Power Steering . . . . . 5-18
Locks Automatic Door . . . . . . . . . . . . . . . 2-12
Door . . . . . . . . . . . . . . . . . . . . . . . . . . 2-11
Power Door . . . . . . . . . . . . . . . . . . . 2-12
Safety . . . . . . . . . . . . . . . . . . . . . . . . 2-13
Loss of Control . . . . . . . . . . . . . . . . . 9-5
Low Fuel Warning Light . . . . . . . . 5-20
Low-Profile Tires . . . . . . . . . . . . . . 10-45
Lower Anchors and Tethers for Children (LATCH
System) . . . . . . . . . . . . . . . . . . . . . . 3-37
M
MaintenanceRecords . . . . . . . . . . . . . . . . . . . . .11-15
Maintenance Schedule Recommended Fluidsand Lubricants . . . . . . . . . . . . .11-12
Malfunction Indicator Lamp . . . . 5-14
Manual Mirrors . . . . . . . . . . . . . . . . 2-18
Manual Mode . . . . . . . . . . . . . . . . . . 9-35
Manual Transmission . . . . . . . . . . 9-37 Fluid . . . . . . . . . . . . . . . . . . . . . . . . 10-16
Messages Airbag System . . . . . . . . . . . . . . . . 5-32
Battery Voltage andCharging . . . . . . . . . . . . . . . . . . . . 5-27
Brake System . . . . . . . . . . . . . . . . 5-27
Compass . . . . . . . . . . . . . . . . . . . . . 5-27
Diesel Exhaust Fluid . . . . . . . . . . 5-29
Diesel Particulate Filter . . . . . . . 5-30
Door Ajar . . . . . . . . . . . . . . . . . . . . . 5-28
Engine Cooling System . . . . . . . 5-28
Engine Oil . . . . . . . . . . . . . . . . . . . . 5-29
Engine Power . . . . . . . . . . . . . . . . 5-29
Fuel System . . . . . . . . . . . . . . . . . . 5-29
Key and Lock . . . . . . . . . . . . . . . . . 5-30
Lamp . . . . . . . . . . . . . . . . . . . . . . . . . 5-31 Messages (cont'd)
Object Detection System . . . . . 5-31
Ride Control System . . . . . . . . . . 5-32
Security . . . . . . . . . . . . . . . . . . . . . . 5-32
Service Vehicle . . . . . . . . . . . . . . . 5-32
Starting the Vehicle . . . . . . . . . . . 5-33
Tire . . . . . . . . . . . . . . . . . . . . . . . . . . . 5-33
Transmission . . . . . . . . . . . . . . . . . 5-33
Vehicle . . . . . . . . . . . . . . . . . . . . . . . 5-27
Vehicle Reminder . . . . . . . . . . . . . 5-34
Vehicle Speed . . . . . . . . . . . . . . . . 5-34
Mirrors Automatic DimmingRearview . . . . . . . . . . . . . . . . . . . . 2-20
Convex . . . . . . . . . . . . . . . . . . . . . . . 2-18
Folding . . . . . . . . . . . . . . . . . . . . . . . 2-19
Heated . . . . . . . . . . . . . . . . . . . . . . . 2-19
Manual . . . . . . . . . . . . . . . . . . . . . . . 2-18
Manual Rearview . . . . . . . . . . . . . 2-19
Power . . . . . . . . . . . . . . . . . . . . . . . . 2-19
Mirrors, Interior Rearview . . . . . . 2-19
Monitor System, Tire Pressure . . . . . . . . . . . . . . . . . . . . 10-52
Multi-band Antenna . . . . . . . . . . . . 7-13