2014 CHEVROLET CAMARO ECO mode
[x] Cancel search: ECO modePage 18 of 432

Black plate (12,1)Chevrolet Camaro Owner Manual (GMNA-Localizing-U.S./Canada/Mexico-
6042601) - 2014 - CRC - 1/21/14
1-12 In Brief
Transmission
Automatic Transmission
Tap Shift
Tap Shift allows the driver to
manually control the automatic
transmission. To use Tap Shift, the
shift lever must be in M (Manual
Mode) or D (Drive). Vehicles with
this feature have indicators on the
steering wheel. The controls are on
the back of the steering wheel. Tap
the left control to downshift, and the
right control to upshift. A Driver
Information Center (DIC) message
indicates the gear the vehicle is in.
Electronic Range Select
(ERS) Mode
Vehicles with axle code GW8 have
an ERS mode. ERS mode allows
you to choose the top-gear limit of
the transmission with fully automatic
gear selection. This can help controlthe vehicle's speed while driving
downhill or towing a trailer. The
vehicle has an electronic shift
position indicator within the
instrument cluster. When using the
ERS mode a number will display
next to the M, indicating the current
maximum gear allowed.
To use this feature:
1. Move the shift lever to
M (Manual Mode).
2. Press the plus/minus buttons on the back of the steering wheel,
to increase or decrease the gear
range available.
See Manual Mode on page 9-32.
Manual Transmission
One to Four Shift Message
(V8 Only)
When this message comes on, you
can only shift from 1 (First) to
4 (Fourth) instead of 1 (First) to
2 (Second). The message will be
displayed in the Driver Information
Center. See Manual Transmission
on page 9-34.
Page 43 of 432
Black plate (17,1)Chevrolet Camaro Owner Manual (GMNA-Localizing-U.S./Canada/Mexico-
6042601) - 2014 - CRC - 1/21/14
Keys, Doors, and Windows 2-17
Express Window Anti-Pinch
Feature
When express-up is active, the
window will auto-reverse if there is
an obstruction or severe icing. The
window returns to normal operation
after the obstruction or condition is
removed.
If conditions prevent a window from
closing and it continues to
auto-reverse, the window can be
closed by having the ignition in ON/
RUN and holding the window switch
up until the window is closed.
Express Window Anti-Pinch
Override
{Warning
If express override is activated,
the window will not reverse
automatically. You or others could
be injured and the window could
be damaged. Before you use(Continued)
Warning (Continued)
express override, make sure that
all people and obstructions are
clear of the window path.
In an emergency, the anti-pinch
feature can be overridden in a
supervised mode. Hold the window
switch all the way up to the second
position. The window will rise for as
long as the switch is held. Once the
switch is released, the express
mode is re-activated.
In this mode, the window can still
close on an object in its path. Use
care when using the override mode.
Programming the Power
Windows
If the battery on the vehicle has
been recharged or disconnected,
or is not working, you may need to
reprogram the windows for the
express-up feature to work. Before
reprogramming, replace or recharge
the vehicle's battery. To program each front window:
1. With the ignition in ON/RUN,
close all doors.
2. With the window partially open, pull the power window switch up
until the window is fully closed.
3. Repeat Step 2 on the other window.
The windows are now
reprogrammed.
Sun Visors
Pull the sun visor down to block
glare. Detach the sun visor from the
center mount to pivot it to the side,
if available.
Page 68 of 432
Black plate (18,1)Chevrolet Camaro Owner Manual (GMNA-Localizing-U.S./Canada/Mexico-
6042601) - 2014 - CRC - 1/21/14
3-18 Seats and Restraints
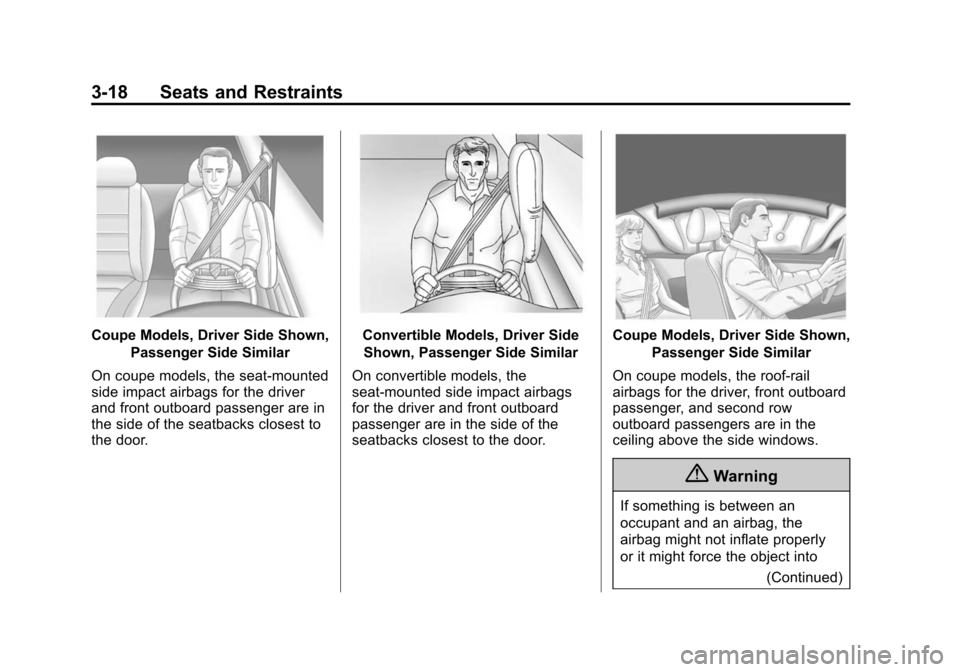
Coupe Models, Driver Side Shown,Passenger Side Similar
On coupe models, the seat-mounted
side impact airbags for the driver
and front outboard passenger are in
the side of the seatbacks closest to
the door.Convertible Models, Driver Side Shown, Passenger Side Similar
On convertible models, the
seat-mounted side impact airbags
for the driver and front outboard
passenger are in the side of the
seatbacks closest to the door.Coupe Models, Driver Side Shown, Passenger Side Similar
On coupe models, the roof-rail
airbags for the driver, front outboard
passenger, and second row
outboard passengers are in the
ceiling above the side windows.
{Warning
If something is between an
occupant and an airbag, the
airbag might not inflate properly
or it might force the object into (Continued)
Page 70 of 432
Black plate (20,1)Chevrolet Camaro Owner Manual (GMNA-Localizing-U.S./Canada/Mexico-
6042601) - 2014 - CRC - 1/21/14
3-20 Seats and Restraints
Seat-mounted side impact airbags
are designed to inflate in moderate
to severe side crashes, depending
on the location of the impact.
Seat-mounted side impact airbags
are not designed to inflate in frontal
impacts, near-frontal impacts,
rollovers, or rear impacts.
A seat-mounted side impact airbag
is designed to inflate on the side of
the vehicle that is struck.
Roof-rail airbags, if equipped, are
designed to inflate in moderate to
severe side crashes, depending on
the location of the impact. In
addition, these roof-rail airbags are
designed to inflate during a rollover
or in a severe frontal impact.
Roof-rail airbags are not designed
to inflate in rear impacts. Both
roof-rail airbags will inflate when
either side of the vehicle is struck or
if the sensing system predicts that
the vehicle is about to roll over on
its side, or in a severe frontal
impact.In any particular crash, no one can
say whether an airbag should have
inflated simply because of the
vehicle damage or repair costs.
What Makes an Airbag
Inflate?
In a deployment event, the sensing
system sends an electrical signal
triggering a release of gas from the
inflator. Gas from the inflator fills the
airbag causing the bag to break out
of the cover. The inflator, the airbag,
and related hardware are all part of
the airbag module.
For airbag locations, see
Where Are
the Airbags? on page 3-17.
How Does an Airbag
Restrain?
In moderate to severe frontal or
near frontal collisions, even belted
occupants can contact the steering
wheel or the instrument panel. In moderate to severe side collisions,
even belted occupants can contact
the inside of the vehicle.
Airbags supplement the protection
provided by safety belts by
distributing the force of the impact
more evenly over the
occupant's body.
Rollover capable roof-rail airbags
are designed to help contain the
head and chest of occupants in the
outboard seating positions in the
first and second rows. The rollover
capable roof-rail airbags are
designed to help reduce the risk of
full or partial ejection in rollover
events, although no system can
prevent all such ejections.
But airbags would not help in many
types of collisions, primarily
because the occupant's motion is
not toward those airbags. See
When
Should an Airbag Inflate? on
page 3-19.
Airbags should never be regarded
as anything more than a supplement
to safety belts.
Page 86 of 432
Black plate (36,1)Chevrolet Camaro Owner Manual (GMNA-Localizing-U.S./Canada/Mexico-
6042601) - 2014 - CRC - 1/21/14
3-36 Seats and Restraints
Lower Anchors and
Tethers for Children
(LATCH System)
The LATCH system secures a child
restraint during driving or in a crash.
LATCH attachments on the child
restraint are used to attach the child
restraint to the anchors in the
vehicle. The LATCH system is
designed to make installation of a
child restraint easier.
In order to use the LATCH system in
your vehicle, you need a child
restraint that has LATCH
attachments. LATCH-compatible
rear-facing and forward-facing child
seats can be properly installed
using either the LATCH anchors or
the vehicle’s safety belts. Do not
use both the safety belts and the
LATCH anchorage system to secure
a rear-facing or forward-facing
child seat.
Booster seats use the vehicle’s
safety belts to secure the child in
the booster seat. If the manufacturer recommends that the booster seat
be secured with the LATCH system,
this can be done as long as the
booster seat can be positioned
properly and there is no interference
with the proper positioning of the
lap-shoulder belt on the child.
Make sure to follow the instructions
that came with the child restraint,
and also the instructions in this
manual.
When installing a child restraint with
a top tether, you must also use
either the lower anchors or the
safety belts to properly secure the
child restraint. A child restraint must
never be installed using only the top
tether and anchor.
The LATCH anchorage system can
be used until the combined weight
of the child plus the child restraint is
29.5 kg (65 lbs). Use the safety belt
alone instead of the LATCH
anchorage system once the
combined weight is more than
29.5 kg (65 lbs).
The following explains how to attach
a child restraint with these
attachments in the vehicle.
Not all vehicle seating positions or
child restraints have lower anchors
and attachments or top tether
anchors and attachments.
In Canada, the law requires that
forward-facing child restraints have
a top tether, and that the tether be
attached.
Convertible models do not have top
tether anchors to secure a child
restraint. If a national or local law
requires that the top tether be
anchored, do not use a child
restraint in this vehicle because a
top tether cannot be properly
anchored.
Page 91 of 432
Black plate (41,1)Chevrolet Camaro Owner Manual (GMNA-Localizing-U.S./Canada/Mexico-
6042601) - 2014 - CRC - 1/21/14
Seats and Restraints 3-41
1.2. Put the child restraint onthe seat.
1.3. Attach and tighten the lower attachments on the child
restraint to the lower
anchors.
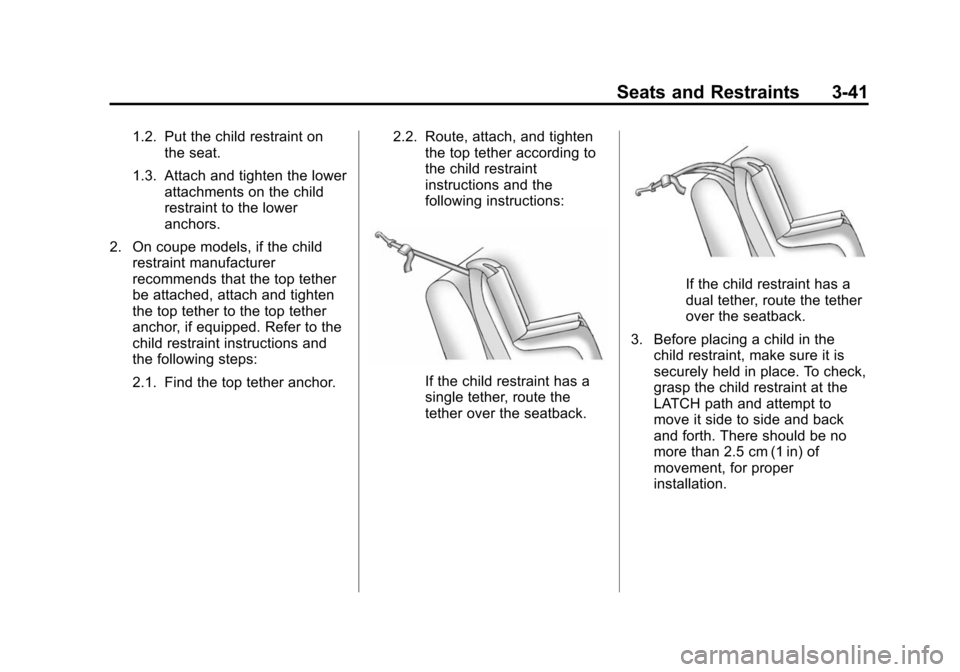
2. On coupe models, if the child restraint manufacturer
recommends that the top tether
be attached, attach and tighten
the top tether to the top tether
anchor, if equipped. Refer to the
child restraint instructions and
the following steps:
2.1. Find the top tether anchor. 2.2. Route, attach, and tighten
the top tether according to
the child restraint
instructions and the
following instructions:
If the child restraint has a
single tether, route the
tether over the seatback.
If the child restraint has a
dual tether, route the tether
over the seatback.
3. Before placing a child in the child restraint, make sure it is
securely held in place. To check,
grasp the child restraint at the
LATCH path and attempt to
move it side to side and back
and forth. There should be no
more than 2.5 cm (1 in) of
movement, for proper
installation.
Page 128 of 432

Black plate (24,1)Chevrolet Camaro Owner Manual (GMNA-Localizing-U.S./Canada/Mexico-
6042601) - 2014 - CRC - 1/21/14
5-24 Instruments and Controls
Information Displays
Driver Information
Center (DIC)
The DIC displays information about
your vehicle. It also displays
warning messages if a system
problem is detected. SeeVehicle
Messages on page 5-32. All
messages appear in the DIC display
in the center of the instrument
cluster.
The vehicle may also have features
that can be customized through the
controls on the radio. See Vehicle
Personalization on page 5-43.
DIC Operation and Displays
The DIC has different displays
which can be accessed by using the
DIC buttons on the turn signal lever
on the left side of the steering
wheel. The DIC displays trip, fuel,
vehicle system information, and
warning messages if a system
problem is detected. The bottom of the DIC display
shows what position the shift lever
is in (automatic transmission only),
the odometer, and the direction the
vehicle is driving.
DIC Buttons
1.
SET/CLR (Set/Clear): Press to
set, or press and hold to clear,
the menu item displayed.
2.
w/x(Band): Use the band to
scroll through the items in
each menu.
3. MENU: Press this button to get
to the Trip/Fuel Menu and the
Vehicle Information Menu. Some
models may also have a
Performance Menu. This button is also used to return to or exit
the last screen displayed on
the DIC.
Trip/Fuel Menu Items
Press the MENU button on the turn
signal lever until Trip/Fuel
Information Menu is displayed. Use
the band to scroll through the
following menu items:
.Digital Speedometer
.Trip 1
.Trip 2
.Fuel Range
.Average Fuel Economy
.Average Vehicle Speed
.Turn-by-Turn
.Blank
Digital Speedometer
The speedometer shows how fast
the vehicle is moving in either
kilometers per hour (km/h) or miles
per hour (mph). The speedometer
cannot be reset.
Page 145 of 432

Black plate (41,1)Chevrolet Camaro Owner Manual (GMNA-Localizing-U.S./Canada/Mexico-
6042601) - 2014 - CRC - 1/21/14
Instruments and Controls 5-41
This message also displays LEFT
FRONT, RIGHT FRONT, LEFT
REAR, or RIGHT REAR to indicate
the location of the low tire.
The low tire pressure warning light
will also come on. SeeTire
Pressure Light on page 5-22.
If a tire pressure message appears
on the DIC, stop as soon as you
can. Inflate the tires by adding air
until the tire pressure is equal to the
values shown on the Tire and
Loading Information label. See Tires
on page 10-56, Vehicle Load Limits
on page 9-14, and Tire Pressure on
page 10-65.
The DIC also shows the tire
pressure values. See Driver
Information Center (DIC) on
page 5-24.SERVICE TIRE MONITOR
SYSTEM
This message displays if there is a
problem with the Tire Pressure
Monitor System (TPMS). See Tire
Pressure Monitor Operation on
page 10-68.
TIRE LEARNING ACTIVE
This message displays when the
system is learning new tires. See
Tire Pressure Monitor Operation on
page 10-68.
Transmission Messages
1 –4 SHIFT
This message displays when you
can only shift from 1 (First) to
4 (Fourth) instead of 1 (First) to
2 (Second). See Manual
Transmission on page 9-34.
PRESS CLUTCH TO START
This message displays when
attempting to start a vehicle with a
manual transmission without
pressing on the clutch pedal.
SERVICE TRANSMISSION
This message displays if there is a
problem with the transmission. See
your dealer.
SHIFT DENIED
This message displays when
attempting to use the automatic
transmission manual mode to shift
to too low of a gear. See Manual
Mode on page 9-32.
SHIFT TO PARK
This message displays when the
transmission needs to be shifted to
P (Park). This may appear when
attempting to remove the key from
the ignition if the vehicle is not in
P (Park).