2014 CHEVROLET CAMARO door lock
[x] Cancel search: door lockPage 215 of 432

Black plate (17,1)Chevrolet Camaro Owner Manual (GMNA-Localizing-U.S./Canada/Mexico-
6042601) - 2014 - CRC - 1/21/14
Driving and Operating 9-17
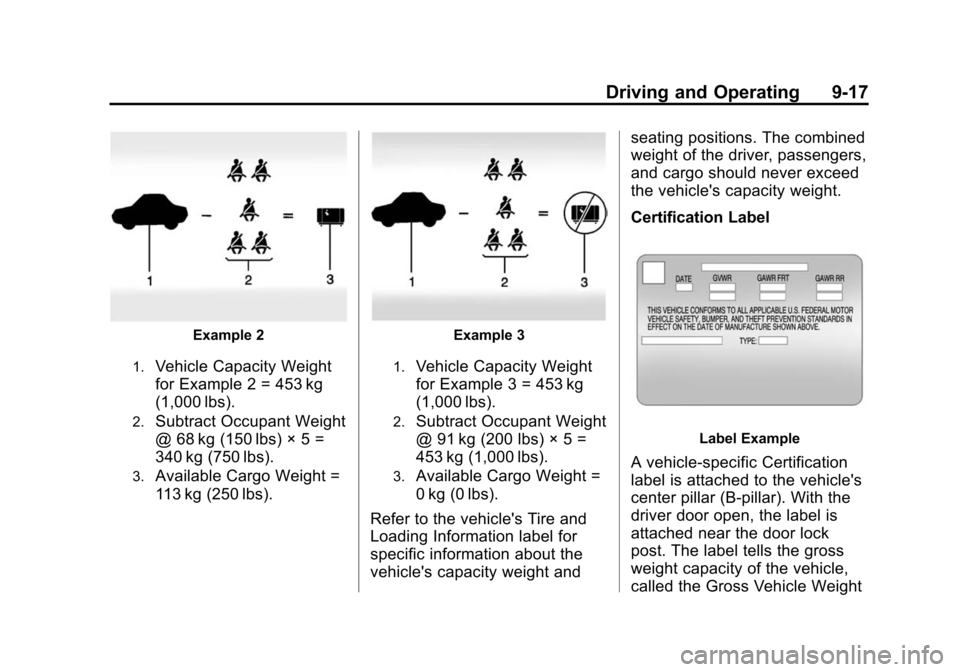
Example 2
1.Vehicle Capacity Weight
for Example 2 = 453 kg
(1,000 lbs).
2.Subtract Occupant Weight
@ 68 kg (150 lbs) × 5 =
340 kg (750 lbs).
3.Available Cargo Weight =
113 kg (250 lbs).
Example 3
1.Vehicle Capacity Weight
for Example 3 = 453 kg
(1,000 lbs).
2.Subtract Occupant Weight
@ 91 kg (200 lbs) × 5 =
453 kg (1,000 lbs).
3.Available Cargo Weight =
0 kg (0 lbs).
Refer to the vehicle's Tire and
Loading Information label for
specific information about the
vehicle's capacity weight and seating positions. The combined
weight of the driver, passengers,
and cargo should never exceed
the vehicle's capacity weight.
Certification Label
Label Example
A vehicle-specific Certification
label is attached to the vehicle's
center pillar (B-pillar). With the
driver door open, the label is
attached near the door lock
post. The label tells the gross
weight capacity of the vehicle,
called the Gross Vehicle Weight
Page 219 of 432

Black plate (21,1)Chevrolet Camaro Owner Manual (GMNA-Localizing-U.S./Canada/Mexico-
6042601) - 2014 - CRC - 1/21/14
Driving and Operating 9-21
4. Set the parking brake. SeeParking Brake on page 9-37.
{Warning
Turning off the vehicle while
moving may cause loss of power
assist in the brake and steering
systems and disable the airbags.
While driving, only shut the
vehicle off in an emergency.
If the vehicle cannot be pulled over,
and must be shut off while driving,
turn the ignition to ACC/
ACCESSORY.
2 (ACC/ACCESSORY): This
position provides power to some of
the electrical accessories. It unlocks
the steering wheel and ignition. To
move the key from ACC/
ACCESSORY to LOCK/OFF, push
in the key and then turn it to
LOCK/OFF. 3 (ON/RUN):
The ignition switch
stays in this position when the
engine is running. This position can
be used to operate the electrical
accessories, including the
ventilation fan and 12-volt power
outlet, as well as to display some
warning and indicator lights. This
position can also be used for
service and diagnostics, and to
verify the proper operation of the
malfunction indicator lamp as may
be required for emission inspection
purposes. The transmission is also
unlocked in this position on
automatic transmission vehicles.
The battery could be drained if the
key is left in the ACC/ACCESSORY
or ON/RUN position with the engine
off. The vehicle might not start if the
battery is allowed to drain for an
extended period of time.
4 (START): This position starts the
engine. When the engine starts,
release the key. The ignition switch
will return to ON/RUN for normal
driving. A warning tone sounds when the
driver door is opened if the ignition
is still in ACC/ACCESSORY and the
key is in the ignition. If the ignition
becomes difficult to turn, see
Keys
on page 2-1.
Starting the Engine
Place the transmission in the
proper gear.
Automatic Transmission
Move the shift lever to P (Park) or
N (Neutral). The engine will not start
in any other position. To restart the
vehicle when it is already moving,
use N (Neutral) only.
{Caution
Do not try to shift to P (Park) if the
vehicle is moving. If you do, you
could damage the transmission.
Shift to P (Park) only when the
vehicle is stopped.
Page 222 of 432

Black plate (24,1)Chevrolet Camaro Owner Manual (GMNA-Localizing-U.S./Canada/Mexico-
6042601) - 2014 - CRC - 1/21/14
9-24 Driving and Operating
Retained Accessory
Power (RAP)
These vehicle accessories may be
used for up to 10 minutes after the
engine is turned off:
.Audio System
.Power Windows
.Sunroof (if equipped)
The power windows and sunroof will
continue to work for up to
10 minutes or until any door is
opened. The radio will work when
the key is in ON/RUN or ACC/
ACCESSORY. Once the key is
turned from ON/RUN to LOCK/OFF,
the radio will continue to work for
10 minutes, or until the driver door is
opened or the key is removed from
the ignition.
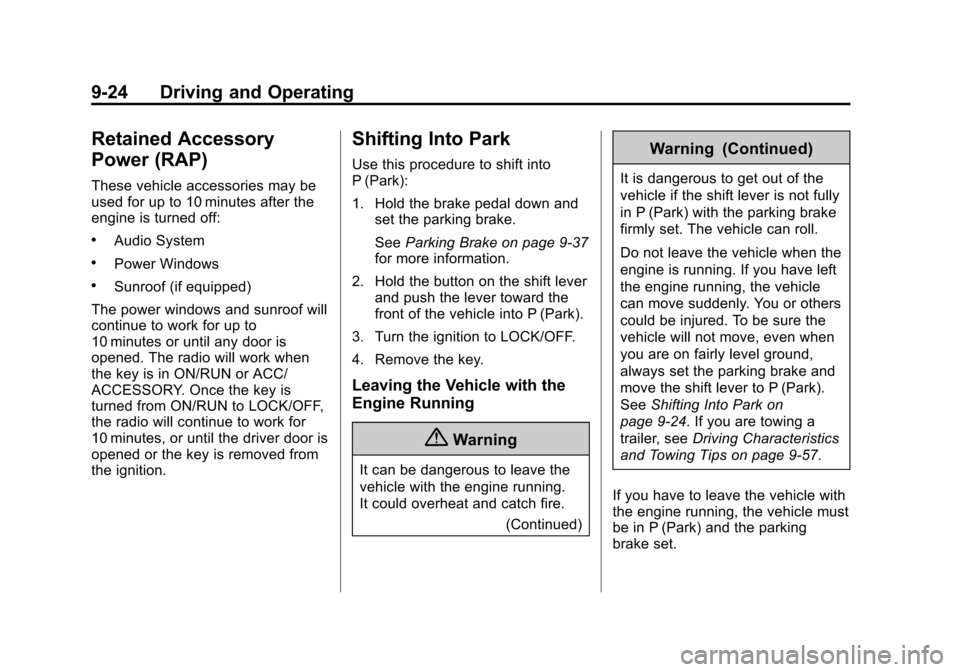
Shifting Into Park
Use this procedure to shift into
P (Park):
1. Hold the brake pedal down and set the parking brake.
See Parking Brake on page 9-37
for more information.
2. Hold the button on the shift lever and push the lever toward the
front of the vehicle into P (Park).
3. Turn the ignition to LOCK/OFF.
4. Remove the key.
Leaving the Vehicle with the
Engine Running
{Warning
It can be dangerous to leave the
vehicle with the engine running.
It could overheat and catch fire. (Continued)
Warning (Continued)
It is dangerous to get out of the
vehicle if the shift lever is not fully
in P (Park) with the parking brake
firmly set. The vehicle can roll.
Do not leave the vehicle when the
engine is running. If you have left
the engine running, the vehicle
can move suddenly. You or others
could be injured. To be sure the
vehicle will not move, even when
you are on fairly level ground,
always set the parking brake and
move the shift lever to P (Park).
SeeShifting Into Park on
page 9-24. If you are towing a
trailer, see Driving Characteristics
and Towing Tips on page 9-57.
If you have to leave the vehicle with
the engine running, the vehicle must
be in P (Park) and the parking
brake set.
Page 253 of 432

Black plate (55,1)Chevrolet Camaro Owner Manual (GMNA-Localizing-U.S./Canada/Mexico-
6042601) - 2014 - CRC - 1/21/14
Driving and Operating 9-55
Warning (Continued)
.Keep children away from the
fuel pump and never let
children pump fuel.
.Fuel can spray out if the fuel
cap is opened too quickly.
This spray can happen if the
tank is nearly full, and is
more likely in hot weather.
Open the fuel cap slowly and
wait for any hiss noise to stop
then unscrew the cap all
the way.
The fuel cap is behind a hinged
fuel door on the passenger side of
the vehicle. If equipped, the fuel
door is locked when the vehicle
doors are locked. Press
Kon
the RKE transmitter to unlock. To
open the fuel door, push and
release the rearward center edge of
the door. Be careful not to spill fuel. Do not
top off or overfill the tank and wait a
few seconds after you have finished
pumping before removing the
nozzle. Clean fuel from painted
surfaces as soon as possible. See
Exterior Care on page 10-101.
When replacing the fuel cap, turn it
clockwise until it clicks, otherwise
the malfunction indicator lamp may
turn on. The diagnostic system can
determine if the fuel cap has been
left off or improperly installed. This
would allow fuel to evaporate into
the atmosphere. See
Malfunction
Indicator Lamp on page 5-16.{Warning
If a fire starts while you are
refueling, do not remove the
nozzle. Shut off the flow of fuel by
shutting off the pump or by
notifying the station attendant.
Leave the area immediately.
Page 312 of 432

Black plate (52,1)Chevrolet Camaro Owner Manual (GMNA-Localizing-U.S./Canada/Mexico-
6042601) - 2014 - CRC - 1/21/14
10-52 Vehicle Care
Micro
Relays Usage
K61 Starter
K69 Wiper Control
K613 Cooling Fan Low
K617 Air Conditioning Compressor Clutch
K619 Wiper Speed
K627 High Intensity Discharge
Headlamps
K632 Brake Vacuum Pump
K641 Intercooler PumpInstrument Panel Fuse
BlockThe instrument panel fuse block is
on the end of the instrument panel,
on the driver side of the vehicle. To
access the fuses, open the fuse
panel door by pulling out.
To reinstall the door, push the door
back into its original location.
Page 345 of 432

Black plate (85,1)Chevrolet Camaro Owner Manual (GMNA-Localizing-U.S./Canada/Mexico-
6042601) - 2014 - CRC - 1/21/14
Vehicle Care 10-85
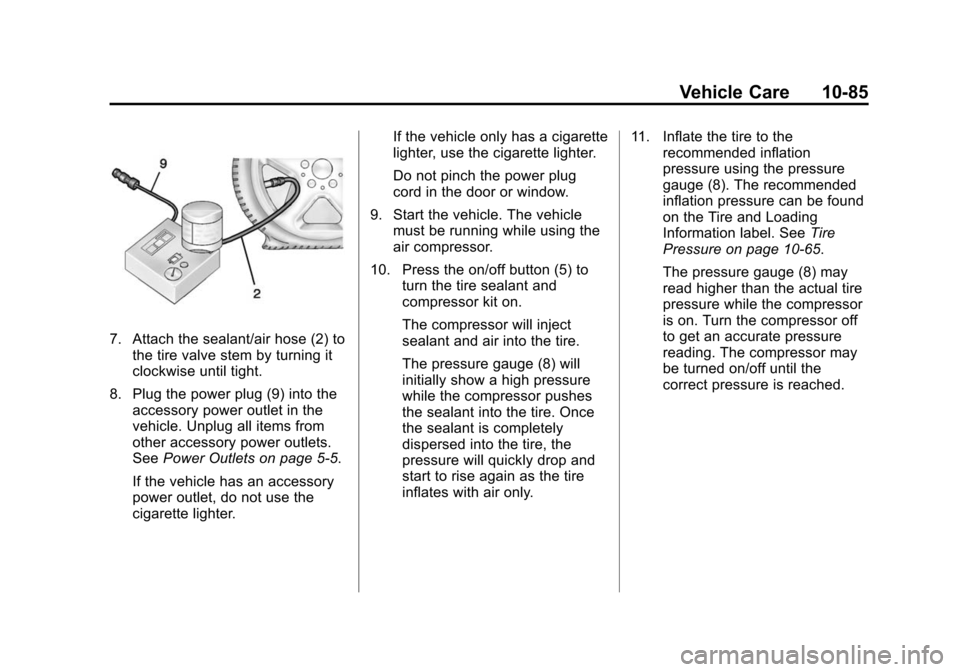
7. Attach the sealant/air hose (2) tothe tire valve stem by turning it
clockwise until tight.
8. Plug the power plug (9) into the accessory power outlet in the
vehicle. Unplug all items from
other accessory power outlets.
See Power Outlets on page 5-5.
If the vehicle has an accessory
power outlet, do not use the
cigarette lighter. If the vehicle only has a cigarette
lighter, use the cigarette lighter.
Do not pinch the power plug
cord in the door or window.
9. Start the vehicle. The vehicle must be running while using the
air compressor.
10. Press the on/off button (5) to turn the tire sealant and
compressor kit on.
The compressor will inject
sealant and air into the tire.
The pressure gauge (8) will
initially show a high pressure
while the compressor pushes
the sealant into the tire. Once
the sealant is completely
dispersed into the tire, the
pressure will quickly drop and
start to rise again as the tire
inflates with air only. 11. Inflate the tire to the
recommended inflation
pressure using the pressure
gauge (8). The recommended
inflation pressure can be found
on the Tire and Loading
Information label. See Tire
Pressure on page 10-65.
The pressure gauge (8) may
read higher than the actual tire
pressure while the compressor
is on. Turn the compressor off
to get an accurate pressure
reading. The compressor may
be turned on/off until the
correct pressure is reached.
Page 348 of 432

Black plate (88,1)Chevrolet Camaro Owner Manual (GMNA-Localizing-U.S./Canada/Mexico-
6042601) - 2014 - CRC - 1/21/14
10-88 Vehicle Care
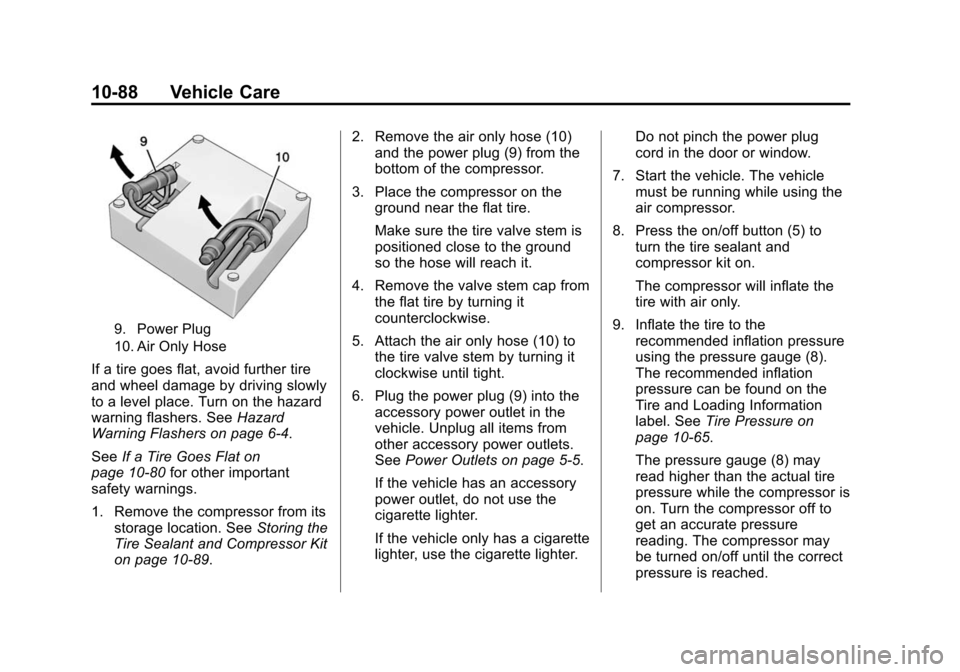
9. Power Plug
10. Air Only Hose
If a tire goes flat, avoid further tire
and wheel damage by driving slowly
to a level place. Turn on the hazard
warning flashers. SeeHazard
Warning Flashers on page 6-4.
See If a Tire Goes Flat on
page 10-80 for other important
safety warnings.
1. Remove the compressor from its
storage location. See Storing the
Tire Sealant and Compressor Kit
on page 10-89. 2. Remove the air only hose (10)
and the power plug (9) from the
bottom of the compressor.
3. Place the compressor on the ground near the flat tire.
Make sure the tire valve stem is
positioned close to the ground
so the hose will reach it.
4. Remove the valve stem cap from the flat tire by turning it
counterclockwise.
5. Attach the air only hose (10) to the tire valve stem by turning it
clockwise until tight.
6. Plug the power plug (9) into the accessory power outlet in the
vehicle. Unplug all items from
other accessory power outlets.
See Power Outlets on page 5-5.
If the vehicle has an accessory
power outlet, do not use the
cigarette lighter.
If the vehicle only has a cigarette
lighter, use the cigarette lighter. Do not pinch the power plug
cord in the door or window.
7. Start the vehicle. The vehicle must be running while using the
air compressor.
8. Press the on/off button (5) to turn the tire sealant and
compressor kit on.
The compressor will inflate the
tire with air only.
9. Inflate the tire to the recommended inflation pressure
using the pressure gauge (8).
The recommended inflation
pressure can be found on the
Tire and Loading Information
label. See Tire Pressure on
page 10-65.
The pressure gauge (8) may
read higher than the actual tire
pressure while the compressor is
on. Turn the compressor off to
get an accurate pressure
reading. The compressor may
be turned on/off until the correct
pressure is reached.
Page 366 of 432

Black plate (106,1)Chevrolet Camaro Owner Manual (GMNA-Localizing-U.S./Canada/Mexico-
6042601) - 2014 - CRC - 1/21/14
10-106 Vehicle Care
Steering, Suspension, and
Chassis Components
Visually inspect steering,
suspension, and chassis
components for damaged, loose,
or missing parts or signs of wear at
least once a year.
Inspect power steering for proper
hook-up, binding, leaks, cracks,
chafing, etc.
Visually check constant velocity joint
boots and axle seals for leaks.
Body Component Lubrication
Lubricate all key lock cylinders,
hood hinges, liftgate hinges, and
steel fuel door hinge unless the
components are plastic. Applying
silicone grease on weatherstrips
with a clean cloth will make them
last longer, seal better, and not stick
or squeak.
Underbody Maintenance
At least twice a year, spring and fall,
use plain water to flush dirt and
debris from the vehicle's underbody.Your dealer or an underbody car
washing system can do this. If not
removed, rust, and corrosion can
develop.
Sheet Metal Damage
If the vehicle is damaged and
requires sheet metal repair or
replacement, make sure the body
repair shop applies anti-corrosion
material to parts repaired or
replaced to restore corrosion
protection.
Original manufacturer replacement
parts will provide the corrosion
protection while maintaining the
vehicle warranty.
Finish Damage
Quickly repair minor chips and
scratches with touch-up materials
available from your dealer to avoid
corrosion. Larger areas of finish
damage can be corrected in your
dealer's body and paint shop.
Chemical Paint Spotting
Airborne pollutants can fall upon
and attack painted vehicle surfaces
causing blotchy, ring-shaped
discolorations, and small, irregular
dark spots etched into the paint
surface. See
“Finish Care”
previously in this section.
Interior Care
To prevent dirt particle abrasions,
regularly clean the vehicle's interior.
Immediately remove any soils. Note
that newspapers or dark garments
that can transfer color to home
furnishings can also permanently
transfer color to the vehicle's
interior.
Use a soft bristle brush to remove
dust from knobs and crevices on the
instrument cluster. Using a mild
soap solution, immediately remove
hand lotions, sunscreen, and insect
repellent from all interior surfaces or
permanent damage may result.