2014 CHEVROLET CAMARO trunk
[x] Cancel search: trunkPage 301 of 432
Black plate (41,1)Chevrolet Camaro Owner Manual (GMNA-Localizing-U.S./Canada/Mexico-
6042601) - 2014 - CRC - 1/21/14
Vehicle Care 10-41
{Warning
With the wrong kind of fluid in the
brake/clutch hydraulic system, the
brakes might not work well. This
could cause a crash. Always use
the proper brake/clutch fluid.
{Caution
.Using the wrong fluid can
badly damage brake/clutch
hydraulic system parts. For
example, just a few drops of
mineral-based oil, such as
engine oil, in the brake
hydraulic system can damage
brake hydraulic system parts
so badly that they will have to
be replaced. Do not let
someone put in the wrong
kind of fluid.(Continued)
Caution (Continued)
.If brake fluid is spilled on the
vehicle's painted surfaces,
the paint finish can be
damaged. Be careful not to
spill brake fluid on the
vehicle. If you do, wash it off
immediately.
Battery
The battery is in the trunk, under the
floor panel. Refer to the
replacement number shown on the
original battery label when a new
battery is needed.
{Warning
Battery posts, terminals, and
related accessories contain lead
and lead compounds, chemicals
known to the State of California to
cause cancer and reproductive
harm. Wash hands after handling.
Vehicle Storage
{Warning
Batteries have acid that can burn
you and gas that can explode.
You can be badly hurt if you are
not careful. SeeJump Starting on
page 10-97 for tips on working
around a battery without
getting hurt.
Infrequent Usage: Remove the
black, negative (−) cable from the
battery to keep the battery from
running down.
Extended Storage: Remove the
black, negative (−) cable from the
battery or use a battery trickle
charger.
Page 307 of 432
Black plate (47,1)Chevrolet Camaro Owner Manual (GMNA-Localizing-U.S./Canada/Mexico-
6042601) - 2014 - CRC - 1/21/14
Vehicle Care 10-47
6. Reconnect the electricalconnector.
7. Pull the duct back out of the air cleaner/filter housing until the
tabs snap the duct back into
position.
Taillamps, Turn Signal,
and Stoplamps
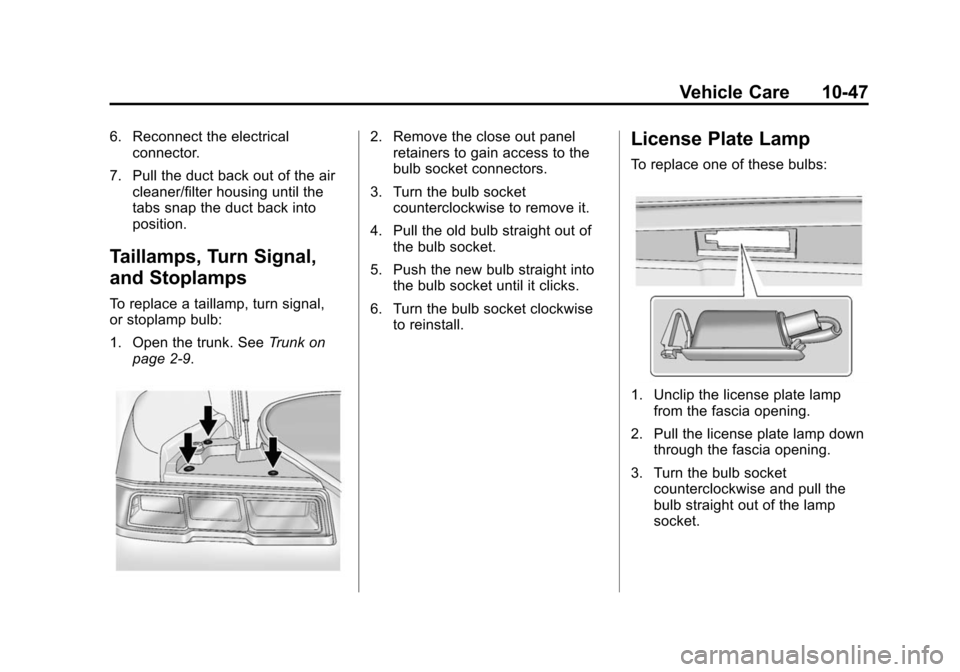
To replace a taillamp, turn signal,
or stoplamp bulb:
1. Open the trunk. See Trunk on
page 2-9.
2. Remove the close out panel retainers to gain access to the
bulb socket connectors.
3. Turn the bulb socket counterclockwise to remove it.
4. Pull the old bulb straight out of the bulb socket.
5. Push the new bulb straight into the bulb socket until it clicks.
6. Turn the bulb socket clockwise to reinstall.License Plate Lamp
To replace one of these bulbs:
1. Unclip the license plate lampfrom the fascia opening.
2. Pull the license plate lamp down through the fascia opening.
3. Turn the bulb socket counterclockwise and pull the
bulb straight out of the lamp
socket.
Page 314 of 432

Black plate (54,1)Chevrolet Camaro Owner Manual (GMNA-Localizing-U.S./Canada/Mexico-
6042601) - 2014 - CRC - 1/21/14
10-54 Vehicle Care
FusesUsage
F21 Spare
F22 Spare
F23 Trunk
F24 Automatic Occupant Sensing
F25 Body Control Module 1
F27 Body Control Module 8
F28 Front Heater, Ventilation, and Air
Conditioning
F29 Spare
F30 Body Control Module 7
Circuit
Breakers Usage
CB7 Passenger Seat
CB26 Driver Seat Relays
Usage
K10 Retained Accessory Power
K609 Trunk
SPARE SPARE
Rear Compartment Fuse
Block
The rear compartment fuse block is
on the right side of the trunk behind
a cover. Remove the convenience
net retainers, the rear sill plate, and
the passenger side trim retainers,
then swing the trim out of the way.
Page 349 of 432
Black plate (89,1)Chevrolet Camaro Owner Manual (GMNA-Localizing-U.S./Canada/Mexico-
6042601) - 2014 - CRC - 1/21/14
Vehicle Care 10-89
{Caution
If the recommended pressure
cannot be reached after
approximately 25 minutes, the
vehicle should not be driven
farther. The tire is too severely
damaged and the tire sealant and
compressor kit cannot inflate the
tire. Remove the power plug from
the accessory power outlet and
unscrew the inflating hose from
the tire valve. SeeRoadside
Assistance Program on
page 13-5.
10. Press the on/off button (5) to turn the tire sealant and
compressor kit off.
Be careful while handling the
compressor as it could be
warm after usage.
11. Unplug the power plug (9) from the accessory power outlet in
the vehicle. 12. Turn the air only hose (10)
counterclockwise to remove it
from the tire valve stem.
13. Replace the tire valve stem cap.
14. Return the air only hose (10) and power plug (9) back to
their original storage location.
15. Return the equipment to its original storage location in the
vehicle.
The tire sealant and compressor kit
has accessory adapters located in a
compartment on the bottom of its
housing that can be used to inflate
air mattresses, balls, etc.
Storing the Tire Sealant
and Compressor Kit
The tire sealant and compressor kit
is in a case in the trunk.
1. Open the trunk. See Trunk on
page 2-9.
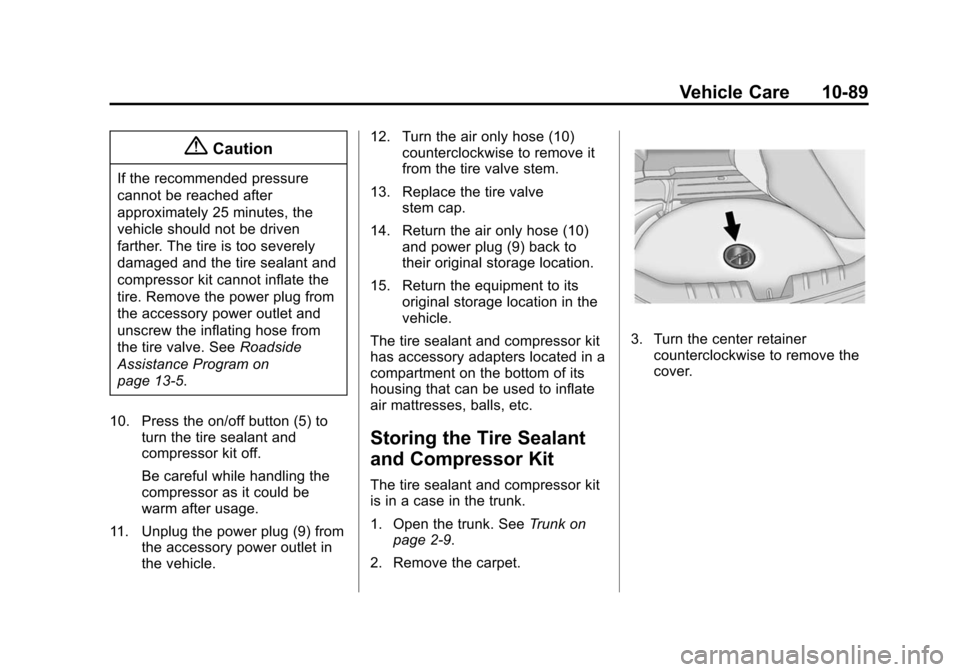
2. Remove the carpet.
3. Turn the center retainer counterclockwise to remove the
cover.
Page 350 of 432
Black plate (90,1)Chevrolet Camaro Owner Manual (GMNA-Localizing-U.S./Canada/Mexico-
6042601) - 2014 - CRC - 1/21/14
10-90 Vehicle Care
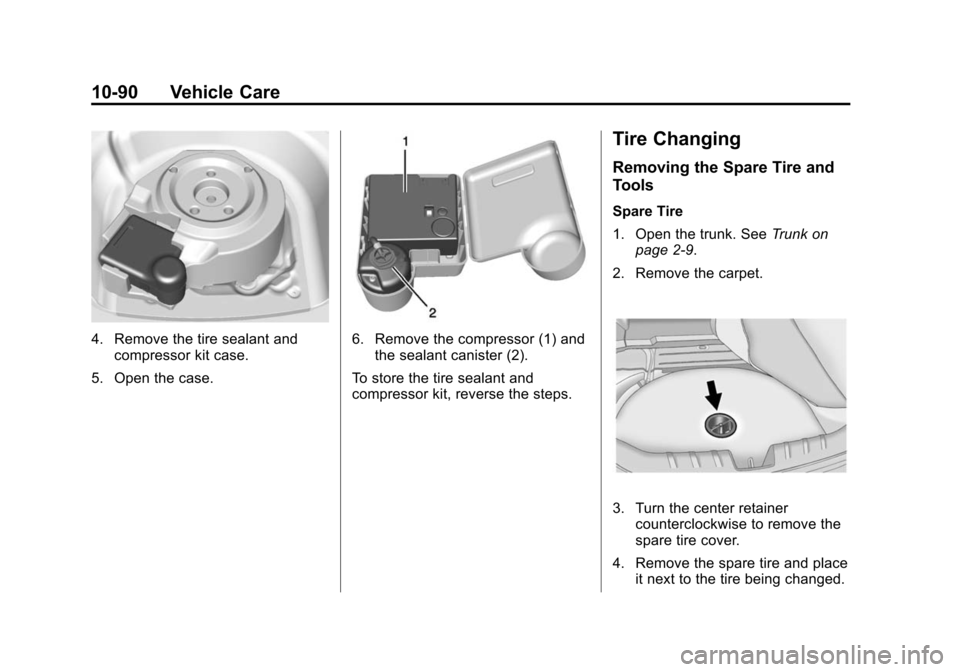
4. Remove the tire sealant andcompressor kit case.
5. Open the case.6. Remove the compressor (1) and the sealant canister (2).
To store the tire sealant and
compressor kit, reverse the steps.
Tire Changing
Removing the Spare Tire and
Tools
Spare Tire
1. Open the trunk. See Trunk on
page 2-9.
2. Remove the carpet.
3. Turn the center retainer counterclockwise to remove the
spare tire cover.
4. Remove the spare tire and place it next to the tire being changed.
Page 355 of 432
Black plate (95,1)Chevrolet Camaro Owner Manual (GMNA-Localizing-U.S./Canada/Mexico-
6042601) - 2014 - CRC - 1/21/14
Vehicle Care 10-95
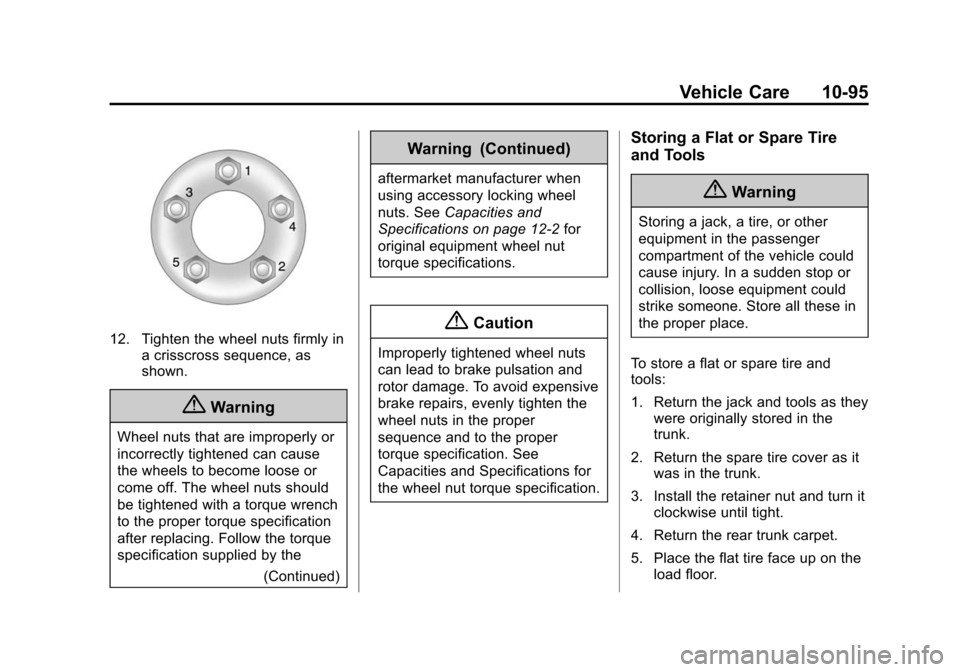
12. Tighten the wheel nuts firmly ina crisscross sequence, as
shown.
{Warning
Wheel nuts that are improperly or
incorrectly tightened can cause
the wheels to become loose or
come off. The wheel nuts should
be tightened with a torque wrench
to the proper torque specification
after replacing. Follow the torque
specification supplied by the
(Continued)
Warning (Continued)
aftermarket manufacturer when
using accessory locking wheel
nuts. SeeCapacities and
Specifications on page 12-2 for
original equipment wheel nut
torque specifications.
{Caution
Improperly tightened wheel nuts
can lead to brake pulsation and
rotor damage. To avoid expensive
brake repairs, evenly tighten the
wheel nuts in the proper
sequence and to the proper
torque specification. See
Capacities and Specifications for
the wheel nut torque specification.
Storing a Flat or Spare Tire
and Tools
{Warning
Storing a jack, a tire, or other
equipment in the passenger
compartment of the vehicle could
cause injury. In a sudden stop or
collision, loose equipment could
strike someone. Store all these in
the proper place.
To store a flat or spare tire and
tools:
1. Return the jack and tools as they were originally stored in the
trunk.
2. Return the spare tire cover as it was in the trunk.
3. Install the retainer nut and turn it clockwise until tight.
4. Return the rear trunk carpet.
5. Place the flat tire face up on the load floor.
Page 389 of 432

Black plate (1,1)Chevrolet Camaro Owner Manual (GMNA-Localizing-U.S./Canada/Mexico-
6042601) - 2014 - CRC - 1/21/14
Technical Data 12-1
Technical Data
Vehicle Identification
Vehicle IdentificationNumber (VIN) . . . . . . . . . . . . . . 12-1
Service Parts Identification Label . . . . . . . . . . . . . . . . . . . . . . . 12-1
Vehicle Data
Capacities andSpecifications . . . . . . . . . . . . . . 12-2
Engine Drive Belt Routing . . . 12-5
Vehicle Identification
Vehicle Identification
Number (VIN)
This legal identifier is in the front
corner of the instrument panel, on
the left side of the vehicle. It can be
seen through the windshield from
outside. The VIN also appears on
the Vehicle Certification and Service
Parts labels and certificates of title
and registration.
Engine Identification
The eighth character in the VIN is
the engine code. This code
identifies the vehicle's engine,
specifications, and replacement
parts. See “Engine Specifications”
under Capacities and Specifications
on page 12-2 for the vehicle's
engine code.
Service Parts
Identification Label
This label, in the trunk, has the
following information:
.Vehicle Identification
Number (VIN).
.Model designation.
.Paint information.
.Production options and special
equipment.
Do not remove this label from the
vehicle.
Page 422 of 432

Black plate (2,1)Chevrolet Camaro Owner Manual (GMNA-Localizing-U.S./Canada/Mexico-
6042601) - 2014 - CRC - 1/21/14
i-2 INDEX
B
Battery . . . . . . . . . . . . . . . . . . . . . . . 10-41Jump Starting . . . . . . . . . . . . . . . 10-97
Load Management . . . . . . . . . . . . . 6-6
Power Protection . . . . . . . . . . . . . . 6-7
Voltage and ChargingMessages . . . . . . . . . . . . . . . . . . . 5-33
Blade Replacement, Wiper . . . 10-43
Bluetooth Overview . . . . . . . . . 7-20, 7-21, 7-25
Brake
System Warning Light . . . . . . . . 5-19
Brakes . . . . . . . . . . . . . . . . . . . . . . . . 10-38 Antilock . . . . . . . . . . . . . . . . . . . . . . . 9-36
Assist . . . . . . . . . . . . . . . . . . . . . . . . . 9-38
Fluid . . . . . . . . . . . . . . . . . . . . . . . . 10-40
Parking . . . . . . . . . . . . . . . . . . . . . . . 9-37
System Messages . . . . . . . . . . . . 5-33
Braking . . . . . . . . . . . . . . . . . . . . . . . . . 9-3
Break-In, New Vehicle . . . . . . . . . 9-19
Bulb Replacement . . . . . . . . . . . . 10-48 Halogen Bulbs . . . . . . . . . . . . . . 10-45
Headlamp Aiming . . . . . . . . . . . 10-44
Headlamps . . . . . . . . . . . . . . . . . 10-45 Bulb Replacement (cont'd)
Headlamps, Front
Turn Signal, and
Parking Lamps . . . . . 10-45, 10-46
High Intensity Discharge (HID) Lighting . . . . . . . . . . . . . 10-45
License Plate Lamps . . . . . . . 10-47
Taillamps, Turn Signal, and Stoplamps . . . . . . . . . . . . 10-47
Buying New Tires . . . . . . . . . . . . . 10-75
C
Calibration . . . . . . . . . . . . . . . . . . . . . . 5-4
California Fuel Requirements . . . . . . . . . . . 9-54
Perchlorate MaterialsRequirements . . . . . . . . . . . . . . . 10-3
Warning . . . . . . . . . . . . . . . . . . . . . . 10-3
Camera Rear Vision (RVC) . . . . . . . . . . . . 9-50
Canadian Vehicle Owners . . . . . . . . iii
Capacities and Specifications . . . . . . . . . . . . . . . . 12-2 Carbon Monoxide
Engine Exhaust . . . . . . . . . . . . . . . 9-27
Trunk . . . . . . . . . . . . . . . . . . . . . . . . . . 2-9
Winter Driving . . . . . . . . . . . . . . . . 9-12
Cautions, Danger, and Warnings . . . . . . . . . . . . . . . . . . . . . . . . iv
CD Player . . . . . . . . . . . . . . . . . . . . . 7-12
Center Console Storage . . . . . . . . 4-2
Chains, Tire . . . . . . . . . . . . . . . . . . 10-80
Charging System Light . . . . . . . . 5-16
Check
Engine Light . . . . . . . . . . . . . . . . . . 5-16
IgnitionTransmission Lock . . . . . . . . 10-43
Child Restraints Infants and Young
Children . . . . . . . . . . . . . . . . . . . . . 3-30
Lower Anchors and Tethers for Children . . . . . . . . . 3-36
Older Children . . . . . . . . . . . . . . . . 3-28
Securing . . . . . . . . . . . . . . . . 3-42, 3-44
Systems . . . . . . . . . . . . . . . . . . . . . . 3-33
Circuit Breakers . . . . . . . . . . . . . . 10-49
Cleaning Exterior Care . . . . . . . . . . . . . . 10-101
Interior Care . . . . . . . . . . . . . . . 10-106