2014 CHEVROLET CAMARO inflation pressure
[x] Cancel search: inflation pressurePage 347 of 432

Black plate (87,1)Chevrolet Camaro Owner Manual (GMNA-Localizing-U.S./Canada/Mexico-
6042601) - 2014 - CRC - 1/21/14
Vehicle Care 10-87
22. Immediately drive the vehicle8 km (5 mi) to distribute the
sealant in the tire.
23. Stop at a safe location and check the tire pressure. Refer
to Steps 1–10 under “Using the
Tire Sealant and Compressor
Kit without Sealant to Inflate a
Tire (Not Punctured).”
If the tire pressure has fallen
more than 68 kPa (10 psi)
below the recommended
inflation pressure, stop driving
the vehicle. The tire is too
severely damaged and the tire
sealant cannot seal the tire.
See Roadside Assistance
Program on page 13-5.
If the tire pressure has not
dropped more than 68 kPa
(10 psi) from the recommended
inflation pressure, inflate the
tire to the recommended
inflation pressure. 24. Wipe off any sealant from the
wheel, tire, or vehicle.
25. Dispose of the used tire sealant canister (4) at a local
dealer or in accordance with
local state codes and practices.
26. Replace it with a new canister available from your dealer.
27. After temporarily sealing a tire using the tire sealant and
compressor kit, take the
vehicle to an authorized dealer
within 161 km (100 mi) of
driving to have the tire repaired
or replaced.Using the Tire Sealant and
Compressor Kit without
Sealant to Inflate a Tire (Not
Punctured)
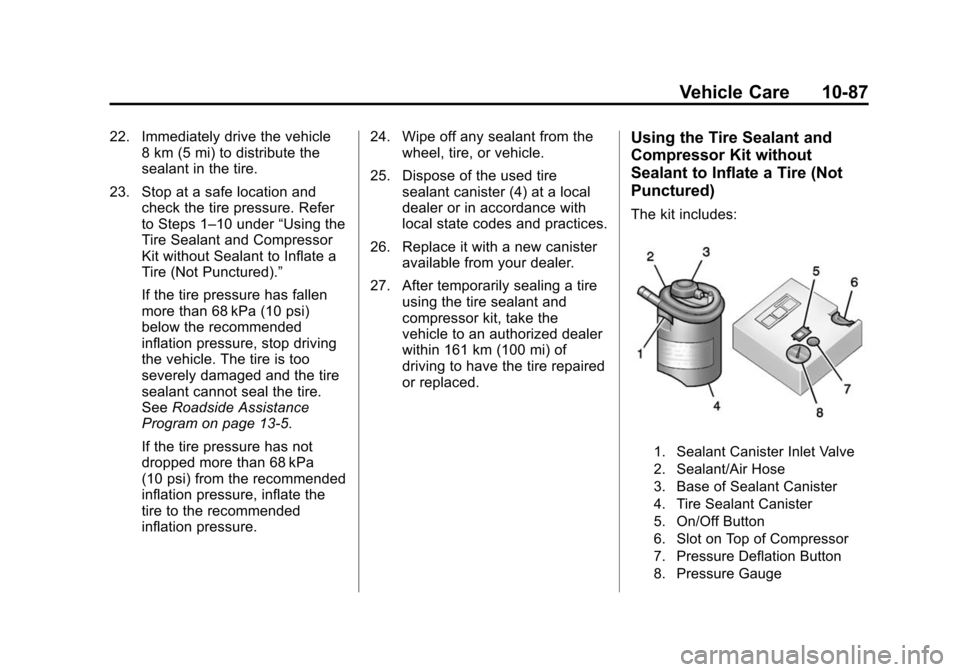
The kit includes:
1. Sealant Canister Inlet Valve
2. Sealant/Air Hose
3. Base of Sealant Canister
4. Tire Sealant Canister
5. On/Off Button
6. Slot on Top of Compressor
7. Pressure Deflation Button
8. Pressure Gauge
Page 348 of 432

Black plate (88,1)Chevrolet Camaro Owner Manual (GMNA-Localizing-U.S./Canada/Mexico-
6042601) - 2014 - CRC - 1/21/14
10-88 Vehicle Care
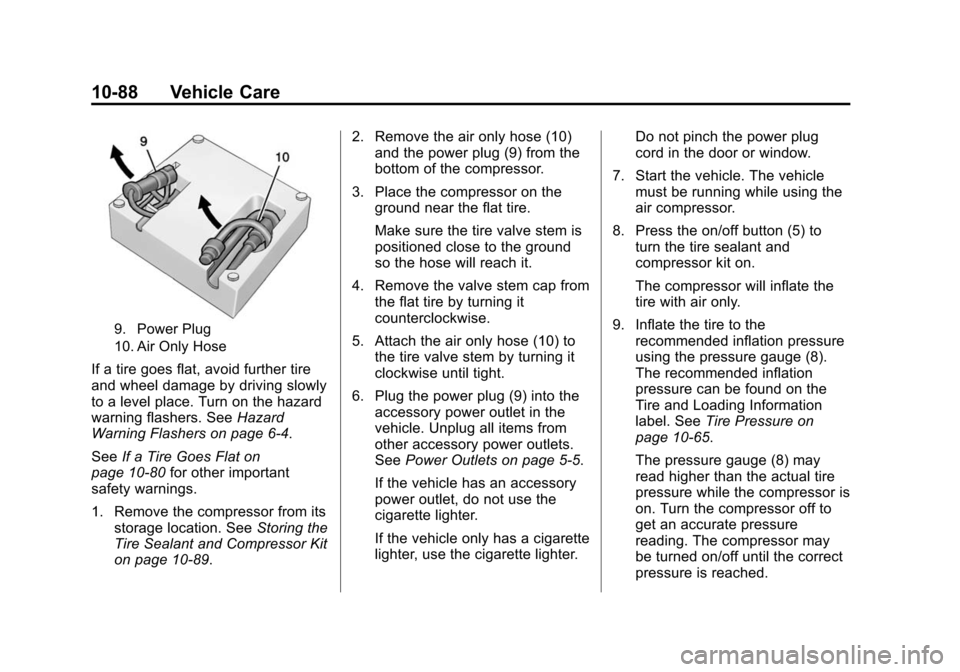
9. Power Plug
10. Air Only Hose
If a tire goes flat, avoid further tire
and wheel damage by driving slowly
to a level place. Turn on the hazard
warning flashers. SeeHazard
Warning Flashers on page 6-4.
See If a Tire Goes Flat on
page 10-80 for other important
safety warnings.
1. Remove the compressor from its
storage location. See Storing the
Tire Sealant and Compressor Kit
on page 10-89. 2. Remove the air only hose (10)
and the power plug (9) from the
bottom of the compressor.
3. Place the compressor on the ground near the flat tire.
Make sure the tire valve stem is
positioned close to the ground
so the hose will reach it.
4. Remove the valve stem cap from the flat tire by turning it
counterclockwise.
5. Attach the air only hose (10) to the tire valve stem by turning it
clockwise until tight.
6. Plug the power plug (9) into the accessory power outlet in the
vehicle. Unplug all items from
other accessory power outlets.
See Power Outlets on page 5-5.
If the vehicle has an accessory
power outlet, do not use the
cigarette lighter.
If the vehicle only has a cigarette
lighter, use the cigarette lighter. Do not pinch the power plug
cord in the door or window.
7. Start the vehicle. The vehicle must be running while using the
air compressor.
8. Press the on/off button (5) to turn the tire sealant and
compressor kit on.
The compressor will inflate the
tire with air only.
9. Inflate the tire to the recommended inflation pressure
using the pressure gauge (8).
The recommended inflation
pressure can be found on the
Tire and Loading Information
label. See Tire Pressure on
page 10-65.
The pressure gauge (8) may
read higher than the actual tire
pressure while the compressor is
on. Turn the compressor off to
get an accurate pressure
reading. The compressor may
be turned on/off until the correct
pressure is reached.
Page 356 of 432

Black plate (96,1)Chevrolet Camaro Owner Manual (GMNA-Localizing-U.S./Canada/Mexico-
6042601) - 2014 - CRC - 1/21/14
10-96 Vehicle Care
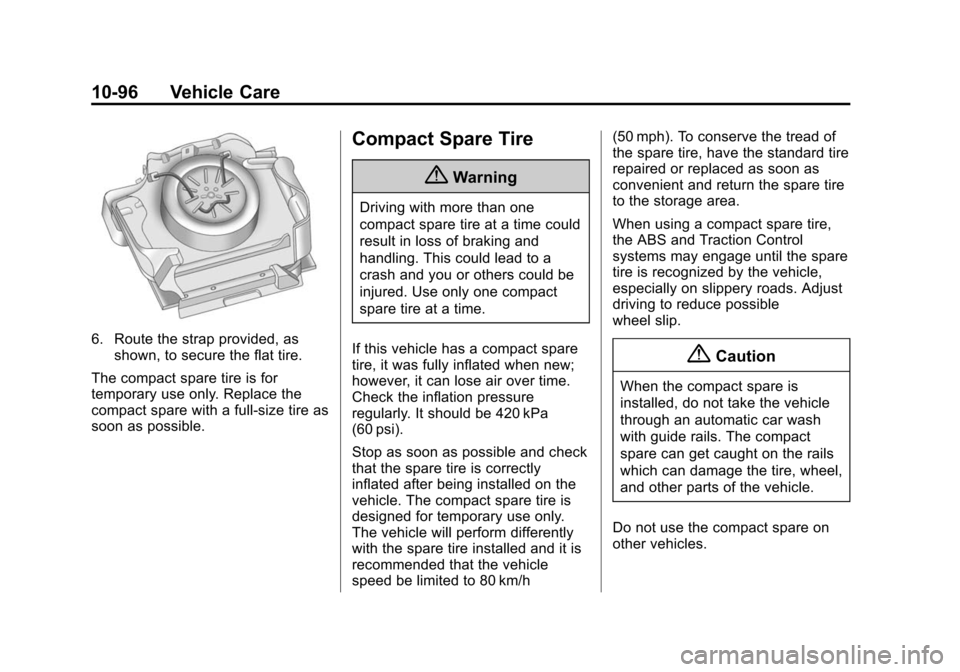
6. Route the strap provided, asshown, to secure the flat tire.
The compact spare tire is for
temporary use only. Replace the
compact spare with a full-size tire as
soon as possible.
Compact Spare Tire
{Warning
Driving with more than one
compact spare tire at a time could
result in loss of braking and
handling. This could lead to a
crash and you or others could be
injured. Use only one compact
spare tire at a time.
If this vehicle has a compact spare
tire, it was fully inflated when new;
however, it can lose air over time.
Check the inflation pressure
regularly. It should be 420 kPa
(60 psi).
Stop as soon as possible and check
that the spare tire is correctly
inflated after being installed on the
vehicle. The compact spare tire is
designed for temporary use only.
The vehicle will perform differently
with the spare tire installed and it is
recommended that the vehicle
speed be limited to 80 km/h (50 mph). To conserve the tread of
the spare tire, have the standard tire
repaired or replaced as soon as
convenient and return the spare tire
to the storage area.
When using a compact spare tire,
the ABS and Traction Control
systems may engage until the spare
tire is recognized by the vehicle,
especially on slippery roads. Adjust
driving to reduce possible
wheel slip.
{Caution
When the compact spare is
installed, do not take the vehicle
through an automatic car wash
with guide rails. The compact
spare can get caught on the rails
which can damage the tire, wheel,
and other parts of the vehicle.
Do not use the compact spare on
other vehicles.
Page 373 of 432

Black plate (3,1)Chevrolet Camaro Owner Manual (GMNA-Localizing-U.S./Canada/Mexico-
6042601) - 2014 - CRC - 1/21/14
Service and Maintenance 11-3
Maintenance
Schedule
Owner Checks and Services
At Each Fuel Stop
.Check the engine oil level. See
Engine Oil on page 10-15.
Once a Month
.Check the tire inflation
pressures. See Tire Pressure on
page 10-65.
.Inspect the tires for wear. See
Tire Inspection on page 10-72.
.Check the windshield washer
fluid level. See Washer Fluid on
page 10-38.
Engine Oil Change
When the CHANGE ENGINE OIL
SOON message displays, have the
engine oil and filter changed within
the next 1 000 km/600 mi. If driven
under the best conditions, the
engine oil life system might not
indicate the need for vehicle service
for more than a year. The engine oil
and filter must be changed at least
once a year and the oil life system
must be reset. Your trained dealer
technician can perform this work.
If the engine oil life system is reset
accidentally, service the vehicle
within 5 000 km/3,000 mi since the
last service. Reset the oil life
system when the oil is changed.
See Engine Oil Life System on
page 10-20.
Tire Rotation and Required
Services Every 12 000 km/
7,500 mi
Rotate the tires, if recommended for
the vehicle, and perform the
following services. See Tire
Rotation on page 10-72.
.Check engine oil level and oil
life percentage. If needed,
change engine oil and filter, and
reset oil life system. See Engine
Oil on page 10-15 andEngine
Oil Life System on page 10-20.
.Check engine coolant level. See
Engine Coolant on page 10-30.
.Check windshield washer fluid
level. See Washer Fluid on
page 10-38.
.Visually inspect windshield wiper
blades for wear, cracking,
or contamination. See Exterior
Care on page 10-101. Replace
worn or damaged wiper blades.
See Wiper Blade Replacement
on page 10-43.
Page 374 of 432

Black plate (4,1)Chevrolet Camaro Owner Manual (GMNA-Localizing-U.S./Canada/Mexico-
6042601) - 2014 - CRC - 1/21/14
11-4 Service and Maintenance
.Check tire inflation pressures.
SeeTire Pressure on
page 10-65.
.Inspect tire wear. See Tire
Inspection on page 10-72.
.Visually check for fluid leaks.
.Inspect engine air cleaner filter.
See Engine Air Cleaner/Filter
(Except ZL1 and Z/28) on
page 10-22 orEngine Air
Cleaner/Filter (ZL1 Only) on
page 10-23 orEngine Air
Cleaner/Filter (Z/28 Only) on
page 10-24.
.Inspect brake system.
.Visually inspect steering,
suspension, and chassis
components for damaged, loose,
or missing parts or signs of
wear. See Exterior Care on
page 10-101.
.Check restraint system
components. See Safety System
Check on page 3-14.
.Visually inspect fuel system for
damage or leaks.
.Visually inspect exhaust system
and nearby heat shields for
loose or damaged parts.
.Lubricate body components. See
Exterior Care on page 10-101.
.Check starter switch. See Starter
Switch Check on page 10-42.
.Check automatic transmission
shift lock control function. See
Automatic Transmission Shift
Lock Control Function Check on
page 10-42.
.Check ignition transmission lock.
See Ignition Transmission Lock
Check on page 10-43.
.Check parking brake and
automatic transmission park
mechanism. See Park Brake and
P (Park) Mechanism Check on
page 10-43.
.Check accelerator pedal for
damage, high effort, or binding.
Replace if needed.
.Visually inspect gas strut for
signs of wear, cracks, or other
damage. Check the hold open
ability of the strut. See your
dealer if service is required.
.Check tire sealant expiration
date, if equipped. See Tire
Sealant and Compressor Kit on
page 10-82.
.Inspect sunroof track and seal,
if equipped. See Sunroof on
page 2-18.
Page 431 of 432

Black plate (11,1)Chevrolet Camaro Owner Manual (GMNA-Localizing-U.S./Canada/Mexico-
6042601) - 2014 - CRC - 1/21/14
INDEX i-11
T
Tachometer . . . . . . . . . . . . . . . . . . . . . 5-9
Taillamp Indicator Light . . . . . . . . 5-23
TaillampsTurn Signal andStoplamps . . . . . . . . . . . . . . . . 10-47
Text Telephone (TTY) Users . . . 13-4
Theater Dimming . . . . . . . . . . . . . . . 6-6
Theft-Deterrent Systems . . . . . . . 2-13
Immobilizer . . . . . . . . . . . . . . . . . . . 2-13
Time . . . . . . . . . . . . . . . . . . . . . . . . . . . . 5-4
Tires
Buying New Tires . . . . . . . . . . . 10-75
Chains . . . . . . . . . . . . . . . . . . . . . . 10-80
Changing . . . . . . . . . . . . . . . . . . . 10-90
Compact Spare . . . . . . . . . . . . . 10-96
Competition Oriented . . . . . . . 10-58
Designations . . . . . . . . . . . . . . . 10-62
Different Size . . . . . . . . . . . . . . . 10-77
If a Tire Goes Flat . . . . . . . . . . 10-80
Inflation Monitor System . . . . 10-68
Inspection . . . . . . . . . . . . . . . . . . 10-72
Low Profile . . . . . . . . . . . . . . . . . 10-57
Messages . . . . . . . . . . . . . . . . . . . . 5-40
Pressure . . . . . . . . . . . . . . . . . . . . 10-67
Pressure Light . . . . . . . . . . . . . . . . 5-22 Tires (cont'd)
Pressure Monitor System . . . 10-67
Rotation . . . . . . . . . . . . . . . . . . . . 10-72
Sealant and
Compressor Kit . . . . . . . . . . . 10-82
Sealant and Compressor Kit, Storing . . . . . . . . . . . . . . . . 10-89
Sidewall Labeling . . . . . . . . . . . 10-59
Terminology and Definitions . . . . . . . . . . . . . . . . . 10-62
Uniform Tire Quality Grading . . . . . . . . . . . . . . . . . . . 10-77
Wheel Alignment and Tire Balance . . . . . . . . . . . . . . . . . . . 10-79
Wheel Replacement . . . . . . . . 10-79
When It Is Time for New Tires . . . . . . . . . . . . . . . . . . . . . . 10-74
Winter . . . . . . . . . . . . . . . . . . . . . . 10-57
Tonneau Cover . . . . . . . . . . . . . . . . . 4-3
Towing Driving Characteristics . . . . . . . . 9-57
Equipment . . . . . . . . . . . . . . . . . . . . 9-61
General Information . . . . . . . . . . 9-57
Recreational Vehicle . . . . . . . 10-100
Trailer . . . . . . . . . . . . . . . . . . . . . . . . 9-60
Vehicle . . . . . . . . . . . . . . . . . . . . 10-100 Track Events and
Competitive Driving . . . . . . . . . . . 9-6
Traction . . . . . . . . . . . . . . . . . . . . . . . . 5-21 Control OFF/StabiliTrakOFF Light . . . . . . . . . . . . . . . . . . . 5-21
Control System (TCS)/ StabiliTrak
®Light . . . . . . . . . . . . 5-21
Limited-Slip Rear Axle . . . . . . . . 9-44
Off Light . . . . . . . . . . . . . . . . . . . . . . 5-20
Selective Ride Control . . . . . . . . 9-44
Traction Control/Electronic
Stability Control . . . . . . . . . . . . . . 9-39
Trailer Towing . . . . . . . . . . . . . . . . . . . . . . . . 9-60
Transmission Automatic . . . . . . . . . . . . . . . . . . . . . 9-28
Fluid, Automatic . . . . . . . . . . . . 10-21
Fluid, Manual . . . . . . . . . . . . . . . 10-21
Messages . . . . . . . . . . . . . . . . . . . . 5-41
Temperature Gauge . . . . . . . . . . 5-12
Transportation Program,
Courtesy . . . . . . . . . . . . . . . . . . . . . 13-7
Trip Odometer . . . . . . . . . . . . . . . . . . 5-9
Trunk . . . . . . . . . . . . . . . . . . . . . . . . . . . 2-9
Turn and Lane-Change Signals . . . . . . . . . . . . . . . . . . . . . . . . 6-4