Page 240 of 408

Black plate (52,1)Cadillac ELR Owner Manual (GMNA-Localizing-U.S./Canada-6081525) -
2014 - Second Edition - 1/22/14
9-52 Driving and Operating
Selecting the Alert Timing
With Adaptive Cruise Control
Without Adaptive Cruise ControlThe Collision Alert control is on the
steering wheel. Press
[/3to set
the FCA timing to far, medium, near,
or on some vehicles, off. The first
button press shows the current
setting on the DIC. Additional button
presses will change this setting. The
chosen setting will remain until it is
changed and will affect the timing of
both the Collision Alert and the
Tailgating Alert features. The timing
of both alerts will vary based on
vehicle speed. The faster the
vehicle speed, the farther away the
alert will occur. Consider traffic and
weather conditions when selecting
the alert timing. The range of
selectable alert timing may not be
appropriate for all drivers and
driving conditions.
If your vehicle is equipped with
Adaptive Cruise Control (ACC),
changing the FCA timing setting
automatically changes the following
gap setting (Far, Medium, or Near).
Following Distance Indication
The following distance to a moving
vehicle you are following is
indicated in following time in
seconds on the Driver Information
Center (DIC). See Driver
Information Center (DIC) on
page 5-38. The minimum following
time is 0.5 seconds away. If there is
no vehicle detected ahead, or the
vehicle ahead is out of sensor
range, dashes will be displayed.
Unnecessary Alerts
FCA may provide unnecessary
alerts for turning vehicles, vehicles
in other lanes, objects that are not
vehicles, or shadows. These alerts
are normal operation and the
vehicle does not need service.
Cleaning the System
If the FCA system does not seem to
operate properly, cleaning the
outside of the windshield in front of
the camera sensor on the back of
the rearview mirror, and cleaning the
Page 266 of 408

Black plate (6,1)Cadillac ELR Owner Manual (GMNA-Localizing-U.S./Canada-6081525) -
2014 - Second Edition - 1/22/14
10-6 Vehicle Care
Warning (Continued)
High voltage components are
identified by labels. Do not
remove, open, take apart,
or modify these components.
High voltage cable or wiring has
orange covering. Do not probe,
tamper with, cut, or modify high
voltage cable or wiring.
{Warning
It can be dangerous to work on
your vehicle if you do not have
the proper knowledge, service
manual, tools, or parts. Always
follow owner manual procedures
and consult the service manual
for your vehicle before doing any
service work.
If doing some of your own service
work, use the proper service
manual. It tells you much more about how to service the vehicle
than this manual can. To order the
proper service manual, see
Service
Publications Ordering Information
on page 13-11.
This vehicle has an airbag system.
Before attempting to do your own
service work, see Airbag System
Check on page 3-31.
Keep a record with all parts receipts
and list the mileage and the date of
any service work performed. See
Maintenance Records on
page 11-14.{Caution
Even small amounts of
contamination can cause damage
to vehicle systems. Do not allow
contaminants to contact the fluids,
reservoir caps, or dipsticks.
Hood
To open the hood:
1. Turn the vehicle off before opening the hood. If the vehicle
is on, the engine will start when
the hood is opened. See Electric
Mode on page 9-21 and
Extended Range Mode on
page 9-22.
2. Pull the release handle with this
symbol. It is below the
instrument panel outboard of the
steering wheel.
Page 291 of 408
Black plate (31,1)Cadillac ELR Owner Manual (GMNA-Localizing-U.S./Canada-6081525) -
2014 - Second Edition - 1/22/14
Vehicle Care 10-31
Mini
Fuses Amps Usage
14 –Not Used
15 15A Traction Power Inverter
Module and
Transmission
Control Module
–Battery
17 5A Engine Control Module–
Battery
22 10A Left High-Beam
Headlamp
24 –Empty
25 –Empty
26 –Not Used
31 5A Adaptive Cruise Control/
Auto
Headlamp Mini
Fuses Amps Usage
32 5A Vehicle Integration
Control Module
33 10A Run/Crank for Heated
Steering
Wheel
34 10A Vehicle Integration
Control Module
–Battery
35 –Not Used
36 10A Power Electronics
Coolant Pump
37 5A Cabin Heater Control Module Mini
Fuses Amps Usage
38 10A Rechargeable Energy
Storage
System (High
Voltage
Battery)
Coolant Pump
39 10A Rechargeable Energy
Storage
System (High
Voltage
Battery)
Control Module
40 10A Front Windshield
Washer
41 10A Right High-Beam
Headlamp
46 –Empty
47 –Empty
49 –Empty
Page 294 of 408
Black plate (34,1)Cadillac ELR Owner Manual (GMNA-Localizing-U.S./Canada-6081525) -
2014 - Second Edition - 1/22/14
10-34 Vehicle Care
To reinstall the door, insert the
forward edge hook feature, and
press around the edges of the end
cap to reengage all of the clips.
A fuse puller is in the engine
compartment fuse block.
The vehicle may not be equipped
with all of the fuses, relays, and
features shown.Fuses Amps Usage
F1 20A Power Outlet/ Cigarette
Lighter–Top
of IP
Storage Bin
F2 15A Infotainment (HMI, CD) Fuses Amps Usage
F3 10A Instrument Cluster
F4 10A Infotainment Display,
Steering
Wheel
Control
Switches
F5 10A Heating, Ventilation, &
Air
Conditioning
Page 297 of 408
Black plate (37,1)Cadillac ELR Owner Manual (GMNA-Localizing-U.S./Canada-6081525) -
2014 - Second Edition - 1/22/14
Vehicle Care 10-37
A fuse puller is in the engine
compartment fuse block.
The vehicle may not be equipped
with all of the fuses, relays, and
features shown.Fuses Amps Usage
F1 2A Steering Wheel Switch
F2 10A Auto Headlamp
Leveling Fuses Amps Usage
F3 10A Motorized Cup Holder
F4 15A Body Control Module 3/
Right
Headlamp Fuses Amps Usage
F5 7.5A Body Control Module 2/
Body Control
Module
Electronics/
Trunk Lamp/
Right
Daytime
Running
Lamp/Shifter
Lock/Switch
Backlighting
F6 15A Tilt/Telescope Column
F7 7.5A Body Control Module 6/
Map Lights/
Courtesy
Lights/
Back-up
Lamp
Page 313 of 408

Black plate (53,1)Cadillac ELR Owner Manual (GMNA-Localizing-U.S./Canada-6081525) -
2014 - Second Edition - 1/22/14
Vehicle Care 10-53
using a TPMS relearn tool, in the
following order: driver side front tire,
passenger side front tire, passenger
side rear tire, and driver side rear.
See your dealer for service or to
purchase a relearn tool.
There are two minutes to match the
first tire/wheel position, and
five minutes overall to match all four
tire/wheel positions. If it takes
longer, the matching process stops
and must be restarted.
The TPMS sensor matching
process is:
1. Set the parking brake.
2. Place the vehicle power mode inON/RUN. See Power Button on
page 9-16.
3. Make sure the Tire Pressure info display option is turned on. The
info displays on the DIC can be
turned on and off through the
Settings menu. See Driver
Information Center (DIC) on
page 5-38. 4. Use the five-way DIC control on
the right side of the steering
wheel to scroll to the Tire
Pressure screen under the DIC
info page. See Driver
Information Center (DIC) on
page 5-38.
5. Press and hold the SEL button in the center of the five-way DIC
control.
The horn sounds twice to signal
the receiver is in relearn mode
and the TIRE LEARNING
ACTIVE message displays on
the DIC screen.
6. Start with the driver side front tire.
7. Place the relearn tool against the tire sidewall, near the valve
stem. Then press the button to
activate the TPMS sensor.
A horn chirp confirms that the
sensor identification code has
been matched to this tire and
wheel position. 8. Proceed to the passenger side
front tire, and repeat Step 7.
9. Proceed to the passenger side rear tire, and repeat Step 7.
10. Proceed to the driver side rear tire, and repeat Step 7. The
horn sounds two times to
indicate the sensor
identification code has been
matched to the driver side rear
tire, and the TPMS sensor
matching process is no longer
active. The TIRE LEARNING
ACTIVE message on the DIC
display screen goes off.
11. Shut the ignition off.
12. Set all four tires to the recommended air pressure
level as indicated on the Tire
and Loading Information label.
Page 322 of 408

Black plate (62,1)Cadillac ELR Owner Manual (GMNA-Localizing-U.S./Canada-6081525) -
2014 - Second Edition - 1/22/14
10-62 Vehicle Care
It is unusual for a tire to blowout
while driving, especially if the tires
are maintained properly. SeeTires
on page 10-42. If air goes out of a
tire, it is much more likely to leak
out slowly. But if there ever is a
blowout, here are a few tips about
what to expect and what to do:
If a front tire fails, the flat tire will
create a drag that pulls the vehicle
toward that side. Take your foot off
the accelerator pedal and grip the
steering wheel firmly. Steer to
maintain lane position, and then
gently brake to a stop, well off the
road, if possible.
A rear blowout, particularly on a
curve, acts much like a skid and
may require the same correction as
used in a skid. Stop pressing the
accelerator pedal and steer to
straighten the vehicle. It may be
very bumpy and noisy. Gently brake
to a stop, well off the road,
if possible.{Warning
Driving on a flat tire will cause
permanent damage to the tire.
Re-inflating a tire after it has been
driven on while severely
underinflated or flat may cause a
blowout and a serious crash.
Never attempt to re-inflate a tire
that has been driven on while
severely underinflated or flat.
Have your dealer or an authorized
tire service center repair or
replace the flat tire as soon as
possible.
If a tire goes flat, avoid further tire
and wheel damage by driving slowly
to a level place and stopping, well
off the road, if possible.
1. Turn on the hazard warning flashers. See Hazard Warning
Flashers on page 6-5.
2. Set the parking brake firmly. 3. Put the shift lever in P (Park).
See Shifting Into Park on
page 9-19.
4. Turn off the engine.
5. Inspect the flat tire.
If the tire has been separated from
the wheel, has damaged sidewalls,
or has a puncture larger than
6 mm (0.25 in), the tire is too
severely damaged for the tire
sealant and compressor kit to be
effective. See Roadside Service on
page 13-5.
If the tire has a puncture less than
6 mm (0.25 in) in the tread area of
the tire, see Tire Sealant and
Compressor Kit on page 10-63.
Page 339 of 408

Black plate (79,1)Cadillac ELR Owner Manual (GMNA-Localizing-U.S./Canada-6081525) -
2014 - Second Edition - 1/22/14
Vehicle Care 10-79
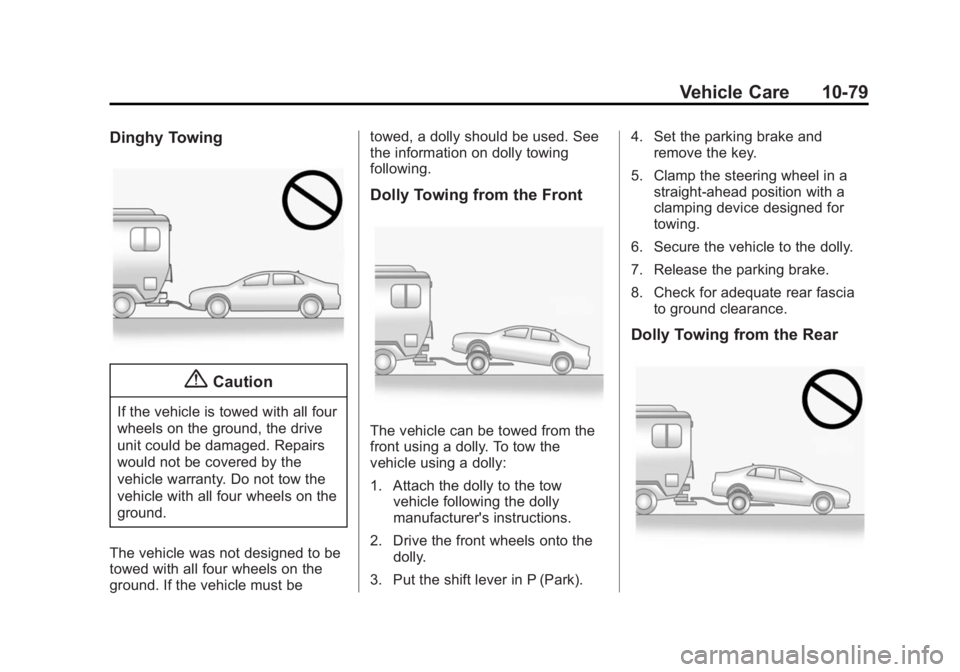
Dinghy Towing
{Caution
If the vehicle is towed with all four
wheels on the ground, the drive
unit could be damaged. Repairs
would not be covered by the
vehicle warranty. Do not tow the
vehicle with all four wheels on the
ground.
The vehicle was not designed to be
towed with all four wheels on the
ground. If the vehicle must be towed, a dolly should be used. See
the information on dolly towing
following.
Dolly Towing from the Front
The vehicle can be towed from the
front using a dolly. To tow the
vehicle using a dolly:
1. Attach the dolly to the tow
vehicle following the dolly
manufacturer's instructions.
2. Drive the front wheels onto the dolly.
3. Put the shift lever in P (Park). 4. Set the parking brake and
remove the key.
5. Clamp the steering wheel in a straight-ahead position with a
clamping device designed for
towing.
6. Secure the vehicle to the dolly.
7. Release the parking brake.
8. Check for adequate rear fascia to ground clearance.
Dolly Towing from the Rear