Page 169 of 265

Ventilation in rear, center▷Thumbwheels to vary the temperature, ar‐
row 1.
Toward blue: colder.
Toward red: warmer.▷Lever for changing the air flow direction,
arrow 2.▷Thumbwheels for continuous opening and
closing of the vents, arrow 3.
Lateral ventilation
▷Thumbwheel for opening and closing the
vents continuously, arrow 1.▷Lever for changing the air flow direction,
arrow 2.
Heating and ventilation, third row of
seats
The air in the area of the third row of seats can
be heated or circulated. The vents are located
in the storage area between the seats and in
the footwell of the third row of seats.
▷Button for switching on the fan, arrow 1.
LED comes on.▷Thumbwheel for the activation of the heat
and distribution of the air, arrow 2.
Turn toward the front: activate the heater
and distribute the air in the footwell.
Turn toward the rear: distribute the air in
the storage area between the seats.
The heater is not ready for operation without
switching on the fan. After the heater is
switched off, the fan can be used to circulate
the interior air, e.g., at high temperatures. To
do this, switch on the fan, arrow1 and turn the
thumbwheel toward the rear, arrow 2.
Rear automatic climate
control
At a glance
1Temperature2AUTO program3Vent settings4Air volume, AUTO intensitySeite 169Climate controlControls169
Online Edition for Part no. 01 40 2 926 740 - X/13
Page 170 of 265

5Display6Maximum cooling7Seat heating 55
Switching the rear automatic climate
control on/off
1."Settings"2."Climate"3."Rear climate"
The rear automatic climate control is not op‐
erational if the automatic climate control is
switched off or if the function for defrosting or
defogging the windows is active.
AUTO program Press the button.
Air flow, air distribution, and tempera‐
ture are controlled automatically:
Depending on the selected temperature, the
AUTO intensity, and outside influences, the air
is directed to the upper body and into the foot‐
well.
The cooling function is switched on automati‐
cally with the AUTO program.
Intensity of the AUTO program With the AUTO program switched on, auto‐
matic control of the air flow and air distribution
can be adjusted.
Press the left or right side of the but‐
ton: decrease or increase the inten‐
sity.
The selected intensity is shown on the display
of the automatic climate control.
Temperature
Turn the wheel to set the de‐
sired temperature.
The automatic climate control achieves this
temperature as quickly as possible, if neces‐
sary by using the maximum cooling or heating
capacity, and then keeps it constant.
Avoid rapidly switching between different tem‐
perature settings. The automatic climate con‐
trol will not have sufficient time to adjust the
set temperature.
Manual air distribution
The air distribution can be adjusted to individ‐
ual needs.
Press the button repeatedly to select
a program:▷Upper body region.▷Upper body region and footwell.▷Footwell.
Air flow, manual
To be able to manually adjust the air flow,
switch off the AUTO program first.
Press the left or right side of the but‐
ton: decrease or increase air flow.
The selected air flow is shown on the display of
the automatic climate control.
Switching the system on/off
Switching off Press and hold the left button.
Switching on Press any button except:
▷Left side of Air volume button.Seite 170ControlsClimate control170
Online Edition for Part no. 01 40 2 926 740 - X/13
Page 171 of 265

▷Seat heating.
Maximum coolingPress the button.
The system is set to the lowest tem‐
perature, maximum air flow and air circulation
mode.
Air flows out of the vents for the upper body
region. Open them for this purpose.
Air is cooled as quickly as possible:
▷At an external temperature of approx.
32 ℉/0 ℃.▷When the engine is running.
Parked-car ventilation/
heating
The concept The parked-car ventilation ventilates the vehi‐
cle interior and lowers its temperature, if nec‐
essary.
The parked-car heating warms the vehicle in‐
terior, making snow and ice easier to remove.
With the ignition switched off, the air is auto‐
matically routed to the windshield, to the side
windows, and into the footwell.
The systems can be switched on and off di‐
rectly or by using two preset departure times.
The switch-on time is automatically deter‐
mined based on the temperature. The systems
promptly switch on before the selected depar‐
ture time.
Operation takes place on the iDrive or the re‐ mote control.
Hints Parked-car heating in enclosed areas
Do not operate the parked-car heating in
enclosed areas, as breathing of the harmful ex‐
haust fumes may lead to loss of consciousness
and death. The exhaust gases contain carbon
monoxide, an odorless and colorless but highly
toxic gas. Switch off the parked-car heating
when refueling.◀
Operation of the parked-car heating
When parked-car heating is in operation,
high temperatures can occur under the car
body. Before the parked-car heating is
switched on, make sure that no flammable ma‐
terials, such as hay, leaves, grass, etc. are un‐
der the vehicle. Such contact could lead to a
fire, and with it the risk of serious personal in‐
jury as well as property damage.◀
At external temperatures below 32 ℉/0 ℃, wa‐
ter vapor occurs that emerges from below the
vehicle.
Functional requirements
Parked-car ventilation▷With remote control or when the departure
time is preselected: depends on internal,
external and set temperature.▷Direct operation via iDrive: any external
temperature.▷In direct mode via remote control: external
temperature above approx. 59 ℉/15 ℃.
Open the vents to allow air to flow out.
Parked-car heating
▷With remote control or when the departure
time is preselected: depends on internal,
external and set temperature.▷Direct operation via iDrive: any external
temperature.▷In direct mode via remote control: external
temperature below approx. 59 ℉/15 ℃.▷The battery is sufficiently charged.▷The fuel tank is filled to above the reserve
range.
If the parked-car heating has not been used for
several months, it may be necessary to switch
the system on again after several minutes.
Seite 171Climate controlControls171
Online Edition for Part no. 01 40 2 926 740 - X/13
Page 172 of 265

Switching on/off directly1."Settings"2."Climate"3."Activate comfort heating" or
"Activate comf. ventilation"
The symbol on the automatic climate con‐
trol flashes if the system is switched on.
The system continues to run for some time af‐
ter being switched off.
Preselecting the departure time
1."Settings"2."Climate"3."Dep. time 1:" or "Dep. time 2:"4.Set the desired time.
Activating the departure time
1."Settings"2."Climate"3."Activate depart. time 1" or "Activate
depart. time 2"
The symbol on the automatic climate con‐
trol lights up when the departure time is acti‐
vated.
The symbol on the automatic climate con‐
trol flashes when the system has been
switched on.
The system will only be switched on within the
next 24 hours. After that, it needs to reacti‐
vated.
Remote control
At a glance1Display2Selection buttons3OK4MENU
Buttons
Press the
buttonFunctionDecrease or increase the se‐
lection.Press briefly:
- Switch on remote control.
- Switch menu.
Press and hold down:
- Switch off remote control.Confirm the selection.
Symbols
SymbolsMeaning Parked-car ventilation/heating Timer 1. Timer 2.Seite 172ControlsClimate control172
Online Edition for Part no. 01 40 2 926 740 - X/13
Page 173 of 265

SymbolsMeaning Radio reception. Remote control battery indica‐
tor. Parked-car ventilation/heating
fault. Tank contents too low. Vehicle battery charging state
too low. No radio reception.
Switching on
Press button briefly until the display
lights up.
The last menu opened is displayed.
Switching off Press for approx. 2 seconds until the dis‐
play is switched off.
If no entry is made for 10 seconds, the display
shuts off automatically.
Select menu
The following menus can be selected via the
remote control.
▷ Parked-car ventilation/heating▷ Timer 1▷ Timer 2
Press the button repeatedly until the de‐
sired menu is displayed.
Activating/deactivating the functions Several menu items are preceded by a check‐
box. It indicates whether the function is acti‐
vated or deactivated. Selecting the menu item
activates or deactivates the function.
The function is activated.
The function is deactivated.
Parked-car ventilation/heating Activating1. Select menu.2. Press button to activate parked-car
ventilation/heating.
Deactivating
1. Select menu.2. Press button to deactivate parked-
car ventilation/heating.
Timer
Two timers can be set with different times.
Only one timer can ever be activated.
Activating
1.Select Timer 1 or Timer 2.2. Press the button to set the
hour.3. Press the button.4. Press the button to set the mi‐
nute.5. Press the button twice to activate the
timer.
Deactivating
1.Select desired timer.2. Press the button to deactivate the
timer.
Remote control range
The reception-dependent average range is ap‐
prox. 490 ft/150 m.
Seite 173Climate controlControls173
Online Edition for Part no. 01 40 2 926 740 - X/13
Page 174 of 265
The range is greatest if the remote control is
kept horizontally toward the front.
Frequencies
The remote control may not function properly
if it experiences interference from other sys‐
tems or devices that use the same frequency.
Replacing the batteries
Replace the batteries if a check control mes‐
sage is displayed or the battery indicator
flashes.
No rechargeable batteries
Do not use rechargeable batteries, as
damage may result from the substances in the
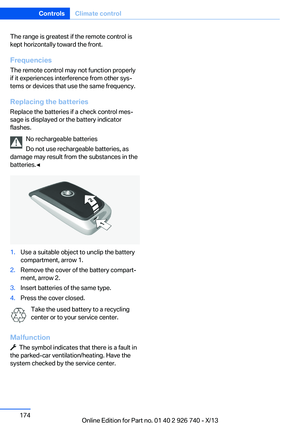
batteries.◀1.Use a suitable object to unclip the battery
compartment, arrow 1.2.Remove the cover of the battery compart‐
ment, arrow 2.3.Insert batteries of the same type.4.Press the cover closed.
Take the used battery to a recycling
center or to your service center.
Malfunction
The symbol indicates that there is a fault in
the parked-car ventilation/heating. Have the
system checked by the service center.
Seite 174ControlsClimate control174
Online Edition for Part no. 01 40 2 926 740 - X/13
Page 175 of 265

Interior equipmentVehicle equipmentAll standard, country-specific and optional
equipment that is offered in the model series is
described in this chapter. Therefore, equip‐
ment is also described that is not available in a
vehicle, e. g., because of the selected optional
equipment or country variant. This also applies
for safety-related functions and systems.
Universal garage door
opener
The concept
The universal garage door opener can operate
up to 3 functions of remote-controlled sys‐
tems such as garage door drives or lighting
systems. The universal garage door opener re‐
places up to 3 different hand-held transmitters.
To operate the remote control, the buttons on
the interior rearview mirror must be program‐
med with the desired functions. The hand-held
transmitter for the particular system is required
in order to program the remote control.
During programming
During programming and before activat‐
ing a device using the integrated universal re‐
mote control, ensure that there are no people,
animals, or objects in the range of movement
of the remote-controlled device; otherwise,
there is a risk of injury or damage.
Also follow the safety instructions of the hand-
held transmitter.◀
Before selling the vehicle, delete the stored
functions for the sake of security.
Compatibility If this symbol is printed on the packag‐
ing or in the instructions of the system
to be controlled, the system is gener‐ally compatible with the universal garage door
opener.
If you have any questions, please contact:▷Your service center.▷www.homelink.com on the Internet.
HomeLink is a registered trademark of John‐
son Controls, Inc.
Controls on the interior rearview
mirror
▷LED, arrow 1.▷Buttons, arrow 2.▷The hand-held transmitter, arrow 3, is re‐
quired for programming.
Programming
General information
1.Switch on the ignition.2.Initial setup:
Press and hold the left and right button on
the interior rearview mirror simultaneously
for approximately 20 seconds until the LED
on the interior rearview mirror flashes. This
erases all programming of the buttons on
the interior rearview mirror.3.Hold the hand-held transmitter for the sys‐
tem to be controlled approx. 1 to 3 in/2.5 to
8 cm away from the buttons on the interiorSeite 175Interior equipmentControls175
Online Edition for Part no. 01 40 2 926 740 - X/13
Page 176 of 265

rearview mirror. The required distance de‐
pends on the manual transmitter.4.Simultaneously press and hold the button
of the desired function on the hand-held
transmitter and the button to be program‐
med on the interior rearview mirror. The
LED on the interior rearview mirror will be‐
gin flashing slowly.5.Release both buttons as soon as the LED
flashes more rapidly. When the LED is
flashing faster, this indicates that the but‐
ton on the interior rearview mirror has been
programmed.
If the LED does not flash faster after at
least 60 seconds, change the distance be‐
tween the interior rearview mirror and the
hand-held transmitter and repeat the step.
Several more attempts at different distan‐
ces may be necessary. Wait at least
15 seconds between attempts.
Canada: if programming with the hand-
held transmitter was interrupted, hold
down the interior rearview mirror button
and repeatedly press and release the
hand-held transmitter button for 2 sec‐
onds.6.To program other functions on other but‐
tons, repeat steps 3 to 5.
The systems can be controlled using the inte‐
rior rearview mirror buttons.
Special feature of the alternating-
code wireless system
If you are unable to operate the system after
repeated programming, please check if the
system to be controlled features an alternat‐
ing-code system.
Read the system's operating manual, or press
the programmed button on the interior rear‐
view mirror longer. If the LED on the interior
rearview mirror starts flashing rapidly and then
stays lit constantly for 2 seconds, the system
features an alternating-code system. Flashing
and continuous illumination of the LED will re‐
peat for approximately 20 seconds.
For systems with an alternating-code system,
the universal garage door opener and the sys‐
tem also have to be synchronized.
Please read the operating manual of the sys‐
tem being set up for information on how to
synchronize the system.
Synchronizing is easier with the aid of a sec‐
ond person.
To synchronize:1.Park the vehicle within range of the re‐
mote-controlled system.2.Program the relevant button on the interior
rearview mirror as described.3.Locate and press the synchronizing button
on the system being programmed. You
have approx. 30 seconds for the next step.4.Hold down the programmed button on the
interior rearview mirror for approximately
3 seconds and then release it. If necessary,
repeat this work step up to three times in
order to finish synchronization. Once syn‐
chronization is complete, the programmed
function will be carried out.
Reprogramming individual buttons
1.Switch on the ignition.2.Press and hold the interior rearview mirror
button to be programmed.3.As soon as the interior rearview mirror LED
starts flashing slowly, hold the hand-held
transmitter for the system to be controlled
approx. 1 to 3 in/2.5 to 8 cm away from the
buttons on the interior rearview mirror. The
required distance depends on the manual
transmitter.4.Likewise, press and hold the button of the
desired function on the hand-held trans‐
mitter.5.Release both buttons as soon as the inte‐
rior rearview mirror LED flashes more rap‐
idly. When the LED is flashing faster, thisSeite 176ControlsInterior equipment176
Online Edition for Part no. 01 40 2 926 740 - X/13