Page 81 of 295

Symbols
The following functions can be selected within
the supplementary text message, depending
on the Check Control message.▷ "Service request"
Contact the service partner.▷ "Roadside Assistance"
Contact Roadside Assistance.
Hiding Check Control messages
Press the computer button in the turn signal
lever.
Some Check Control messages are displayed
until the malfunctions have been rectified.
They cannot be hidden.
If several malfunctions occur at once, the mes‐
sages are displayed consecutively.
They are marked with the symbol
shown here.
Other Check Control messages are hidden au‐
tomatically after approx. 20 seconds. However,
they are stored and can be displayed again
later.
They are marked with the symbol
shown here.
Viewing stored Check Control
messages
1.Lightly press button 1 in the turn indicator
lever up or down repeatedly until the ap‐
propriate symbol appears in the display,accompanied by the words "CHECK CON‐
TROL".2.Press button 2.
If there is no Check Control message, this
is indicated by "CHECK OK“. If a Check
Control message has been stored, the cor‐
responding lamp comes on. It is accompa‐
nied by a text message on the Control Dis‐
play.3.Press button 1 to check for other mes‐
sages.4.Press button 2.
The display again shows the external tem‐
perature and the time.
Displaying stored Check Control
messages
1."Vehicle Info"2."Vehicle status"3. "Check Control"4.Select the text message.
Messages after trip completion
Special messages that were displayed during a
trip are displayed again after the ignition is
switched off.
Speed limit
Entry of a speed limit which, when reached,
should cause a Check Control message to be
issued.
Seite 81DisplaysControls81
Online Edition for Part no. 01 40 2 911 269 - VI/13
Page 82 of 295
Renewed warning if the vehicle speed drops
below the set speed limit once by at least
3 mph/5 km/h.
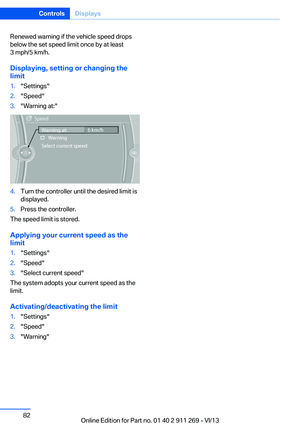
Displaying, setting or changing the
limit1."Settings"2."Speed"3."Warning at:"4.Turn the controller until the desired limit is
displayed.5.Press the controller.
The speed limit is stored.
Applying your current speed as the
limit
1."Settings"2."Speed"3."Select current speed"
The system adopts your current speed as the
limit.
Activating/deactivating the limit
1."Settings"2."Speed"3."Warning"Seite 82ControlsDisplays82
Online Edition for Part no. 01 40 2 911 269 - VI/13
Page 83 of 295

LampsVehicle equipment
This chapter describes all series equipment as
well as country-specific and special equipment
offered for this model series.Therefore, it also
describes equipment that may not be found in
your vehicle, for instance due to the selected
special equipment or the country version. This
also applies to safety-related functions and
systems.
At a glance1Automatic headlamp control / adaptive
light control / high-beam Assistant / wel‐
come lamps / daytime running lights2Lamps off / daytime running lights3Parking lamps / daytime running lights4Low beams/welcome lamps5Fog lamps
Parking lamps/low beams,
headlamp control
General information If the driver's door is opened while the ignition
is switched off, the exterior lighting is switched
off automatically in the following switch set‐
tings:
0,
,
Parking lamps
Switch position
: the vehicle lamps light
up on all sides, e.g., for parking.
Do not use the parking lamps for extended pe‐
riods; otherwise, the battery may become dis‐
charged and it would then be impossible to
start the engine.
When parking, it is preferable to switch on the
one-sided roadside parking lamps, refer to
page 85.
Low beams Switch position
with the ignition switched
on: the low beams light up.
Welcome lamps When parking the vehicle, leave the switch in
position
or : the parking and interior
lamps light up briefly when the vehicle is un‐
locked.
Activating/deactivating the welcome
lamps
1."Settings"2."Lighting"3."Welcome light"
The setting is stored for the remote control
currently in use.
Seite 83LampsControls83
Online Edition for Part no. 01 40 2 911 269 - VI/13
Page 84 of 295

Headlamp courtesy delay feature
The low beams stay lit for a short while after
the ignition is switched off, if the lamps are
switched off and the headlamp flasher is
switched on.
Setting the duration1."Settings"2."Lighting"3."Pathway light.: s"4.Set the duration.
The setting is stored for the remote control
currently in use.
Automatic headlamp control
Switch position
: the low beams are
switched on and off automatically, e.g., in tun‐
nels, in twilight or if there is precipitation. The
LED next to the symbol lights up.
A blue sky with the sun low on the horizon can
cause the lights to be switched on.
The low beams remain switched on independ‐
ent of the ambient lighting conditions when
you switch on the front fog lamps.
Personal responsibility
The automatic headlamp control cannot
serve as a substitute for your personal judg‐
ment in determining when the lamps should be
switched on in response to ambient lighting
conditions.
For example, the sensors are unable to detect
fog or hazy weather. To avoid safety risks, you
should always switch on the lamps manually
under these conditions.◀
Daytime running lights The daytime running lights light up in posi‐
tion 0,
and . After the ignition is
switched off, the parking lamps light up in po‐
sition
.
Activating/deactivating
1."Settings"2."Lighting"3."Daytime running lamps"
The setting is stored for the remote control
currently in use.
Adaptive Light Control
The concept Adaptive Light Control is a variable headlamp
control system that enables dynamic illumina‐
tion of the road surface.
Depending on the steering angle and other pa‐
rameters, the light from the headlamp follows
the course of the road.
In sharp curves, e.g. serpentines, or during
turning, up to a certain speed one of the two
front fog lamps is switched on as a turning
lamp. This provides improved illumination of
the area inside the curve.
Seite 84ControlsLamps84
Online Edition for Part no. 01 40 2 911 269 - VI/13
Page 85 of 295

Controls
Activating Switch position
with the ignition switched
on.
The turning lamps are automatically switched
on depending on the steering angle or the use
of turn signals.
To avoid blinding oncoming traffic, the Adap‐
tive Light Control does not swivel to the driv‐
er's side when the vehicle is at a standstill.
When driving in reverse, both turning lamps
are active.
Malfunction The warning lamp lights up.A mes‐
sage appears on the Control Display.
Adaptive Light Control is malfunc‐
tioning or has failed. Have the system checked
as soon as possible.
High beams/roadside
parking lamps
1High beams2Headlamp flasher3Roadside parking lamps
Left and right roadside parking lamps
The vehicle can be illuminated on one side.
Switching onAfter parking the vehicle, press the lever up ordown beyond the resistance point for ap‐
prox. 2 seconds, arrow 3.
The roadside parking lamps drain the battery.
Therefore, do not leave them on for unduly
long periods of time; otherwise, the battery
might not have enough power to start the en‐
gine.
Switching off
Briefly press the lever in the opposite direction
to the pressure point, arrow 3.
High-beam Assistant
The concept When the lights are switched on, this systemautomatically switches the high beams on and
off. The procedure is controlled by a sensor on
the front of the interior rearview mirror. The as‐
sistant ensures that the high beams are
switched on whenever the traffic situation al‐
lows. The driver can intervene at any time and
switch the high beams on and off as usual.
Activating the High-beam Assistant1.Turn the light switch to .2.With the low beams switched on, briefly
push the turn indicator lever in the direc‐
tion of the high beam.
The indicator lamp in the instrument
cluster lights up. The high beams are
switched on and off automatically.
The system responds to light from oncoming
traffic and traffic driving ahead of you, and to
adequate illumination, e.g., in towns and cities.
Seite 85LampsControls85
Online Edition for Part no. 01 40 2 911 269 - VI/13
Page 86 of 295

Switching the high beams on and off
manually▷High beams on, arrow 1.▷High beams off/headlamp flasher, arrow 2.
To reactivate the High-beam Assistant, briefly
push the turn indicator lever toward the high
beams.
Activating/deactivating via iDrive
1."Settings"2."Lighting"3."High beam assistant"
The setting is stored for the remote control
currently in use.
System limits Personal responsibility
The High-beam Assistant cannot serve
as a substitute for the driver's personal judg‐
ment of when to use the high beams. There‐
fore, manually switch off the high beams in sit‐
uations where this is required to avoid a safety
risk.◀
The system is not fully functional in situations
such as the following, and driver intervention
may be necessary:▷In very unfavorable weather conditions,
such as fog or heavy precipitation.▷In detecting poorly-lit road users, such as
pedestrians, cyclists, horseback riders and
wagons; when driving close to train or ship
traffic; and at animal crossings.▷In tight curves, on hilltops or in depres‐
sions, in cross traffic or half-obscured on‐
coming traffic on freeways.▷In poorly-lit towns and cities and in the
presence of highly reflective signs.▷At low speeds.▷When the windshield in front of the interior
rearview mirror is fogged over, dirty or cov‐
ered with stickers, etc.▷If the sensor view field is dirty.
The view field of the sensor is located on
the front of the interior rearview mirror.
Do not cover this area with stickers, etc.
Clean the sensor view field with a cloth
moistened with a small amount of glass
cleaner.
Fog lamps
Front fog lamps
The parking lamps or low beams must be
switched on.
Press the button. The green indicator
lamp in the instrument cluster lights
up.
If the automatic headlamp control, refer to
page 84, is activated, the low beams will come
on automatically when you switch on the fog
lamps.
Seite 86ControlsLamps86
Online Edition for Part no. 01 40 2 911 269 - VI/13
Page 87 of 295

Instrument lightingThe parking lamps or low beams must be
switched on to adjust the brightness.1.Push button 1 up or down repeatedly until
the appropriate symbol appears in the dis‐
play, accompanied by the brightness set‐
ting and the word "SET".2.Press button 2.3.Push button 1 up or down to select the de‐
sired brightness level.4.Press button 2.
The display again shows the external tem‐
perature and the time.
Interior lamps
General information
The interior lamps, footwell lamps, , cargo area
lamps, and courtesy lamps are controlled auto‐
matically.
The LEDs for the courtesy lamps are set in the
door handles and illuminate the ground in front
of the doors.
To avoid draining the battery, all lamps inside
the car are switched off about 8 minutes after
the ignition is switched off, Start/Stop button,
refer to page 57.
Switching the interior lamps on and
off
Press the button.
To switch off permanently: press the button for
approx. 3 seconds.
To clear this setting: briefly press the button.
Reading lamps Press the button.
Reading lamps are located at the front and rear
next to the interior lamps.
Danger of burns
Do not reach into the opening of the
lamps; otherwise, there is a risk of burns.◀
Ambient lighting
Depending on the equipment, the interior light‐
ing can be set individually for some lamps.
Selecting the color scheme
1."Settings"2."Lighting"3."Ambient:"4.Select the desired setting.Seite 87LampsControls87
Online Edition for Part no. 01 40 2 911 269 - VI/13
Page 88 of 295
SafetyVehicle equipment
This chapter describes all series equipment as
well as country-specific and special equipment
offered for this model series.Therefore, it alsodescribes equipment that may not be found in
your vehicle, for instance due to the selected
special equipment or the country version. This
also applies to safety-related functions and
systems.
Airbags
1Front airbags2Head airbags3Side airbags4Knee airbagFront airbags
Front airbags help protect the driver and front
passenger by responding to frontal impacts in
which safety belts alone cannot provide ade‐
quate restraint.
Side airbags
In a lateral impact, the side airbag supports the
side of the body in the chest and lap area.Head airbags
In a lateral impact, the head airbag supports
the head.
Knee airbagThe knee airbag supports the legs in a frontal
impact.Seite 88ControlsSafety88
Online Edition for Part no. 01 40 2 911 269 - VI/13