2014 BMW X1 SDRIVE28I service
[x] Cancel search: servicePage 244 of 295

propriate symbol appears in the display,
accompanied by the word "OIL".2.Press button 2 in the turn indicator lever.
The oil level is checked and the reading
displayed.
Possible displays
SymbolFunctionOil level OK.Oil level is being checked.
This can take about 3 minutes
if the car is at a standstill on a
level surface, or about 5 mi‐
nutes while the car is on the
move.Oil at minimum level:
Add a maximum quantity of
1 US quart/1 liter of engine oil,
refer to page 245, at the next
opportunity.SymbolFunctionOil level is too high.
Overfilling oil damages the en‐
gine. Have the vehicle
checked immediately.The oil level sensor is defec‐
tive.
Do not add engine oil.
It is possible to continue driv‐
ing. Note the newly calculated
remaining mileage until the
next oil service, refer to
page 78. Have the system
checked as soon as possible.
Display via iDrive
1."Vehicle Info"2."Vehicle status"3. "Engine oil level"
Possible messages
▷"Engine oil level OK"▷"Measurement not possible at this time."▷"Measuring engine oil level..."
Duration with the engine running: ap‐
prox. 3 minutes.
Duration while driving: approx. 5 minutes.
If engine oil was added, it may take up to
30 minutes to obtain an oil level reading.▷"Engine oil level below minimum. Add 1
quart!"Seite 244MobilityEngine compartment244
Online Edition for Part no. 01 40 2 911 269 - VI/13
Page 245 of 295
Add a maximum quantity of 1 US quart/1 li‐
ter of engine oil at the next opportunity, re‐
fer also to Adding engine oil below.▷"Engine oil level too high! Have this
checked."
Too much engine oil
Have the vehicle checked immedi‐
ately; otherwise, surplus oil can lead to en‐
gine damage.◀▷"Measurement inactive. Have this
checked." Do not add engine oil. It is possi‐
ble to continue driving. Note the newly cal‐
culated remaining mileage until the next oil
service, refer to page 78. Have the system
checked as soon as possible.
Adding engine oil
Filler neck
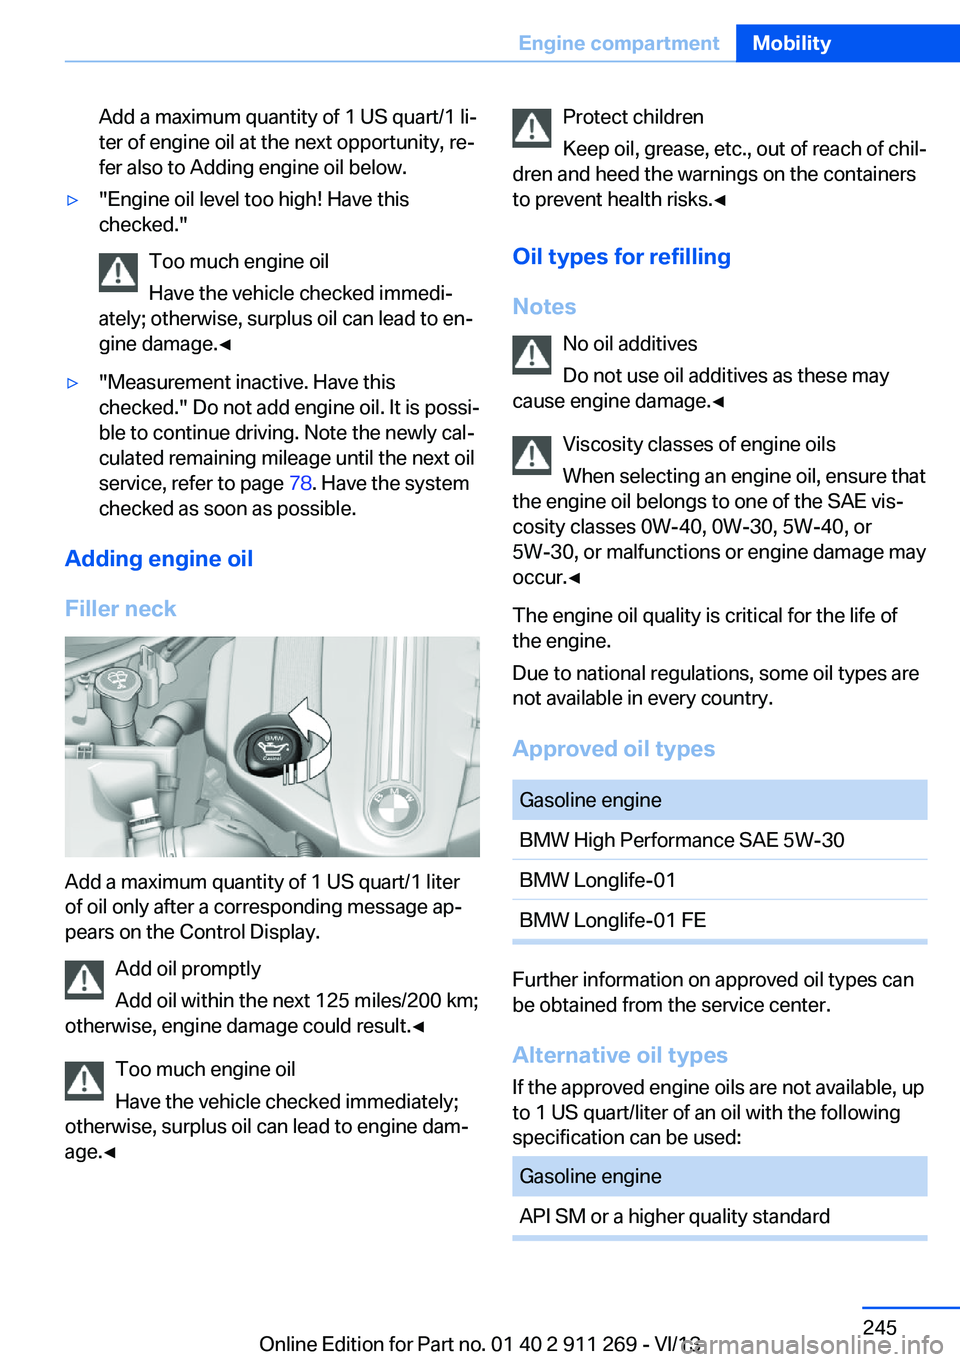
Add a maximum quantity of 1 US quart/1 liter
of oil only after a corresponding message ap‐
pears on the Control Display.
Add oil promptly
Add oil within the next 125 miles/200 km;
otherwise, engine damage could result.◀
Too much engine oil
Have the vehicle checked immediately;
otherwise, surplus oil can lead to engine dam‐
age.◀
Protect children
Keep oil, grease, etc., out of reach of chil‐
dren and heed the warnings on the containers
to prevent health risks.◀
Oil types for refilling
Notes No oil additives
Do not use oil additives as these may
cause engine damage.◀
Viscosity classes of engine oils
When selecting an engine oil, ensure that
the engine oil belongs to one of the SAE vis‐
cosity classes 0W-40, 0W-30, 5W-40, or
5W-30, or malfunctions or engine damage may
occur.◀
The engine oil quality is critical for the life of
the engine.
Due to national regulations, some oil types are
not available in every country.
Approved oil typesGasoline engineBMW High Performance SAE 5W-30BMW Longlife-01BMW Longlife-01 FE
Further information on approved oil types can
be obtained from the service center.
Alternative oil types If the approved engine oils are not available, up
to 1 US quart/liter of an oil with the following
specification can be used:
Gasoline engineAPI SM or a higher quality standardSeite 245Engine compartmentMobility245
Online Edition for Part no. 01 40 2 911 269 - VI/13
Page 246 of 295
Oil changeAn oil change should be carried out by the
service center only.
Coolant
General information Danger of burns from hot engine
Do not open the cooling system while
the engine is hot; otherwise, escaping coolant
may cause burns.◀
Suitable additives
Only use suitable additives; otherwise,
engine damage may occur. The additives are
harmful to your health.◀
Coolant consists of water and additives.
Not all commercially available additives are
suitable for your vehicle. Ask your service cen‐
ter for suitable additives.
Checking the coolant level
1.Do not open the hood until the engine has
cooled down.2.Turn the expansion tank cap counterclock‐
wise slightly to allow any accumulatedpressure to escape; then continue turning
to open.3.The filling level indicator 1 in the filler neck
indicates the coolant level. The coolant
level is correct if it is between the arrows of
the respective reservoir label 2.4.If the coolant is low, slowly add coolant up
to the specified level; do not overfill.5.Turn the cap until there is an audible click.6.Have the cause of the coolant loss elimi‐
nated as soon as possible.
Disposal
Comply with the appropriate environ‐
mental protection regulations when dis‐
posing of coolant additives.
Seite 246MobilityEngine compartment246
Online Edition for Part no. 01 40 2 911 269 - VI/13
Page 247 of 295

MaintenanceVehicle equipment
This chapter describes all series equipment as
well as country-specific and special equipment
offered for this model series.Therefore, it also
describes equipment that may not be found in
your vehicle, for instance due to the selected
special equipment or the country version. This
also applies to safety-related functions and
systems.
BMW Maintenance System
The maintenance system provides information
on required maintenance measures and thus
provides support in maintaining road safety
and the operational reliability of the vehicle.
Condition Based Service
CBS
Sensors and special algorithms take into ac‐
count the driving conditions of your vehicle.
Based on this, Condition Based Service deter‐
mines the maintenance requirements.
The system makes it possible to adapt the
amount of maintenance you need to your user
profile.
Details on the service requirements, refer to
page 78, can be displayed on the Control Dis‐
play.
On the Control Display, the remaining distan‐
ces and times for selected maintenance re‐
quirements and any legally required deadlines
can be displayed individually, refer to page 78.
Service data in the remote control Information on the required maintenance is
continuously stored in the remote control. Your service center will read out this data and
suggest the right array of service procedures
for your vehicle.
Therefore, hand your service specialist the re‐
mote control that you used most recently.
Setting the correct date
Make sure the date is set correctly, refer
to page 76; otherwise, the effectiveness of
CBS Condition Based Service is not ensured.◀
Storage periods Storage periods during which the vehicle bat‐
tery was disconnected are not taken into ac‐
count.
If this occurs, have a service center update the
time-dependent maintenance procedures,
such as checking brake fluid and, if necessary,
changing the engine oil and the microfilter/
activated-charcoal filter.
Service and Warranty
Information Booklet for US
models and Warranty and
Service Guide Booklet for Canadian models
Please consult your Service and Warranty In‐
formation Booklet for US models and Warranty
and Service Guide Booklet for Canadian mod‐
els for additional information on service re‐
quirements.Seite 247MaintenanceMobility247
Online Edition for Part no. 01 40 2 911 269 - VI/13
Page 248 of 295
Maintenance and repair should be performed
by your service center. Make sure to have reg‐
ular maintenance procedures recorded in the
vehicle's Service and Warranty Information
Booklet for US models, and in the Warranty
and Service Guide Booklet for Canadian mod‐
els. These entries are proof of regular mainte‐
nance.
Socket for OBD Onboard
Diagnosis
Socket for Onboard Diagnosis
The socket for Onboard Diagnosis may
only be used by the service center, by work‐
shops that operate according to the specifica‐
tions of the vehicle manufacturer with appro‐
priately trained personnel, and by other
authorized persons. Otherwise, its use may
lead to vehicle malfunctions.◀
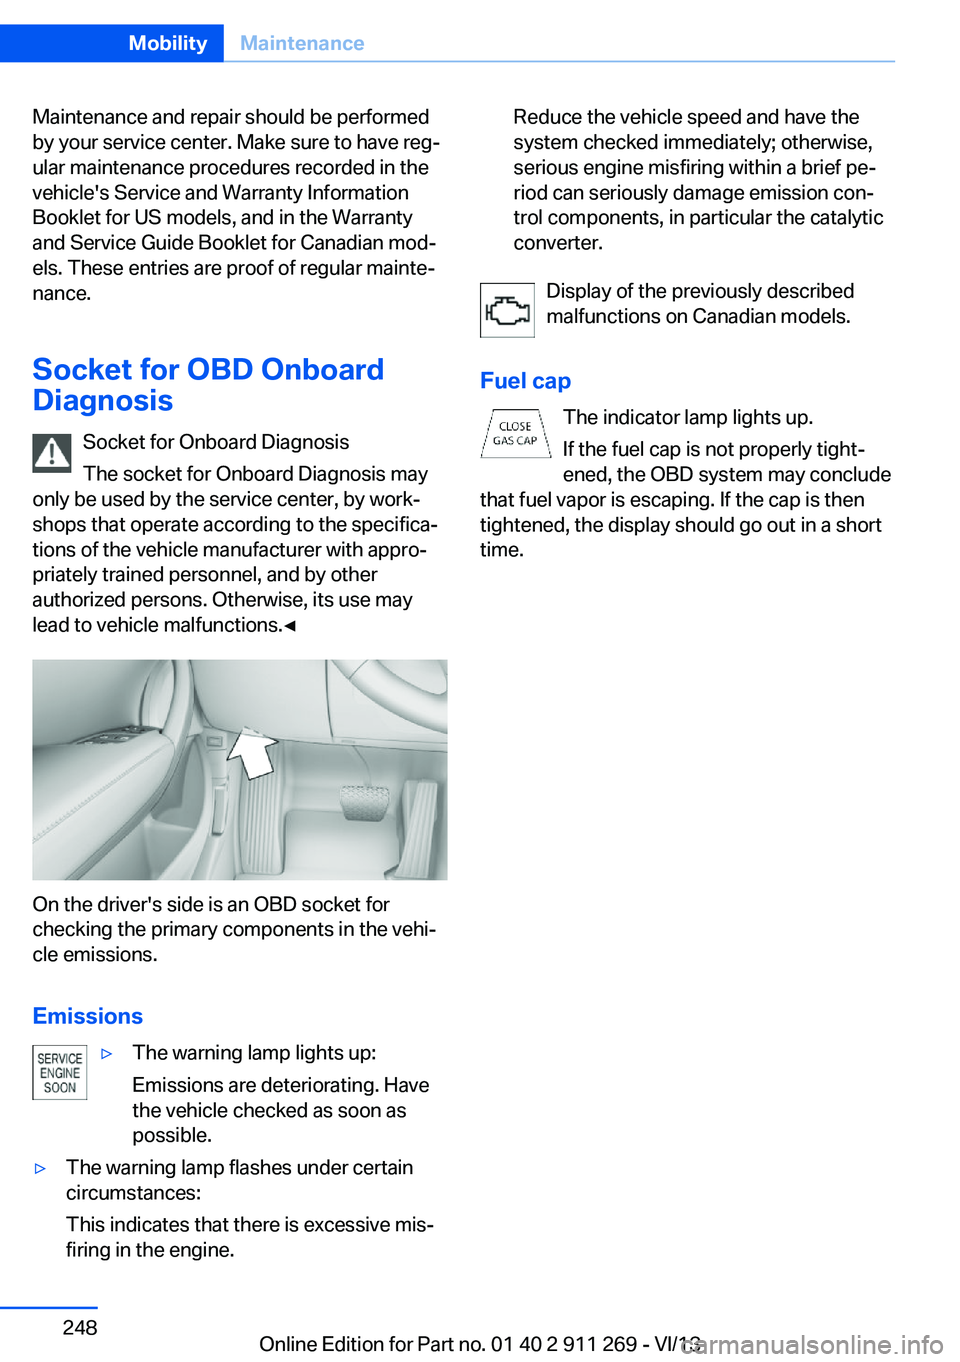
On the driver's side is an OBD socket for
checking the primary components in the vehi‐
cle emissions.
Emissions
▷The warning lamp lights up:
Emissions are deteriorating. Have
the vehicle checked as soon as
possible.▷The warning lamp flashes under certain
circumstances:
This indicates that there is excessive mis‐
firing in the engine.Reduce the vehicle speed and have the
system checked immediately; otherwise,
serious engine misfiring within a brief pe‐
riod can seriously damage emission con‐
trol components, in particular the catalytic
converter.
Display of the previously described
malfunctions on Canadian models.
Fuel cap The indicator lamp lights up.
If the fuel cap is not properly tight‐
ened, the OBD system may conclude
that fuel vapor is escaping. If the cap is then
tightened, the display should go out in a short
time.
Seite 248MobilityMaintenance248
Online Edition for Part no. 01 40 2 911 269 - VI/13
Page 250 of 295
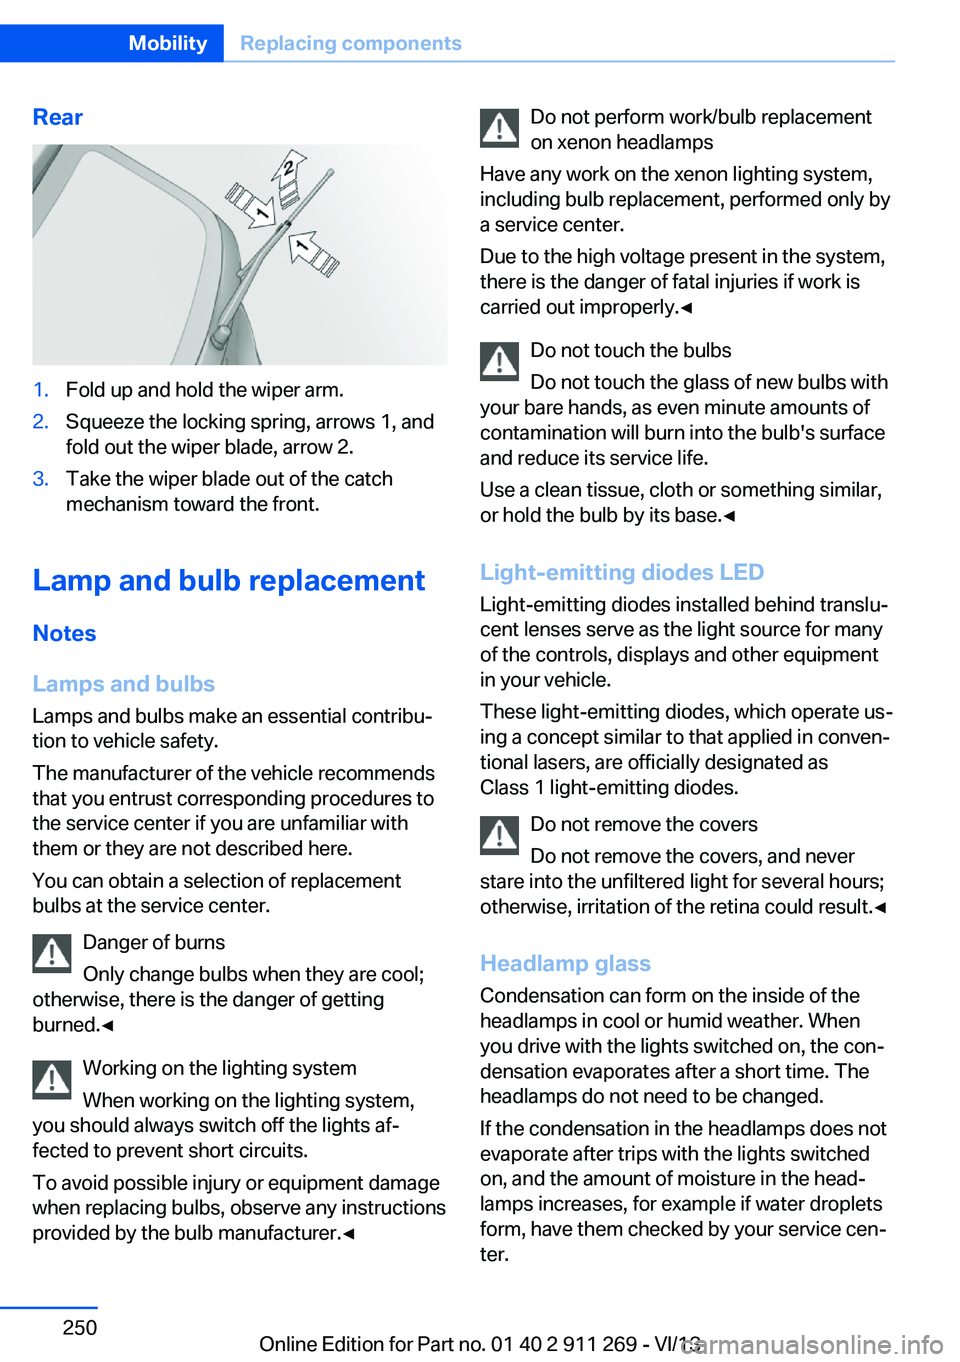
Rear1.Fold up and hold the wiper arm.2.Squeeze the locking spring, arrows 1, and
fold out the wiper blade, arrow 2.3.Take the wiper blade out of the catch
mechanism toward the front.
Lamp and bulb replacement
Notes
Lamps and bulbs
Lamps and bulbs make an essential contribu‐
tion to vehicle safety.
The manufacturer of the vehicle recommends
that you entrust corresponding procedures to
the service center if you are unfamiliar with them or they are not described here.
You can obtain a selection of replacement
bulbs at the service center.
Danger of burns
Only change bulbs when they are cool;
otherwise, there is the danger of getting
burned.◀
Working on the lighting system
When working on the lighting system,
you should always switch off the lights af‐
fected to prevent short circuits.
To avoid possible injury or equipment damage
when replacing bulbs, observe any instructions
provided by the bulb manufacturer.◀
Do not perform work/bulb replacement
on xenon headlamps
Have any work on the xenon lighting system,
including bulb replacement, performed only by
a service center.
Due to the high voltage present in the system,
there is the danger of fatal injuries if work is
carried out improperly.◀
Do not touch the bulbs
Do not touch the glass of new bulbs with
your bare hands, as even minute amounts of
contamination will burn into the bulb's surface
and reduce its service life.
Use a clean tissue, cloth or something similar,
or hold the bulb by its base.◀
Light-emitting diodes LED
Light-emitting diodes installed behind translu‐
cent lenses serve as the light source for many
of the controls, displays and other equipment
in your vehicle.
These light-emitting diodes, which operate us‐
ing a concept similar to that applied in conven‐
tional lasers, are officially designated as
Class 1 light-emitting diodes.
Do not remove the covers
Do not remove the covers, and never
stare into the unfiltered light for several hours; otherwise, irritation of the retina could result.◀
Headlamp glass
Condensation can form on the inside of the
headlamps in cool or humid weather. When
you drive with the lights switched on, the con‐
densation evaporates after a short time. The
headlamps do not need to be changed.
If the condensation in the headlamps does not
evaporate after trips with the lights switched
on, and the amount of moisture in the head‐
lamps increases, for example if water droplets
form, have them checked by your service cen‐
ter.Seite 250MobilityReplacing components250
Online Edition for Part no. 01 40 2 911 269 - VI/13
Page 252 of 295
7.Insert the new bulb.8.Fold up the wire bracket and lock it.9.Plug in the connector.10.Reattach the cover.11.Low beam: attach the folding cover in the
wheel arch.
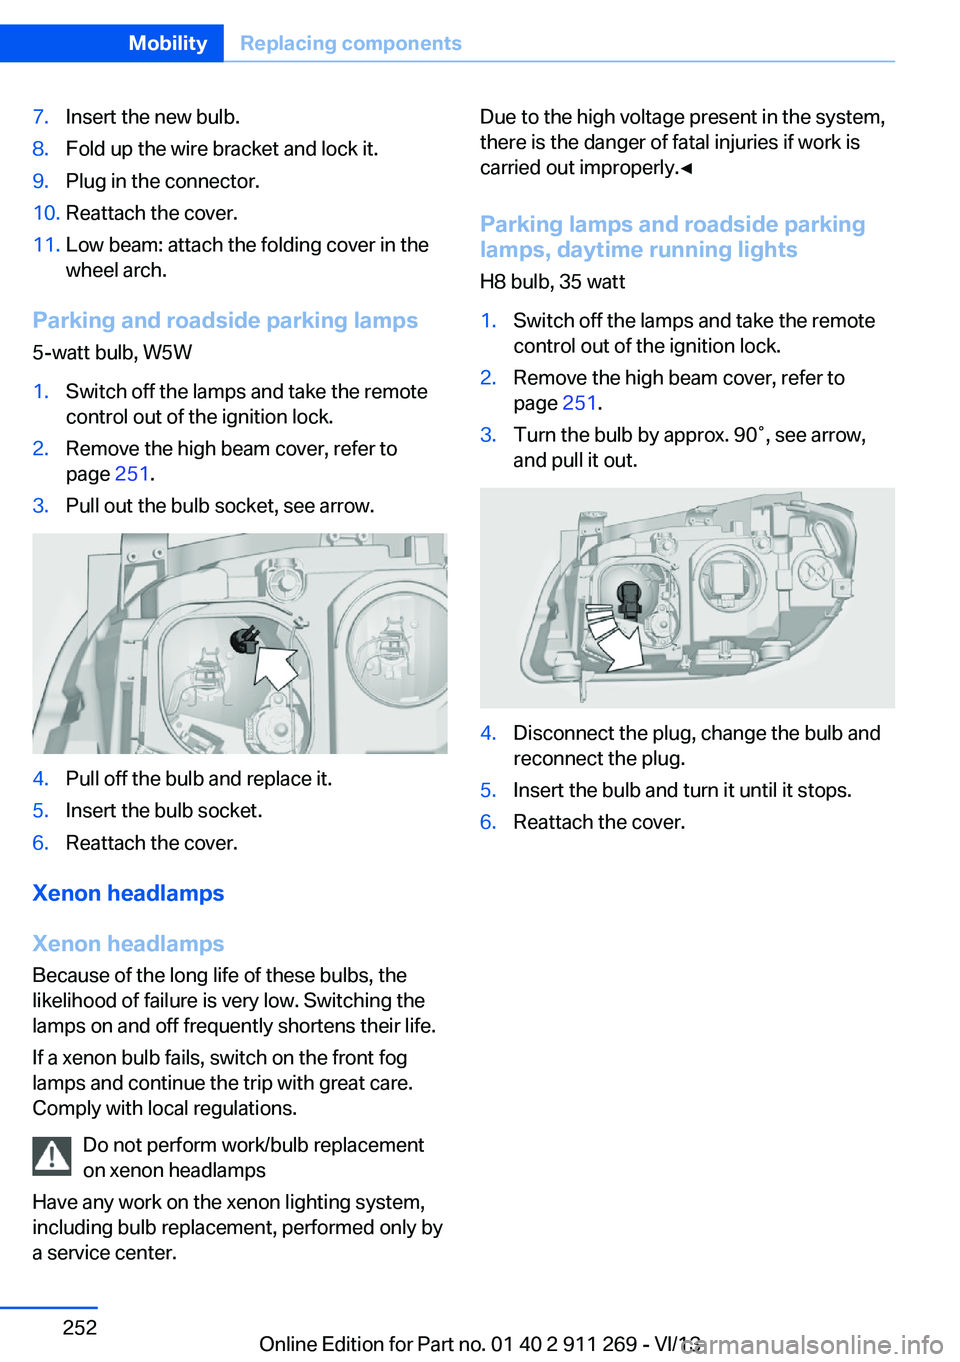
Parking and roadside parking lamps
5-watt bulb, W5W
1.Switch off the lamps and take the remote
control out of the ignition lock.2.Remove the high beam cover, refer to
page 251.3.Pull out the bulb socket, see arrow.4.Pull off the bulb and replace it.5.Insert the bulb socket.6.Reattach the cover.
Xenon headlamps
Xenon headlamps Because of the long life of these bulbs, the
likelihood of failure is very low. Switching the
lamps on and off frequently shortens their life.
If a xenon bulb fails, switch on the front fog
lamps and continue the trip with great care.
Comply with local regulations.
Do not perform work/bulb replacement
on xenon headlamps
Have any work on the xenon lighting system,
including bulb replacement, performed only by
a service center.
Due to the high voltage present in the system,
there is the danger of fatal injuries if work is
carried out improperly.◀
Parking lamps and roadside parkinglamps, daytime running lights
H8 bulb, 35 watt1.Switch off the lamps and take the remote
control out of the ignition lock.2.Remove the high beam cover, refer to
page 251.3.Turn the bulb by approx. 90˚, see arrow,
and pull it out.4.Disconnect the plug, change the bulb and
reconnect the plug.5.Insert the bulb and turn it until it stops.6.Reattach the cover.Seite 252MobilityReplacing components252
Online Edition for Part no. 01 40 2 911 269 - VI/13
Page 253 of 295
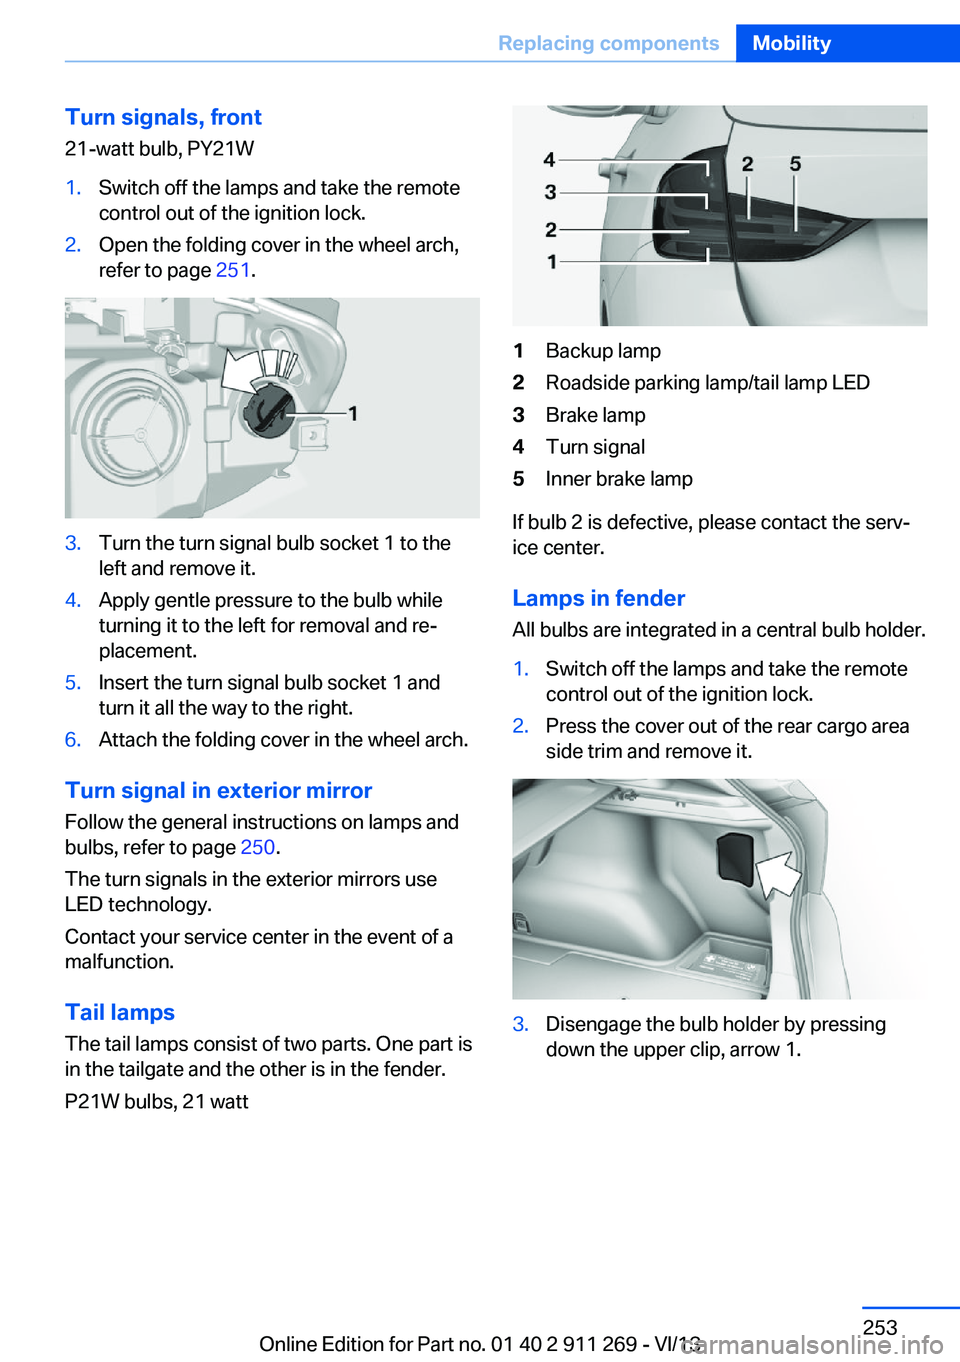
Turn signals, front21-watt bulb, PY21W1.Switch off the lamps and take the remote
control out of the ignition lock.2.Open the folding cover in the wheel arch,
refer to page 251.3.Turn the turn signal bulb socket 1 to the
left and remove it.4.Apply gentle pressure to the bulb while
turning it to the left for removal and re‐
placement.5.Insert the turn signal bulb socket 1 and
turn it all the way to the right.6.Attach the folding cover in the wheel arch.
Turn signal in exterior mirror
Follow the general instructions on lamps and
bulbs, refer to page 250.
The turn signals in the exterior mirrors use
LED technology.
Contact your service center in the event of a
malfunction.
Tail lamps
The tail lamps consist of two parts. One part is
in the tailgate and the other is in the fender.
P21W bulbs, 21 watt
1Backup lamp2Roadside parking lamp/tail lamp LED3Brake lamp4Turn signal5Inner brake lamp
If bulb 2 is defective, please contact the serv‐
ice center.
Lamps in fender
All bulbs are integrated in a central bulb holder.
1.Switch off the lamps and take the remote
control out of the ignition lock.2.Press the cover out of the rear cargo area
side trim and remove it.3.Disengage the bulb holder by pressing
down the upper clip, arrow 1.Seite 253Replacing componentsMobility253
Online Edition for Part no. 01 40 2 911 269 - VI/13