2014 BMW I8 lock
[x] Cancel search: lockPage 67 of 216

Have the safety belts, including the safety belt
tensioners, replaced and have the belt anchors
checked.
Check and replace safety belts
This should only be done by your service
center; otherwise, this safety feature might not
work properly.◀
Front head restraints Distance
The spacing is adjusted to the back of the
head using the incline of the seat backrest.
Adjust the distance so that the head restraint
is as close as possible to the back of the head.
Removing The head restraints cannot be removed.
Mirrors Exterior mirrors
General information
The mirror on the passenger side is more
curved than the driver's side mirror.
Depending on the vehicle equipment, the mir‐
ror setting is stored for the profile currently in
use. When the vehicle is unlocked via the re‐
mote control, the position is automatically re‐
trieved if this function is active.
Note Estimating distances correctly
Objects reflected in the mirror are closer
than they appear. Do not estimate the distance
to the traffic behind you based on what you
see in the mirror, as this will increase your risk
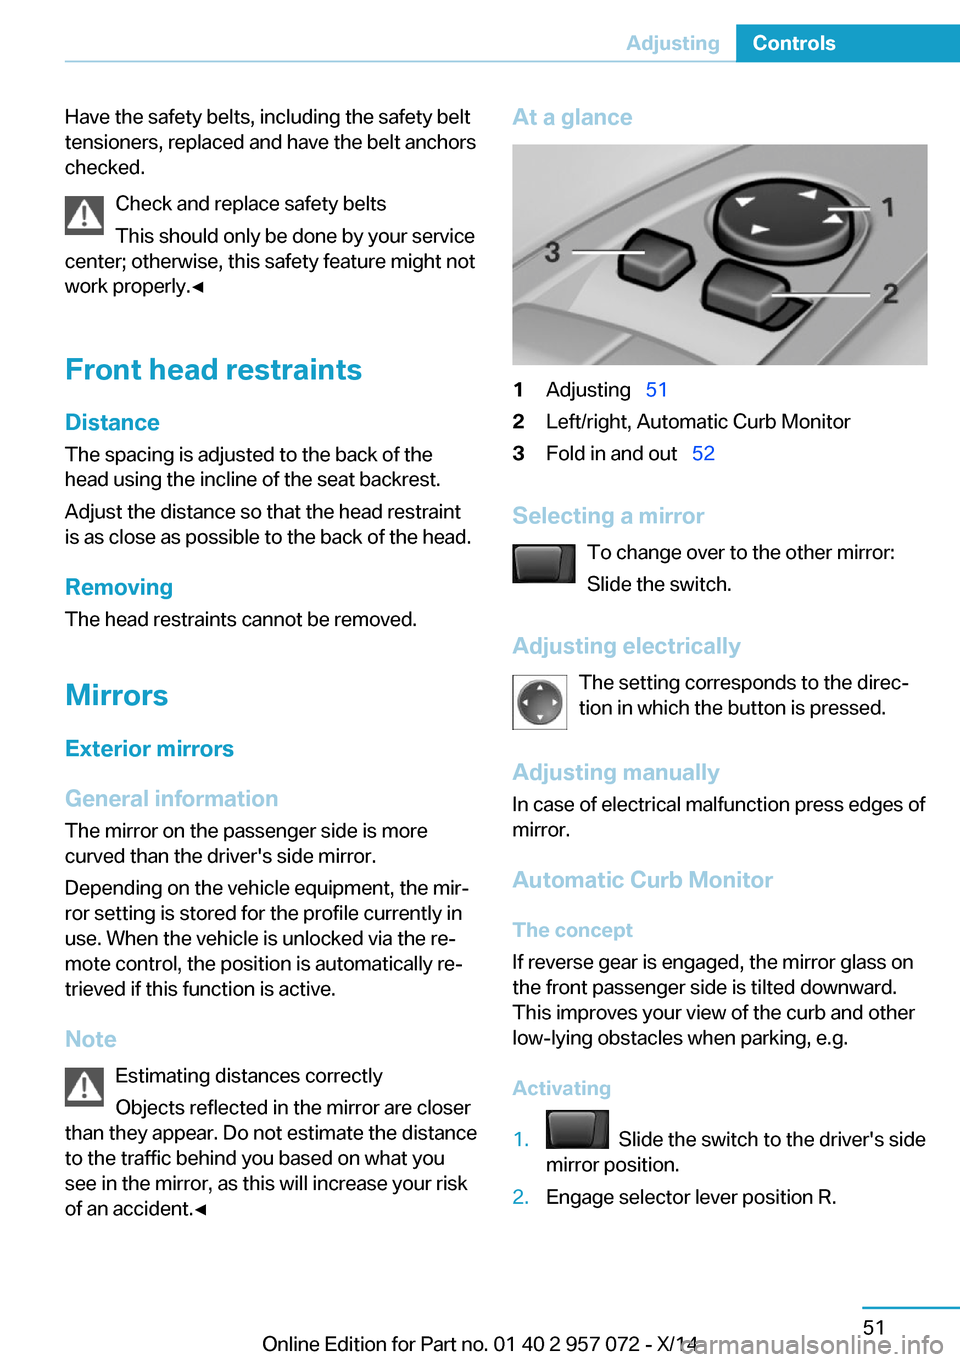
of an accident.◀At a glance1Adjusting 512Left/right, Automatic Curb Monitor3Fold in and out 52
Selecting a mirror
To change over to the other mirror:
Slide the switch.
Adjusting electrically The setting corresponds to the direc‐
tion in which the button is pressed.
Adjusting manually
In case of electrical malfunction press edges of
mirror.
Automatic Curb MonitorThe concept
If reverse gear is engaged, the mirror glass on
the front passenger side is tilted downward.
This improves your view of the curb and other
low-lying obstacles when parking, e.g.
Activating
1. Slide the switch to the driver's side
mirror position.2.Engage selector lever position R.Seite 51AdjustingControls51
Online Edition for Part no. 01 40 2 957 072 - X/14
Page 70 of 216

Transporting children safelyVehicle features and optionsThis chapter describes all standard, country-
specific and optional features offered with the
series. It also describes features that are notnecessarily available in your car, e. g., due to
the selected options or country versions. This
also applies to safety-related functions and
systems.
The right place for children
Note
Children in the vehicle
Do not leave children unattended in the
vehicle; otherwise, they could endanger them‐
selves and other persons, e.g., by opening the
doors.◀
Children should always be in the rear Accident research shows that the safest place
for children is in the back seat.
Transporting children in the rear
Only transport children younger than
13 years of age or shorter than 5 ft/150 cm in
the rear in child restraint systems provided in
accordance with the age, weight and size of
the child; otherwise, there is an increased risk
of injury in an accident.
Children 13 years of age or older must wear a
safety belt as soon as a suitable child restraint
system can no longer be used due to their age,
weight and size.◀
Children on the front passenger seat
Should it ever be necessary to use a child re‐
straint system in the front passenger seat,
make sure that the front, knee and side airbags
on the front passenger side are deactivated.
Automatic deactivation of front-seat passen‐
ger airbags, refer to page 95.Note
Deactivating the front-seat passenger
airbags
If a child restraint system is used in the front
passenger seat, deactivate the front-seat pas‐
senger airbags; otherwise, there is an in‐
creased risk of injury to the child when the air‐
bags are activated, even with a child restraint
system.◀
Installing child restraint
systems
Hints Manufacturer's information for child re‐straint systems
To select, mount and use child restraint sys‐
tems, observe the information provided by the
system manufacturer; otherwise, the protec‐
tive effect can be lost.◀
Ensuring the stability of the child seat
When installing child restraint systems,
make sure that the child seat is securely fas‐
tened to the backrest of the seat. Angle and
headrest of the backrest might need to be ad‐
justed or possibly be removed. Make sure that
all backrests are securely locked. Otherwise
the stability of the child seat can be affected,
and there is an increased risk of injury becauseSeite 54ControlsTransporting children safely54
Online Edition for Part no. 01 40 2 957 072 - X/14
Page 71 of 216

of unexpected movement of the rear seat
backrest.◀
On the front passenger seat
Deactivating airbags Deactivating the front-seat passenger
airbags
If a child restraint system is used in the front
passenger seat, deactivate the front-seat pas‐
senger airbags; otherwise, there is an in‐
creased risk of injury to the child when the air‐
bags are activated, even with a child restraint
system.◀
After installing a child restraint system in the
front passenger seat, make sure that the front,
knee and side airbags on the front passenger
side are deactivated.
Deactivate the front-seat passenger airbags
automatically, refer to page 95.
Seat position and height
Before installing a child restraint system, move
the front passenger seat as far back as possi‐
ble and adjust its height to the highest and
thus best possible position for the belt and to
offer optimal protection in the event of an acci‐
dent.
If the upper anchorage of the safety belt is lo‐
cated in front of the belt guide of the child seat,
move the passenger seat carefully forward un‐til the best possible belt guide position is
reached.
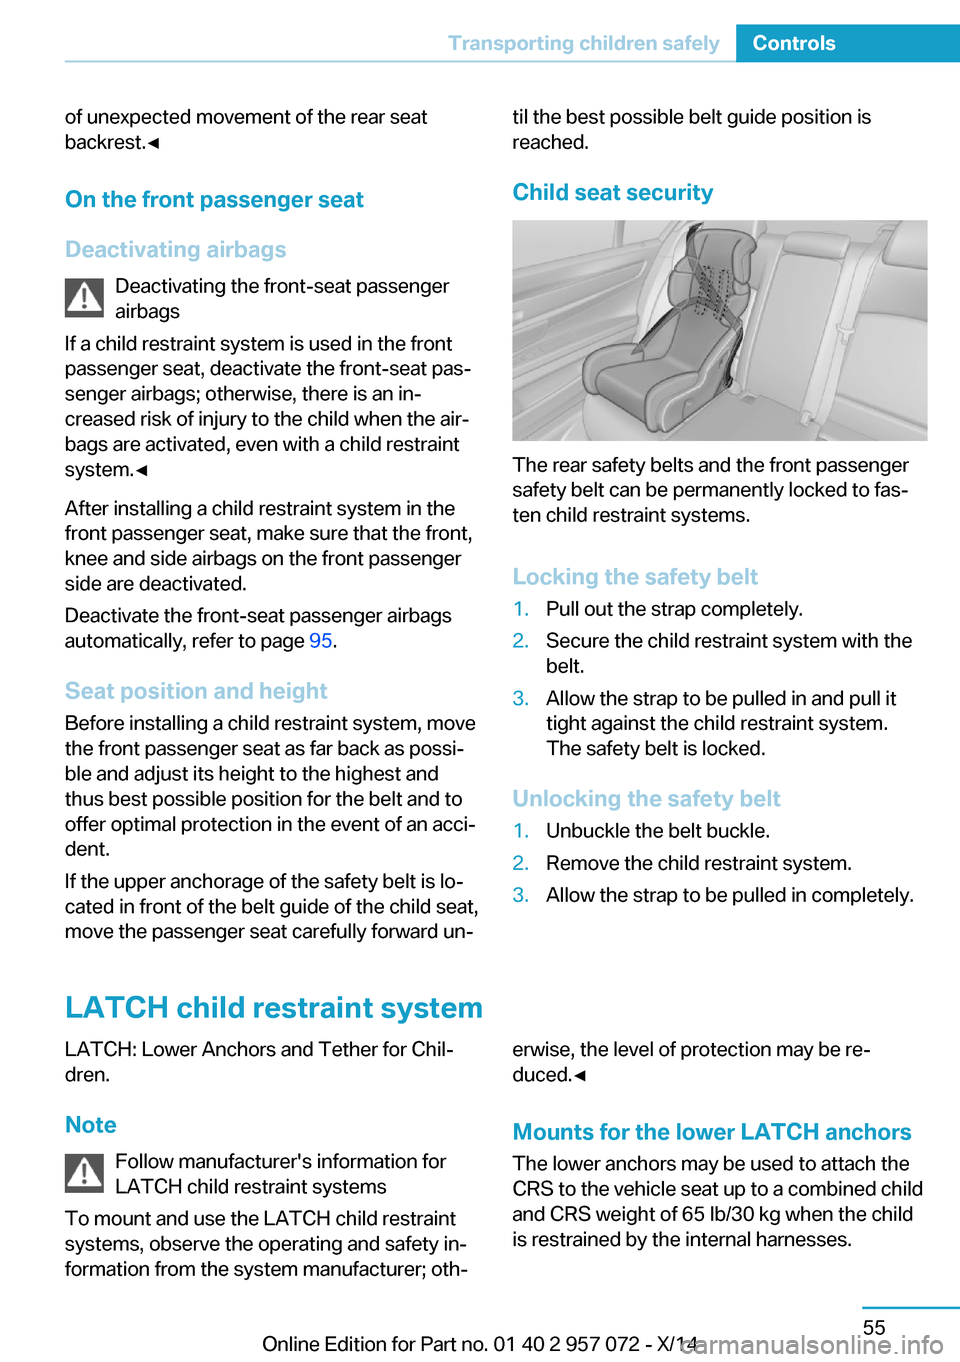
Child seat security
The rear safety belts and the front passenger
safety belt can be permanently locked to fas‐
ten child restraint systems.
Locking the safety belt
1.Pull out the strap completely.2.Secure the child restraint system with the
belt.3.Allow the strap to be pulled in and pull it
tight against the child restraint system.
The safety belt is locked.
Unlocking the safety belt
1.Unbuckle the belt buckle.2.Remove the child restraint system.3.Allow the strap to be pulled in completely.
LATCH child restraint system
LATCH: Lower Anchors and Tether for Chil‐
dren.
Note Follow manufacturer's information for
LATCH child restraint systems
To mount and use the LATCH child restraint
systems, observe the operating and safety in‐
formation from the system manufacturer; oth‐erwise, the level of protection may be re‐
duced.◀
Mounts for the lower LATCH anchors The lower anchors may be used to attach the
CRS to the vehicle seat up to a combined child
and CRS weight of 65 lb/30 kg when the child
is restrained by the internal harnesses.Seite 55Transporting children safelyControls55
Online Edition for Part no. 01 40 2 957 072 - X/14
Page 74 of 216

DrivingVehicle features and options
This chapter describes all standard, country-
specific and optional features offered with the
series. It also describes features that are not
necessarily available in your car, e. g., due to
the selected options or country versions. This
also applies to safety-related functions and
systems.
Start/Stop button, drive
readiness
The concept The following ready states can
be attained by pressing the
Start/Stop button:▷Radio ready state on/off.▷Operating readiness on/off.▷Activating/deactivating drive readiness.
To activate drive readiness, press the brake
pedal.
Switching radio-ready state on/off
The radio-ready state is activated by pressing
the Start/Stop button in the following situa‐
tions:
▷When the engine is running.▷When drive readiness is activated.
Some electronic systems/power consumers
remain ready for operation.
The radio-ready state is switched off automati‐
cally:
▷After approx. 8 minutes.▷When the vehicle is locked using the cen‐
tral locking system.▷Shortly before the battery is discharged
completely, so that drive readiness is
maintained.
The radio-ready state remains active if, e.g.,
the operating readiness is automatically
switched off for the following reasons:
▷Opening or closing the driver's door.▷Unfastening of the driver's safety belt.▷When automatically switching from low
beams to parking lights.
Operating readiness on
The switched on operating readiness corre‐
sponds to the switched on ignition for conven‐
tional vehicles.
Press the Start/Stop button, and do not press
on the brake pedal at the same time.
All vehicle systems are ready for operation.
Most of the indicator and warning lights in the
instrument cluster light up for a varied length
of time.
To save battery power when the engine is off,
reel off operating readiness and any unneces‐
sary electronic systems/power consumers.
Operating readiness is switched off automati‐
cally in the following situations:
▷When locking the vehicle, even if the low
beams are activated.▷Shortly before the battery is discharged
completely, so that drive readiness is
maintained.
Note
If the engine is switched off and operating
readiness is switched on, the system automati‐
cally switches to the radio-ready state when
the door is opened if the lights are turned off
or, if correspondingly equipped, the daytime
running lights are activated.
Seite 58ControlsDriving58
Online Edition for Part no. 01 40 2 957 072 - X/14
Page 75 of 216

Operating readiness offPress the Start/Stop button again, and do not
press on the brake pedal at the same time.
All indicator lights in the instrument cluster go
out.
To save battery power when the engine is off,
reel off operating readiness and any unneces‐
sary electronic systems/power consumers.
Operating readiness is switched off automati‐
cally in the following situations while the vehi‐
cle is stationary and the engine is off:▷When locking the vehicle, and when the
low beams are activated.▷Shortly before the battery is discharged
completely, so that drive readiness is
maintained. This function is only available
when the low beams are turned off.▷When opening or closing the driver door, if
the driver's safety belt is unbuckled and
the low beams are turned off.▷While the driver's safety belt is unbuckled
with driver's door open and low beams off.
The low beams reel to parking lights after ap‐
prox. 15 minutes of no use.
Selector lever position P is automatically en‐
gaged when operating readiness is switched
off. In order for the vehicle to be able to roll,
e.g. into a car wash, heed the information re‐
garding washing in automatic car washes, refer
to page 180.
Drive readiness
When drive readiness is activated, the vehicle
is operational. Activated drive readiness is the
equivalent of a running engine in conventional
vehicles. Deactivated engine readiness is
equivalent to switching the ignition off.
Selector lever position P is automatically en‐
gaged when drive readiness is switched off. In
order for the vehicle to be able to roll, e.g. into
a car wash, heed the information regarding
washing in automatic car washes, refer to
page 180.
Drive readiness in detail
The concept The following are the different drive readiness
variants:▷Electric drive readiness, Silent Start, refer
to page 60.
The vehicle is powered by the electric mo‐
tor.▷Starting the combustion engine, refer to
page 60.
The vehicle is powered by the combustion
engine.
Hints
Do not leave the vehicle unattended
Do not leave the vehicle unattended with
drive readiness active; otherwise, it may pose a
risk.◀
Awareness of vehicle reduced when
driven in electric mode
When driving in electric mode, note that due to
the lack of engine noise pedestrians and other traffic might pay less attention to the vehicle
due to missing engine noises. Please take spe‐
cial care when parking or leaving a parking
space.◀
Display on the Start/Stop buttonGeneral information Drive readiness is also displayed
through light indicators on the
Start/Stop button.
Lighting pulses orange
▷After unlocking and opening the door.▷After switching off drive readiness.
When the brake pedal is depressed, the light‐
ing becomes more intense.
Seite 59DrivingControls59
Online Edition for Part no. 01 40 2 957 072 - X/14
Page 83 of 216

Folding wipers back down
Before switching the ignition on, fold the
wipers back down to the windshield; other‐
wise, the wipers may become damaged when
they are activated.◀1.Switch on the ignition.2.Push wiper lever down. Wipers move to
their resting position and are ready again
for operation.
Washer fluid
General information Antifreeze for washer fluid
Antifreeze is flammable and can cause
injury if it is used incorrectly.
Therefore, keep it away from possible sources
of ignition.
Only keep it in the closed original container
and inaccessible to children.
Follow the notes and instructions on the con‐
tainer.
United States: The washer fluid mixture ratio is
regulated by the U.S. EPA and many individual
states; do not exceed the allowable washer
fluid dilution ratios limits that apply. Follow the
usage instructions on the washer fluid con‐
tainer. Use BMW’s Windshield Washer Con‐
centrate or the equivalent.◀
Washer fluid reservoir
Open the cover.
All washer nozzles are supplied from one res‐
ervoir.
Fill with a mixture of windshield washer con‐
centrate and tap water and – if required – with a
washer antifreeze, according to the manufac‐
turer's recommendations.
Mix the washer fluid before adding to find the
right mixture.
Do not add windshield washer concentrate and
antifreeze undiluted and do not fill with pure
water; this could damage the wiper system.
Do not mix window washer concentrates of dif‐
ferent manufacturers because they can clog
the windshield washer nozzles.
Recommended minimum fill quantity:
0.2 US gal/1 liter.
Steptronic Sport
transmission
Selector lever positions
D Drive
Position for normal vehicle operation. All gears
for forward travel are activated automatically.
R is Reverse
Select only when the vehicle is stationary.
N Neutral: The vehicle may roll. Use in automatic carwashes, e.g.
When drive readiness is off, selector lever po‐
sition P is automatically engaged.
P Park
Select only when the vehicle is stationary. The
drive wheels are blocked.
P is engaged automatically:▷After drive readiness is deactivated with
radio-ready state, refer to page 58, or op‐Seite 67DrivingControls67
Online Edition for Part no. 01 40 2 957 072 - X/14
Page 84 of 216

erating readiness off, refer to page 59,
when selector lever position D or R is set.▷With operating readiness off if selector
lever position N is set.▷If the driver's safety belt is released, the
driver's door is opened, and the brake
pedal is not pressed while the vehicle is
stationary and selector lever position D or
R is set.
Before exiting the vehicle, make sure that se‐
lector lever position P is set. Otherwise, the ve‐
hicle may begin to move.
On steep upward and downward inclines, se‐
cure the vehicle with the parking brake, refer to
page 63, before shifting into the selector lever
position P.
Kickdown Kickdown is used to achieve maximum driving
performance. Step on the accelerator pedal
beyond the resistance point at the full throttle
position.
Engaging selector lever positions
▷Selector lever position P can only be disen‐
gaged when the vehicle drive readiness is
engaged and the brake pedal is depressed.▷With the vehicle is stationary, press on the
brake pedal before shifting out of P or N;
otherwise, the shift command will not be
executed: shift lock.
Press on the brake pedal until you
start driving
To prevent the vehicle from creeping after
you select a gear, maintain pressure on the
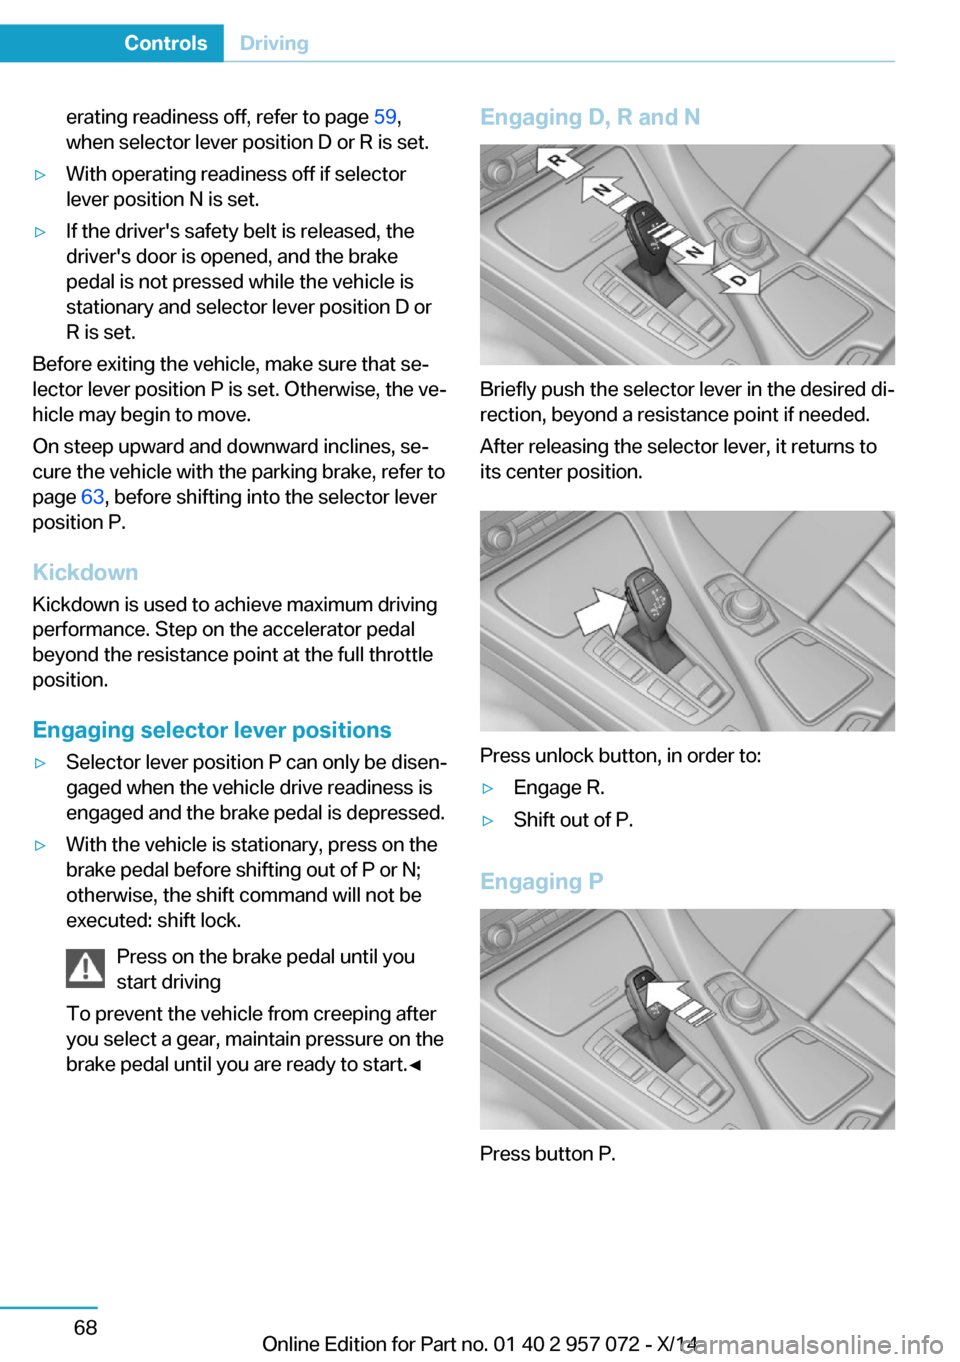
brake pedal until you are ready to start.◀Engaging D, R and N
Briefly push the selector lever in the desired di‐
rection, beyond a resistance point if needed.
After releasing the selector lever, it returns to
its center position.
Press unlock button, in order to:
▷Engage R.▷Shift out of P.
Engaging P
Press button P.
Seite 68ControlsDriving68
Online Edition for Part no. 01 40 2 957 072 - X/14
Page 86 of 216

Gears will only be shifted at appropriate engine
and road speeds, for example downshifting is
not possible if the engine speed is too high.
The selected gear is briefly displayed in the in‐
strument cluster, followed by the current gear.
If the shift paddles on the steering wheel are
used to shift gears in automatic mode, the
transmission temporarily switches to manual
mode.
In the manual mode, if there has been no ac‐
celeration or shifting of the shift paddles within
a certain amount of time, the transmission
switches back to automatic mode.
Displays in the instrument cluster The selector lever position is dis‐played, e.g.: P.
Electronic unlocking of the
transmission lock
General information Electronically unlock the transmission lock to
maneuver vehicle from the danger area.
Engaging selector lever position N1.Depress the brake pedal.2.Press and hold the Start/Stop button.3.Press and hold the selector lever into posi‐
tion N, until position N is displayed in the
instrument cluster.
A corresponding Check Control message
is displayed.4.Release Start/Stop button and selector
lever.5.Release brake.6.Maneuver the vehicle from the danger area
and secure it against moving on its own.Launch Control
The concept Launch Control enables optimum accelerationon surfaces with good traction.
Hints Component wear
Do not use Launch Control too often;
otherwise, this may result in premature wear of
components due to the high stress placed on
the vehicle.◀
Do not use Launch Control during the break-in,
refer to page 134, period.
To increase vehicle stability, activate DSC
again as soon as possible.
Requirements Launch Control is available when the combus‐tion engine is warmed up, that is, after uninter‐
rupted driving with the combustion engine of
at least 6 miles/10 km.
To start with Launch Control do not steer the
steering wheel.
Start with launch control
With the combustion engine running:1. Press button.
TRACTION is displayed in the instrument
cluster and the indicator lamp for DSC OFF
lights up.2.Engage selector lever position S.3.With the left foot, forcefully press down on
the brake.4.Press and hold down the accelerator pedal
beyond the resistance point at the full
throttle position.
A flag symbol is displayed in the instru‐
ment cluster.5.The starting engine speed adjusts. Within
3 seconds, release the brake.Seite 70ControlsDriving70
Online Edition for Part no. 01 40 2 957 072 - X/14