2014 BMW 640I GRAN COUPE Front center
[x] Cancel search: Front centerPage 168 of 243
Without Professional navigation
system or TV: at a glance
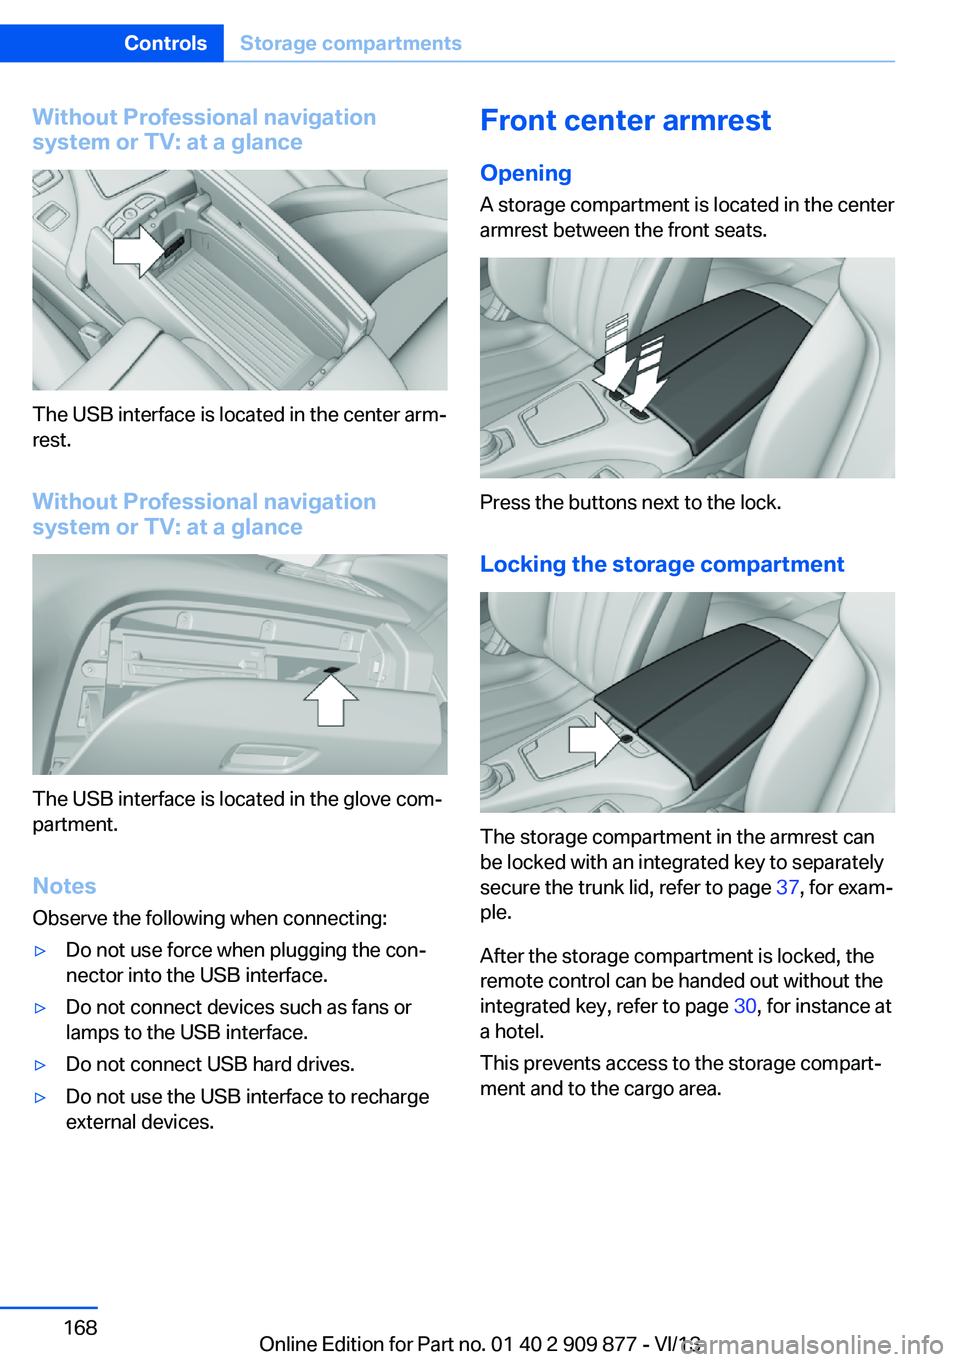
The USB interface is located in the center arm‐
rest.
Without Professional navigation
system or TV: at a glance
The USB interface is located in the glove com‐
partment.
Notes
Observe the following when connecting:
▷Do not use force when plugging the con‐
nector into the USB interface.▷Do not connect devices such as fans or
lamps to the USB interface.▷Do not connect USB hard drives.▷Do not use the USB interface to recharge
external devices.Front center armrest
Opening A storage compartment is located in the center
armrest between the front seats.
Press the buttons next to the lock.
Locking the storage compartment
The storage compartment in the armrest can
be locked with an integrated key to separately
secure the trunk lid, refer to page 37, for exam‐
ple.
After the storage compartment is locked, the
remote control can be handed out without the
integrated key, refer to page 30, for instance at
a hotel.
This prevents access to the storage compart‐
ment and to the cargo area.
Seite 168ControlsStorage compartments168
Online Edition for Part no. 01 40 2 909 877 - VI/13
Page 201 of 243
case of a flat tire. Your service center will be
glad to advise you.
Rotating wheels between axles The manufacturer of your vehicle advises
against switching wheels between the front
and rear axles.
This can impair the handling characteristics.
Storage
Store wheels and tires in a cool, dry place with
as little exposure to light as possible.
Always protect tires against all contact with oil,
grease and fuels.
Do not exceed the maximum tire inflation pres‐
sure indicated on the side wall of the tire.
Run-flat tires
Label
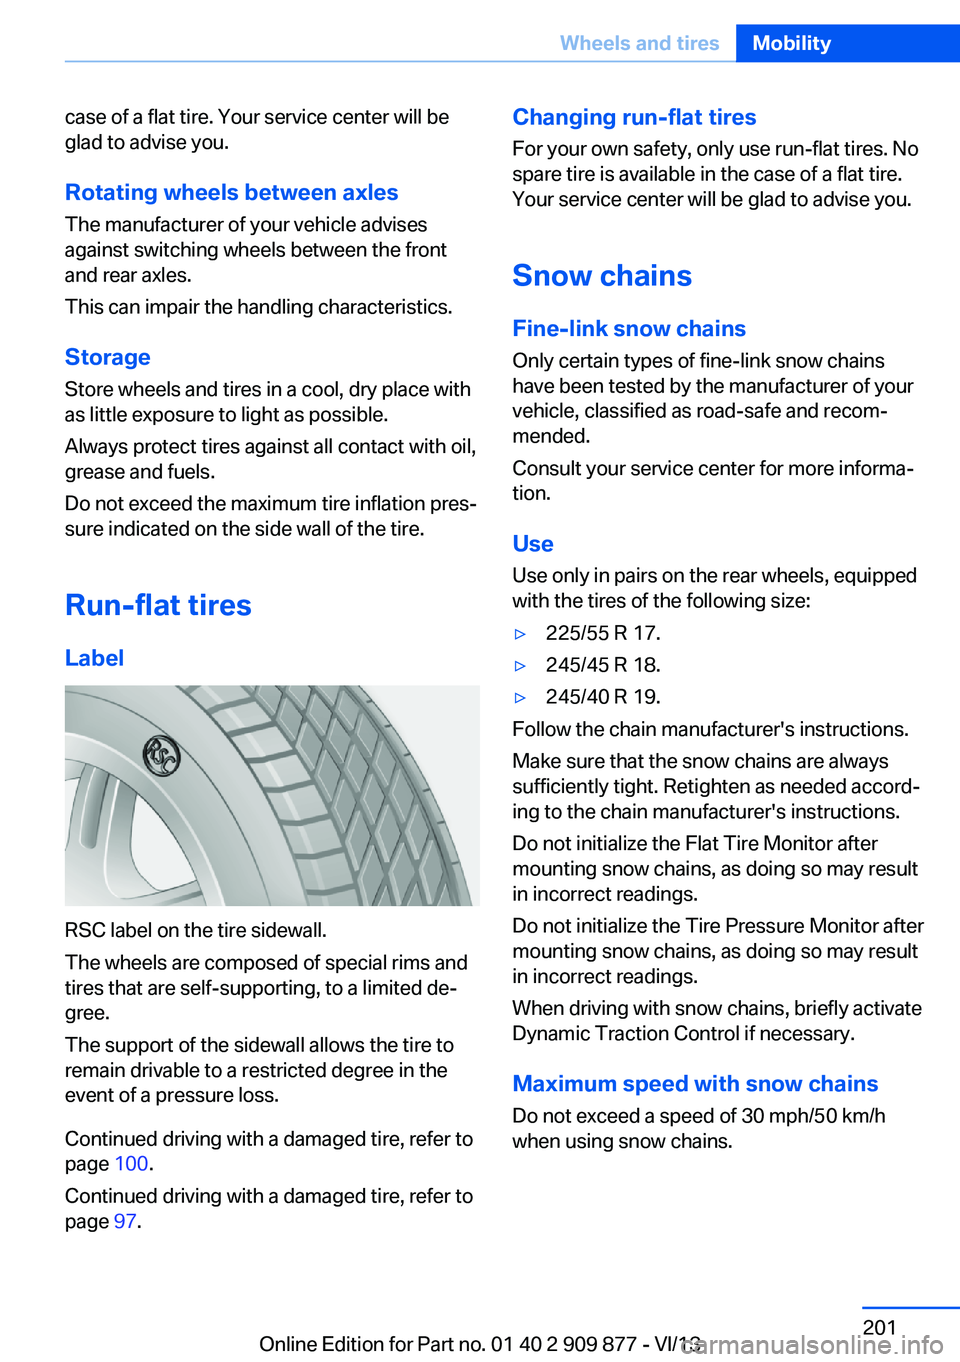
RSC label on the tire sidewall.
The wheels are composed of special rims and
tires that are self-supporting, to a limited de‐
gree.
The support of the sidewall allows the tire to
remain drivable to a restricted degree in the
event of a pressure loss.
Continued driving with a damaged tire, refer to
page 100.
Continued driving with a damaged tire, refer to
page 97.
Changing run-flat tires
For your own safety, only use run-flat tires. No
spare tire is available in the case of a flat tire.
Your service center will be glad to advise you.
Snow chains
Fine-link snow chains
Only certain types of fine-link snow chains
have been tested by the manufacturer of your
vehicle, classified as road-safe and recom‐
mended.
Consult your service center for more informa‐
tion.
Use
Use only in pairs on the rear wheels, equipped
with the tires of the following size:▷225/55 R 17.▷245/45 R 18.▷245/40 R 19.
Follow the chain manufacturer's instructions.
Make sure that the snow chains are always
sufficiently tight. Retighten as needed accord‐
ing to the chain manufacturer's instructions.
Do not initialize the Flat Tire Monitor after
mounting snow chains, as doing so may result
in incorrect readings.
Do not initialize the Tire Pressure Monitor after
mounting snow chains, as doing so may result
in incorrect readings.
When driving with snow chains, briefly activate
Dynamic Traction Control if necessary.
Maximum speed with snow chains Do not exceed a speed of 30 mph/50 km/h
when using snow chains.
Seite 201Wheels and tiresMobility201
Online Edition for Part no. 01 40 2 909 877 - VI/13
Page 211 of 243
the service center if you are unfamiliar with
them or they are not described here.
You can obtain a selection of replacement
bulbs at the service center.
Danger of burns
Only change bulbs when they are cool;
otherwise, there is the danger of getting
burned.◀
Working on the lighting system
When working on the lighting system,
you should always switch off the lights af‐
fected to prevent short circuits.
To avoid possible injury or equipment damage
when replacing bulbs, observe any instructions
provided by the bulb manufacturer.◀
Do not perform work/bulb replacement
on xenon headlamps
Have any work on the xenon lighting system,
including bulb replacement, performed only by
a service center. Due to the high voltage
present in the system, there is the danger of
fatal injuries if work is carried out improperly.◀
Do not touch the bulbs
Do not touch the glass of new bulbs with
your bare hands, as even minute amounts of
contamination will burn into the bulb's surface
and reduce its service life.
Use a clean tissue, cloth or something similar,
or hold the bulb by its base.◀
Light-emitting diodes (LEDs)
Light-emitting diodes installed behind a cover
serve as the light source for controls, display
elements and other equipment.
These light-emitting diodes, which are related
to conventional lasers, are officially designated as Class 1 light-emitting diodes.Do not remove the covers
Do not remove the covers, and never
stare into the unfiltered light for several hours;
otherwise, irritation of the retina could result.◀
Headlamp glass
Condensation can form on the inside of the ex‐
ternal lamps in cool or humid weather. When
driving with the light switched on, the conden‐
sation evaporates after a short time. The head‐
lamp glasses do not need to be changed.
If the headlamps do not dim despite driving
with the light switched on, increasing humidity
forms, e. g. water droplets in the light, have the
service center check this.
Headlamp setting
The headlamp adjustments can be affected by
changing lamps and bulbs. Therefore after a
change, have the headlamp setting checked
and corrected by Service.
Xenon headlamps
Hints
Because of the long life of these bulbs, the
likelihood of failure is very low. Switching the
lamps on and off frequently shortens their life.
If a bulb fails, switch on the front fog lamps and
continue the trip with great care. Comply with
local regulations.
Do not perform work/bulb replacement
on xenon headlamps
Have any work on the xenon lighting system,
including bulb replacement, performed only by
a service center. Due to the high voltage
present in the system, there is the danger of
fatal injuries if work is carried out improperly.◀
For checking and adjusting headlamp aim,
please contact your BMW center.Seite 211Replacing componentsMobility211
Online Edition for Part no. 01 40 2 909 877 - VI/13
Page 212 of 243
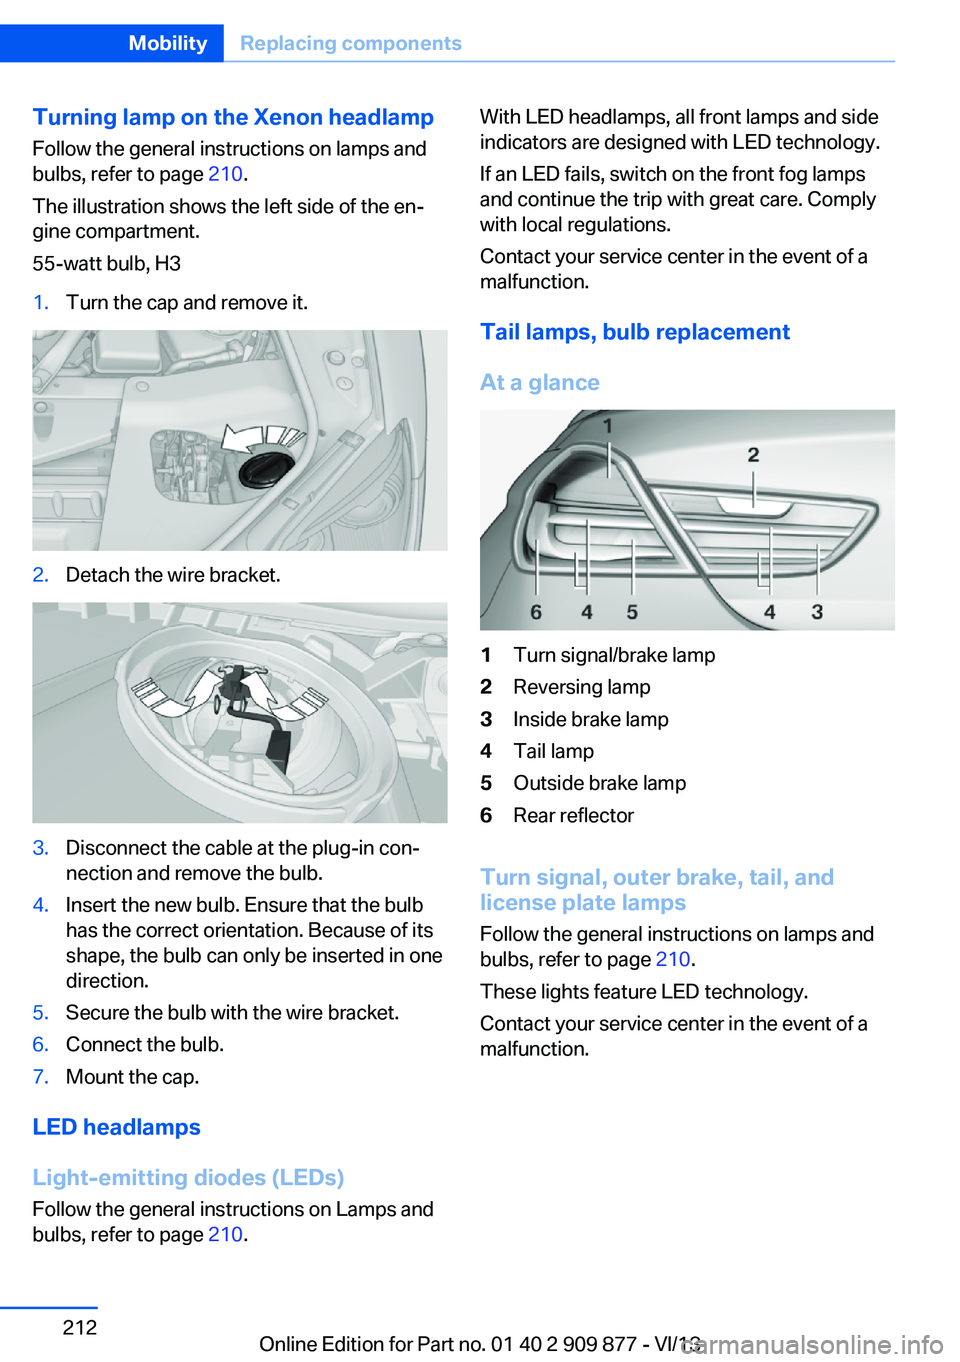
Turning lamp on the Xenon headlampFollow the general instructions on lamps and
bulbs, refer to page 210.
The illustration shows the left side of the en‐
gine compartment.
55-watt bulb, H31.Turn the cap and remove it.2.Detach the wire bracket.3.Disconnect the cable at the plug-in con‐
nection and remove the bulb.4.Insert the new bulb. Ensure that the bulb
has the correct orientation. Because of its
shape, the bulb can only be inserted in one
direction.5.Secure the bulb with the wire bracket.6.Connect the bulb.7.Mount the cap.
LED headlamps
Light-emitting diodes (LEDs)
Follow the general instructions on Lamps and
bulbs, refer to page 210.
With LED headlamps, all front lamps and side
indicators are designed with LED technology.
If an LED fails, switch on the front fog lamps
and continue the trip with great care. Comply
with local regulations.
Contact your service center in the event of a
malfunction.
Tail lamps, bulb replacement
At a glance1Turn signal/brake lamp2Reversing lamp3Inside brake lamp4Tail lamp5Outside brake lamp6Rear reflector
Turn signal, outer brake, tail, and
license plate lamps
Follow the general instructions on lamps and
bulbs, refer to page 210.
These lights feature LED technology.
Contact your service center in the event of a
malfunction.
Seite 212MobilityReplacing components212
Online Edition for Part no. 01 40 2 909 877 - VI/13
Page 219 of 243
other attempt in order to allow the dis‐
charged battery to recharge.3.Let both engines run for several minutes.4.Disconnect the jumper cables in the re‐
verse order.
Check the battery and recharge if necessary.
Tow-starting and towing Transportieren Transporting your
vehicle
Note
Your vehicle is not permitted to be towed.
Therefore, contact a service center in the
event of a breakdown.
Do not have the vehicle towedHave your vehicle transported on a load‐
ing platform only; otherwise, damage may oc‐
cur.◀
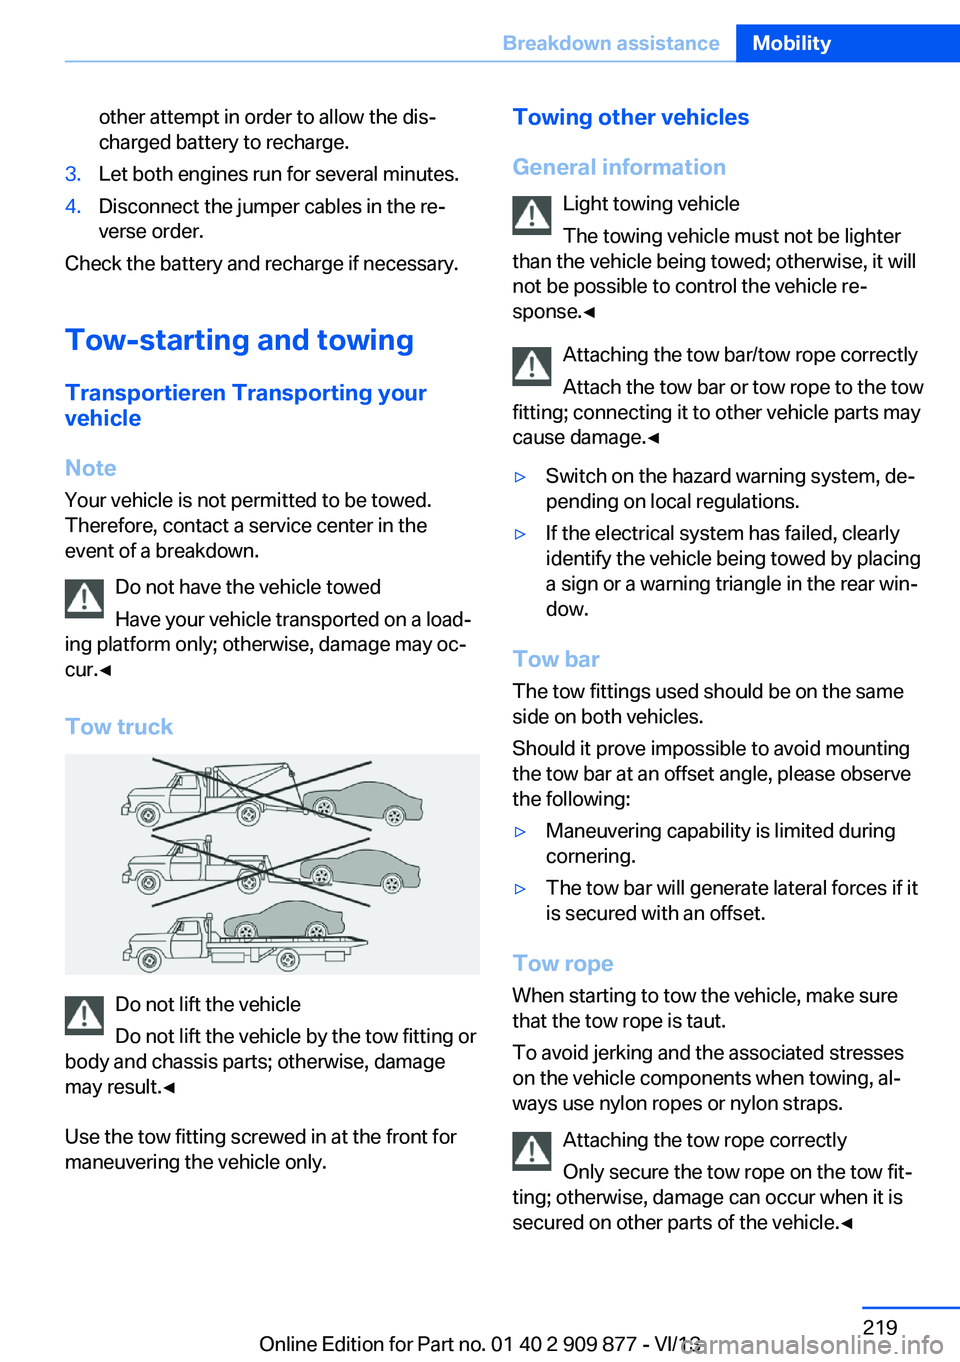
Tow truck
Do not lift the vehicle
Do not lift the vehicle by the tow fitting or
body and chassis parts; otherwise, damage
may result.◀
Use the tow fitting screwed in at the front for
maneuvering the vehicle only.
Towing other vehicles
General information Light towing vehicle
The towing vehicle must not be lighter
than the vehicle being towed; otherwise, it will
not be possible to control the vehicle re‐
sponse.◀
Attaching the tow bar/tow rope correctly
Attach the tow bar or tow rope to the tow
fitting; connecting it to other vehicle parts may
cause damage.◀▷Switch on the hazard warning system, de‐
pending on local regulations.▷If the electrical system has failed, clearly
identify the vehicle being towed by placing
a sign or a warning triangle in the rear win‐
dow.
Tow bar
The tow fittings used should be on the same
side on both vehicles.
Should it prove impossible to avoid mounting
the tow bar at an offset angle, please observe
the following:
▷Maneuvering capability is limited during
cornering.▷The tow bar will generate lateral forces if it
is secured with an offset.
Tow rope
When starting to tow the vehicle, make sure
that the tow rope is taut.
To avoid jerking and the associated stresses
on the vehicle components when towing, al‐
ways use nylon ropes or nylon straps.
Attaching the tow rope correctly
Only secure the tow rope on the tow fit‐
ting; otherwise, damage can occur when it is
secured on other parts of the vehicle.◀
Seite 219Breakdown assistanceMobility219
Online Edition for Part no. 01 40 2 909 877 - VI/13
Page 232 of 243
Everything from A to Z
IndexA ABS, Antilock Brake Sys‐ tem 117
ACC, Active Cruise Control with Stop & Go 125
Activated-charcoal filter 155
Active Blind Spot Detec‐ tion 113
Active Cruise Control with Stop & Go, ACC 125
Active Protection 114
Active roll stabilization, see Dynamic Drive 120
Active seat, front 47
Active seat ventilation, front 48
Active Steering, integral 120
Adaptive brake assistant 117
Adaptive brake lights, refer to Brake force display 114
Adaptive drive 120
Adaptive light control 88
Additives, oil 206
Adjusting, steering wheel 53
Adjustments, seats/head re‐ straints 45
After washing vehicle 222
Airbags 92
Airbags, indicator/warning light 93
Air circulation, refer to Recir‐ culated-air mode 154
Air distribution, manual 153
Air drying, refer to Cooling function 154
Air flow, automatic climate control 153
Air pressure, tires 191
Air vents, refer to Ventila‐ tion 157 Alarm system 40
Alarm, unintentional 41
All around the center con‐ sole 14
All around the interior rear‐ view mirror 15
All around the steering wheel 12
All-season tires, refer to Win‐ ter tires 200
All-wheel-drive 119
Alternating-code hand-held transmitter 161
Alternative oil types 206
Ambient light 90
Antifreeze, washer fluid 67
Antilock Brake System, ABS 117
Anti-slip control, refer to DSC 117
Approved engine oils 206
Armrest, refer to Front center armrest 168
Armrest, refer to Rear center armrest 169
Arrival time 84
Ashtray 162
Ashtray, rear 163
Assistance, Roadside Assis‐ tance 217
Assistance when driving off 117
Attentiveness assistant 115
AUTO H button, refer to Au‐ tomatic Hold 63
AUTO intensity 153
Automatic car wash 221
Automatic Cruise Control with Stop & Go 125
Automatic Curb Monitor 52 Automatic deactivation, front
passenger airbags 94
Automatic headlamp con‐ trol 88
Automatic Hold 63
Automatic locking 39
Automatic recirculated-air control 154
Automatic Soft Closing, doors 36
Automatic transmission with Steptronic 68
AUTO program, automatic cli‐ mate control 153
AUTO program, intensity 153
Auto Start/Stop function 60
Average fuel consumption 84
Average speed 84
Axle loads, weights 229
B Backrest curvature, refer to Lumbar support 46
Backrest, seats 45
Backrest, width 46
Backup camera 139
Band-aids, refer to First aid kit 217
Bar for tow-starting/ towing 219
Battery replacement, remote control for parked-car heat‐
ing/ventilation 159
Battery replacement, vehicle battery 214
Battery replacement, vehicle remote control 30
Battery, vehicle 214
Belts, safety belts 48 Seite 232ReferenceEverything from A to Z232
Online Edition for Part no. 01 40 2 909 877 - VI/13
Page 233 of 243
Beverage holder, cu‐pholder 169
Blinds, sun protection 42
BMW Assist, see user's manual for Navigation, En‐
tertainment and Communi‐
cation
BMW Homepage 6
BMW Internet page 6
BMW maintenance sys‐ tem 208
Bonus range, ECO PRO 181
Bottle holder, refer to Cu‐ pholder 169
Brake assistant 117
Brake assistant, adaptive 117
Brake discs, breaking in 174
Brake force display 114
Brake lamps, brake force dis‐ play 114
Brake lamps, bulb replace‐ ment 212
Brake lights, adaptive 114
Brake pads, breaking in 174
Braking, hints 175
Breakdown assis‐ tance 216, 217
Breaking in 174
Brightness of Control Dis‐ play 86
Bulb replacement, front 210
Bulb replacement, rear 212
Button, RES 128
Button, Start/Stop 58
Bypassing, refer to Jump- starting 217
C
California Proposition 65 Warning 7
Calling up mirror adjust‐ ment 39
Calling up seat adjust‐ ment 39 Calling up steering wheel ad‐
justment 39
Camera, backup camera 139
Camera, care 224
Camera, Side View 144
Camera, Top View 142
Can holder, refer to Cu‐ pholder 169
Car battery 214
Car care products 222
Care, displays 224
Care, vehicle 222
Cargo 177
Cargo area, enlarging 164
Cargo area lid 36
Cargo area, storage compart‐ ments 170
Cargo, securing 178
Cargo straps, securing cargo 178
Car key, refer to Remote con‐ trol 30
Carpet, care 224
Car wash 221
Catalytic converter, refer to Hot exhaust system 174
CBS Condition Based Serv‐ ice 208
CD/Multimedia, see user's manual for Navigation, En‐
tertainment and Communi‐
cation
Center console 14
Center-Lock, see button for central locking 33
Central locking system 33
Central screen, refer to Con‐ trol Display 16
Changes, technical, refer to Safety 7
Changing parts 210
Changing wheels 213
Changing wheels/tires 199
Check Control 76
Checking the oil level elec‐ tronically 205 Children, seating position 54
Children, transporting safely 54
Child restraint fixing sys‐ tem 54
Child restraint fixing system LATCH 55
Child restraint fixing systems, mounting 54
Child safety locks 57
Child seat, mounting 54
Child seats 54
Chrome parts, care 223
Cigarette lighter 162
Cleaning, displays 224
Climate control 152
Climate control laminated tinted safety glass 175
Climate control wind‐ shield 175
Clock 79
Closing/opening from in‐ side 36
Closing/opening via door lock 35
Closing/opening with remote control 34
Clothes hooks 169
Coasting 183
Coasting with engine decou‐ pled, coasting 183
Coasting with idling en‐ gine 183
Collision warning with braking function 101
Collision warning with City Braking function 104
Combination switch, refer to Turn signals 65
Combination switch, refer to Wiper system 65
COMFORT+ program, Driving Dynamics Control 123
Comfort Access 37
COMFORT program, Driving Dynamics Control 123 Seite 233Everything from A to ZReference233
Online Edition for Part no. 01 40 2 909 877 - VI/13
Page 235 of 243
Engine, automatic switch-off 60
Engine compartment 203
Engine compartment, work‐ ing in 203
Engine coolant 207
Engine idling when driving, coasting 183
Engine oil 205
Engine oil, adding 206
Engine oil additives 206
Engine oil change 206
Engine oil filler neck 206
Engine oil temperature 78
Engine oil types, alterna‐ tive 206
Engine oil types, ap‐ proved 206
Engine start during malfunc‐ tion 31
Engine start, jump-start‐ ing 217
Engine start, refer to Starting the engine 59
Engine stop 59
Engine temperature 78
Entering/exiting vehicle, as‐ sistance, steering wheel 53
Entering a car wash 221
Equipment, interior 160
ESP Electronic Stability Pro‐ gram, refer to DSC 117
Exchanging wheels/tires 199
Exhaust system 174
Exterior mirror, automatic dimming feature 52
Exterior mirrors 51
External start 217
External temperature dis‐ play 79
External temperature warn‐ ing 79
Eyes for securing cargo 178 F
Failure message, refer to Check Control 76
False alarm, refer to Uninten‐ tional alarm 41
Fan, refer to Air flow 153
Fault displays, refer to Check Control 76
Filler neck for engine oil 206
Fine wood, care 223
First aid kit 217
Fitting for towing, refer to Tow fitting 220
Flat tire, changing wheels 213
Flat Tire Monitor FTM 98
Flat tire, Tire Pressure Moni‐ tor TPM 95
Flat tire, warning lamp 96, 99
Flooding 175
Floor carpet, care 224
Floor mats, care 224
Fold down the rear seat back‐ rest, see Though-loading
system 164
Fold-out position, windshield wipers 67
Foot brake 175
For the headliner, refer to All around the interior rearview
mirror 15
Front airbags 92
Front center armrest 168
Front fog lamps 90
Front lamps 210
Front passenger airbags, au‐ tomatic deactivation 94
Front passenger airbags, indi‐ cator lamp 94
Front seats 45
FTM Flat Tire Monitor 98
Fuel 190
Fuel cap 188
Fuel consumption, current 80 Fuel consumption, refer to
Average fuel consump‐
tion 84
Fuel filler flap 188
Fuel gauge 78
Fuel quality 190
Fuel recommendation 190
Fuel, tank capacity 230
Fuse 214
G Garage door opener, refer to Integrated universal remote
control 160
Gasoline 190
Gasoline quality 190
Gear change, automatic transmission 68
Gear shift indicator 81
General driving notes 174
Glass sunroof, powered with tilt function 43
Glove compartment 167
Gross vehicle weight, ap‐ proved 229
Gross weight, permissible for trailer towing 229
H
Handbrake, refer to Parking brake 62
Hand-held transmitter, alter‐ nating code 161
Hazard warning flashers 216
HDC Hill Descent Con‐ trol 119
Head airbags 92
Headlamp control, auto‐ matic 88
Headlamp courtesy delay fea‐ ture 87
Headlamp courtesy delay fea‐ ture via remote control 34
Headlamp flasher 65 Seite 235Everything from A to ZReference235
Online Edition for Part no. 01 40 2 909 877 - VI/13