2014 BMW 535I XDRIVE SEDAN ESP
[x] Cancel search: ESPPage 164 of 273
▷The variable, green pathway line assists
you in assessing the amount of space ac‐
tually needed to the side of the vehicle.
The lane line depends on the engaged
gear and the current steering angle. The
track line is continuously adjusted for the
steering wheel movement.
"Parking aid lines"
Turning circle and pathway lines are displayed.
System limits
Top View cannot be used in the following sit‐
uations:
▷With a door open.▷With the trunk lid open.▷With an exterior mirror folded in.▷In poor light.
A Check Control message is displayed in some
of these situations.
Parking assistant The concept
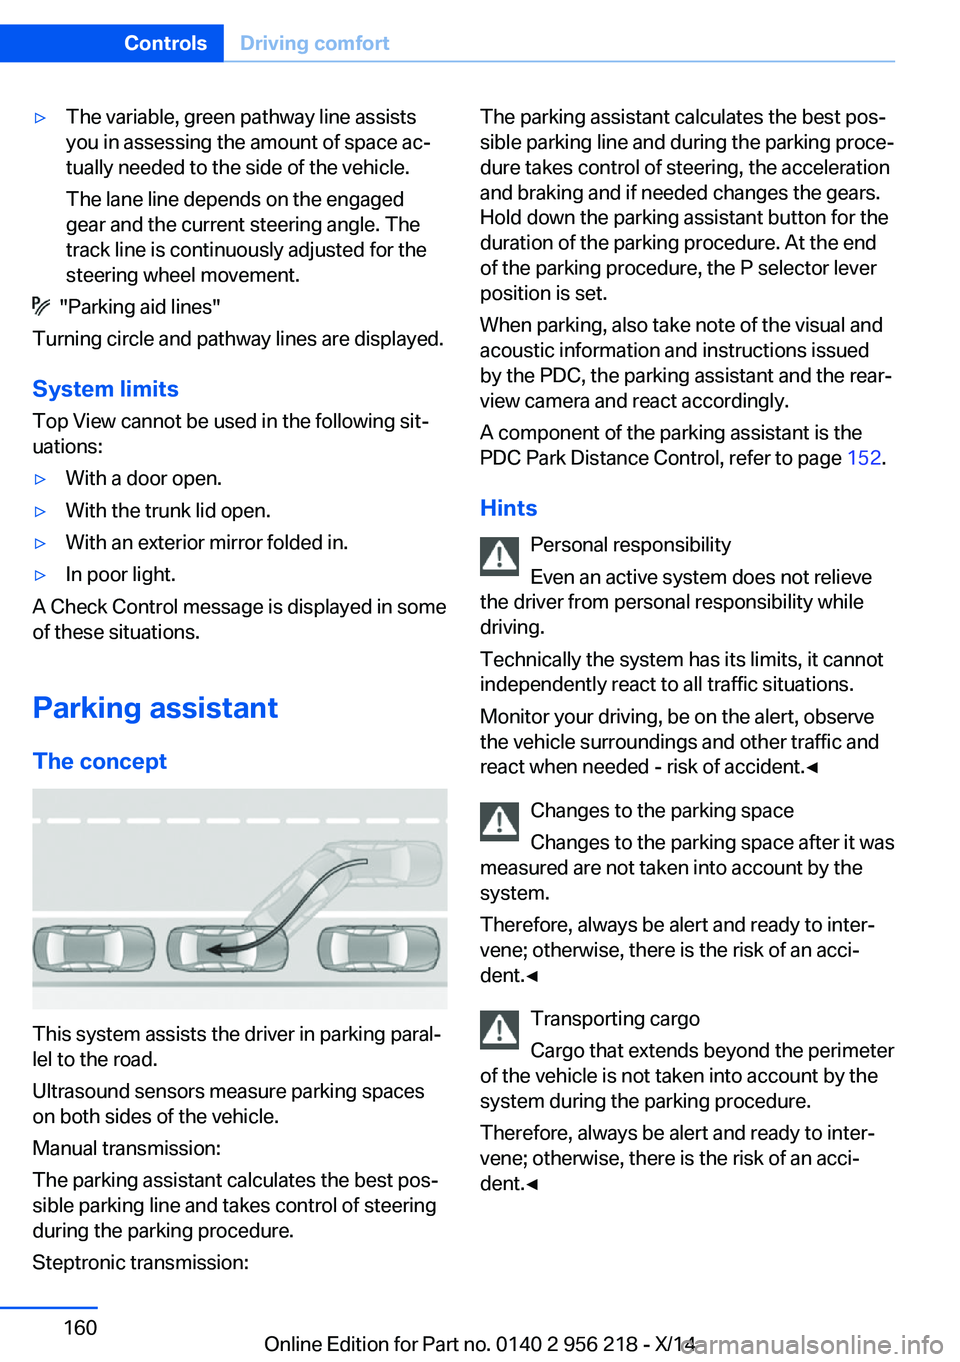
This system assists the driver in parking paral‐
lel to the road.
Ultrasound sensors measure parking spaces
on both sides of the vehicle.
Manual transmission:
The parking assistant calculates the best pos‐
sible parking line and takes control of steering
during the parking procedure.
Steptronic transmission:
The parking assistant calculates the best pos‐
sible parking line and during the parking proce‐
dure takes control of steering, the acceleration
and braking and if needed changes the gears.
Hold down the parking assistant button for the
duration of the parking procedure. At the end
of the parking procedure, the P selector lever
position is set.
When parking, also take note of the visual and
acoustic information and instructions issued
by the PDC, the parking assistant and the rear‐
view camera and react accordingly.
A component of the parking assistant is the
PDC Park Distance Control, refer to page 152.
Hints Personal responsibility
Even an active system does not relieve
the driver from personal responsibility while
driving.
Technically the system has its limits, it cannot
independently react to all traffic situations.
Monitor your driving, be on the alert, observe
the vehicle surroundings and other traffic and
react when needed - risk of accident.◀
Changes to the parking space
Changes to the parking space after it was
measured are not taken into account by the
system.
Therefore, always be alert and ready to inter‐
vene; otherwise, there is the risk of an acci‐
dent.◀
Transporting cargo
Cargo that extends beyond the perimeter
of the vehicle is not taken into account by the
system during the parking procedure.
Therefore, always be alert and ready to inter‐
vene; otherwise, there is the risk of an acci‐
dent.◀Seite 160ControlsDriving comfort160
Online Edition for Part no. 0140 2 956 218 - X/14
Page 165 of 273
Curbs
The parking assistant may steer the vehi‐
cle over or onto curb if need be.
Therefore, always be alert and ready to inter‐
vene; otherwise, the wheels, tires, or the vehi‐
cle may become damaged.◀
An engine that has been switched off by the
Auto Start Stop function is restarted automati‐
cally when the parking assistant is activated.
Requirements
For measuring parking spaces▷Maximum speed while driving forward ap‐
prox. 22 mph/35 km/h.▷Maximum distance to row of parked vehi‐
cles: 5 ft/1.5 m.
Suitable parking space
▷Gap between two objects with a minimum
length of approx. 5 ft/1.5 m.▷Min. length of gap between two objects:
your vehicle's length plus approx.
4 ft/1.2 m.▷Minimum depth: approx. 5 ft/1.5 m.
Regarding the parking procedure
▷Doors and trunk lid closed.▷Parking brake released.▷When parking in parking spaces on the
driver's side, the corresponding turn signal
must be set where applicable.
Steptronic transmission:
▷Driver's safety belt fastened.At a glance
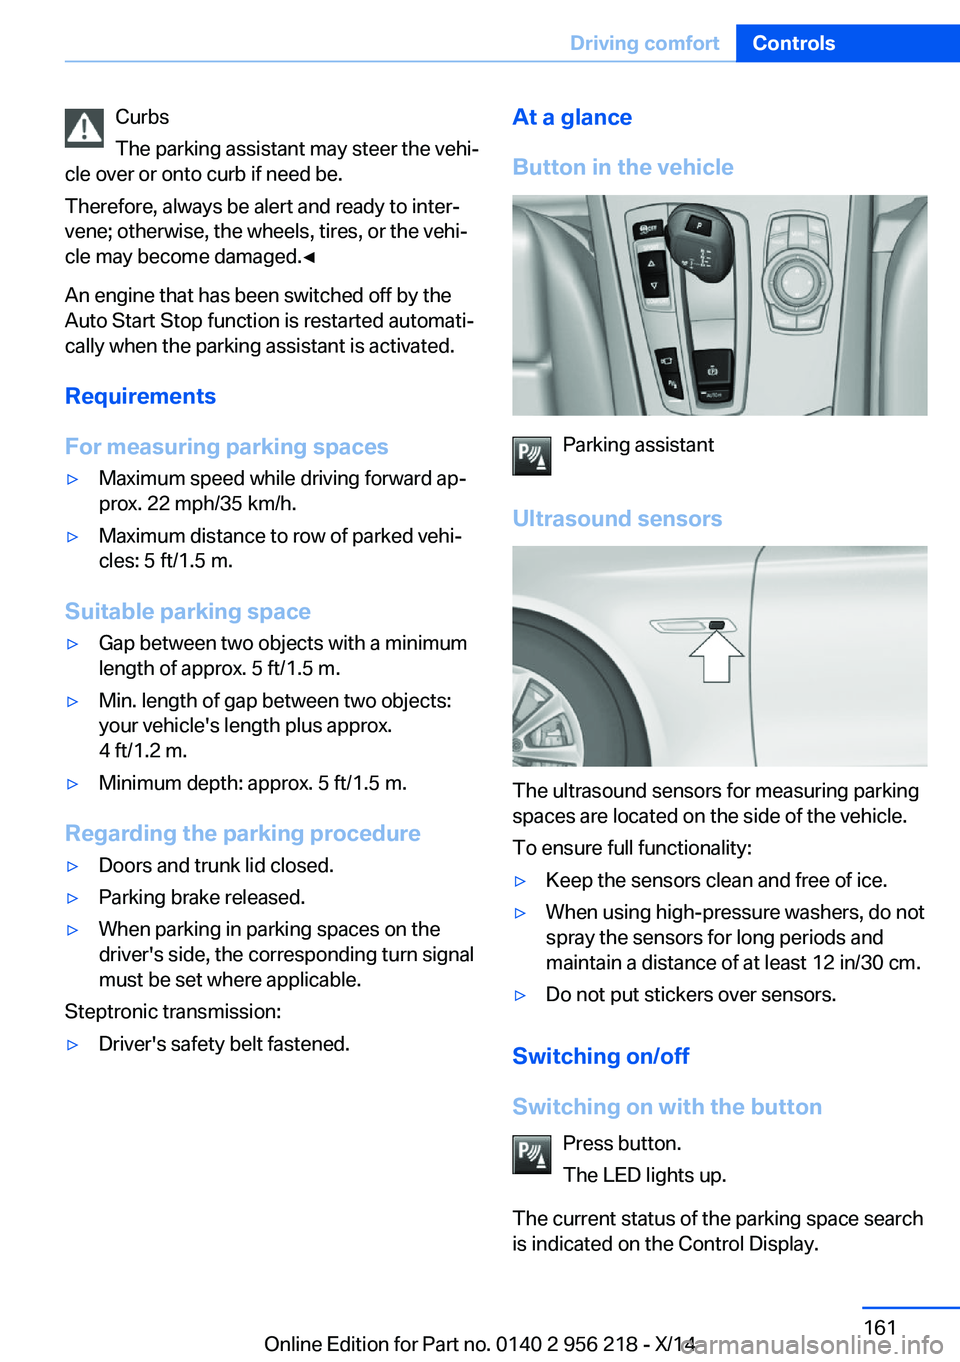
Button in the vehicle
Parking assistant
Ultrasound sensors
The ultrasound sensors for measuring parking
spaces are located on the side of the vehicle.
To ensure full functionality:
▷Keep the sensors clean and free of ice.▷When using high-pressure washers, do not
spray the sensors for long periods and
maintain a distance of at least 12 in/30 cm.▷Do not put stickers over sensors.
Switching on/off
Switching on with the button Press button.
The LED lights up.
The current status of the parking space search
is indicated on the Control Display.
Seite 161Driving comfortControls161
Online Edition for Part no. 0140 2 956 218 - X/14
Page 171 of 273
Ice and condensation are quickly removed
from the windshield and the front side win‐
dows.
For this purpose, point the side vents onto the
side windows as needed.
Adjust air flow with the program active.
If the windows are fogged over, you can also
reel on the cooling function or press the AUTO
button to utilize the condensation sensor.
Maximum cooling Press button.
The system is set to the lowest tem‐
perature, optimum air flow and air circulation
mode.
Air flows out of the vents to the upper body re‐
gion. The vents need to be open for this.
The function is available above an external
temperature of approx. 32 ℉/0 ℃ and with the
engine running is indicated.
Adjust air flow with the program active.
Automatic recirculated-air control/
recirculated-air mode
You may respond to unpleasant odors or pollu‐
tants in the immediate environment by tempo‐
rarily suspending the supply of outside air. The
system then recirculates the air currently
within the vehicle.
Press button repeatedly to select an
operating mode:▷LEDs off: outside air flows in continuously.▷Left LED on, automatic recirculated-air
control: a sensor detects pollutants in the
outside air and shuts off automatically.▷Right LED on, recirculated-air mode: the
supply of outside air into the vehicle is per‐
manently blocked.
If the windows are fogged over, reel off the re‐
circulated-air mode and press the AUTO but‐
ton on the driver's side to utilize the condensa‐
tion sensor. Make sure that air can flow to the
windshield.
Sufficient ventilation
When remaining in the vehicle for an ex‐
tended period of time, ensure sufficient exter‐
nal ventilation. Do not continuously use recir‐
culated-air mode; otherwise the air quality in
the interior continuously worsens.◀
Cooling function
The car's interior can only be cooled with the
engine running.
Press button.
The air will be cooled and dehumidi‐
fied and, depending on the temperature set‐
ting, warmed again.
Depending on the weather, the windshield and
side windows may fog up briefly when the en‐
gine is started.
The cooling function is switched on automati‐
cally with the AUTO program.
When using the automatic climate control,
condensation water, refer to page 191, devel‐
ops that exits underneath the vehicle.
Rear window defroster Press button.
The rear window defroster switches
off automatically after a certain period of time.
SYNC program The current settings on the driver'sside for temperature, air flow, air distri‐
bution, and AUTO program are transferred to the front passenger side and to the left andright rear.
The program is switched off if the settings on
the front passenger side or in the rear are
changed.Seite 167Climate controlControls167
Online Edition for Part no. 0140 2 956 218 - X/14
Page 182 of 273
middle section is folded down. Otherwise, in‐
jury or damage may result.◀
Ensuring the stability of the child seat
When installing child restraint systems,
make sure that the child seat is securely fas‐
tened to the backrest of the seat. Angle and
headrest of the backrest might need to be ad‐
justed or possibly be removed. Make sure that
all backrests are securely locked. Otherwise
the stability of the child seat can be affected,
and there is an increased risk of injury because
of unexpected movement of the rear seat
backrest.◀
Opening Move the front seats to an upright posi‐
tion
Before folding down the rear backrests, ensure
that the front seats are moved forward slightly
and are in an upright position. Otherwise, the
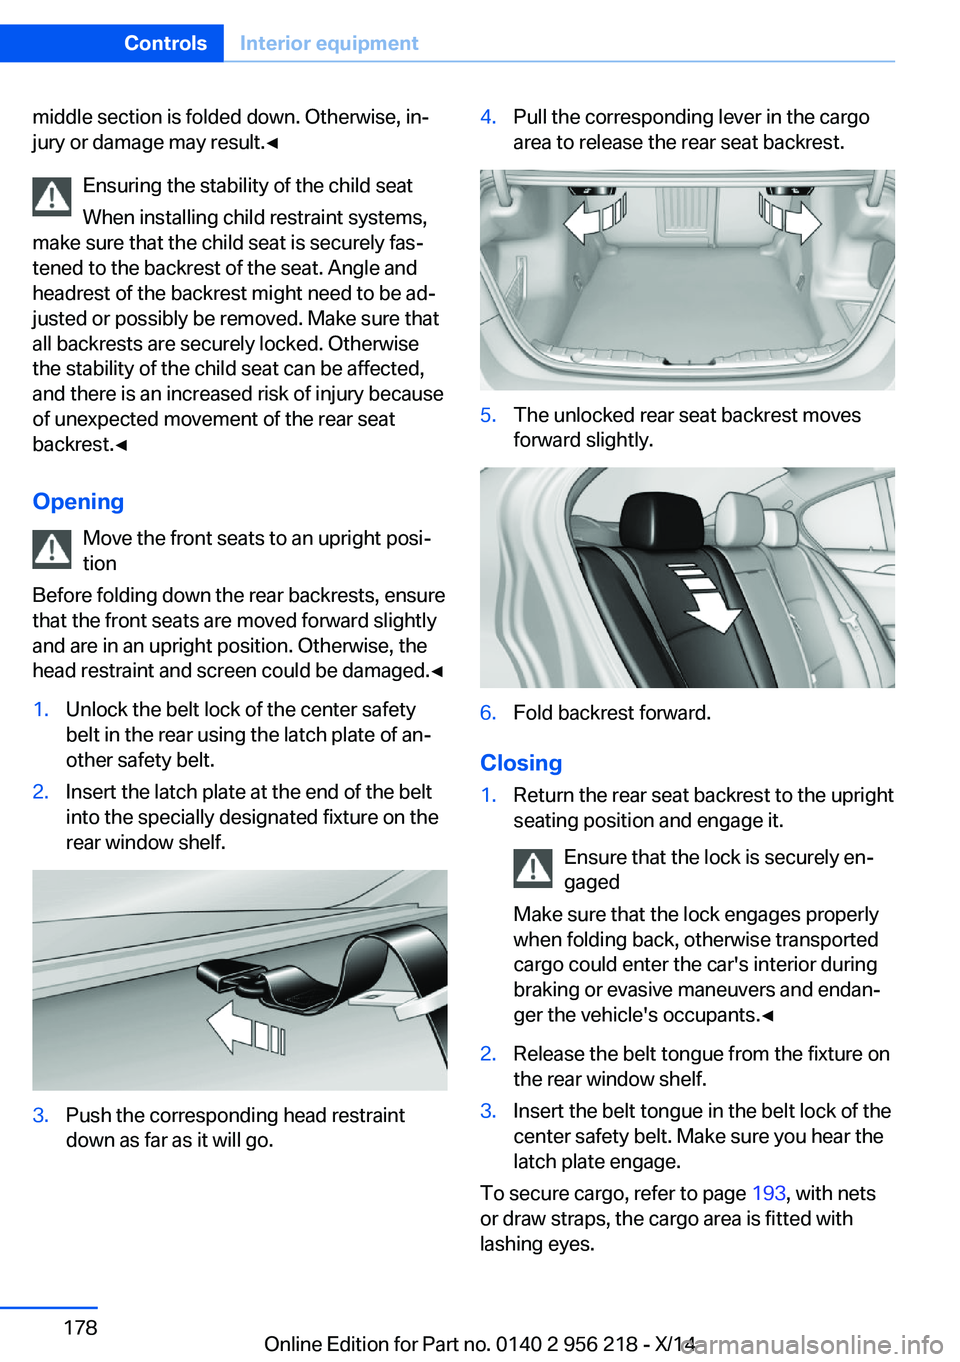
head restraint and screen could be damaged.◀1.Unlock the belt lock of the center safety
belt in the rear using the latch plate of an‐
other safety belt.2.Insert the latch plate at the end of the belt
into the specially designated fixture on the
rear window shelf.3.Push the corresponding head restraint
down as far as it will go.4.Pull the corresponding lever in the cargo
area to release the rear seat backrest.5.The unlocked rear seat backrest moves
forward slightly.6.Fold backrest forward.
Closing
1.Return the rear seat backrest to the upright
seating position and engage it.
Ensure that the lock is securely en‐
gaged
Make sure that the lock engages properly
when folding back, otherwise transported
cargo could enter the car's interior during
braking or evasive maneuvers and endan‐
ger the vehicle's occupants.◀2.Release the belt tongue from the fixture on
the rear window shelf.3.Insert the belt tongue in the belt lock of the
center safety belt. Make sure you hear the
latch plate engage.
To secure cargo, refer to page 193, with nets
or draw straps, the cargo area is fitted with
lashing eyes.
Seite 178ControlsInterior equipment178
Online Edition for Part no. 0140 2 956 218 - X/14
Page 194 of 273
This phenomenon is referred to as hydroplan‐
ing. It is characterized by a partial or complete
loss of contact between the tires and the road
surface, ultimately undermining your ability to
steer and brake the vehicle.
Driving through water Observe water level and speed
Do not exceed the maximum water level
and maximum speed; otherwise, the vehicle's
engine, the electrical systems and the trans‐
mission may be damaged.◀
Drive though calm water only and only if it is
not deeper than 9.8 inches/25 cm and at this
height, no faster than walking speed, up to
3 mph/5 km/h.
Braking safely
Your vehicle is equipped with ABS as a stand‐
ard feature.
Applying the brakes fully is the most effective
way of braking in situations needed.
Steering is still responsive. You can still avoid
any obstacles with a minimum of steering ef‐
fort.
Pulsation of the brake pedal and sounds from
the hydraulic circuits indicate that ABS is in its
active mode.
In certain braking situations, the perforated
brake discs can cause functional problems.
However, this has no effect on the perform‐
ance and operational reliability of the brake.
Objects within the range of movement
of the pedals
No objects in the area around the pedals
Keep floor mats, carpets, and any other
objects out of the pedal area; otherwise, the
function of the pedals could be impeded while driving and create the risk of an accident.
Do not place additional floor mats over existing
mats or other objects.Only use floor mats that have been approved
for the vehicle and can be properly attached to
floor.
Ensure that the floor mats are securely fas‐
tened again after they were removed for clean‐
ing, e.g.◀
Driving in wet conditions When roads are wet, salted, or in heavy rain,
press brake pedal ever so gently every few
miles.
Ensure that this action does not endanger other traffic.
The heat generated in this process helps dry
the brake discs and pads.
In this way braking efficiency will be available
when you need it.
Hills Avoid stressing the brakes
Avoid placing excessive stress on the
brake system. Light but consistent brake pres‐
sure can lead to high temperatures, brakes
wearing out and possibly even brake failure.◀
Do not drive in neutral
Do not drive in neutral or with the engine
stopped, as doing so disables engine braking.
In addition, steering and brake assist are un‐
available with the engine stopped.◀
Drive long or steep downhill gradients in the
gear that requires least braking efforts. Other‐
wise the brakes may overheat and reduce
brake efficiency.
You can increase the engine's braking effect
by shifting down, going all the way to first gear,
if needed.
Brake disc corrosion
Brake disc corrosion and contamination of the
brake pads are favored by:▷Low mileage.Seite 190Driving tipsThings to remember when driving190
Online Edition for Part no. 0140 2 956 218 - X/14
Page 200 of 273
Avoid high engine speeds
As a rule: driving at low engine speeds lowers
fuel consumption and reduces wear.
Use 1st gear to get the vehicle moving. Start‐
ing with the 2nd gear, accelerate rapidly. When
accelerating, shift up before reaching high en‐
gine speeds.
When you reach the desired speed, shift into
the highest applicable gear and drive with the
engine speed as low as possible and at a con‐
stant speed.
If necessary, observe the gear shift indicator of
the vehicle, refer to page 95.
Use coasting
When approaching a red light, take your foot
off the accelerator and let the vehicle coast to
a halt.
For going downhill take your foot off the accel‐
erator and let the vehicle roll.
The flow of fuel is interrupted while coasting.
Switch off the engine during longer stops
Switch off the engine during longer stops, e.g.,
at traffic lights, railroad crossings or in traffic
congestion.
Auto Start/Stop function The Auto Start/Stop function of your vehicle
automatically switches off the engine during a
stop.
If the engine is switched off and then restarted
rather than leaving the engine running con‐
stantly, fuel consumption and emissions are
reduced. Savings can begin within a few sec‐
onds of switching off the engine.
In addition, fuel consumption is also deter‐
mined by other factors, such as driving style,road conditions, maintenance or environmental
factors.
Switch off any functions that
are not currently needed
Functions such as seat heating and the rear
window defroster require a lot of energy and
reduce the range, especially in city and stop-
and-go traffic.
Reel off these functions if they are not needed. The ECO PRO driving program supports the
energy conserving use of comfort features.
These functions are automatically deactivated
partially or completely.
Have maintenance carriedout
Have vehicles maintained regularly to achieve
optimal vehicle efficiency and operating life.
The maintenance should be carried out by
your service center.
Also note the BMW Maintenance System, refer
to page 233.
ECO PRO
The concept ECO PRO supports a driving style that saves
on fuel consumption. For this purpose, the en‐
gine control and comfort features, e. g. the cli‐
mate control output, are adjusted.
Under certain conditions the engine is auto‐
matically decoupled from the transmission in
the D selector lever position. The vehicle con‐
tinues traveling with the engine idling to re‐
duce fuel consumption. Selector lever position
D remains engaged.
In addition, context-sensitive instructions are
displayed to assist with an optimized fuel con‐
sumption driving style.Seite 196Driving tipsSaving fuel196
Online Edition for Part no. 0140 2 956 218 - X/14
Page 210 of 273
FuelVehicle features and optionsThis chapter describes all standard, country-
specific and optional features offered with the
series. It also describes features that are not
necessarily available in your car, e. g., due to
the selected options or country versions. This
also applies to safety-related functions and
systems.
Fuel recommendation
Note General fuel quality
Even fuels that conform to the specifica‐
tions can be of low quality. This may cause en‐
gine problems, for instance poor engine start-
up behavior, poor handling and/or poor
performance. Switch gas stations or use a
brand name fuel with a higher octane rating.◀
Gasoline
For the best fuel efficiency, the gasoline
should be sulfur-free or very low in sulfur con‐
tent.
Fuels that are marked on the gas pump as con‐
taining metal must not be used.
Refuel only with unleaded gasoline with‐
out metallic additives.
Do not refuel with any leaded gasoline or gaso‐
line with metallic additives, e. g. manganese or
iron, as this can cause permanent damage to
the catalytic converter and other compo‐
nents.◀
Fuels with a maximum ethanol content of
10 %, i. e., E10, may be used for refueling.
Ethanol should satisfy the following quality
standards:
US: ASTM 4806–xxCAN: CGSB-3.511–xx
xx: comply with the current standard in each
case.
Do not use a fuel with a higher percent‐
age of ethanol
Do not use a fuel with a higher ethanol per‐
centage than recommended or one with other
types of alcohol, e.g. M5 to M100; otherwise
this could damage the engine and fuel supply
system.◀
Recommended fuel grade BMW recommends AKI 91.
Minimum fuel grade
BMW recommends AKI 89.
Minimum fuel grade
Do not use any gasoline below the mini‐
mum fuel grade as this may impair engine per‐
formance.◀
If you use gasoline with this minimum AKI Rat‐
ing, the engine may produce knocking sounds
when starting at high outside temperatures.
This has no effect on the engine life.
Fuel quality
The use of poor-quality fuels may result
in harmful engine deposits or damage. Addi‐
tionally, problems relating to drivability, start‐
ing and stalling, especially under certain envi‐
ronmental conditions such as high ambient
temperature and high altitude, may occur.
If drivability problems are encountered, we rec‐
ommend switching to a high quality gasoline
brand and a higher octane grade — AKI num‐
ber — for a few tank fills. To avoid harmful en‐
gine deposits, it is highly recommended to
purchase gasoline from BP or Top Tier retail‐
ers.Seite 206MobilityFuel206
Online Edition for Part no. 0140 2 956 218 - X/14
Page 213 of 273
Suitable Diesel exhaust fluid▷Preferred: BMW Diesel Exhaust Fluid. With
this bottle and its special adapter, Diesel
exhaust fluid can be replenished simply
and safely.▷Alternative: NOx reduction agent AUS 32
Diesel exhaust fluid can be purchased at your
service center.
Refill quantity
When the Reserve display starts, add at least
3 bottles of reducing agent.
This corresponds to approx. 1.5 US gal/6 liters.
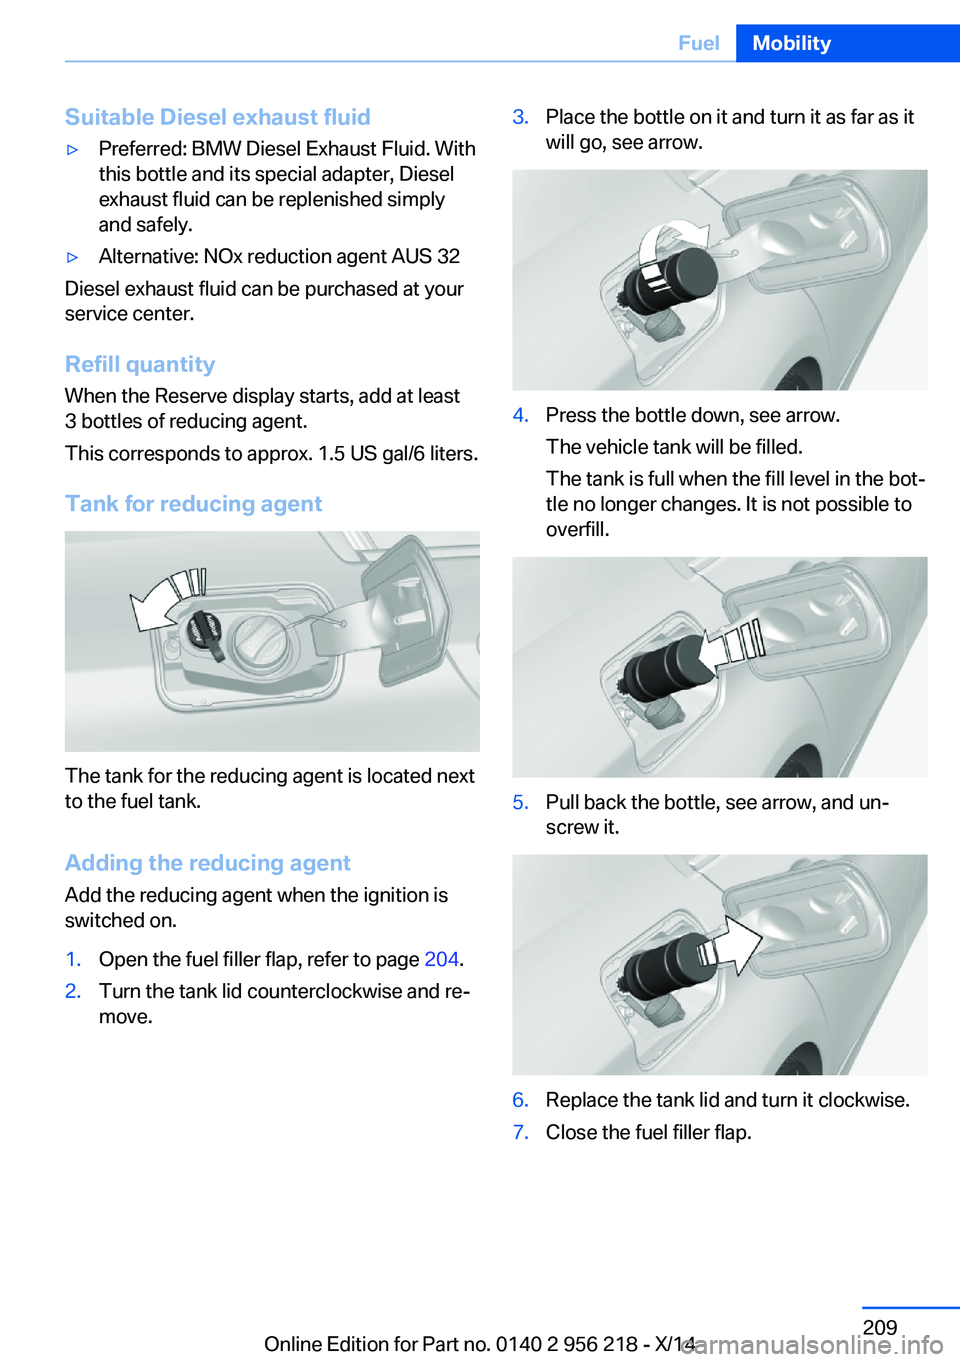
Tank for reducing agent
The tank for the reducing agent is located next
to the fuel tank.
Adding the reducing agent Add the reducing agent when the ignition is
switched on.
1.Open the fuel filler flap, refer to page 204.2.Turn the tank lid counterclockwise and re‐
move.3.Place the bottle on it and turn it as far as it
will go, see arrow.4.Press the bottle down, see arrow.
The vehicle tank will be filled.
The tank is full when the fill level in the bot‐
tle no longer changes. It is not possible to
overfill.5.Pull back the bottle, see arrow, and un‐
screw it.6.Replace the tank lid and turn it clockwise.7.Close the fuel filler flap.Seite 209FuelMobility209
Online Edition for Part no. 0140 2 956 218 - X/14