2014 BMW 5 SERIES GRAN TURISMO Neutral
[x] Cancel search: NeutralPage 85 of 259

Steptronic transmission
Selector lever positions
D Drive Selector lever position for normal vehicle oper‐
ation. All gears for forward travel are activated
automatically.
R is Reverse
Select only when the vehicle is stationary.
N Neutral: The vehicle may roll. Use in automatic car
washes, e.g.
When the ignition is switched off, refer to
page 70, selector lever position P is engaged
automatically.
P Park Select only when the vehicle is stationary. The
drive wheels are blocked.
P is engaged automatically:▷After the engine is switched off when the
vehicle is in radio-ready state, refer to
page 70, or when the ignition is switched
off, refer to page 70, and when position R
or D is set.▷With the ignition off, if selector lever posi‐
tion N is set.▷If the safety belt is unbuckled, the driver's
door is opened, and the brake pedal is not
pressed while the vehicle is stationary and
position D or R is set.
Before exiting the vehicle, make sure that se‐
lector lever position P is set. Otherwise, the ve‐
hicle may begin to move.
Kickdown Kickdown is used to achieve maximum driving
performance. Step on the accelerator pedal
beyond the resistance point at the full throttle
position.
Engaging selector lever positions
Press on the brake pedal until you start
driving
To prevent the vehicle from creeping after you
select a gear, maintain pressure on the brake
pedal until you are ready to start.◀▷It is not possible to shift out of selector
lever position P until the engine is running
and the brake is applied.▷With the vehicle is stationary, press on the
brake pedal before shifting out of P or N;
otherwise, the shift command will not be
executed: shift lock.
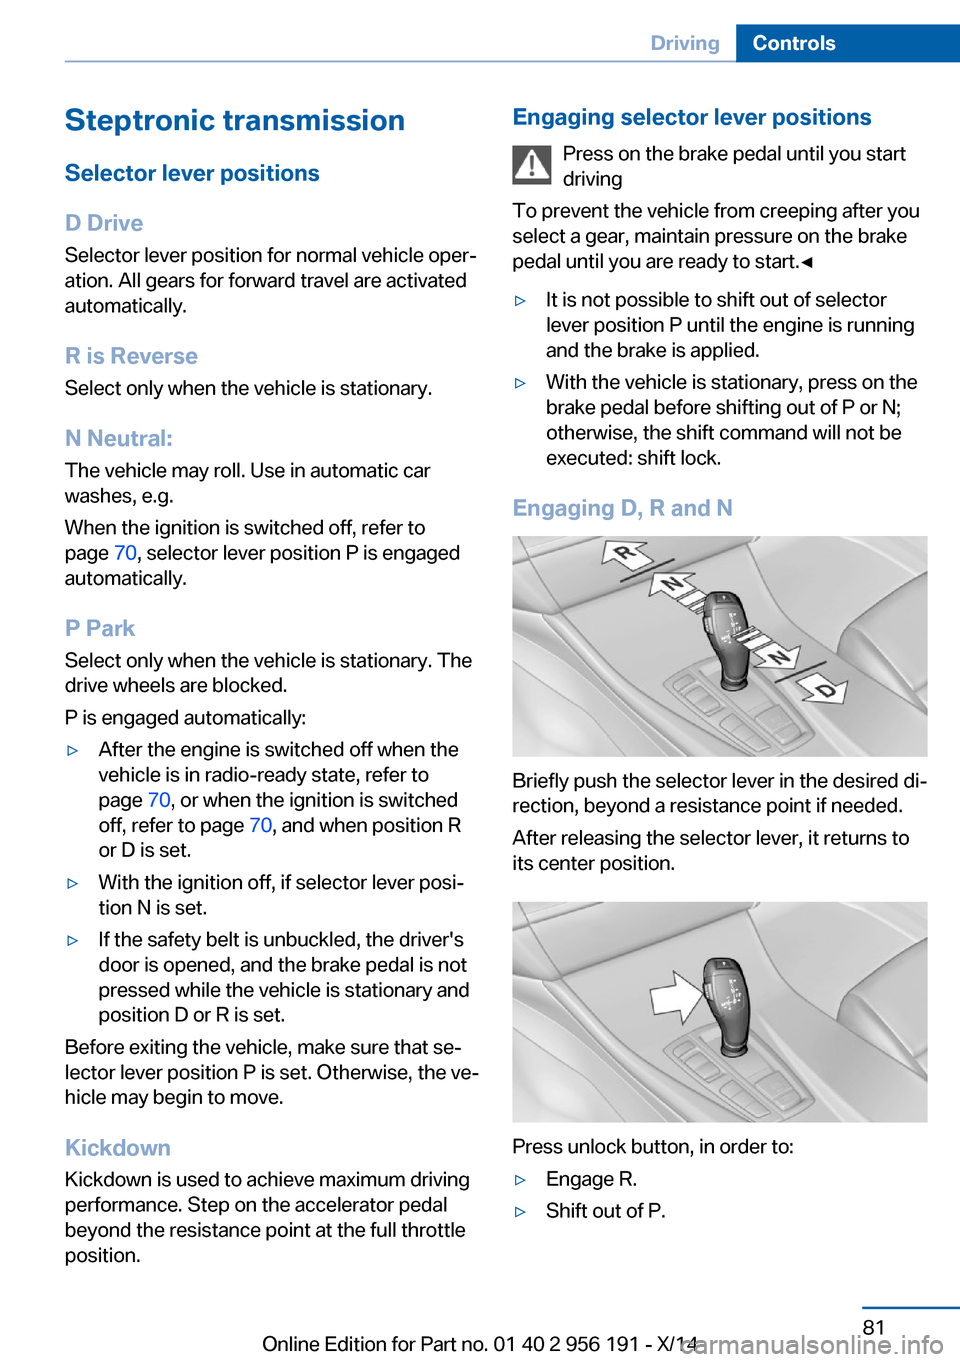
Engaging D, R and N
Briefly push the selector lever in the desired di‐
rection, beyond a resistance point if needed.
After releasing the selector lever, it returns to
its center position.
Press unlock button, in order to:
▷Engage R.▷Shift out of P.Seite 81DrivingControls81
Online Edition for Part no. 01 40 2 956 191 - X/14
Page 190 of 259

Objects within the range of movement
of the pedals
No objects in the area around the pedals
Keep floor mats, carpets, and any other
objects out of the pedal area; otherwise, the
function of the pedals could be impeded while
driving and create the risk of an accident.
Do not place additional floor mats over existing
mats or other objects.
Only use floor mats that have been approved
for the vehicle and can be properly attached to
floor.
Ensure that the floor mats are securely fas‐
tened again after they were removed for clean‐
ing, e.g.◀
Driving in wet conditions When roads are wet, salted, or in heavy rain,
press brake pedal ever so gently every few
miles.
Ensure that this action does not endanger other traffic.
The heat generated in this process helps dry
the brake discs and pads.
In this way braking efficiency will be available
when you need it.
Hills Avoid stressing the brakes
Avoid placing excessive stress on the
brake system. Light but consistent brake pres‐
sure can lead to high temperatures, brakes
wearing out and possibly even brake failure.◀
Do not drive in neutral
Do not drive in neutral or with the engine
stopped, as doing so disables engine braking.
In addition, steering and brake assist are un‐
available with the engine stopped.◀
Drive long or steep downhill gradients in the
gear that requires least braking efforts. Other‐wise the brakes may overheat and reduce
brake efficiency.
You can increase the engine's braking effect
by shifting down, going all the way to first gear,
if needed.
Brake disc corrosion
Brake disc corrosion and contamination of the
brake pads are favored by:▷Low mileage.▷Extended periods when the vehicle is not
used at all.▷Infrequent use of the brakes.
Corrosion will built up when the maximum
pressure applied to the brake pads during
braking is not reached - thus discs don't get
cleaned.
Corrosion buildup on the brake discs will cause
a pulsating effect on the brakes in their re‐
sponse - generally that cannot be corrected.
Condensation under the parked
vehicle
When using the automatic climate control,
condensation water develops collecting under‐
neath the vehicle.
These traces of water under the vehicle are
normal.
Seite 186Driving tipsThings to remember when driving186
Online Edition for Part no. 01 40 2 956 191 - X/14
Page 239 of 259

Otherwise, particles of dust and road grime
chafe in pores and folds, and lead to increased
wear and premature degradation of the leather
surface.
To guard against discoloration, such as from
clothing, provide leather care roughly every
two months.
Clean light-colored leather more frequently be‐
cause soiling on such surfaces is substantially
more visible.
Use leather care products; otherwise, dirt and
grease will gradually break down the protective
layer of the leather surface.
Suitable care products are available from the
service center.
Upholstery material care Vacuum regularly with a vacuum cleaner.
If upholstery is very dirty, e.g., with beverage
stains, use a soft sponge or microfiber cloth
with a suitable interior cleaner.
Clean the upholstery down to the seams using
large sweeping motions. Avoid rubbing the
material vigorously.
Damage from Velcro® fasteners
Open Velcro® fasteners on pants or
other articles of clothing can damage the seat
covers. Ensure that any Velcro® fasteners are
closed.◀
Caring for special components
Light-alloy wheels When cleaning the vehicle, use only neutral
wheel cleaners having a pH value from 5 to 9.
Do not use abrasive cleaning agents or steam
jets above 140 ℉/60 ℃. Follow the manufac‐
turer's instructions.
Aggressive, acidic or alkaline cleaning agents
can destroy the protective layer of adjacent
components, such as the brake disk.Chrome surfaces
Carefully clean components such as the radia‐
tor grille or door handles with an ample supply
of water, possibly with shampoo added, partic‐
ularly when they have been exposed to road
salt.
Rubber components
Aside from water, treat only with rubber
cleansers.
When cleaning rubber seals, do not use any
silicon-containing car care products in order to
avoid damage or noises.
Fine wood partsClean fine wood facing and fine wood compo‐
nents only with a moist rag. Then dry with a
soft cloth.
Plastic components
These include:▷Imitation leather surfaces.▷Roofliner.▷Lamp lenses.▷Instrument cluster cover.▷Matt black spray-coated components.▷Painted parts in the interior.
Clean with a microfiber cloth.
Dampen cloth lightly with water.
Do not soak the roofliner.
No cleansers that contain alcohol or sol‐
vents
Do not use cleansers that contain alcohol or
solvents, such as lacquer thinners, heavy-duty
grease removers, fuel, or such; this could lead
to surface damage.◀
Safety belts
Dirty belt straps impede the reeling action and
thus have a negative impact on safety.
Seite 235CareMobility235
Online Edition for Part no. 01 40 2 956 191 - X/14
Page 253 of 259

Light bulb replacement, seeLamp and bulb replace‐
ment 221
Light control 103
Light-emitting diodes, LEDs 222
Lighting 102
Lighting, speaker 106
Lighting via remote con‐ trol 38
Light reel 102
Lights 102
Lights and bulbs, see Lamp and bulb replacement 221
Load 188
Loading 187
Loading position 176
Lock, door 39
Locking/unlocking via door lock 39
Locking/unlocking with re‐ mote control 37
Locking, automatic 47
Locking, settings 46
Locking via tailgate 41
Lock, power window 50
Locks, doors, and win‐ dows 69
Low beams 102
Low beams, automatic, refer to High-beam Assistant 104
Lower back support 55
Luggage rack, see Roof- mounted luggage rack 188
Lumbar support 55
M
Maintenance 219
Maintenance require‐ ments 219
Maintenance, service require‐ ments 93
Maintenance system, BMW 219
Make-up mirror 171 Malfunction displays, see
Check Control 87
Malfunction, self-leveling sus‐ pension 138
Manual air distribution 163
Manual air flow 163
Manual brake, refer to Parking brake 73
Manual mode, Steptronic transmission 82
Manual operation, door lock 39
Manual operation, exterior mirrors 62
Manual operation, fuel filler flap 198
Manual operation, Park Dis‐ tance Control PDC 151
Manual operation, parking brake 76
Manual operation, rearview camera 153
Manual operation, Side View 155
Manual operation, Top View 157
Marking on approved tires 208
Marking, run-flat tires 209
Massage seat, front 56
Master key, refer to Remote control 34
Maximum cooling 164
Maximum speed, display 94
Maximum speed, winter tires 209
Measure, units of 99
Medical kit 229
Memory for seat, mirrors, steering wheel 61
Menu, EfficientDynamics 193
Menu in instrument clus‐ ter 96
Menus, operating, iDrive 18
Menus, refer to iDrive operat‐ ing concept 19 Messages, see Check Con‐
trol 87
Microfilter 165
Minimum tread, tires 207
Mirror 62
Mirror memory 61
Mobile communication devi‐ ces in the vehicle 185
Modifications, technical, refer to Safety 7
Moisture in headlight 222
Monitor, refer to Control Dis‐ play 18
Mounting of child restraint systems 65
Multifunctional instrument display 85
Multi-function hook 180
Multifunction steering wheel, buttons 14
N
Navigation, see user's manual for Navigation, Entertain‐
ment and Communication
Neck restraints, front, refer to Head restraints 59
Neck restraints, rear, refer to Head restraints 60
Neutral cleaner, see wheel cleaner 235
New wheels and tires 208
Night Vision 124
Night Vision device, see Night Vision 124
Nylon rope for tow-starting/ towing 231
O OBD Onboard Diagnosis 219
OBD, see OBD Onboard Di‐ agnosis 219
Object detection, see Night Vision 124 Seite 249Everything from A to ZReference249
Online Edition for Part no. 01 40 2 956 191 - X/14