2014 BMW 335I XDRIVE GRAN TURISMO manual radio set
[x] Cancel search: manual radio setPage 18 of 240
Press the but‐
tonFunctionBACKOpen previous panel.OPTIONOpens the Options menu.
Operating concept
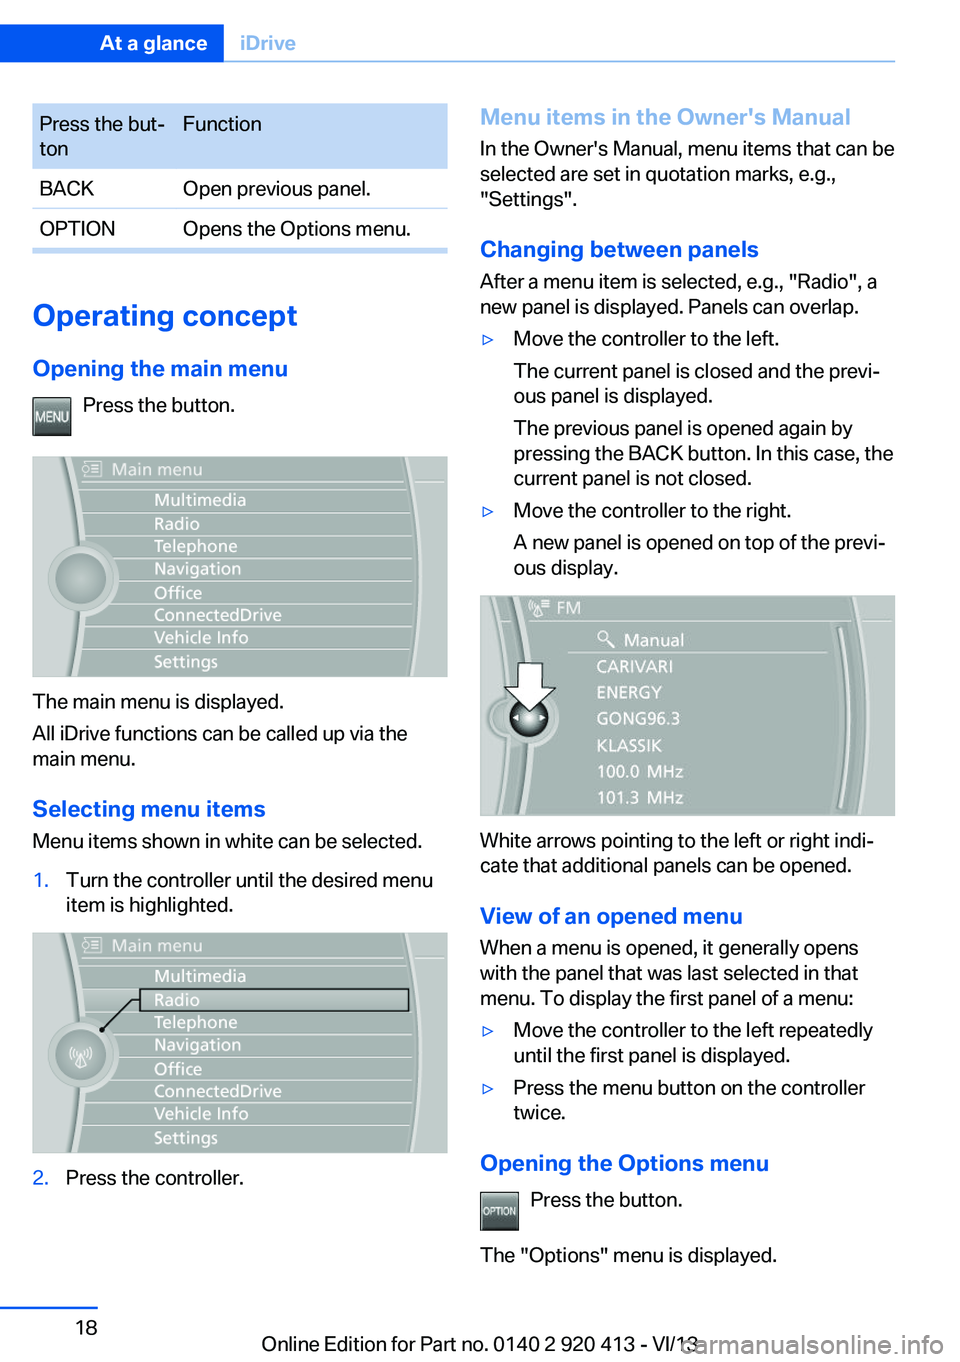
Opening the main menu Press the button.
The main menu is displayed.
All iDrive functions can be called up via the
main menu.
Selecting menu items
Menu items shown in white can be selected.
1.Turn the controller until the desired menu
item is highlighted.2.Press the controller.Menu items in the Owner's Manual
In the Owner's Manual, menu items that can be
selected are set in quotation marks, e.g.,
"Settings".
Changing between panels
After a menu item is selected, e.g., "Radio", a
new panel is displayed. Panels can overlap.▷Move the controller to the left.
The current panel is closed and the previ‐
ous panel is displayed.
The previous panel is opened again by
pressing the BACK button. In this case, the
current panel is not closed.▷Move the controller to the right.
A new panel is opened on top of the previ‐
ous display.
White arrows pointing to the left or right indi‐
cate that additional panels can be opened.
View of an opened menu
When a menu is opened, it generally opens
with the panel that was last selected in that
menu. To display the first panel of a menu:
▷Move the controller to the left repeatedly
until the first panel is displayed.▷Press the menu button on the controller
twice.
Opening the Options menu
Press the button.
The "Options" menu is displayed.
Seite 18At a glanceiDrive18
Online Edition for Part no. 0140 2 920 413 - VI/13
Page 22 of 240
Programmable memory
buttons
General information
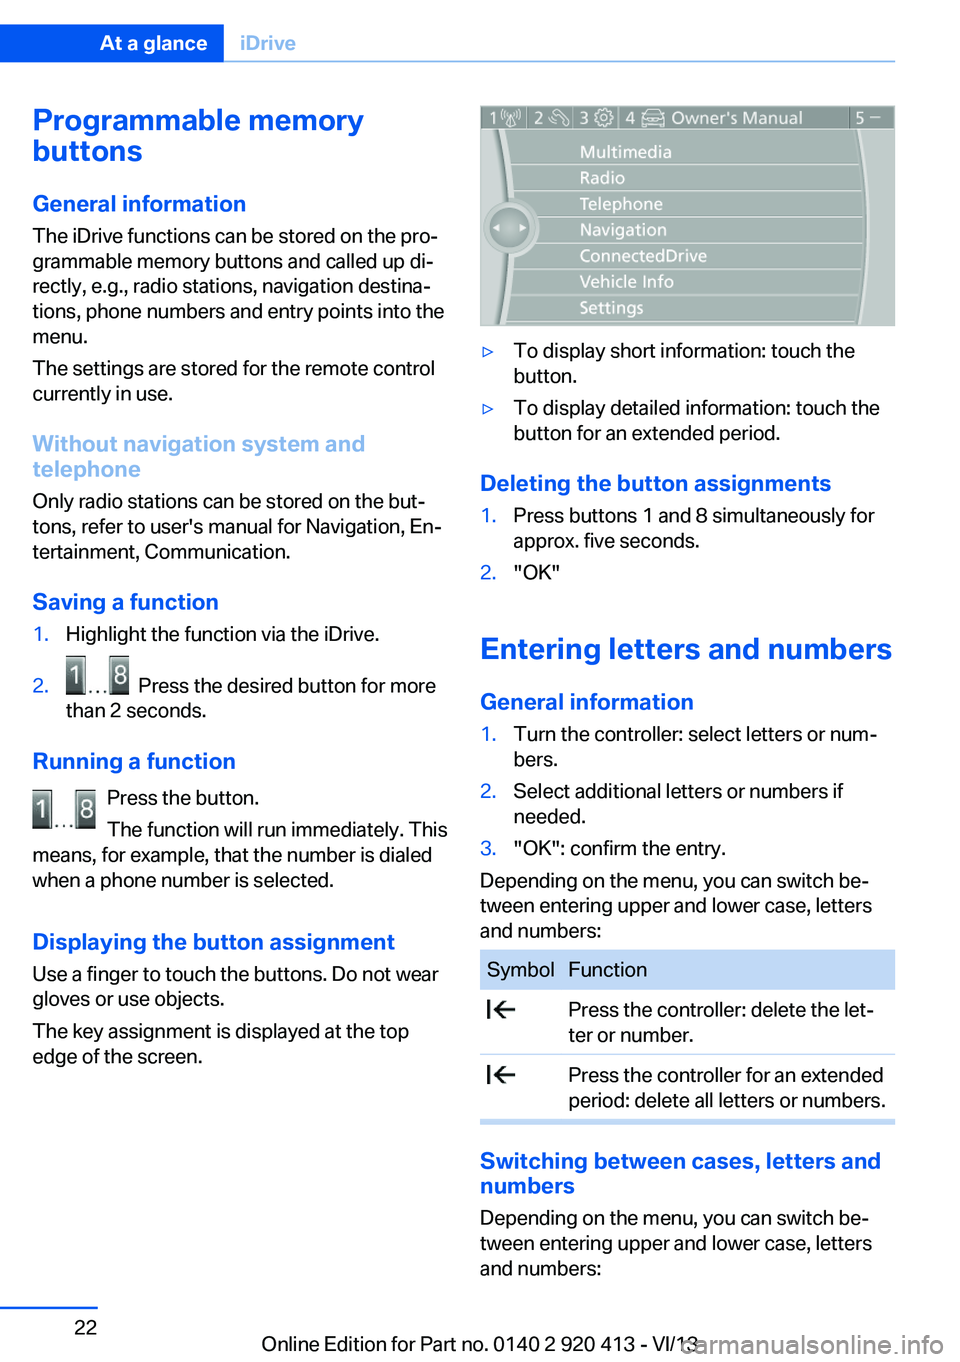
The iDrive functions can be stored on the pro‐
grammable memory buttons and called up di‐
rectly, e.g., radio stations, navigation destina‐
tions, phone numbers and entry points into the
menu.
The settings are stored for the remote control
currently in use.
Without navigation system and
telephone
Only radio stations can be stored on the but‐
tons, refer to user's manual for Navigation, En‐
tertainment, Communication.
Saving a function1.Highlight the function via the iDrive.2. Press the desired button for more
than 2 seconds.
Running a function
Press the button.
The function will run immediately. This
means, for example, that the number is dialed
when a phone number is selected.
Displaying the button assignment Use a finger to touch the buttons. Do not wear
gloves or use objects.
The key assignment is displayed at the top
edge of the screen.
▷To display short information: touch the
button.▷To display detailed information: touch the
button for an extended period.
Deleting the button assignments
1.Press buttons 1 and 8 simultaneously for
approx. five seconds.2."OK"
Entering letters and numbers
General information
1.Turn the controller: select letters or num‐
bers.2.Select additional letters or numbers if
needed.3."OK": confirm the entry.
Depending on the menu, you can switch be‐
tween entering upper and lower case, letters
and numbers:
SymbolFunction Press the controller: delete the let‐
ter or number. Press the controller for an extended
period: delete all letters or numbers.
Switching between cases, letters and
numbers
Depending on the menu, you can switch be‐
tween entering upper and lower case, letters
and numbers:
Seite 22At a glanceiDrive22
Online Edition for Part no. 0140 2 920 413 - VI/13
Page 33 of 240
New remote controlsYou can obtain new remote controls from your
service center.
Loss of the remote controls
Lost remote controls can be blocked by your
service center.
Emergency detection of remote
control
It is possible to switch on the ignition or start
the engine in situations such as the following:▷Interference of radio transmission to re‐
mote control by external sources.▷Discharged battery in the remote control.▷Interference of radio transmission by mo‐
bile devices in close proximity to the re‐
mote control.▷Interference of radio transmission by
charger while charging items such as mo‐
bile devices in the vehicle.
A Check Control message is displayed if an at‐
tempt is made to switch on the ignition or start
the engine.
Starting the engine with emergency
detection of the remote control
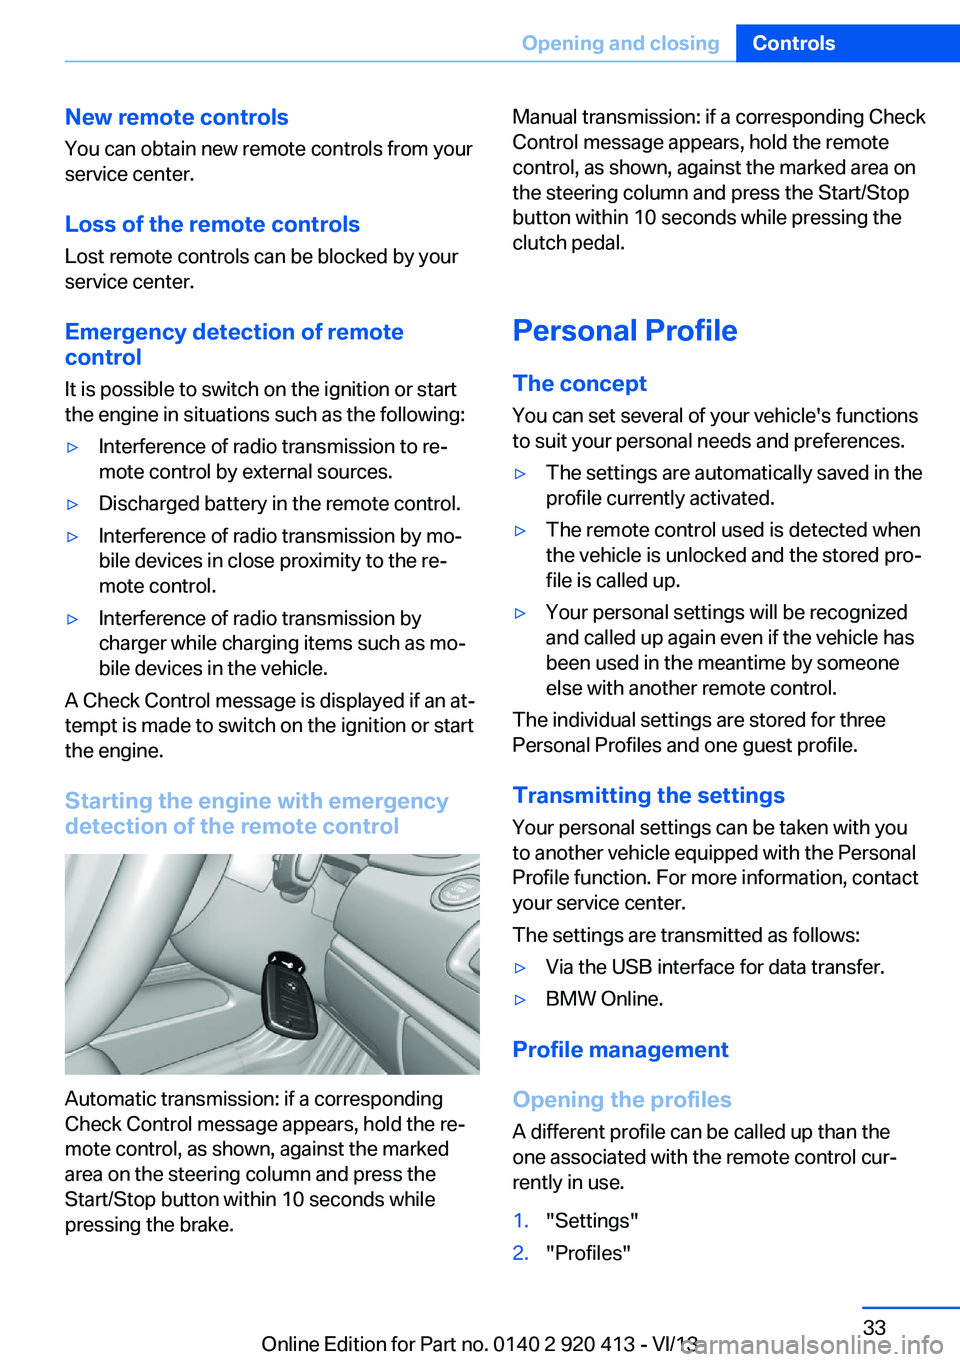
Automatic transmission: if a corresponding
Check Control message appears, hold the re‐
mote control, as shown, against the marked
area on the steering column and press the
Start/Stop button within 10 seconds while
pressing the brake.
Manual transmission: if a corresponding Check
Control message appears, hold the remote
control, as shown, against the marked area on
the steering column and press the Start/Stop
button within 10 seconds while pressing the
clutch pedal.
Personal Profile
The concept You can set several of your vehicle's functions
to suit your personal needs and preferences.▷The settings are automatically saved in the
profile currently activated.▷The remote control used is detected when
the vehicle is unlocked and the stored pro‐
file is called up.▷Your personal settings will be recognized
and called up again even if the vehicle has
been used in the meantime by someone
else with another remote control.
The individual settings are stored for three
Personal Profiles and one guest profile.
Transmitting the settings
Your personal settings can be taken with you
to another vehicle equipped with the Personal
Profile function. For more information, contact
your service center.
The settings are transmitted as follows:
▷Via the USB interface for data transfer.▷BMW Online.
Profile management
Opening the profiles A different profile can be called up than the
one associated with the remote control cur‐
rently in use.
1."Settings"2."Profiles"Seite 33Opening and closingControls33
Online Edition for Part no. 0140 2 920 413 - VI/13
Page 63 of 240
▷While the driver's seat belt is unbuckled, if
the driver's door is open and the low
beams are switched off.
When the ignition is switched off, by opening
or closing the driver's door or unbuckling the
driver's seat belt, the radio ready state remains
active.
Radio ready state
Activate radio ready state:
▷When the engine is running: press the
Start/Stop button.
Some electronic systems/power consumers
remain ready for operation.
The radio ready state switches off automati‐
cally:
▷After approx. 8 minutes.▷When the vehicle is locked using the cen‐
tral locking system.▷Shortly before the battery is discharged
completely, so that the engine can still be
started.
Starting the engine
Hints Enclosed areas
Do not let the engine run in enclosed
areas; otherwise, breathing of exhaust fumes may lead to loss of consciousness and death.
The exhaust gases contain carbon monoxide,
an odorless and colorless but highly toxic
gas.◀
Unattended vehicle
Do not leave the vehicle unattended with
the engine running; doing so poses a risk of
danger.
Before leaving the vehicle with the engine run‐
ning, set the parking brake and place the trans‐
mission in position P or neutral to prevent the
vehicle from moving.◀
Repeated starting in quick succession
Avoid repeated unsuccessful attempts to
start the vehicle or starting the vehicle several
times in quick succession. Otherwise, the fuel
is not burned or is inadequately burned, posing
a risk of overheating and damage to the cata‐
lytic converter.◀
Do not wait for the engine to warm-up while
the vehicle remains stationary. Start driving at
moderate engine speeds.
Manual transmission
Starting the engine1.Depress the brake pedal.2.Press on the clutch pedal and shift to neu‐
tral.3.Press the Start/Stop button.
The ignition is activated automatically for a
certain time and is stopped as soon as the en‐
gine starts.
Automatic transmission
Starting the engine
1.Depress the brake pedal.2.Press the Start/Stop button.
The ignition is activated automatically for a
certain time and is stopped as soon as the en‐
gine starts.
Engine stop
Hints Take the remote control with you
Take the remote control with you when
leaving the vehicle so that children, for exam‐
ple, cannot start the engine.◀
Seite 63DrivingControls63
Online Edition for Part no. 0140 2 920 413 - VI/13
Page 64 of 240
Set the parking brake and further secure
the vehicle as required
Set the parking brake firmly when parking; oth‐
erwise, the vehicle could roll. On steep upward
and downward inclines, further secure the ve‐
hicle, for example, by turning the steering
wheel in the direction of the curb. ◀
Before driving into a car wash In order for the vehicle to be able to roll into a
car wash, heed the information regarding
Washing in automatic car washes, refer to
page 220.
Manual transmission
Switching off the engine1.With the vehicle at a standstill, press the
Start/Stop button.2.Shift into first gear or reverse.3.Set the parking brake.
Automatic transmission
Switching off the engine
1.Engage transmission position P with the
vehicle stopped.2.Press the Start/Stop button.
The engine is switched off.
The radio ready state is switched on.3.Set the parking brake.
Automatic Engine Start/Stop
Function
The concept The Auto Start/Stop function helps save fuel.
The system switches off the engine during a
stop, e.g., in a traffic congestion or at traffic
lights. The ignition remains switched on. The
engine starts again automatically for driving
off.
Certain vehicle components may experience
additional wear as a result of this system.
Automatic mode
The Auto Start/Stop function is operational af‐
ter each engine start.
This function is activated at speeds faster than
about 3 mph, approx. 5 km/h.
Engine stop
The engine is switched off automatically dur‐
ing a stop under the following conditions:
Manual transmission:▷Neutral is engaged and the clutch pedal is
not pressed.▷The driver's seat belt is buckled or the driv‐
er's door is closed.
Automatic transmission:
▷The selector lever is in transmission posi‐
tion D.▷Brake pedal remains depressed while the
vehicle is stopped.▷The driver's seat belt is buckled or the driv‐
er's door is closed.
The air volume of the air conditioner is reduced
when the engine is switched off.
Displays in the instrument cluster The READY display in the tach‐
ometer signals that the Auto
Start/Stop function is ready to
start the engine automatically.
The display indicates that the
conditions for an automatic en‐
gine stop have not been satis‐
fied.
Note The engine is not switched off automatically in
the following situations:
Seite 64ControlsDriving64
Online Edition for Part no. 0140 2 920 413 - VI/13
Page 212 of 240
ter to ensure that all comfort functions are fully
available and that any Check Control mes‐
sages of these comfort functions are no longer
displayed.
Charging the battery
Note Do not plug chargers into the socketDo not connect battery chargers to the
factory-installed sockets in the vehicle as this
may damage the battery.◀
General information Make sure that the battery is always suffi‐
ciently charged to guarantee that the battery
remains usable for its full service life.
The battery may need to be charged in the fol‐
lowing cases:▷When making frequent short-distance
drives.▷If the vehicle is not used for prolonged pe‐
riods, longer than a month.
Starting aid terminals
In the vehicle, only charge the battery via the
starting aid terminals, refer to page 216, in the
engine compartment with the engine off.
Power failure After a temporary power loss, some equipment
needs to be reinitialized.
Individual settings need to be reprogrammed:
▷Seat and mirror memory: store the posi‐
tions again.▷Time: update.▷Date: update.▷Radio station: saving new, see user's
manual for Navigation, Entertainment and
Communication.▷Navigation system: wait for the operability
of the navigation.Disposing of old batteries
Have old batteries disposed of by your
service center or bring them to a recy‐
cling center.
Maintain the battery in an upright position for
transport and storage. Secure the battery so
that it does not tip over during transport.
Fuses Notes Replacing fuses
Never attempt to repair a blown fuse and
do not replace a defective fuse with a substi‐
tute of another color or amperage rating; this could lead to a circuit overload, ultimately re‐
sulting in a fire in the vehicle.◀
Plastic tweezers and information on the fuse
types and locations are stored in the fuse box
in the cargo area.
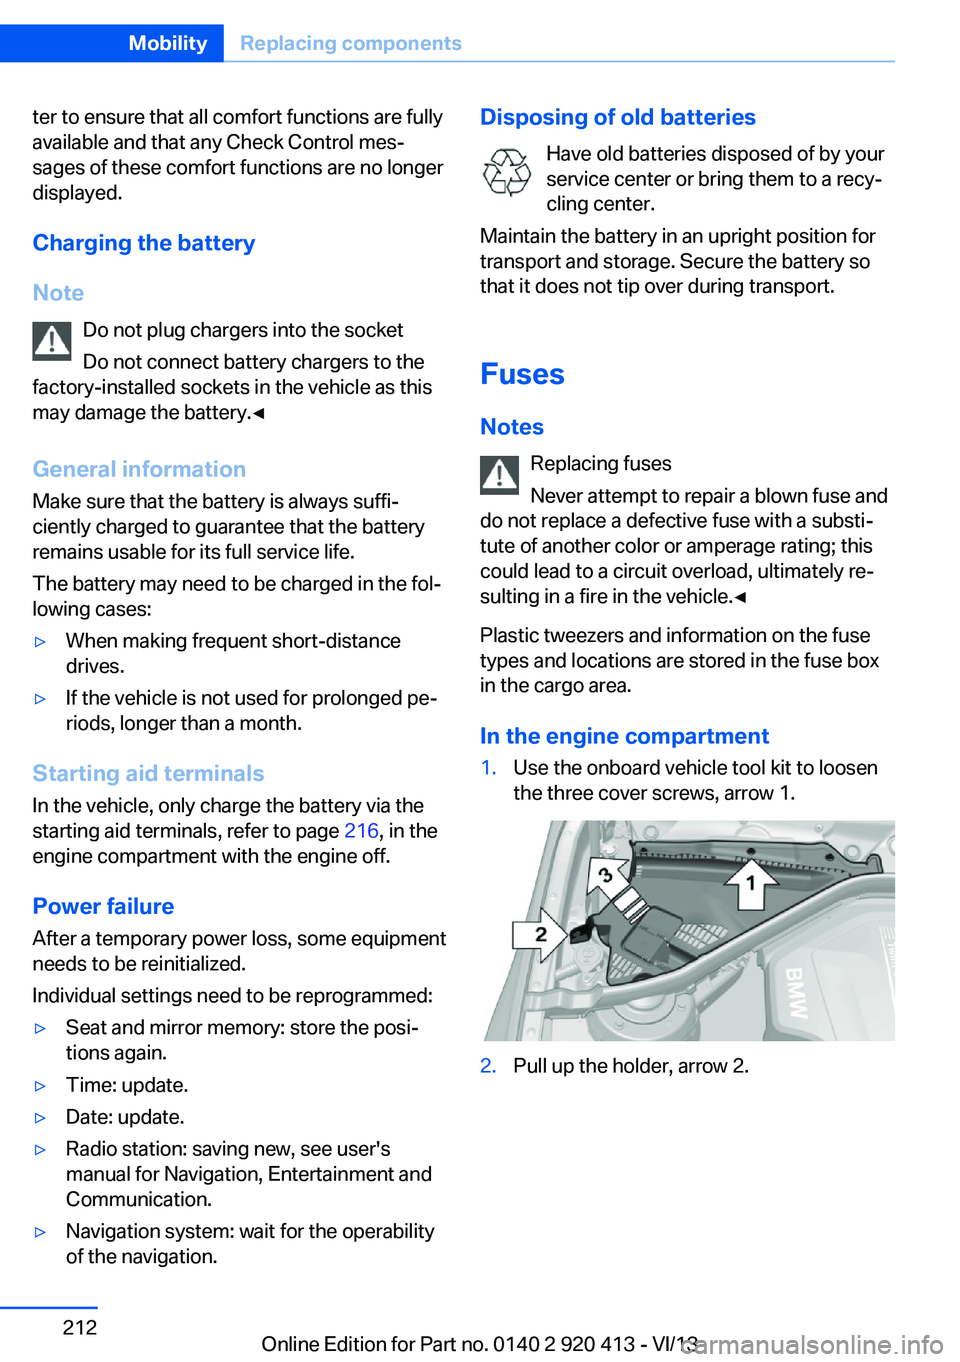
In the engine compartment1.Use the onboard vehicle tool kit to loosen
the three cover screws, arrow 1.2.Pull up the holder, arrow 2.Seite 212MobilityReplacing components212
Online Edition for Part no. 0140 2 920 413 - VI/13
Page 236 of 240
Passenger side mirror, tiltingdownward 55
Pathway lines, rearview cam‐ era 135
PDC Park Distance Con‐ trol 131
Pedestrian protection system, active 98
Pedestrian warning with city braking function 109
Permissible axle load 227
Personal Profile 33
Pinch protection system, glass sunroof 46
Pinch protection system, win‐ dows 45
Plastic, care 222
Power failure 212
Power windows 44
Pressure, tire air pres‐ sure 185
Pressure warning FTM, tires 102
Profile, refer to Personal Pro‐ file 33
Programmable memory but‐ tons, iDrive 22
Protective function, glass sunroof 46
Protective function, win‐ dows 45
Push-and-turn switch, refer to Controller 16, 17
R Radiator fluid 200
Radio-operated key, refer to Remote control 32
Radio ready state 63
Radio, see user's manual for Navigation, Entertainment
and Communication
Rain sensor 68
Rear lamps 209 Rear seat backrest, adjust‐
ing 161
Rear seat backrest tilt 161
Rear socket 158
Rear spoiler, active 119
Rearview mirror 55
Rear window de‐ froster 147, 150
Recirculated-air filter 151
Recirculated-air mode 147, 150
Recommended tire brands 193
Refueling 182
Remaining range 80
Remote control/key 32
Remote control, malfunc‐ tion 37
Remote control, univer‐ sal 153
Replacement fuse 212
Replacing parts 203
Replacing wheels/tires 192
Reporting safety defects 9
RES button 126
Reserve warning, refer to Range 80
Reset, Tire Pressure Monitor TPM 100
Retaining straps, securing cargo 172
Retreaded tires 193
Roadside parking lamps 91
RON gasoline quality 184
Roof load capacity 227
Roof-mounted luggage rack 172
Rope for tow-starting/ towing 218
RSC Run Flat System Com‐ ponent, refer to Run-flat
tires 194
Rubber components, care 222
Run-flat tires 194 S
Safe braking 169
Safety 7
Safety belt reminder for driv‐ er's seat and front passen‐
ger seat 52
Safety belts 51
Safety belts, care 223
Safety Package, refer to Ac‐ tive Protection 114
Safety switch, windows 45
Safety systems, airbags 95
Saving fuel 174
Screen, refer to Control Dis‐ play 16
Screwdriver 203
Screw thread for tow fit‐ ting 219
Seat and mirror memory 54
Seat belts, refer to Safety belts 51
Seat heating, front 51
Seat heating, rear 51
Seating position for chil‐ dren 58
Seats 48
Selection list in instrument cluster 85
Selector lever, automatic transmission 71
Sensors, care 223
Service and warranty 7
Service history 82
Service requirements, Condi‐ tion Based Service
CBS 201
Service requirements, dis‐ play 81
Service, Roadside Assis‐ tance 215
Services, ConnectedDrive
Settings, locking/unlock‐ ing 42
Settings on Control Dis‐ play 87 Seite 236ReferenceEverything from A to Z236
Online Edition for Part no. 0140 2 920 413 - VI/13