2014 BMW 328I XDRIVE SPORTS WAGON height
[x] Cancel search: heightPage 36 of 244
Panic mode
You can trigger the alarm system if you find
yourself in a dangerous situation.
Press the button on the remote con‐
trol for at least 3 seconds.
To switch off the alarm: press any button.
Opening the tailgate Press the button on the remote con‐
trol for approx. 1 second.
The tailgate opens automatically, regardless of
whether the vehicle is locked or unlocked.
Note the opening height of the tailgate
The tailgate pivots back and up when it
opens. Ensure that there is sufficient clearance
when the tailgate opens; otherwise, damage
may result.◀
Depending on how the vehicle is equipped and
the country-specific variant, you can set
whether the doors are also unlocked.
Do not place the remote control in the
cargo area
Take the remote control with you and do not
leave it in the cargo area; otherwise, the re‐
mote control is locked inside the vehicle when
the tailgate is closed.◀
Provide edge protection
Sharp or angular objects can hit the rear
window while driving and damage the heating
wires of the rear window. Provide edge protec‐
tion.◀
Malfunction
If the vehicle can no longer be locked or un‐
locked with the remote control, the battery
may be discharged or there may be interfer‐
ence from external sources such as mobile
phones, metal objects, overhead power lines,
transmission towers, etc.In this case, lock/unlock the vehicle without the
remote control, refer to page 36.
For US owners only The transmitter and receiver units comply with
part 15 of the FCC/Federal Communication
Commission regulations. Operation is gov‐
erned by the following:
FCC ID:▷LX8766S.▷LX8766E.▷LX8CAS.▷LX8CAS2.▷MYTCAS4.
Compliance statement:
This device complies with part 15 of the FCC
Rules. Operation is subject to the following
two conditions:
▷This device may not cause harmful inter‐
ference, and▷this device must accept any interference
received, including interference that may
cause undesired operation.
Any unauthorized modifications or changes to
these devices could void the user's authority to
operate this equipment.
Without remote control
From the outside Locking from the outside
Do not lock the vehicle from the outside
if there are people in it, as the vehicle cannot
be unlocked from inside without special knowl‐
edge.◀
Remove the key before pulling the door
handle
Before pulling the outside door handle, remove
the key to avoid damaging the paintwork and
the key.◀
Seite 36ControlsOpening and closing36
Online Edition for Part no. 01 40 2 925 793 - II/14
Page 37 of 244
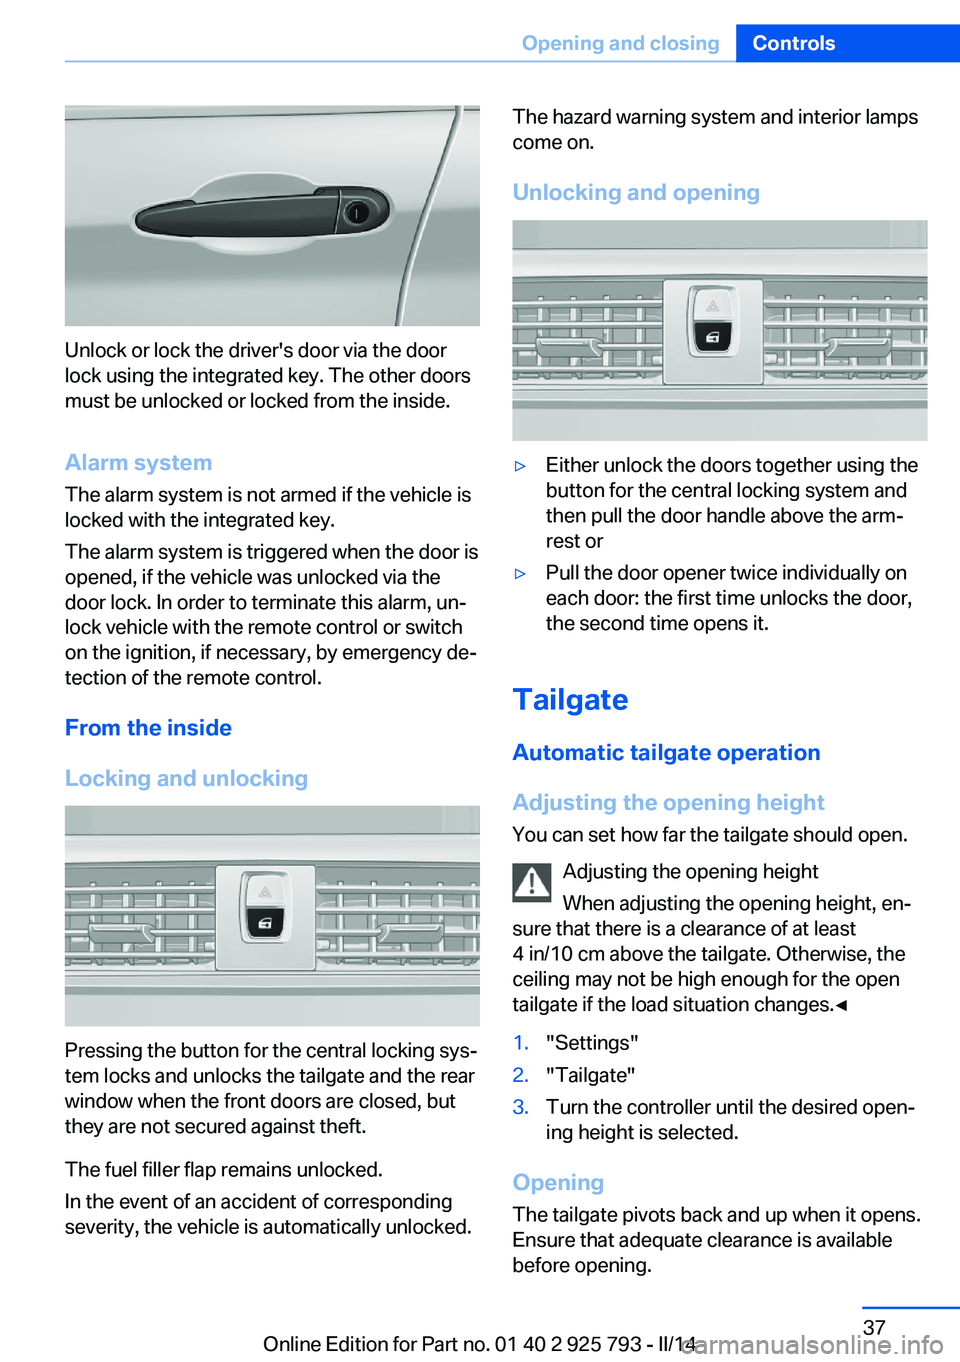
Unlock or lock the driver's door via the door
lock using the integrated key. The other doors
must be unlocked or locked from the inside.
Alarm system
The alarm system is not armed if the vehicle is
locked with the integrated key.
The alarm system is triggered when the door is
opened, if the vehicle was unlocked via the
door lock. In order to terminate this alarm, un‐
lock vehicle with the remote control or switch
on the ignition, if necessary, by emergency de‐
tection of the remote control.
From the inside
Locking and unlocking
Pressing the button for the central locking sys‐
tem locks and unlocks the tailgate and the rear
window when the front doors are closed, but
they are not secured against theft.
The fuel filler flap remains unlocked.
In the event of an accident of corresponding
severity, the vehicle is automatically unlocked.
The hazard warning system and interior lamps
come on.
Unlocking and opening▷Either unlock the doors together using the
button for the central locking system and
then pull the door handle above the arm‐
rest or▷Pull the door opener twice individually on
each door: the first time unlocks the door,
the second time opens it.
Tailgate
Automatic tailgate operation
Adjusting the opening height
You can set how far the tailgate should open.
Adjusting the opening height
When adjusting the opening height, en‐
sure that there is a clearance of at least
4 in/10 cm above the tailgate. Otherwise, the
ceiling may not be high enough for the open
tailgate if the load situation changes.◀
1."Settings"2."Tailgate"3.Turn the controller until the desired open‐
ing height is selected.
Opening
The tailgate pivots back and up when it opens.
Ensure that adequate clearance is available
before opening.
Seite 37Opening and closingControls37
Online Edition for Part no. 01 40 2 925 793 - II/14
Page 38 of 244
Note the opening height of the tailgate
The tailgate pivots back and up when it
opens. Ensure that there is sufficient clearance
when the tailgate opens; otherwise, damage
may result.
Adjust the opening height of the tailgate ac‐
cording to the given situation.◀
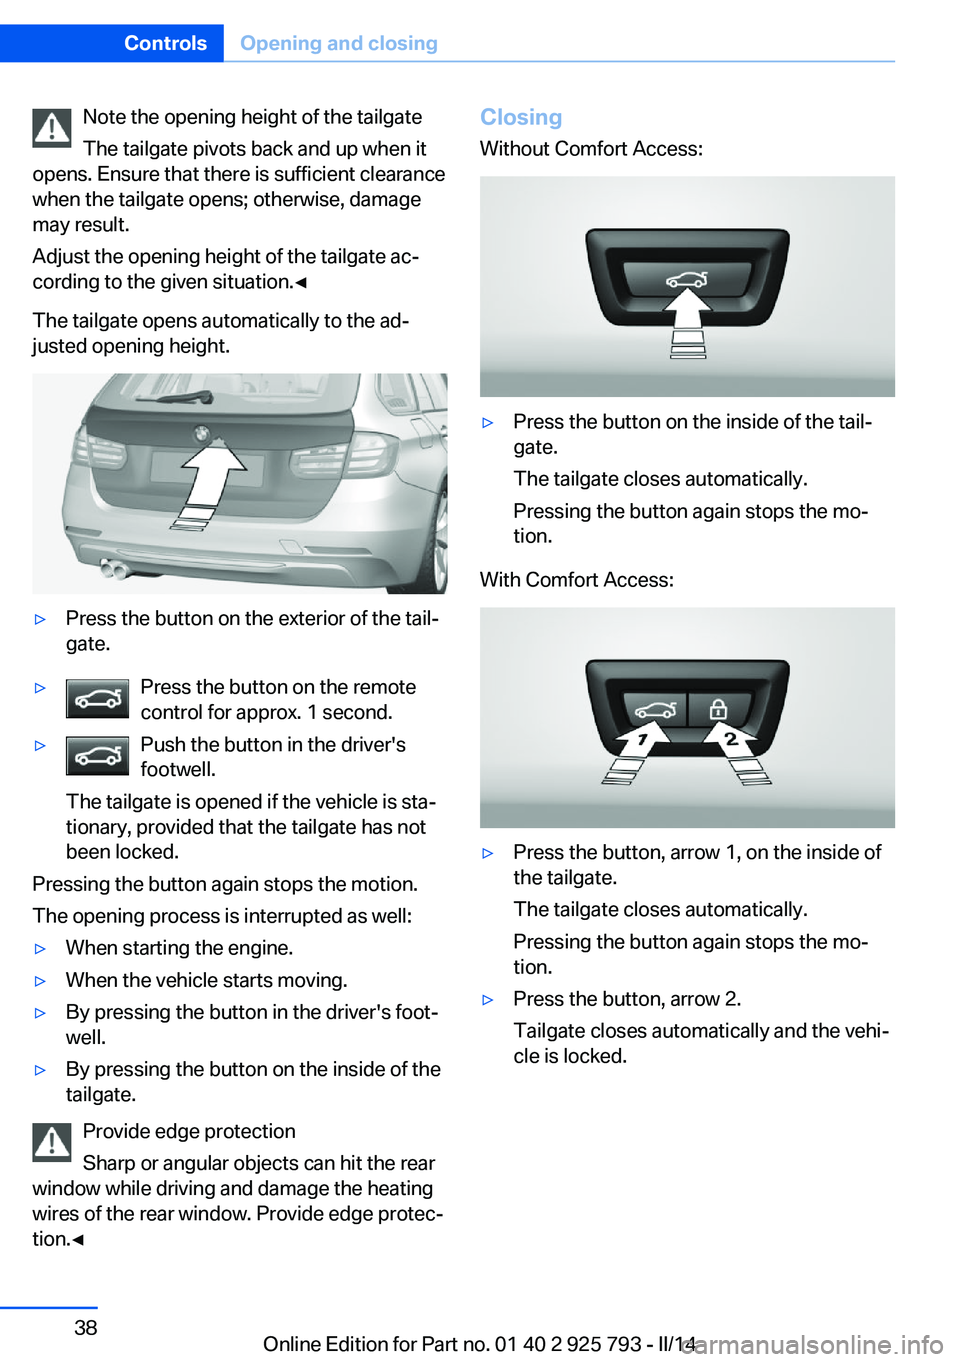
The tailgate opens automatically to the ad‐
justed opening height.▷Press the button on the exterior of the tail‐
gate.▷Press the button on the remote
control for approx. 1 second.▷Push the button in the driver's
footwell.
The tailgate is opened if the vehicle is sta‐
tionary, provided that the tailgate has not
been locked.
Pressing the button again stops the motion.
The opening process is interrupted as well:
▷When starting the engine.▷When the vehicle starts moving.▷By pressing the button in the driver's foot‐
well.▷By pressing the button on the inside of the
tailgate.
Provide edge protection
Sharp or angular objects can hit the rear
window while driving and damage the heating
wires of the rear window. Provide edge protec‐
tion.◀
Closing
Without Comfort Access:▷Press the button on the inside of the tail‐
gate.
The tailgate closes automatically.
Pressing the button again stops the mo‐
tion.
With Comfort Access:
▷Press the button, arrow 1, on the inside of
the tailgate.
The tailgate closes automatically.
Pressing the button again stops the mo‐
tion.▷Press the button, arrow 2.
Tailgate closes automatically and the vehi‐
cle is locked.Seite 38ControlsOpening and closing38
Online Edition for Part no. 01 40 2 925 793 - II/14
Page 48 of 244
AdjustingVehicle equipment
All standard, country-specific and optional
equipment that is offered in the model series is
described in this chapter. Therefore, equip‐
ment is also described that is not available in a
vehicle, e. g., because of the selected optional
equipment or country variant. This also applies
for safety-related functions and systems.
Sitting safely The ideal seating position can make a vital
contribution to relaxed, fatigue-free driving.
The seating position plays an important role in
an accident in combination with:▷Safety belts, refer to page 51.▷Head restraints, refer to page 52.▷Airbags, refer to page 95.
Seats
Hints Do not adjust the seat while driving
Do not adjust the driver's seat while driv‐
ing, or the seat could respond with unexpected
movement and the ensuing loss of vehicle
control could lead to an accident.◀
Do not incline the backrest too far to the
rear
Also on the front passenger side, do not incline
the backrest on the front passenger side too far to the rear during driving, or there is a risk of
slipping under the safety belt in the event of an
accident. This would eliminate the protection
normally provided by the belt.◀
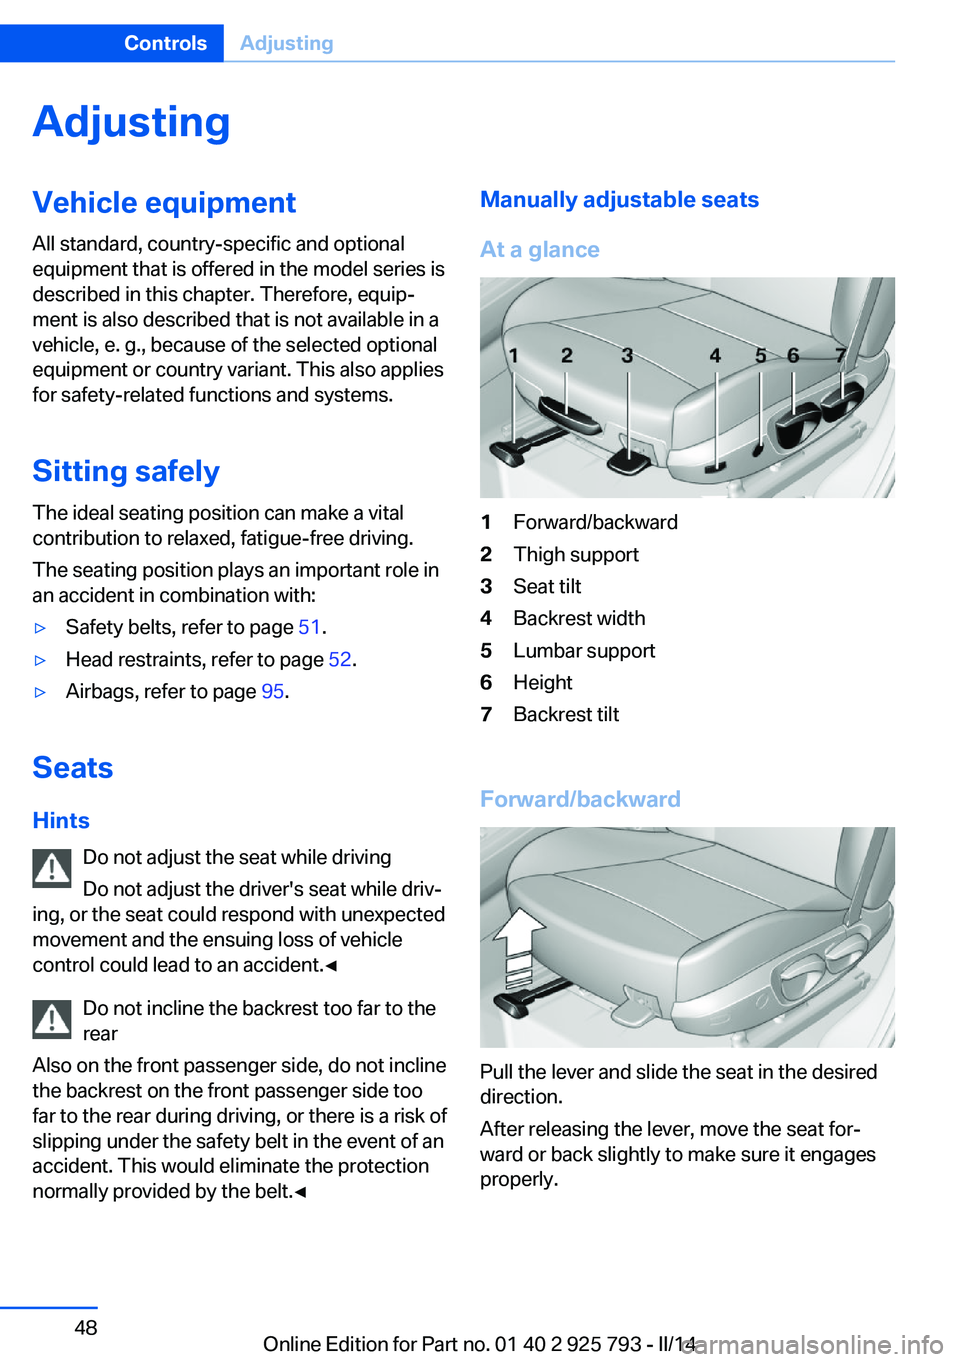
Manually adjustable seats
At a glance1Forward/backward2Thigh support3Seat tilt4Backrest width5Lumbar support6Height7Backrest tilt
Forward/backward
Pull the lever and slide the seat in the desired
direction.
After releasing the lever, move the seat for‐
ward or back slightly to make sure it engages
properly.
Seite 48ControlsAdjusting48
Online Edition for Part no. 01 40 2 925 793 - II/14
Page 49 of 244
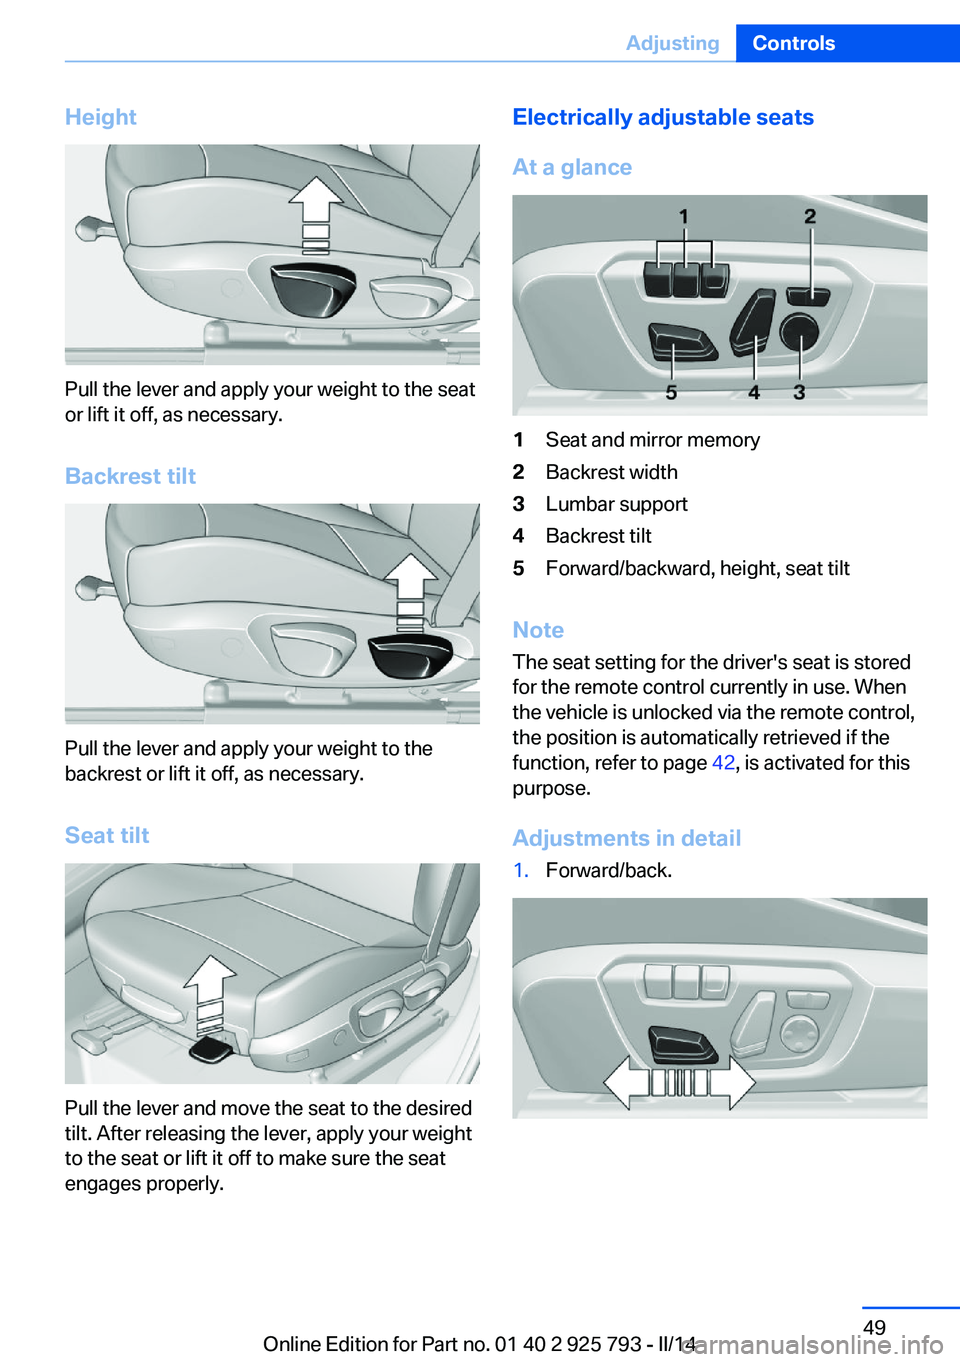
Height
Pull the lever and apply your weight to the seat
or lift it off, as necessary.
Backrest tilt
Pull the lever and apply your weight to the
backrest or lift it off, as necessary.
Seat tilt
Pull the lever and move the seat to the desired
tilt. After releasing the lever, apply your weight
to the seat or lift it off to make sure the seat
engages properly.
Electrically adjustable seats
At a glance1Seat and mirror memory2Backrest width3Lumbar support4Backrest tilt5Forward/backward, height, seat tilt
Note The seat setting for the driver's seat is stored
for the remote control currently in use. When
the vehicle is unlocked via the remote control,
the position is automatically retrieved if the
function, refer to page 42, is activated for this
purpose.
Adjustments in detail
1.Forward/back.Seite 49AdjustingControls49
Online Edition for Part no. 01 40 2 925 793 - II/14
Page 50 of 244
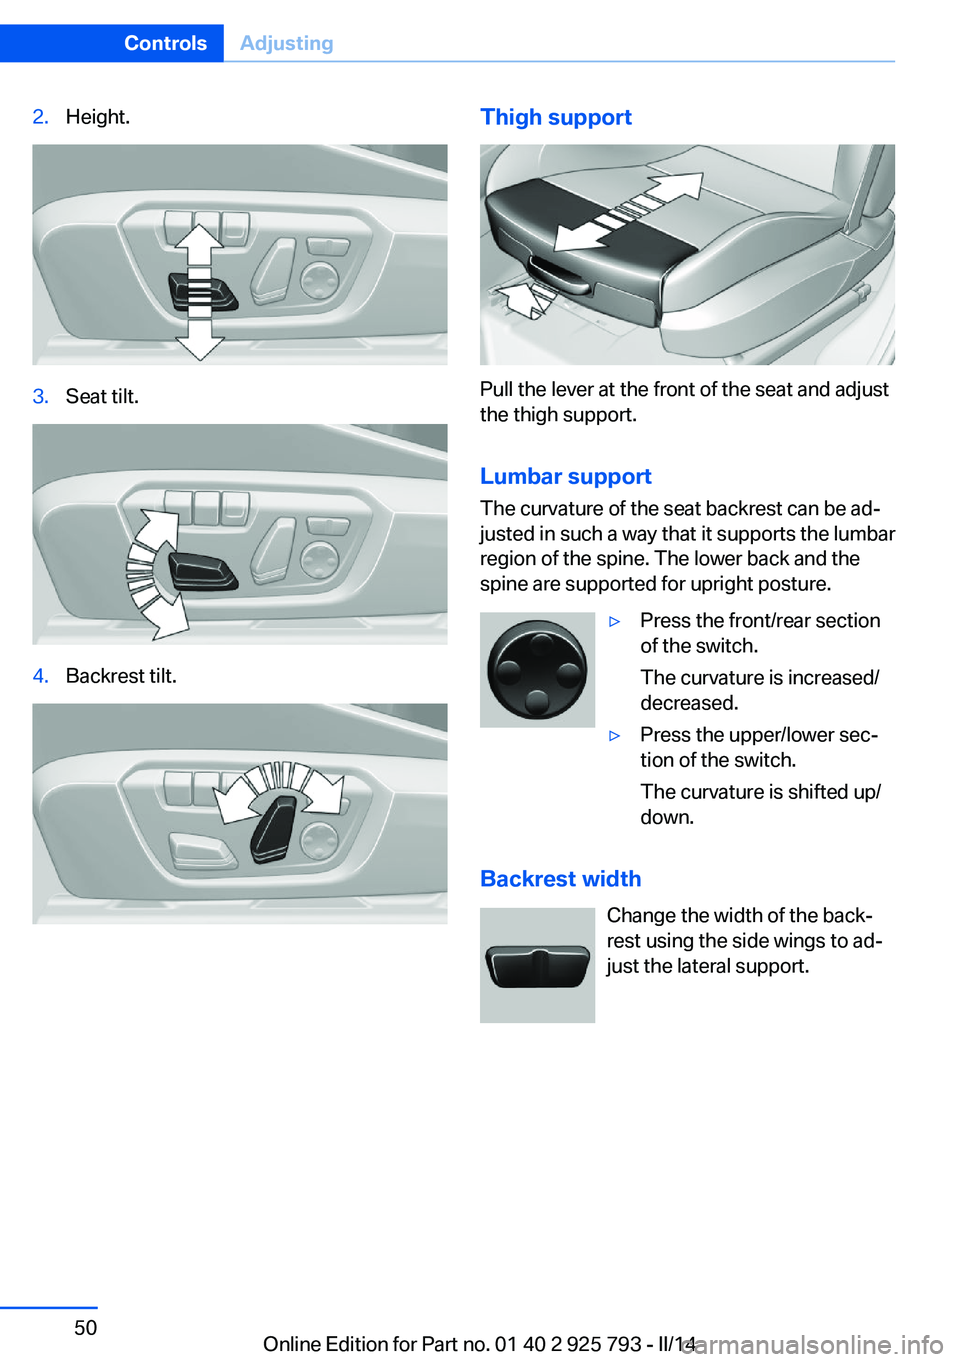
2.Height.3.Seat tilt.4.Backrest tilt.Thigh support
Pull the lever at the front of the seat and adjust
the thigh support.
Lumbar support The curvature of the seat backrest can be ad‐
justed in such a way that it supports the lumbar
region of the spine. The lower back and the
spine are supported for upright posture.
▷Press the front/rear section
of the switch.
The curvature is increased/
decreased.▷Press the upper/lower sec‐
tion of the switch.
The curvature is shifted up/
down.
Backrest width
Change the width of the back‐
rest using the side wings to ad‐
just the lateral support.
Seite 50ControlsAdjusting50
Online Edition for Part no. 01 40 2 925 793 - II/14
Page 52 of 244
One person per safety belt
Never allow more than one person to
wear a single safety belt. Never allow infants or
small children to ride on a passenger's lap.◀
Putting on the belt
Lay the belt, without twisting, snugly
across the lap and shoulders, as close to the
body as possible. Make sure that the belt lies
low around the hips in the lap area and does
not press on the abdomen. Otherwise, the belt
can slip over the hips in the lap area in a frontal
impact and injure the abdomen.
The safety belt must not lie across the neck,
rub on sharp edges, be routed over breakable
objects, or be pinched.◀
Reduction of restraining effect
Avoid wearing bulky clothing, and pull
the shoulder belt periodically to readjust the
tension. Make sure that the belt is not jammed;
otherwise, the belt can be damaged and the
restraining effect reduced.◀
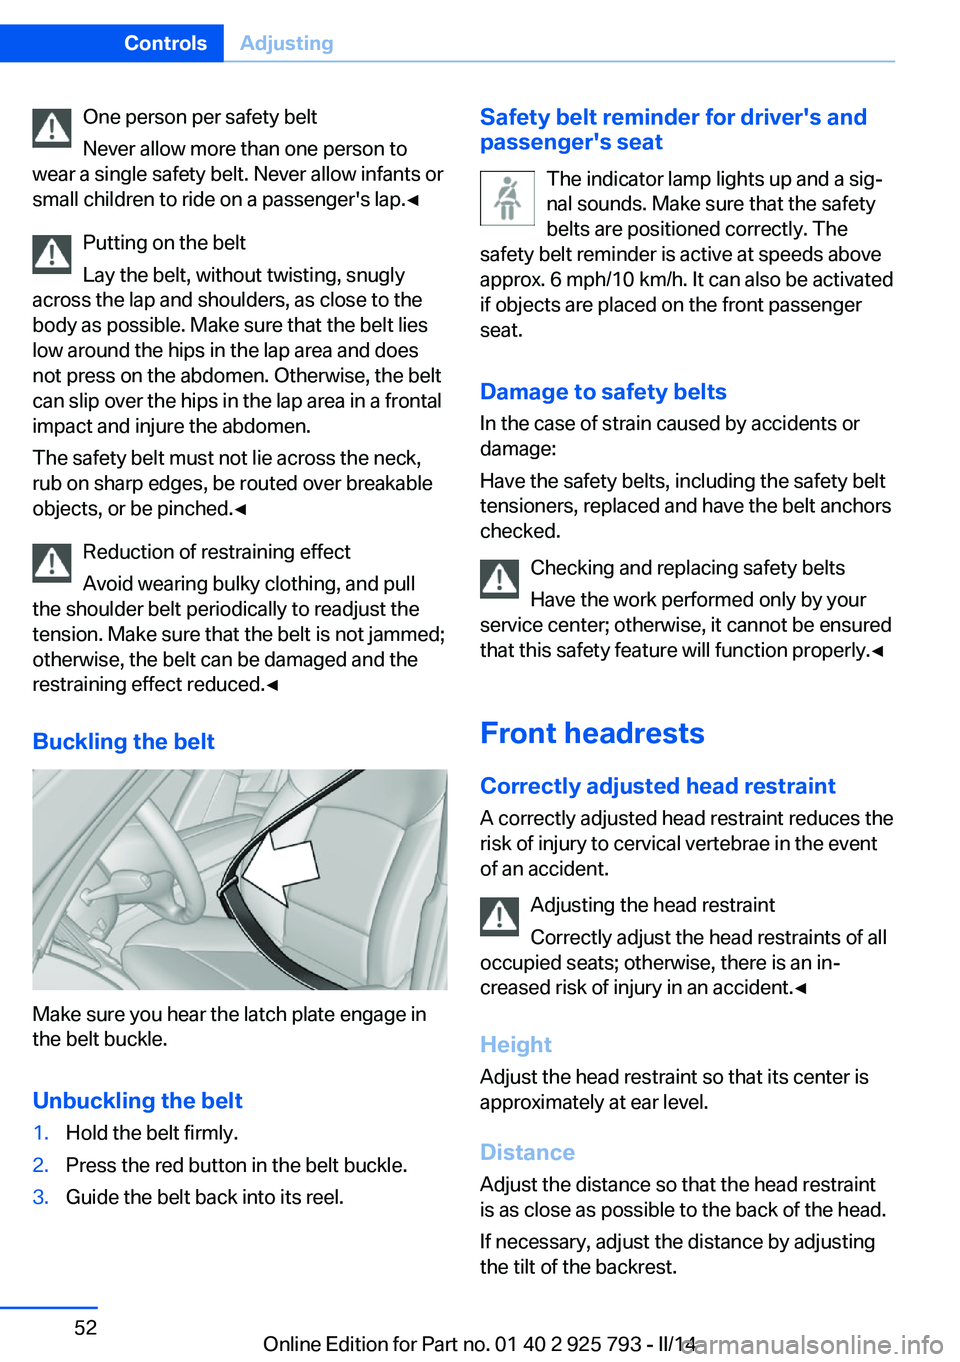
Buckling the belt
Make sure you hear the latch plate engage in
the belt buckle.
Unbuckling the belt
1.Hold the belt firmly.2.Press the red button in the belt buckle.3.Guide the belt back into its reel.Safety belt reminder for driver's and
passenger's seat
The indicator lamp lights up and a sig‐
nal sounds. Make sure that the safety
belts are positioned correctly. The
safety belt reminder is active at speeds above
approx. 6 mph/10 km/h. It can also be activated
if objects are placed on the front passenger
seat.
Damage to safety belts In the case of strain caused by accidents or
damage:
Have the safety belts, including the safety belt
tensioners, replaced and have the belt anchors
checked.
Checking and replacing safety belts
Have the work performed only by your
service center; otherwise, it cannot be ensured
that this safety feature will function properly.◀
Front headrests
Correctly adjusted head restraint A correctly adjusted head restraint reduces the
risk of injury to cervical vertebrae in the event
of an accident.
Adjusting the head restraint
Correctly adjust the head restraints of all
occupied seats; otherwise, there is an in‐
creased risk of injury in an accident.◀
Height
Adjust the head restraint so that its center is
approximately at ear level.
Distance Adjust the distance so that the head restraint
is as close as possible to the back of the head.
If necessary, adjust the distance by adjusting
the tilt of the backrest.Seite 52ControlsAdjusting52
Online Edition for Part no. 01 40 2 925 793 - II/14
Page 53 of 244
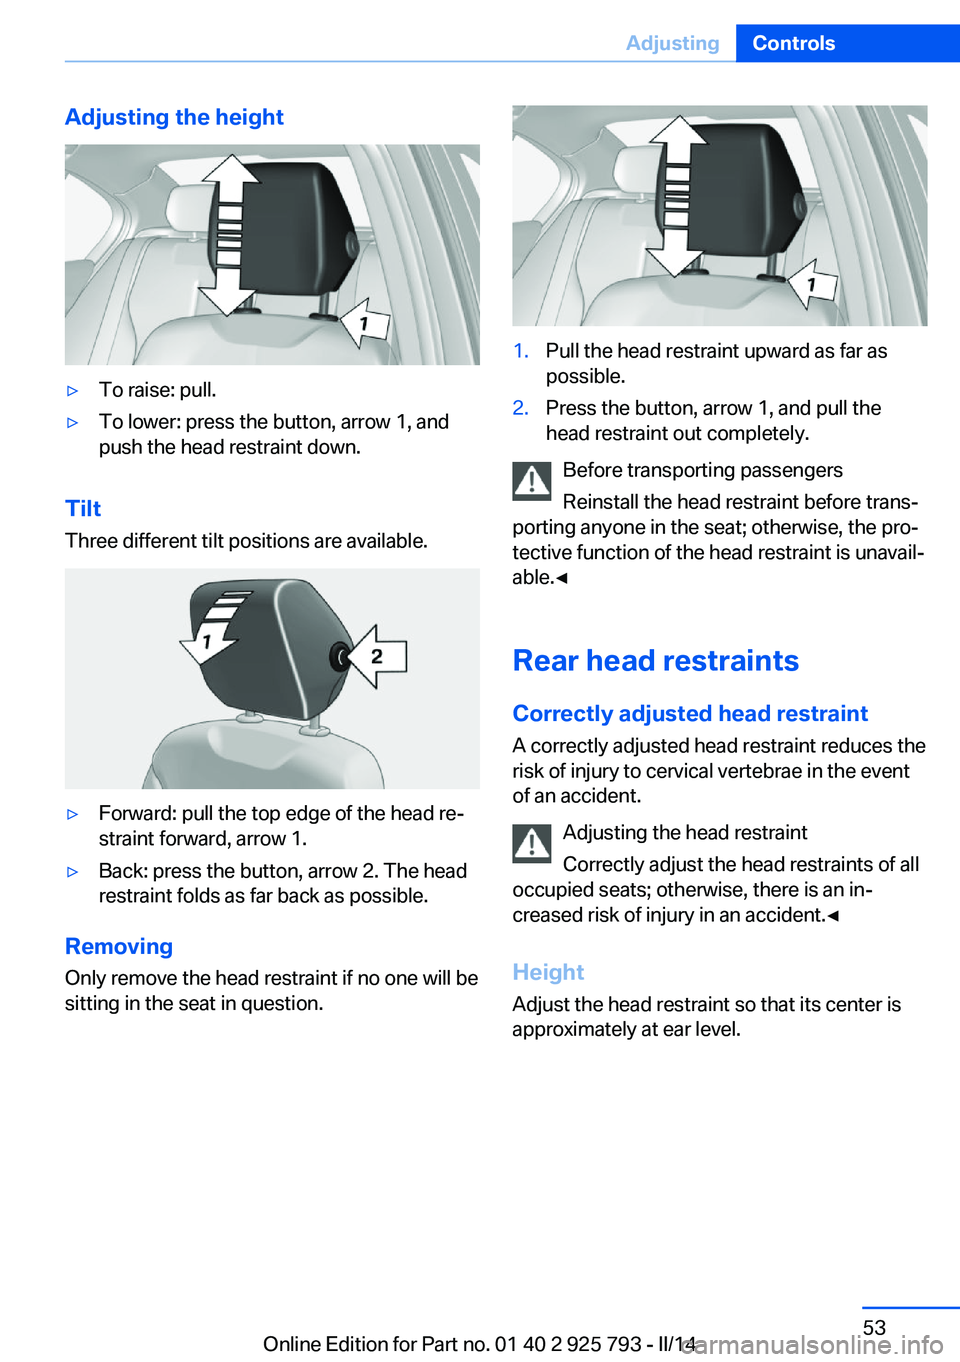
Adjusting the height▷To raise: pull.▷To lower: press the button, arrow 1, and
push the head restraint down.
Tilt
Three different tilt positions are available.
▷Forward: pull the top edge of the head re‐
straint forward, arrow 1.▷Back: press the button, arrow 2. The head
restraint folds as far back as possible.
Removing
Only remove the head restraint if no one will be
sitting in the seat in question.
1.Pull the head restraint upward as far as
possible.2.Press the button, arrow 1, and pull the
head restraint out completely.
Before transporting passengers
Reinstall the head restraint before trans‐
porting anyone in the seat; otherwise, the pro‐
tective function of the head restraint is unavail‐
able.◀
Rear head restraints
Correctly adjusted head restraint
A correctly adjusted head restraint reduces the
risk of injury to cervical vertebrae in the event
of an accident.
Adjusting the head restraint
Correctly adjust the head restraints of all
occupied seats; otherwise, there is an in‐
creased risk of injury in an accident.◀
Height
Adjust the head restraint so that its center is
approximately at ear level.
Seite 53AdjustingControls53
Online Edition for Part no. 01 40 2 925 793 - II/14