2014 BMW 2 SERIES interior light
[x] Cancel search: interior lightPage 145 of 228

▷Do not connect devices such as fans or
lights to the USB interface.▷Do not connect USB hard drives.▷Do not use the USB interface for recharg‐
ing external devices.
Without telephone: overview
The USB interface is located in the glove com‐
partment.
With telephone: overview
The USB interface is located in the center arm‐
rest.
Through-loading system The concept The cargo area can be enlarged by folding
down the rear seat backrest.
The rear seat backrest is divided into two parts at a ratio of 60 to 40.
If equipped with through-loading system: the
rear seat backrest is divided in the ratio 40–20–
40.
The sides can be folded down separately or to‐
gether.
Hints Danger of jamming
Before folding down the rear seat back‐
rests, ensure that the area of movement of the
backrests is clear. In particular, ensure that no
one is located in or reaches into the area of
movement of the rear seat backrests when the
middle section is folded down. Otherwise, in‐
jury or damage may result.◀
Ensuring the stability of the child seat
When installing child restraint systems,
make sure that the child seat is securely fas‐
tened to the backrest of the seat. Angle and
headrest of the backrest might need to be ad‐
justed or possibly be removed. Make sure that
all backrests are securely locked. Otherwise
the stability of the child seat can be affected,
and there is an increased risk of injury because
of unexpected movement of the rear seat
backrest.◀
Retract the head restraint if needed be‐
fore backrest is folded down
With folding head restraints, fold in the head
restraints before folding down the rear seat
backrests, or damage may result.◀Seite 141Interior equipmentControls141
Online Edition for Part no. 01 40 2 956 568 - X/14
Page 146 of 228

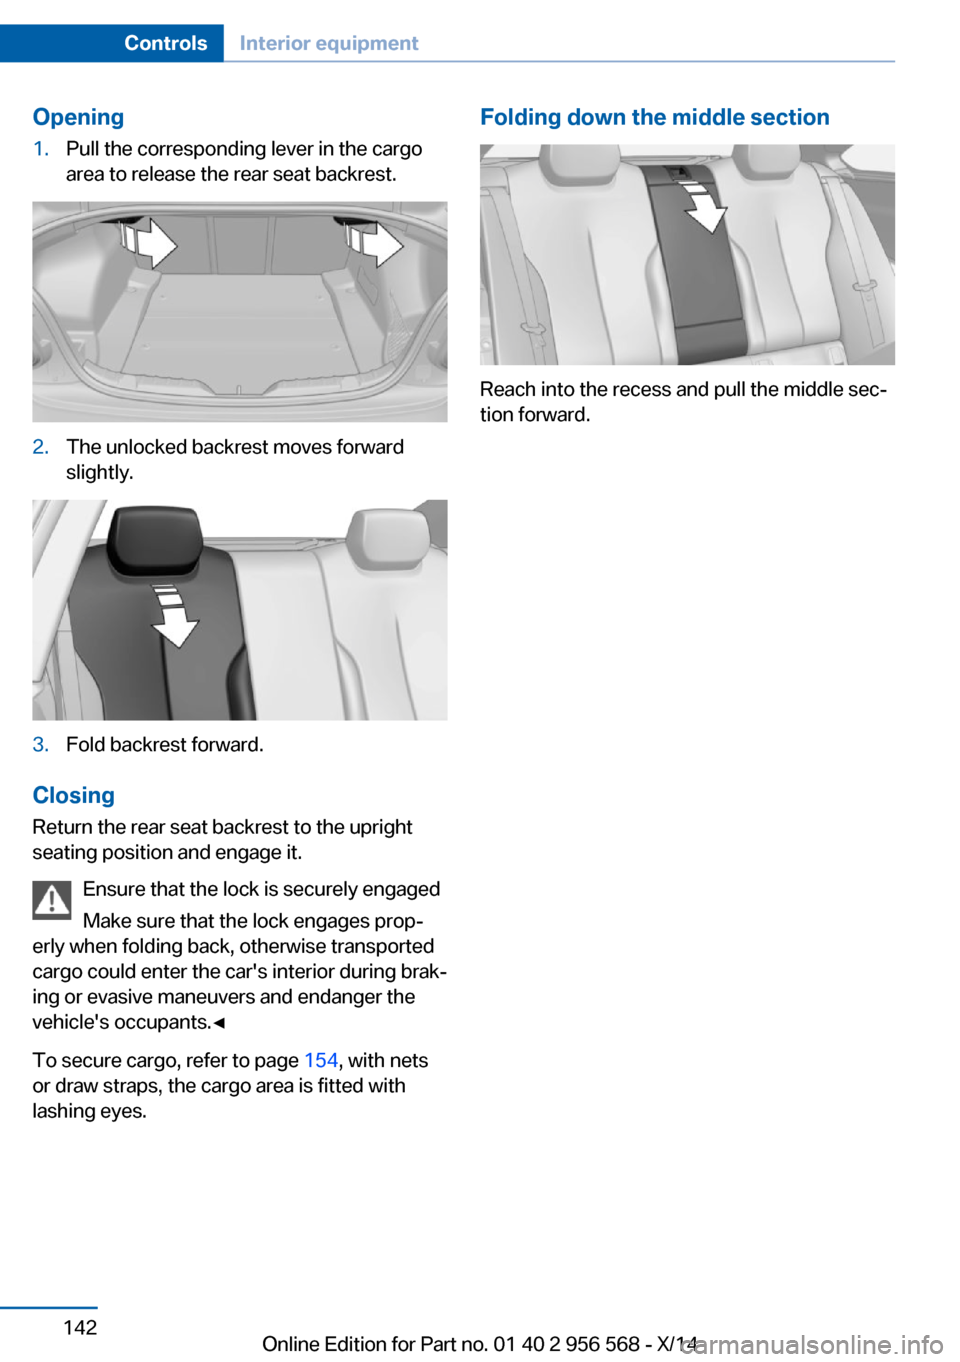
Opening1.Pull the corresponding lever in the cargo
area to release the rear seat backrest.2.The unlocked backrest moves forward
slightly.3.Fold backrest forward.
Closing
Return the rear seat backrest to the upright
seating position and engage it.
Ensure that the lock is securely engaged
Make sure that the lock engages prop‐
erly when folding back, otherwise transported
cargo could enter the car's interior during brak‐
ing or evasive maneuvers and endanger the
vehicle's occupants.◀
To secure cargo, refer to page 154, with nets
or draw straps, the cargo area is fitted with
lashing eyes.
Folding down the middle section
Reach into the recess and pull the middle sec‐
tion forward.
Seite 142ControlsInterior equipment142
Online Edition for Part no. 01 40 2 956 568 - X/14
Page 147 of 228

Storage compartmentsVehicle features and optionsThis chapter describes all standard, country-
specific and optional features offered with the
series. It also describes features that are not
necessarily available in your car, e. g., due to
the selected options or country versions. This
also applies to safety-related functions and
systems.
Hints No loose objects in the car's interior
Do not stow any objects in the car's inte‐
rior without securing them; otherwise, they
may present a danger to occupants e.g., during
braking and evasive maneuvers.◀
Do not place anti-slip mats on the dash‐
board
Do not place anti-slip mats on the dashboard.
The mat materials could damage the dash‐
board.◀
Storage compartments The following storage compartments are avail‐
able in the vehicle interior:▷Glove compartment on the front passenger
side, refer to page 143.▷Glove compartment on the driver's side,
refer to page 144.▷Compartments in the doors, refer to
page 144.▷Without Smoker's package: Front storage
compartment, in front of the cupholders,
refer to page 144.▷Storage compartment in the front center
armrest, refer to page 144.▷Nets on the backrests of the front seats.▷Storage compartment in the rear center
console, refer to page 145.▷Storage compartment between the rear
seats, refer to page 145.
Glove compartment
Front passenger side
Note Close the glove compartment again im‐
mediately
Close the glove compartment immediately af‐
ter use while driving; otherwise, injury may oc‐
cur during accidents.◀
Opening
Pull the handle.
The light in the glove compartment switches
on.
ClosingFold cover closed.
Locking
The glove compartment can be locked with an
integrated key to separately secure the trunk
lid, refer to page 40, e.g.
Seite 143Storage compartmentsControls143
Online Edition for Part no. 01 40 2 956 568 - X/14
Page 162 of 228

The achieved extended range is displayed in
the instrument cluster as bonus range.
At a glance
The system includes the following
EfficientDynamics functions and displays:▷ECO PRO bonus range, refer to page 158.▷ECO PRO tips driving instruction, refer to
page 159▷ECO PRO climate control, refer to
page 158.▷ECO PRO coasting driving status, refer to
page 160.▷ECO PRO driving style analysis, refer to
page 161.
Activate ECO PRO
Press button repeatedly until ECO
PRO is displayed in the instrument
cluster.
Configuring ECO PRO
Via the Driving Dynamics Control
1.Activate ECO PRO.2."Configure ECO PRO"3.Configure the program.
Via the iDrive
1."Settings"2."ECO PRO mode"
Or
1."Settings"2."Driving mode"3."Configure ECO PRO"
Configure the program.
ECO PRO Tip
▷"Tip at:":
Adjust the ECO PRO speed.▷"ECO PRO speed warning":
The output is reduced once the set ECO
PRO speed is reached.
Coasting
Fuel-efficiency can be optimized by disengag‐
ing the engine and Coasting, refer to
page 160, with the engine idling.
This function is only available in ECO PRO
mode.
ECO PRO climate control
"ECO PRO climate control"
Climate control is set to be fuel-efficient.
By making a slight change to the set tempera‐
ture, or slowly adjusting the rate of heating or
cooling of the car's interior, fuel consumption
can be economized.
The mirror heating is made available when out‐
side temperatures are very cold.
ECO PRO potential Shows potential savings with the current set‐
tings in percentages.
Display in the instrument cluster
ECO PRO bonus range An adjusted driving style helps
you extend your driving range.
This may be displayed as the
bonus range in the instrument
cluster.
The bonus range is shown in the range display.
The bonus range is automatically reset every
time the vehicle is refueled.
Seite 158Driving tipsSaving fuel158
Online Edition for Part no. 01 40 2 956 568 - X/14
Page 208 of 228

3.Switch the engine off.4.Switch on the ignition.
Steptronic transmission:
1.Drive into the car wash.2.Engage selector lever position N.3.Switch the engine off.
In this way, the ignition remains switched
on, and a Check-Control message is dis‐
played.
Do not turn off the ignition in the car
wash
Do not turn off the ignition in the car wash;
otherwise, selector lever position P is en‐
gaged and damages can result.◀
The vehicle cannot be locked from the outside
when in selector lever position N. A signal
sounds when an attempt is made to lock the
vehicle.
To start the engine with manual transmission:
1.Press on the clutch pedal.2.Press the Start/Stop button.
To start the engine with Steptronic transmis‐
sion:
1.Depress the brake pedal.2.Press the Start/Stop button.
Pressing the Start/Stop button without step‐
ping on the brake turns the ignition off.
Selector lever positionSelector lever position P is engaged automati‐
cally:
▷When the ignition is switched off.▷After approx. 15 minutes.
Headlights
▷Do not rub dry and do not use abrasive or
acidic cleansers.▷Soak areas that have been dirtied e. g.,
from insects, with shampoo and wash off
with water.▷Thaw ice with de-icing spray; do not use an
ice scraper.
After washing the vehicle
After washing the vehicle, apply the brakes
briefly to dry them; otherwise, braking action
can be reduced and corrosion of the brake
discs can occur.
Completely remove all residues on the win‐
dows, to minimize loss of visibility due to
smearing and to reduce wiper noises and
wiper blade wear.
Vehicle care
Car care products BMW recommends using care and cleaning
products from BMW, since these have been
tested and approved.
Car care and cleaning products
Follow the instructions on the container.
When cleaning the interior, open the doors or
windows.
Only use products intended for cleaning vehi‐
cles.
Cleansers can contain substances that are
dangerous and harmful to your health.◀
Vehicle paint
Regular care contributes to driving safety and
value retention. Environmental influences in
areas with elevated air pollution or natural con‐
taminants, such as tree resin or pollen can af‐
fect the vehicle's paintwork. Tailor the fre‐
quency and extent of your car care to these
influences.
Aggressive substances such as spilled fuel, oil,
grease or bird droppings, must be removed im‐
Seite 204MobilityCare204
Online Edition for Part no. 01 40 2 956 568 - X/14
Page 209 of 228

mediately to prevent the finish from being al‐
tered or discolored.
Leather care Remove dust from the leather often, using a
cloth or vacuum cleaner.
Otherwise, particles of dust and road grime
chafe in pores and folds, and lead to increased
wear and premature degradation of the leather
surface.
To guard against discoloration, such as from
clothing, provide leather care roughly every
two months.
Clean light-colored leather more frequently be‐
cause soiling on such surfaces is substantially
more visible.
Use leather care products; otherwise, dirt and
grease will gradually break down the protective
layer of the leather surface.
Suitable care products are available from the
service center.
Upholstery material care Vacuum regularly with a vacuum cleaner.
If upholstery is very dirty, e.g., with beverage
stains, use a soft sponge or microfiber cloth
with a suitable interior cleaner.
Clean the upholstery down to the seams using
large sweeping motions. Avoid rubbing the
material vigorously.
Damage from Velcro® fasteners
Open Velcro® fasteners on pants or
other articles of clothing can damage the seat
covers. Ensure that any Velcro® fasteners are
closed.◀
Caring for special components
Light-alloy wheels
When cleaning the vehicle, use only neutral
wheel cleaners having a pH value from 5 to 9.
Do not use abrasive cleaning agents or steamjets above 140 ℉/60 ℃. Follow the manufac‐
turer's instructions.
Aggressive, acidic or alkaline cleaning agents
can destroy the protective layer of adjacent
components, such as the brake disk.
Chrome surfaces
Carefully clean components such as the radia‐
tor grille or door handles with an ample supply
of water, possibly with shampoo added, partic‐
ularly when they have been exposed to road
salt.
Rubber components Aside from water, treat only with rubber
cleansers.
When cleaning rubber seals, do not use any
silicon-containing car care products in order to
avoid damage or noises.
Fine wood partsClean fine wood facing and fine wood compo‐
nents only with a moist rag. Then dry with a
soft cloth.
Plastic components
These include:▷Imitation leather surfaces.▷Roofliner.▷Lamp lenses.▷Instrument cluster cover.▷Matt black spray-coated components.▷Painted parts in the interior.
Clean with a microfiber cloth.
Dampen cloth lightly with water.
Do not soak the roofliner.
No cleansers that contain alcohol or sol‐
vents
Do not use cleansers that contain alcohol or
solvents, such as lacquer thinners, heavy-duty
Seite 205CareMobility205
Online Edition for Part no. 01 40 2 956 568 - X/14
Page 220 of 228

Daytime running lights, bulbreplacement 190
Defrosting, refer to defrosting the windows 129
Defrosting, refer to Windows, defrosting 132
Defrosting the windows 129
Dehumidifying, air 129, 131
Deleting personal data 24
Deletion of personal data 24
Destination distance 86
Digital clock 81
Digital compass 137
Dimensions 210
Dimmable exterior mirrors 57
Dimmable interior rearview mirror 57
Direction indicator, refer to Turn signals 67
Display, electronic, instru‐ ment cluster 76
Display lighting, refer to In‐ strument lighting 92
Displays, cleaning 206
Disposal, coolant 184
Disposal, vehicle battery 194
Distance control, refer to PDC 119
Distance to destination 86
Divided screen view, split screen 23
Door lock 38
Door lock, refer to Remote control 34
Drive-off assistant 115
Drive-off assistant, refer to DSC 111
Driver assistance, refer to In‐ telligent Safety 102
Driving Assistant, refer to In‐ telligent Safety 102
Driving Dynamics Con‐ trol 113
Driving instructions, break- in 150
Driving mode 113 Driving notes, general 150
Driving stability control sys‐ tems 111
Driving style analysis 161
Driving tips 150
DSC Dynamic Stability Con‐ trol 111
DTC Dynamic Traction Con‐ trol 112
Dynamic Damping Con‐ trol 113
Dynamic Stability Control DSC 111
Dynamic Traction Control DTC 112
E
ECO PRO 157
ECO PRO, bonus range 158
ECO PRO display 157
ECO PRO driving mode 157
ECO PRO driving style analy‐ sis 161
ECO PRO mode 157
ECO PRO Tip - driving in‐ struction 159
EfficientDynamics 160
Electronic displays, instru‐ ment cluster 76
Electronic oil measure‐ ment 181
Electronic Stability Program ESP, refer to DSC 111
Emergency detection, remote control 35
Emergency release, fuel filler flap 166
Emergency Request 197
Emergency service, refer to Roadside Assistance 198
Emergency start function, en‐ gine start 35
Emergency unlocking, trans‐ mission lock 74 Emergency unlocking, trunk
lid 41
Energy Control 81
Energy recovery 81
Engine, automatic reel-off 65
Engine, automatic Start/Stop function 65
Engine compartment 179
Engine compartment, work‐ ing in 180
Engine coolant 184
Engine idling when driving, coasting 160
Engine oil 181
Engine oil, adding 182
Engine oil additives 182
Engine oil change 183
Engine oil filler neck 182
Engine oil types, alterna‐ tive 183
Engine oil types, ap‐ proved 183
Engine start during malfunc‐ tion 35
Engine start, jump-start‐ ing 198
Engine start, refer to Starting the engine 64
Engine stop 64
Entering a car wash 203
Equipment, interior 135
Error displays, see Check Control 77
ESP Electronic Stability Pro‐ gram, refer to DSC 111
Exchanging wheels/tires 176
Exhaust system 151
Exterior mirror, automatic dimming feature 57
Exterior mirrors 55
External start 198
External temperature dis‐ play 81
External temperature warn‐ ing 81
Eyes for securing cargo 154 Seite 216ReferenceEverything from A to Z216
Online Edition for Part no. 01 40 2 956 568 - X/14
Page 222 of 228

Individual settings, refer toPersonal Profile 35
Inflation pressure, tires 170
Inflation pressure warning, tires 100
Info display, refer to Com‐ puter 85
Initialize, Tire Pressure Moni‐ tor TPM 98
Initializing, Flat Tire Monitor FTM 101
Instrument cluster 76
Instrument cluster, electronic displays 76
Instrument lighting 92
Integrated key 34
Integrated Owner's Manual in the vehicle 29
Intelligent Emergency Re‐ quest 197
Intelligent Safety 102
Intensity, AUTO pro‐ gram 131
Interior equipment 135
Interior lights 92
Interior lights via remote con‐ trol 37
Interior motion sensor 44
Interior rearview mirror, auto‐ matic dimming feature 57
Interior rearview mirror, com‐ pass 137
Interior rearview mirror, man‐ ually dimmable 57
Interval display, service re‐ quirements 81
J Jacking points for the vehicle jack 194
Joystick, Steptronic transmis‐ sion 72
Jump-starting 198 K
Key/remote control 34
Keyless Go, refer to Comfort Access 41
Key Memory, refer to Per‐ sonal Profile 35
Kickdown, Steptronic trans‐ mission 71
Knee airbag 94
L
Lamp replacement 187
Lamp replacement, front 188
Lamp replacement, rear 192
Lane departure warning 108
Lane margin, warning 108
Language on Control Dis‐ play 88
Lashing eyes, securing cargo 154
LATCH child restraint sys‐ tem 60
Launch Control 74
Leather, care 205
LEDs, light-emitting di‐ odes 188
Letters and numbers, enter‐ ing 25
Light alloy wheels, care 205
Light control 90
Light-emitting diodes, LEDs 188
Lighter 139
Lighting 89
Lighting via remote con‐ trol 37
Light reel 89
Lights 89
Lights and bulbs 187
Load 154
Loading 153
Lock, door 38
Locking/unlocking via door lock 38 Locking/unlocking with re‐
mote control 37
Locking, automatic 43
Locking, settings 42
Locking via trunk lid 40
Low beams 89
Low beams, automatic, refer to High-beam Assistant 91
Lower back support 50
Luggage rack, see Roof- mounted luggage rack 155
Lumbar support 50
M
Maintenance 185
Maintenance require‐ ments 185
Maintenance, service require‐ ments 81
Maintenance system, BMW 185
Make-up mirror 139
Malfunction displays, see Check Control 77
Manual air distribu‐ tion 129, 132
Manual air flow 129, 132
Manual mode, Steptronic transmission 72
Manual operation, door lock 38
Manual operation, exterior mirrors 56
Manual operation, fuel filler flap 166
Manual operation, Park Dis‐ tance Control PDC 120
Manual operation, rearview camera 122
Manual transmission 71
Marking on approved tires 177
Marking, run-flat tires 178
Master key, refer to Remote control 34 Seite 218ReferenceEverything from A to Z218
Online Edition for Part no. 01 40 2 956 568 - X/14