2014 AUDI RS7 SPORTBACK engine oil
[x] Cancel search: engine oilPage 223 of 292
fig. 188. With a cold engine, the coolant
lev el should be between the "min" and
"max" markings. When the engine is warm,
the level may be slightly above the "max"
marking .
The location of the coolant expansion tank
can be seen in the engine compartment illus
t ration
<=> page 215.
To obtain an accurate reading , the engine
must be switched
off.
The expansion tank in your vehicle is equipped
with an electric coolant level sensor.
When the coolant level is too low, the warning
light in the Auto-Check System<=>
page 15 will
illuminate until you add coolant and the level
has been restored to normal. Even though
there is an electric coolant level sensor, we
still recommend you check the coolant level
from time to time .
Coolant loss
Coolant loss may indicate a leak in the cooling
system. In the event of coolant loss, the cool
ing system should be inspected immediately
by your authorized Audi dealer. It is not
enough merely to add coolant .
In a
sealed system, losses can occur only if
the boiling point of the coolant is exceeded as
a result of overheating.
&_ WARNING
-
The cooling system is under pressure and
can get very hot. Reduce the risk of scald
ing from hot coolant by following these
steps.
- Turn
off the engine and allow it to cool
down.
- Protect your face, hands and arms from
escaping fluid and steam by covering the
cap with a large, thick rag.
- Turn the cap slowly and very carefully in
a counter-clockwise direction while ap
plying light, downward pressure on the
top of the cap.
Checking and filling 221
-To avoid being burned, do not spill anti
freeze or coolant on the exhaust system
or hot engine parts. Under certain condi
tions, the ethylene glycol in engine cool
ant can catch fire .
(D Note
Do not add any type of radiator leak seal
ant to your vehicle 's engine coolant. Add-
ing radiator repair fluid may adversely af
fect the function and performance of your
cooling system and could result in damage
not covered by your New Vehicle Limited
Warranty.
Adding coolant
Be very careful when adding engine coolant.
Before you check anything in the engine com
partment,
always read and heed all WARN
INGS <=>.&. in Working in the engine compart
ment on page 213.
"'Turn off the engine.
"'Let the engine cool down .
"' Place a thick rag over the coolant expansion
tank
<=> page 220, fig. 191 and carefully
twist the cap counter-clockwise <=>_& .
"'Add coolant mixed in the correct ratio
<=> page 220, Coolant.
"'Twist the cap on again tightly.
Replacement engine coolant must conform to
exact specifications <=>
page 220, Coolant.
We recommend using only coolant addi-
tive G12++, G13 or in an emergency G12+. Do
not use a different additive. In an emergency
use plain water until you can get the correct
additive and can restore the correct ratio. This
should be done as soon as possible.
If you have lost a considerable amount of
coolant , then you should add cold antifreeze
and cold water only when the engine is cold.
Always use
new engine coolant when refilling.
Do not fill coolant above the "MAX" mark. Ex -
cess coolant will be forced out through the ..,.
•
•
Page 264 of 292
262 Fuses and bulb s
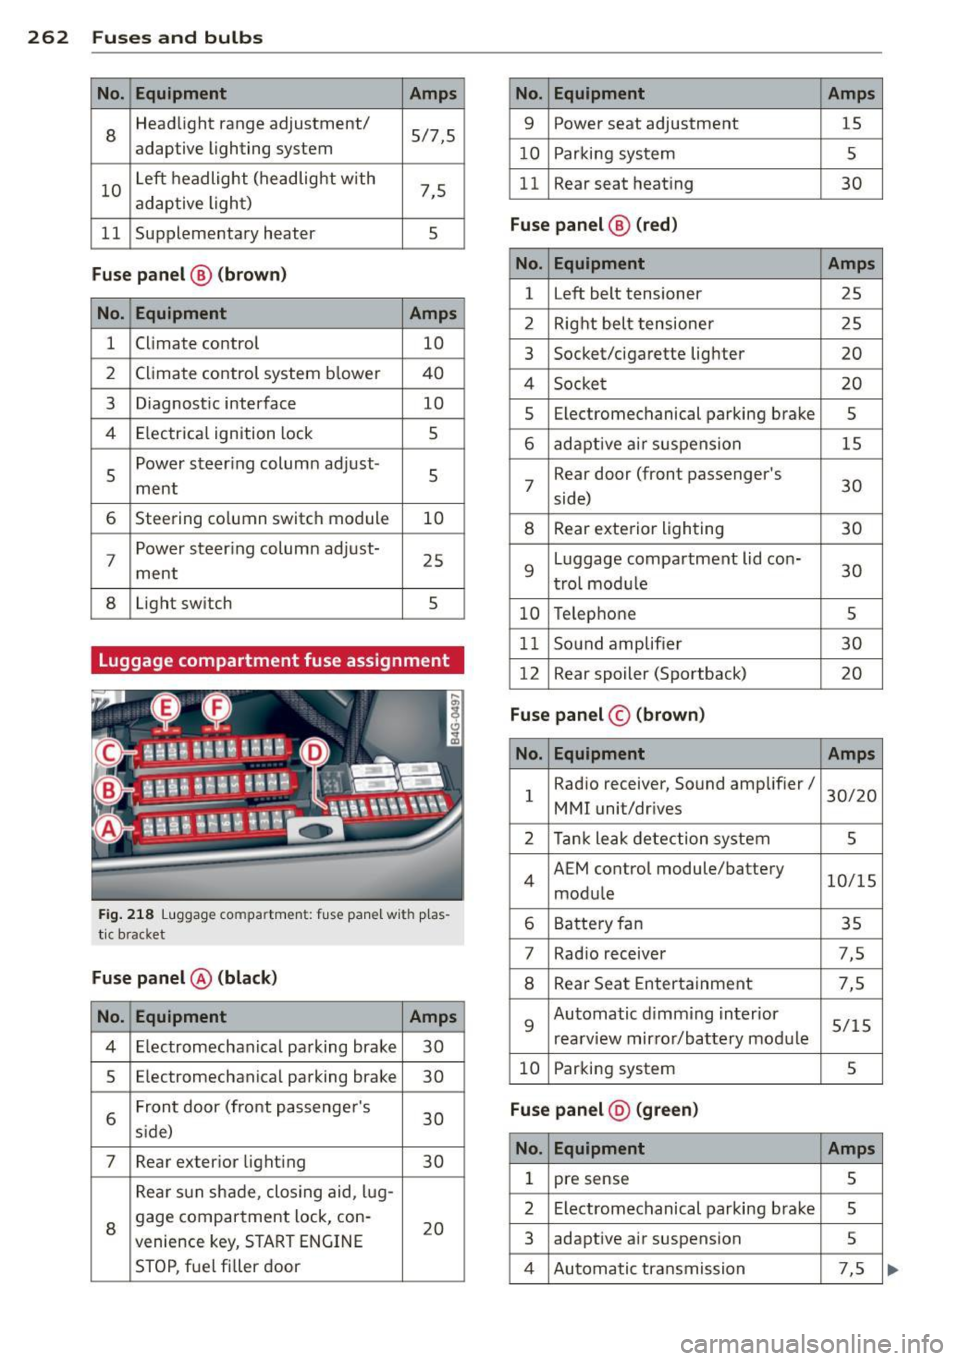
No. Equ ipment Amps
8
Headlight range adjustment/
5/7,S
adaptive lighting system
10 Left headlight
(headlight with
7,5
adaptive light)
11 Supplementary
heater
s
Fuse p ane l@ (b ro w n)
No . Equipment Amps
1 Climate control
10
2 Climate control system blower 40
3 Diagnostic interface
10
4 E lectrical ignition lock
s
s
Power steering column adjust-
s ment
6 Steering column switch module
10
7 Power steering column adjust-
ment
25
8 Light
switch
s
Luggage compartment fuse assignment
Fig. 218 Luggage compartment: fuse panel with plas
tic bracket
Fuse p anel @ (b la ck )
No. Equipment Amps
4 E lectromechanical parking brake 30
s Electromechanical parking brake
30
6 Front door
(front passenger's
30
s ide)
7 Rear exter ior lighting
30
Rear sun shade, closing aid, lug-
8 gage compartment lock, con-
20
venience key, START ENGINE
STOP, fuel filler door
No. Equipment Amps
9 Power seat adjustment
15
10 Parking system
s
11 Rear seat
heating
30
Fuse pan el@ (r e d )
No . Equipment Amps
l Left belt tensioner
25
2 Right belt tensioner 25
3 Socket/cigarette
lighter
20
4 Socket 20
s Electromechanical parking brake s
6 adaptive ai r suspension 15
7 Rear door
(front passenger's
30
side)
8 Rear exterior lighting 30
9 Luggage compartment
lid con-
30
t rol modu le
10 Telephone
s
11 Sound amplifier 30
12 Rear
spoiler (Sportback)
20
Fuse pan el© (brown)
No . Equipment Amps
1 Radio
receiver, Sound amplifier/
30/20
MMI unit/drives
2 Tank leak detection system
s
4 AEM
control module/battery
10/15
module
6 Battery fan 35
7 Rad
io receiver 7,S
8 Rear Seat Entertainment 7,5
9 Automatic d
imming interior
5/15
rearview mirror/battery module
10 Parking system
s
Fuse pan el@ (gre en)
No . Equipment Amps
1 pre sense s
2 Electromechanical parking brake s
3 adaptive
air suspension 5
4 Automatic transmission 7,5
Page 271 of 292
heavy components such as the engi ne
b lock or transmiss ion are removed.
- W hen removing heavy components like
these, ancho r vehicle to hoist o r add cor
respond ing weig hts to ma inta in the cen
ter of g ravity . Otherwise, the vehicle
m ight tilt o r sli p off the hoist, causi ng
ser ious p erso na l in ju ry.
([) Note
-Be awa re of the fo llowing points befo re
li fting t he vehicle:
- The vehicle should never be lifted or
jacked up from underneath the engine oil pan, the transmission housing, the
front or rear axle or the body side
members. This could lead to serious
damage.
- To avoid damage to the underbody or
chassis frame , a rubber pad must be
i nserted between the floor jack and
the lift points.
- Before driving over a workshop hoist,
check that the veh icle weight does not
exceed the permissible lifting capacity
of the hoist.
- Before driving over a workshop hoist,
ensure that there is sufficient clear
ance between the hoist and low parts
of the vehicle.
Emergency situations 269
•
•
Page 272 of 292

2 70 Technical data
Technical data
Vehicle identification
Fig . 228 Vehicle Ident ification Number (VlN) plate: lo·
cat ion on driver 's s ide dash panel
XXXXX XX · X -XXXX XXX xx
r,"\__l f~ -11!111 · NII. ~ V!Hlll -llllll . NO.
IYP IT'fl'E
XXXXXXXX XX X XXXXXXXX
XXX XXX
XX XXXXXXX XX X X XX
XXX
KW XXX
®i ~~:f :l~~ XXXX XXX XXX
@+ ~~r= XXXX I XXXX XXX I XX M ,. AIIISl./ lflllllS
EOA 7D5 4 UB 6XM SSG 5RW
2E H JDZ llB l AS lBA
3FC 5MU 7Xl
FO A
9G3 OG7 O
YH OJF
TL6 J
KA BEH
UlA X9B QZ 7
l XW
8Q3 9Q8 82 4 020
7T6 CV 7 7KO 4X3 2K2
3L4 4 KC 3YO 4I3 502
lS A 7GB Q1A 4GQ
XX X XX X XX X XXXX
Fig. 229 Th e vehicle identificat ion label -inside the
l uggag e compa rtmen t
Vehicle Identification Number (VlN)
The Vehicle Identification Number is located
in different p laces:
- under the w indshield on the driver's side
~fig . 228.
-in the MMI: Select: Function button ICARI >
(Car)* systems> VIN number .
-on the veh icle identification label.
Vehicle identification label
The vehicle identification label is located in
the luggage compartment in the spare wheel
well. T
he label ~
fig. 229 shows the following vehi
cle data:
(D Vehicle Ident ificat ion Number (VIN )
@ . Vehicle type, engine output, transmission
® Engine and transmission code
@ Paint number and interior
® Optional equipment numbers
Th e information of the vehicle identification
lab el can also be found in your Warranty
&
Maintenance booklet.
Safety compliance sticker
The safety compliance sticker is your assur
ance that your new veh icle complies with all
applicable Federal Motor Vehicle Safety
Standards which were in effect at the time the
vehicle was manufactured. You can find this
sticker on the door jamb on the driver's side.
It shows the month and year of production
and the vehicle ident ificat ion number of your
vehicle (perfo rat ion) as well as the Gross Vehi
cl e Weight Rating (GVWR) and the Gross Axle
Weight Rating (GAWR) .
High voltage warning label
The high voltage warning label is located in
the engine compartment next to the engine
hood re lease . The spark ign ition sys tem com·
plies with the Canadian standard IC ES-002.
Weights
Gross Vehicle Weight Rating
The Gross Vehicle Weight Rating (GVWR), and
the Gross Axle Weight Rat ing (GAWR) for
front and rear are listed on a sticker on the
doo r jamb on the driver' s side .
The Gross Vehicle Weight Rating includes the
weight of the bas ic vehicle plus fu ll fuel tank,
oil and coolant, plus maximum load, which in
cl udes passenger weight (150 lbs/68 kg per
designated seating position) and luggage
weight ~&. - .,.
Page 274 of 292

272 Technical data
RS 7 Sportback 4.0, 8 cylinder
Max imum output SA E net hp@rpm 560@ 5700 - 6600
Maximum torque SAE net lb-ft@ rpm 516@ 1750 -5500
Displa cement CID (cm
3
) 2 43 .7 (3993)
Engine oil with f ilter change q uarts ( liters) 8.8 (8.3)
Fuel
Premium unl eaded (91 AKI) , Q page 208, Gasoline
Page 275 of 292
Consumer Information
Warranty coverages
Your Audi is covered by the following war
ranties :
-New Vehicle Limited Warranty
- Limited Warranty Against Corrosion Perfo-
ration
- Emissions Control System Warranty
- Emissions Performance Warranty
- California Emissions Control Warranty (USA
vehicles only)
- California Emissions Performance Warranty
(USA vehicles only)
Detailed information regarding yo ur warran
ties can be found in your
Warranty & Mainte
nance booklet .
Operating your vehicle
outside the U.S.A. or
Canada
Government regulations in the United States
and Canada require that automobiles meet
specific emission regulations and safety
standards. Therefore, veh icles built for the
U.S.A. and Canada differ from vehicles sold in
other countries .
I f you p lan to take your vehicle outside the
continental limits of the United States or Can
ada, there is the possibility that:
- unleaded fuels for vehicles with cata lytic
converter may not be available;
- fuel may have a considerably lower octane
rating . Improper fuel may cause engine
damage;
- service may be inadequate due to lack of
proper service facilities, tools or testing
equipment;
- replacement parts may not be readily availa
ble.
- Navigation systems for vehicles built for the
U.S.A. and Canada will not necessari ly work
in Europe, and may not work in other coun
tries outside North America .
Consumer Information 273
@ Note
Audi cannot be responsible for mechanical
damage that could result from inadequate
fuel, serv ice or parts availab ility.
Audi Service Repair
Manuals and Literature
Audi Offic ial Factory Service Manuals and Lit
erature are published as soon as possible after
model introduct ion. Service manuals and lit
erat ure are available to order from the Audi
T echnical Literature Ordering Center at:
www.audi.techliterature.com
Maintenance
' General
Your vehicle has been designed to help keep
maintenance requirements to a m inimum.
However, a certain amount of regular mainte
nance is still necessary to assure your vehicle's
safety, economy and reliability . For detailed
vehicle maintenance consult your Warranty &
Maintenance booklet.
Under difficult operating conditions , for ex
ample at extremely low outside temperatures,
in very dusty regions, etc., some service work
shou ld be pe rformed between the intervals
specified. This applies particularly to:
- oil changes, and
- cleaning or replacing the air fi lter.
@ For the sake of the environment
By regu larly maintaining your veh icle, you
help make sure that emission standards
are maintained, thus min imizing adverse
effects on the environment.
Important considerations for you and
your vehicle
T he increasing use of electron ics, soph isticat
ed fuel injection and emission control sys
tems, and the genera lly increasing technica l
complexity of today's automobiles, have ..,_
•
•
Page 277 of 292
in P (Park posi tion) an d the park brake is
applied.
@ For the sake of the environment
- Chang ing the engine settings wi ll ad
versely affect emission levels . This is det
rimenta l to the environment and increas
es fue l cons umption .
- Always observe env ironmental regula
tions when d ispos ing of old engine oil,
used brake fluid, dirty engine coolant,
spent batter ies or worn out tires.
- Undeployed airbag modules and preten
s ioners might be classified as Perchlo
rate Material -spec ial handling may ap
ply, see www .dtsc .ca .gov/hazardous
waste/perch lorate . When the veh icle or
parts of the restrai nt system includ ing
airb ag mod ules safety be lts wit h preten
s ioners are scrapped, all applic able laws
and regulations must be observed. Your
a utho rized Audi dea le r is familiar with
these req uirements and we recommend
that you have your dealer perform this
serv ice for you .
Additional accessories,
modifications and
parts replacement
Additional accessories and parts
replacement
Always consult an authorized Audi dealer be
fore purchasing accessories .
Your vehicle incorporates the latest safety de
sig n featu res ensuring a high standard of ac
tive and passive safety .
This sa fe ty could be compromised by non-ap
proved changes to the veh icle . For this reason ,
if pa rts have to be replaced, p lease observe
the following points when install ing addition
a l acc essories:
Approved Audi accessor ies and genuine Audi
pa rts are ava ilable from authorized Aud i deal
e rs.
Con sumer In formation 275
T hese dea le rs a lso have the necessary facili
ties, tools a nd trained specialists to install the
parts and accessories properly .
_& WARNING
Using the wrong spare parts or using non
approved accessories can cause damage to
the vehicle and ser ious persona l injury .
- Use on ly accessories express ly approved
by Audi and ge nuine Audi spare parts
- These parts and accessories have been
specially designed to be used on your ve
hicle .
- Never install accessor ies such as tele
phone crad les or beverage ho lders on air
bag covers or w ithi n the airbag deploy
ment zones. Do ing so wi ll increas e th e
ris k of injury if a irbags are triggered in an
accide nt!
- Before you check anything in the engine
compa rtment, always read and heed a ll
WARNIN GS
<:!)page 213.
(D Note
-If items other than ge nuine Audi spare
parts, add-on equipment and accessory
items are used o r if repair wo rk is no t
perf ormed ac cor ding to spe cifie d meth
ods, this ca n resu lt in seve re dam age to
your vehicle's engine and bo dy (such as
co rrosion) an d adve rsely affect yo ur vehi
cle 's warranty .
- If emergency repairs must be perfo rme d
elsewhere , have the vehicle examine d by
an authorized A udi dealer as soon as
possible.
- The manufacturer cannot be held lia b le
for damage wh ich occ urs due to failure
to comply with these stipu lations.
Technical Modifications
Our guidelines must be complied with when
technical modifications are made.
A lways consult an authorized Audi dealer be-
-
fore start ing work on any modifications. ..,_
•
•
Page 279 of 292
A
Accessories . . . . . . . . . . . . . . . . . . . . . . . . 2 7 5
Active lane assist . . . . . . . . . . . . . . . . . . . . 90
Activating and deactivating . .. .. .. .. .. 91
C leaning the camera area .. .. .. .. .. . 204
Description .............. .... .. .... 90
Instrument cluster indicator light . . . . . 91
Messages .. ................ ... .... 91
Notes on instrument cluster display . . . . 91
Setting the steering wheel vibration .. .. 92
AC (automatic climate control) . .. .. .. .. 70
Adaptive air suspension/sport .. .. ... ... 96
Adaptive cruise control ......... ... .... 81
Cleaning the sensor .......... ..... . 204
Messages .. ............. .... .. .... 88
Request for driver intervention . . . . . . . . 86
Stop-and-go traffic . . . . . . . . . . . . . . . . . 85
Adaptive Light (defective) ............. 21
Adding Engine coolant ........... .. .. .. .. . 221
Engine oil .. ............. .... .. ... 218
Windshield washer fluid ............ 227
Additives Engine oil .. ....... ...... .... .. .. . 218
Adjusting Air distribution (automatic climate con-
trol) ..... ... ...... ....... ...... ... 71
Front seats . . . . . . . . . . . . . . . . . . . . . . . . 53
Instrument illumination ... .. .. .. .. .. 47
Steering column e lectrically .. .. .. .. .. 73
Steering column manually . .. .. .. .. .. 73
Temperature (automatic climate control) 71
Airbag system . . . . . . . . . . . . . . . . . 142, 163
Advanced Airbag System . . . . . . . . . . . . 146
Advanced Airbag System components . 150
Care . .. .. .. .... ............. .. .. . 158
Children ... ................ ... ... 170
Child restraints .............. ... ... 170
Components (front airbags) . ... .. .. . 150
Danger of fitting a child seat on the front
passenger seat . . . . . . . . . . . . . . . . . . . . 144
Disposal . .. ............. .... .. .. . 158
Front airbags . . . . . . . . . . . . . . . . 146, 148
How do the front airbags work? . ..... 152
H ow many airbags does my vehicle
have? ... .. .... ............. .. .. . 150
Index 277
How the Advanced Airbag System com-
ponents work together ............ . 152
Important safety instructions on the
knee airbag system ................ 161
Important things to know ......... .. 142
Knee airbags . .. .. .. ............... 159
Monitoring .. .. .. .. . .. .... ........ 154
PASSENGER AIR BAG OFF light ....... 155
Repairs . . . . . . . . . . . . . . . . . . . . . . . . . . 158
Safety instructions .... ......... .. .. 157
Side airbags ... .. .. ............... 162
Side curtain airbags ............... . 165
Warning/indicator lights ............ . 18
Warning/Indicator lights ....... .. .. 154
When must the system be inspected? 154
Aircraft Transporting your vehicle
Alcantara 268
Cleaning .. .. .. .. .... ........... .. 206
All-wheel drive .. .. .. ............... 195
Winter tires . .. .. .... ... .... .... .. 243
Alternator ... ..... .. ................ 16
Ambience lighting ... ... ..... ... .... . 47
Anti-freeze
refer to Engine coolant ............. 220
Anti-lock braking system ............ . 189
Warning/indicator lights . . . . . . . . . 18, 19
Anti-s lip regu lation .... ......... .. .. 189
Warning/indicator lights ........ .. .. . 18
Anti-theft systems Electronic immobilizer ............. .. 33
Ashtray ..... ... .... ................ 59
Audi braking guard
refer to brak ing guard .......... .... . 81
Audi drive select
refer to drive select ... .. ...... .... .. 96
Audi Serv ice Repair Manuals and Litera-
ture ......... .. .. ................. 273
AUTO automatic climate control .......... .. 71
Automatic headlights ............... 44
Auto Lock . . . . . . . . . . . . . . . . . . . . . . . . . . 34
Automatic belt retractor ......... .. .. 136
Automatic climate control
Air vents .. .. .... .. ................ 71
Automatic recirculation ............ .. 72
Operation . . . . . . . . . . . . . . . . . . . . . . . . . 70
•
•