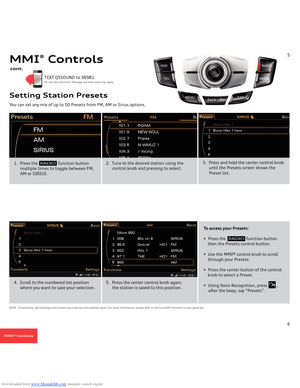
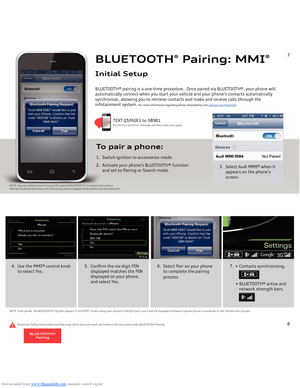
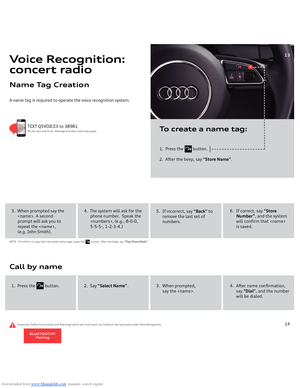
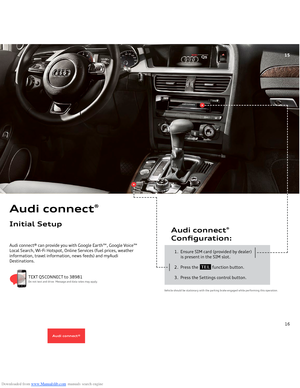
Page 17 of 29
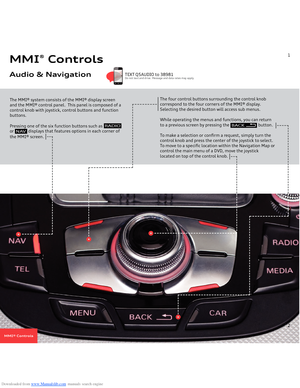
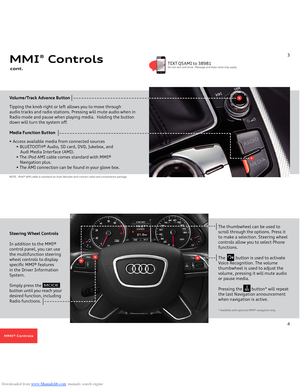
Downloaded from www.Manualslib.com manuals search engine 2. Press the
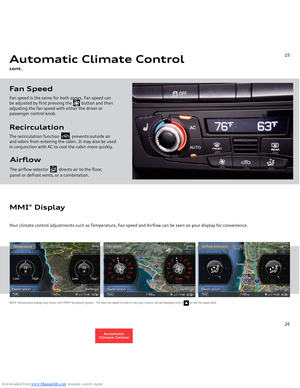
button located on the driver’s door.
3. Press on of the numbered memory buttons until you hear a tone; the memory position is saved.
1. Adjust the seat and mirrors to your desired positions.
The side mirrors are programmed along with the seat position. When you press and hold your numbered memory button, they will adjust automatically.Memory SeatsSetting Your Memory Seats and Mirrors
27
SET
Press the desired memory button while the door is openor with the door closed, press and hold the desired
memory button until the memory position is reached.
Recalling Memory Seat Settings
Important Safety Instructions and Warnings which you must read, are listed on the last panel under Memory Seats.
TEXT Q5SEATS to 38981Do not text and drive. Message and data rates may apply.
28
Memory Seats
Page 18 of 29

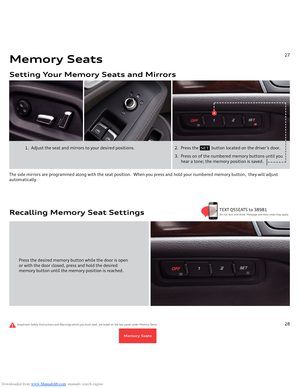
Downloaded from www.Manualslib.com manuals search engine Rain Sensing WipersTo activate rain-sensing wipers:1. From the
“OFF”
position, move the wiper stalk up one click.
2. The rain sensor will automatically turn the wipers on when it begins to rain, adjusting wipe frequency with rainfall intensity.3. The lever on the top of the stalk controls the sensitivity.
Move it left for less sensitivity and right for more sensitivity.NOTE: Turn off rain-sensing wipers before going through a car wash.Rear Wiper OperationTo activate the rear wipers, push the lever one click away from you. Also, anytime you have the front wipers on and you put the car into reverse, the rear wipers activate automatically. To wash the rear glass, push the lever two clicks away from you.Windshield Wipers
TEXT Q5WIPERS to 38981Do not text and drive. Message and data rates may apply.
29
Important Safety Instructions and Warnings which you must read, are listed on the last panel under Windshield Wipers.
• “LOW”
: From the
“OFF”
position, move the wiper stalk
up two clicks.• “HIGH”
: From the
“OFF”
position, move the wiper stalk
up three clicks.Continuous Wipe• Single/quick wipe: From the
“OFF”
position,
press the wiper stalk down once briefly.
NOTE: For faster wiping, press the wiper stalk down once and hold for two seconds.Single/Quick Wipes
30
WindshieldWipers
Page 19 of 29

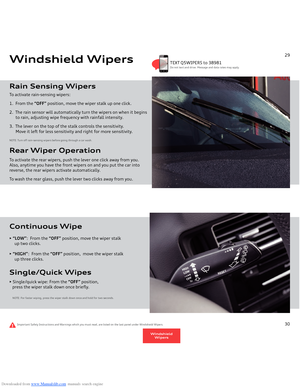
Downloaded from www.Manualslib.com manuals search engine At your desired speed, press the
button
at the end of the stalk. The set speed and the illuminated icon are shown in the Driver Information Display.To activate, pull the control stalk toward you.Set Cruising Speed Cruise ControlActivate
31
SET
CRUISE
TEXT Q5CRUISE to 38981Do not text and drive. Message and data rates may apply.
Important Safety Instructions and Warnings which you must read, are listed on the last panel under cruise control.
Changing Speed
To cancel and resume cruise control:1. Press the brake pedal or push the stalk
slightly away from you.2. The light will go off.3. To resume, pull the stalk towards you;
you will return to your set speed.Your most recently set speed appears as a small icon in the Driver Information Display. It remains in memory until you turn your Audi off.Cancel/Resume
There are three ways to change your speed:1. Accelerate or decelerate, then press
again.
2. To increase/decrease speed in 1 mph
increments, tap the stalk up or down.3. Hold the stalk up or down to
increase/decrease speed in 5 mph
increments; release when desired
speed is reached.
32
SET
CRUISE
Cruise Control
Page 20 of 29

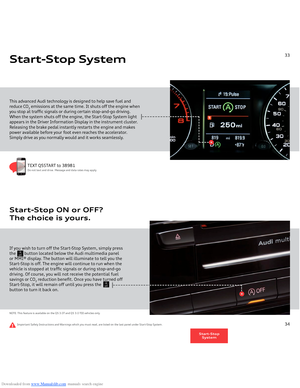
Downloaded from www.Manualslib.com manuals search engine This advanced Audi technology is designed to help save fuel and reduce CO
2 emissions at the same time. It shuts off the engine when
you stop at traffic signals or during certain stop-and-go driving. When the system shuts off the engine, the Start-Stop System light appears in the Driver Information Display in the instrument cluster. Releasing the brake pedal instantly restarts the engine and makes power available before your foot even reaches the accelerator. Simply drive as you normally would and it works seamlessly.Start-Stop System
33
TEXT Q5START to 38981Do not text and drive. Message and data rates may apply.
Important Safety Instructions and Warnings which you must read, are listed on the last panel under Start-Stop System.
If you wish to turn off the Start-Stop System, simply press the
button located below the Audi multimedia panel
or MMI® display. The button will illuminate to tell you the Start-Stop is off. The engine will continue to run when the vehicle is stopped at traffic signals or during stop-and-go driving. Of course, you will not receive the potential fuel savings or CO
2 reduction benefit. Once you have turned off
Start-Stop, it will remain off until you press the button to turn it back on.NOTE: This feature is available on the Q5 3.0T and Q5 3.0 TDI vehicles only.Start-Stop ON or OFF? The choice is yours.
34
AOFF
AOFF
Start-StopSystem
Page 21 of 29

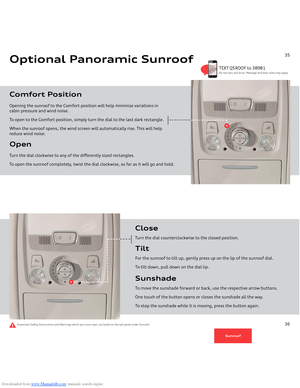
Downloaded from www.Manualslib.com manuals search engine Optional Panoramic SunroofOpen Turn the dial clockwise to any of the differently sized rectangles. To open the sunroof completely, twist the dial clockwise, as far as it will go and hold.Comfort PositionOpening the sunroof to the Comfort position will help minimize variations in cabin pressure and wind noise. To open to the Comfort position, simply turn the dial to the last dark rectangle. Wh
en the sunroof opens, the wind screen will automatically rise. This will help
reduce wind noise.
TEXT Q5ROOF to 38981Do not text and drive. Message and data rates may apply.
35
CloseTurn the dial counterclockwise to the closed position.TiltFor the sunroof to tilt up, gently press up on the lip of the sunroof
dial.
To tilt down, pull down on the dial lip.SunshadeTo move the sunshade forward or back, use the respective arrow buttons. One
touch of the button opens or closes the sunshade all the way.
To s
top the sunshade while it is moving, press the button again.
Important Safety Instructions and Warnings which you must read, are listed on the last panel under Sunroof.
36
Sunroof
Page 22 of 29

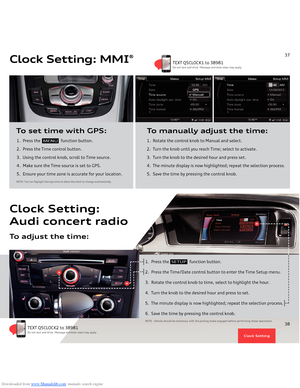
Downloaded from www.Manualslib.com manuals search engine 1. Press the
function button.
2. Press the Time control button.
3. Using the control knob, scroll to Time source. 4. Make sure the Time source is set to GPS.5. Ensure your time zone is accurate for your location.To set time with GPS:
1. Rotate the control knob to Manual and select.
2. Turn the knob until you reach Time; select to activate.3. Turn the knob to the desired hour and press set.4. The minute display is now highlighted; repeat the selection process.5. Save the time by pressing the control knob.To manually adjust the time:
NOTE: Turn on Daylight Savings time to allow the clock to change automatically.
Clock Setting: MMI
®
MENU
37
TEXT Q5CLOCK1 to 38981Do not text and drive. Message and data rates may apply.
Clock Setting
1. Press the
function button.
2. Press the Time/Date control button to enter the Time Setup menu.3. Rotate the control knob to time, select to highlight the hour.4. Turn the knob to the desired hour and press to set.5. The minute display is now highlighted; repeat the selection process.6. Save the time by pressing the control knob.NOTE: Vehicle should be stationary with the parking brake engaged before performing these operations.
Clock Setting:Audi concert radi
o
To adjust the time:
SETUP
38
TEXT Q5CLOCK2 to 38981Do not text and drive. Message and data rates may apply.
Clock Setting
Page 23 of 29
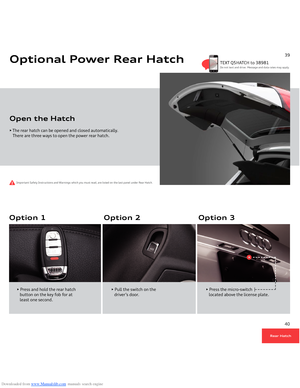
Downloaded from www.Manualslib.com manuals search engine • The rear hatch can be opened and closed automatically. There are three ways to open the power rear hatch.Open the Hatch
Important Safety Instructions and Warnings which you must read, are listed on the last panel under Rear Hatch.
NOTE: Photo may not represent actual vehicle.
TEXT Q5HATCH to 38981Do not text and drive. Message and data rates may apply.
39
Optional Power Rear Hatch
• Press and hold the rear hatch
button on the key fob for at
least one second.
• Pull the switch on the
driver’s door.
• Press the micro-switch
located above the license plate.
Option 1
Option 2
Option 3
Rear Hatch
40
Page 24 of 29
Downloaded from www.Manualslib.com manuals search engine Closing the Hatch • Press the button on the rear hatch edge; the hatch moves to
the closed position and the soft close mechanism locks. Optional Power Rear Hatchcont.
41
Setting the Open PositionThe opening height of the rear hatch can be adjusted.
1. While the rear hatch is opening, press the rear hatch button on the
remote key fob to stop it at the desired height. You may also stop it by pressing the button on the rear hatch.2. Press and hold the button on the rear hatch edge for at least four
seconds to store the new open position. The lights will flash indicating the setting has been stored.3. The opening height of the rear hatch can be readjusted to the maximum height by pushing upwards on the rear hatch and then repeat step 2.
Rear Hatch
42