2014 Alfa Romeo MiTo change time
[x] Cancel search: change timePage 94 of 280

HEADLIGHTSLIGHT BEAM DIRECTIONThe correct orientation of the headlights is important for the driver's
comfort and safety as well as for all other road users. This is also
covered by a specific rule of the highway code.
The headlights must be correctly aligned to ensure the best visibility
conditions for yourself and others when driving with lights on. To check
and, if necessary, adjust, contact Alfa Romeo Authorized Services.HEADLIGHT ALIGNMENT CORRECTORThis device works with the ignition key in the MAR position and the
dipped headlights on.
Headlight alignment adjustment
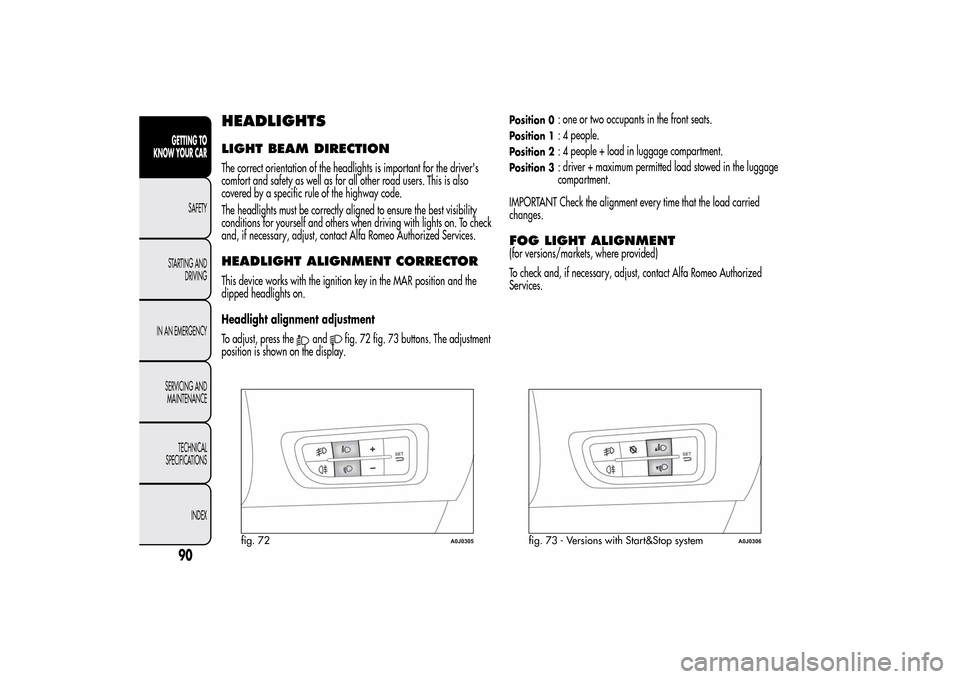
To adjust, press the
and
fig. 72 fig. 73 buttons. The adjustment
position is shown on the display.
Position 0
: one or two occupants in the front seats.
Position 1
: 4 people.
Position 2
: 4 people + load in luggage compartment.
Position 3
: driver + maximum permitted load stowed in the luggage
compartment.
IMPORTANT Check the alignment every time that the load carried
changes.
FOG LIGHT ALIGNMENT(for versions/markets, where provided)
To check and, if necessary, adjust, contact Alfa Romeo Authorized
Services.
fig. 72
A0J0305
fig. 73 - Versions with Start&Stop system
A0J0306
90GETTING TO
KNOW YOUR CAR
SAFETY
STARTING AND
DRIVING
IN AN EMERGENCY
SERVICING AND
MAINTENANCE
TECHNICAL
SPECIFICATIONS
INDEX
Page 111 of 280

❒sensor performance can also be influenced by the position of the
sensors. For example by a change in the ride setting (caused by
the wear of the shock absorbers, suspension), overloading the
vehicle and carrying out specific tuning operations that require the
vehicle to be lowered;
❒The detection of obstacles at the top part of the car may not be
guaranteed because the system detects obstacles that could cause an
impact with the car in the bottom part.
TPMS (Tyre Pressure
Monitoring System)(for versions/markets, where provided)
The car may be fitted with a tyre pressure monitoring system (TPMS),
which informs the driver of the tyre inflation status via the "Check
tyre pressure" and "Low tyre pressure" messages on the display.
This system comprises a radio frequency transmitter fitted to each
wheel (on the wheel rim inside the tyre), which is able to send
information on the tyre inflation pressure of each wheel to the control
unit.IMPORTANT INFORMATION ABOUT
THE TPMSThe fault indications are not stored and will therefore not be displayed
after the engine has been switched off and then on again.
If the fault conditions persist, the control unit will send the relative
indications to the instrument panel only after the car has been in
motion for a short time.
The presence of the TPMS does not permit the driver to
neglect regular checks of the tyre pressure, including
for the spare wheel.Tyre pressure must be checked with tyres rested and
cold. Should it become necessary for whatever reason
to check pressure with warm tyres, do not reduce
pressure even though it is higher than the prescribed value, but
repeat the check when tyres are cold.
107GETTING TO
KNOW YOUR CARSAFETY
STARTING AND
DRIVING
IN AN EMERGENCY
SERVICING AND
MAINTENANCE
TECHNICAL
SPECIFICATIONS
INDEX
Page 120 of 280

PRETENSIONERSThe car is equipped with front seat belt pretensioners, which draw
back the seat belts by several centimetres in the event of a violent
frontal impact. This guarantees the perfect adherence of the seat belts
to the occupants’ bodies before the restraining action begins.
It is evident that the pretensioners have been activated when the belt
withdraws towards the reel.
The car is also equipped with a second pretensioner (in the kick plate
area). Its activation is signalled by the shortening of the metal cable.
A slight discharge of smoke may be produced during the activation of
the pretensioner. This is not harmful and does not indicate the start
of a fire.
IMPORTANT To obtain the highest degree of protection from the action
of the pretensioner, wear the seat belt tight to the chest and pelvis.
The pretensioner does not require any maintenance or lubrication: any
changes to its original conditions will invalidate its efficiency. If, due
to exceptional natural events (floods, sea storms, etc.), the device
has been affected by water and mud, it must be replaced.
The pretensioner may be used only once. Once it has
been activated, contact Alfa Romeo Authorised
Workshops to have it replaced. Consult the plate in the
glove compartment to check the status of the device. Contact Alfa
Romeo Authorised Workshops to have the device replaced as
this date approaches.
Operations which lead to knocks, vibrations or localised
heating (over 100°C for a maximum of 6 hours) in the area
around the pretensioners may cause damage or trigger
them. These devices are not affected by vibrations caused by
irregularities of the road surface or low obstacles such as kerbs, etc.
Contact Alfa Romeo Authorized Services for any assistance necessary.
LOAD LIMITERSTo increase protection, the front seat belt reels contain a load limiter
which controls the force acting on the chest and shoulders during
the belt restraining action in the event of a head-on collision.GENERAL INSTRUCTIONS FOR USING
THE SEAT BELTSComply with (and ensure that all the other occupants of the car comply
with) the local laws in force regarding the use of seat belts. Always
fasten the seat belts before starting off.
Seat belts must also be worn by pregnant women: the risk of injury in
the event of an accident is reduced for them and the unborn child if
they are wearing a seat belt.
116GETTING TO KNOW
YOUR CAR
SAFETY
STARTING AND
DRIVING
IN AN EMERGENCY
SERVICING AND
MAINTENANCE
TECHNICAL
SPECIFICATIONS
INDEX
Page 141 of 280

On models with 6 gears, to engage 6
thgear, press the lever slightly to
the right to avoid changing into 4
thby mistake. The same applies to the
shift from 6
thto 5
thgear.
To engage reverse (R) from neutral position, raise ring A underneath
the knob and, at the same time:
❒on 1.4 Turbo MultiAir 170 HP Quadrifoglio Verde and 1.6 JTD
M
versions, move the lever to the left and then forwards fig. 111;
❒on Turbo TwinAir, 1.4 Petrol, 1.4 Turbo MultiAir and 1.3 JTD
M-2
versions, move the lever to the right and then backwards fig. 110
and fig. 112.IMPORTANT Reverse can only be engaged when the car is completely
stationary.
Press the clutch pedal fully to change gears correctly. It
is therefore essential that there is nothing under the
pedals: make sure the mats are lying flat and do not
get in the way of the pedals.Do not drive with your hand resting on the gear lever as
the force exerted, even if slight, could lead over time to
premature wear of the gearbox internal components.
fig. 112
A0J0267
137GETTING TO KNOW
YOUR CAR
SAFETYSTARTING AND
DRIVINGIN AN EMERGENCY
SERVICING AND
MAINTENANCE
TECHNICAL
SPECIFICATIONS
INDEX
Page 149 of 280

❒unscrew locking device Afig. 115, take toolbox B and bring it next
to the wheel to replace. Then take the space-saver wheel C;
❒for versions with steel rims: insert the screwdriver in the
opening A fig. 116 in order to trigger the hub cap retaining clip B;❒for versions with alloy rims: shake the car to facilitate
detachment of the rim from the wheel hub. Some versions may be
fitted with alloy wheels with a hub cap (fig. 117). To remove the hub
cap, insert the screwdriver into housings A in order to access the
fixing bolts. Replace the wheel as described previously;
❒take wrench A fig. 118 and loosen the fixing bolts by about one
turn;
❒position the jack under the car, near the wheel to be changed. On
versions where this is fitted, be careful not to damage the plastic
aerodynamic guard;
❒operate the device A fig. 119 so as to extend the jack, until the
upper part B fig. 120 is inserted correctly inside the side member C;
❒alert any bystander that the car is about to be raised; all persons
should be kept away from the car and nobody must touch it until
it has been lowered;
❒fit handle D fig. 119 into the housing in device A, operate the jack
and raise the car until the wheel is a few centimetres from the
ground;
fig. 115
A0J0105
fig. 116
A0J0236
fig. 117
A0J0238
145GETTING TO KNOW
YOUR CAR
SAFETY
STARTING AND
DRIVINGIN AN
EMERGENCYSERVICING AND
MAINTENANCE
TECHNICAL
SPECIFICATIONS
INDEX
Page 160 of 280

REPLACING EXTERIOR BULBSFRONT LIGHT CLUSTERSThese contain the bulbs for the side lights/daytime running lights (DRL),
dipped beams, main beams and direction indicators. The bulbs are
arranged as follows fig. 132:ASide lights/daytime running lights and main beam headlightsBDipped headlightsCDirection indicatorsSIDE LIGHTS/DAYTIME RUNNING
LIGHTS (DRL)To change the bulb, proceed as follows:
❒remove cover A fig. 132;
❒remove bulb holder B fig. 133, remove the bulb and replace it;
❒refit bulb holder B, making sure it is correctly secured;
❒refit cover A fig. 132.
MAIN BEAM HEADLIGHTSTo change the bulb, proceed as follows:
❒remove cover A fig. 132;
❒remove bulb holder C fig. 133, remove the bulb and replace it;
❒refit the bulb holder, making sure it is correctly secured;
❒refit cover A fig. 132.DIPPED HEADLIGHTSWith incandescent bulbs
To change the bulb, proceed as follows:
❒remove cover B fig. 132;
❒remove cover A fig. 134 protecting the bulb;
❒extract the bulb and replace it;
❒refit the bulb holder, making sure it is correctly secured;
❒refit cover B fig. 132.
fig. 132
A0J0021
fig. 133
A0J0041
156GETTING TO KNOW
YOUR CAR
SAFETY
STARTING AND
DRIVING
IN AN
EMERGENCY
SERVICING AND
MAINTENANCE
TECHNICAL
SPECIFICATIONS
INDEX
Page 252 of 280

With the Mute function activated, it will be ignored when there is
an incoming traffic alert (if the TA function is activated), or if an
emergency alarm is received. The function will be reactivated when
the alert is over.AUDIO SETTINGSThe functions that can be selected from the audio menu change
depending on the context: AM/FM/CD/AUX (for
versions/markets, where provided).
Press the AUDIO button briefly to change the Audio functions.
After the AUDIO button is first pressed, the display will show the
bass level value for the source activated at that time (e.g. in FM
mode the display will show the wording “FM Bass + 2”).
Use the
or
buttons to scroll through the menu functions. To
change the setting of the function selected use the
or
buttons.
The current status of the function selected will be shown on the
display.
The functions managed by the Menu are:
❒BASS (adjustment of bass tones);
❒TREBLE (adjustment of high tones);
❒BALANCE (right/left balance adjustment);
❒FADER (front/back balance adjustment);
❒LOUDNESS (LOUDNESS function activation/deactivation);
❒EQUALISER (activation and selection of factory-set equaliser
levels);
❒USER EQUALISER (customised equaliser setting).
TONE ADJUSTMENT (bass/treble)Proceed as follows:
❒Use
or
buttons to set the “Bass” or “Treble” in the AUDIO
menu;
❒press theor
button to increase/decrease the bass or
treble.
By pressing the buttons briefly, the levels will change progressively
in steps. By pressing them for longer, the levels will change quickly.
BALANCE ADJUSTMENTProceed as follows:
❒Select the “Balance” setting in the AUDIO menu using the
or
button;
❒press the
button to increase the volume of the right speakers
or the
button to increase the volume of the left speakers.
By pressing the buttons briefly, the levels will change progressively
in steps. By pressing them for longer, the levels will change quickly.
Select the value “
0
” to set the same level for the right and
left audio outputs.
FADER ADJUSTMENTProceed as follows:
❒Select the “Fader” setting in the AUDIO menu using the
or
button;
❒press the
button to increase the sound from the rear speakers
or the
button to increase the sound from the front speakers.
By pressing the buttons briefly, the levels will change progressively
in steps. By pressing them for longer, the levels will change quickly.
248
SOUND-SYSTEM
Page 253 of 280

Select the value “
0
” to set the same level for the front and
rear audio outputs.
LOUDNESS FUNCTIONThe Loudness function improves the volume of the sound whilst
listening at low volumes, increasing the bass and treble.
To activate/deactivate the function, select the Loudness setting of
the AUDIO menu using the
or
buttons.
The condition of the function (on or off) is shown on the display for
a few seconds by the wording “Loudness On” or “Loudness Off”.
PRESET/USER/CLASSIC/ROCK/JAZZ
FUNCTIONS(equaliser activation/deactivation)
The built-in equaliser can be activated/deactivated. When the
equaliser function is off, the audio settings can only be changed by
adjusting the “Bass” and “Treble” settings, whereas when the
function is on, the acoustic curves can be adjusted.
To deactivate the equaliser, select the “EQ Preset” function using the
buttons
or
.
To activate the equaliser, use the
or
buttons to select one of
the adjustments:
❒“FM/AM/CD...EQ User” (adjustment of 7 equaliser bands that
can be changed by the user);
❒“Classic” (equaliser preset for optimal classical music sound);
❒“Rock” (equaliser preset for optimal rock and pop music sound);
❒“Jazz” (equaliser preset for optimal jazz music sound).
When one of the equaliser settings is activated the letters “EQ”
light up.
USER EQ SETTINGS FUNCTION(equaliser settings only if the USER setting is selected)
To set a personalised equaliser adjustment, set to “User” using the
or
button and press the MENU button.
A 7-bar graph appears on the display, in which each bar
represents a frequency.
Select the bar to adjust using the
or
buttons; the selected bar
will start to flash and it can be adjusted using the
or
buttons.
To store the setting, press the AUDIO button again. The display will
show the active source at that time followed by the word “USER”. If
the mode is “FM”, for example, the display will show the text “FM
EQ User”.
MENUMENU button functions
Press the MENU button briefly to activate the Menu function. The
display will show the first menu item that can be adjusted (AF) (“AF
Switching On” on the display).
Use the
or
buttons to scroll through the menu functions. To
change the setting of the function selected use the
or
buttons.
The current status of the function selected will be shown on the
display.
The functions managed by the Menu are:
❒AF SWITCHING (ON/OFF);
❒TRAFFIC INFORMATION (ON/OFF);
❒REGIONAL MODE regional programmes (ON/OFF);
❒MP3 DISPLAY (CD MP3 display settings);
249SOUND-SYSTEM