2014 Alfa Romeo MiTo ECO mode
[x] Cancel search: ECO modePage 45 of 280

ALARM(for versions/markets, where provided)ALARM ACTIVATIONThe alarm activates in the following cases:
❒wrongful opening of a door/bonnet/luggage compartment
(perimeter protection);
❒wrongful operation of the ignition switch (key turned to MAR);
❒cutting of the battery cables;
❒movement inside the passenger compartment (volumetric protection);
❒anomalous lifting/tilting of the car (for versions/markets, where
provided).
Operation of the alarm is indicated by an acoustic and visual signal
(flashing of the direction indicators for several seconds). The alarm
activation modes may vary according to the market. There is a
maximum number of acoustic/visual cycles. When this is reached the
system returns to normal operation.
IMPORTANT The engine locking function is guaranteed by the Alfa
Romeo CODE, which is automatically activated when the ignition key
is extracted from the ignition switch.
IMPORTANT The alarm is adapted to meet requirements in various
countries.SWITCHING ON THE ALARMWith the doors and bonnet closed and the ignition key either turned to
STOP or removed, direct the key with the remote control towards the
car, then press and release the
button. Except for specific markets,
the system emits a visual and acoustic signal and enables door locking.A self-diagnosis stage precedes the switching on of the alarm: in the
event of faults, the system will generate a further acoustic and/or
visual signal through the LED on the dashboard.
If after the alarm is switched on, a second acoustic signal is emitted
and/or a visual signal via the LED on the dashboard, wait about
4 seconds and switch off the alarm by pressing the
button, check
that the doors, bonnet and luggage compartment are closed correctly
and then reactivate the system by pressing the
button.
If the alarm emits an acoustic signal even when the doors, bonnet and
boot are correctly closed, a fault has occurred in system operation:
in this case, contact Alfa Romeo Authorized Services.
ALARM SELF-ACTIVATION(for versions/markets, where provided)
If the alarm has not been activated using the remote control, once
about 30 seconds have elapsed from when the ignition key was turned
to STOP and a door or the tailgate was last opened and then closed,
the alarm activates automatically.
This is indicated by the LED on the button A fig. 20 lighting up
intermittently and the indications of activation described previously.
To deactivate the alarm, press the
button on the remote control.
The alarm also activates when the doors are closed by turning the
metal insert of the key in the driver side door latch. If the system
self-activates, the doors are not locked.
41GETTING TO
KNOW YOUR CARSAFETY
STARTING AND
DRIVING
IN AN EMERGENCY
SERVICING AND
MAINTENANCE
TECHNICAL
SPECIFICATIONS
INDEX
Page 70 of 280

Carry out any of the following manoeuvres to restore automatic
operation of the system:
❒movement of left stalk from the automatic position to any other
position and then back to automatic;
❒sensitivity adjustment (by turning ring nut A to increase or decrease).
When the rain sensor is reactivated using any of the manoeuvres
described above, reactivation is indicated by a single stroke of the
windscreen wipers, regardless of the condition of the windscreen.
If the sensitivity is changed whilst the rain sensor is operating, a
windscreen wiper stroke is carried out to confirm the change.
In the event of malfunction of the rain sensor whilst it is active, the
windscreen wiper operates intermittently at a speed consistent with the
sensitivity setting of the rain sensor, regardless of whether there is
rain on the glass (sensor failure is indicated on the display).
The sensor continues to operate and it is possible to set the windscreen
wiper to continuous mode (1
stor 2
ndspeed). The failure indication
remains for as long as the sensor is active.
REAR WINDOW WASHER/WIPER(for versions/markets, where provided)
Activation
This operates only with the ignition key turned to MAR.
Turn ring nut B fig. 36 from positionOto position
to operate the
rear window wiper as follows:
❒in intermittent mode when the windscreen wiper is not operating;
❒in synchronous mode (at half the speed of the windscreen wiper)
when the windscreen wiper is operating;
❒in continuous mode with reverse gear engaged and the control
active.
With reverse gear engaged and windscreen wiper on, the rear
window wiper is activated in continuous mode. Pushing the stalk
towards the dashboard (unstable position) will activate the rear
window washer jet.
Keep the stalk pushed for more than half a second to activate the rear
window wiper as well. Releasing the stalk will activate the smart
washing function, as described for the windscreen wiper.
66GETTING TO
KNOW YOUR CAR
SAFETY
STARTING AND
DRIVING
IN AN EMERGENCY
SERVICING AND
MAINTENANCE
TECHNICAL
SPECIFICATIONS
INDEX
Page 73 of 280

ROOF LIGHTSFRONT ROOF LIGHTSwitch A fig. 39 switches the roof lights on/off.
A switch positions:
❒central position (position 1): lights C and D switch on/off when the
doors are opened/closed.
❒pressed to the left (position 0): lights C and D are always switched
off;
❒pressed to the right (position 2): lights C and D are always switched
on.
Lights switch on/off progressively.
switch B controls the spot light function.
B switch positions:
❒central position (position 1): lights C and D are always switched off;❒pressed to the left (position 0): light C switches on;
❒pressed to the right (position 2): light D switches on.
IMPORTANT Before getting out of the car, make sure that both switches
are in the central position: when the doors are closed the lights will
switch off to avoid draining the battery.
In any case, if the switch is left inadvertently in the permanently on
position, the roof light will turn off automatically 15 minutes after the
engine stopping.
ROOF LIGHT TIMINGOn certain versions, to facilitate getting in/out of the car at night or in
poorly-lit areas, two timed modes have been provided.
Timing when getting into the car
The roof lights switch on according to the following modes:
❒for about 10 seconds when the doors are unlocked;
❒for about 3 minutes when one of the doors is opened;
❒for about 10 seconds when the doors are closed.
The timed period is interrupted when the ignition key is turned to MAR.
Timing when getting out of the car
After removing the key from the ignition switch, the roof lights switch
on as follows:
❒within 2 minutes of the engine being switched off for a period of
around 10 seconds;
❒for about 3 minutes when one of the doors is opened;
❒for about 10 seconds when one of the doors is closed.
fig. 39
A0J0066
69GETTING TO
KNOW YOUR CARSAFETY
STARTING AND
DRIVING
IN AN EMERGENCY
SERVICING AND
MAINTENANCE
TECHNICAL
SPECIFICATIONS
INDEX
Page 99 of 280
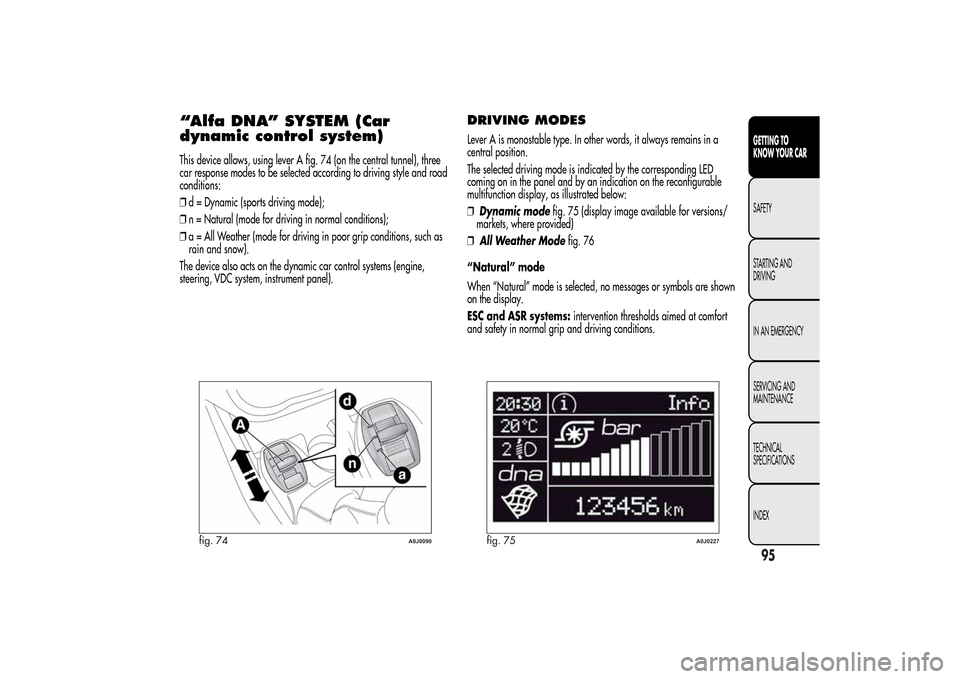
“Alfa DNA” SYSTEM (Car
dynamic control system)This device allows, using lever A fig. 74 (on the central tunnel), three
car response modes to be selected according to driving style and road
conditions:
❒d = Dynamic (sports driving mode);
❒n = Natural (mode for driving in normal conditions);
❒a = All Weather (mode for driving in poor grip conditions, such as
rain and snow).
The device also acts on the dynamic car control systems (engine,
steering, VDC system, instrument panel).
DRIVING MODESLever A is monostable type. In other words, it always remains in a
central position.
The selected driving mode is indicated by the corresponding LED
coming on in the panel and by an indication on the reconfigurable
multifunction display, as illustrated below:
❒Dynamic modefig. 75 (display image available for versions/
markets, where provided)
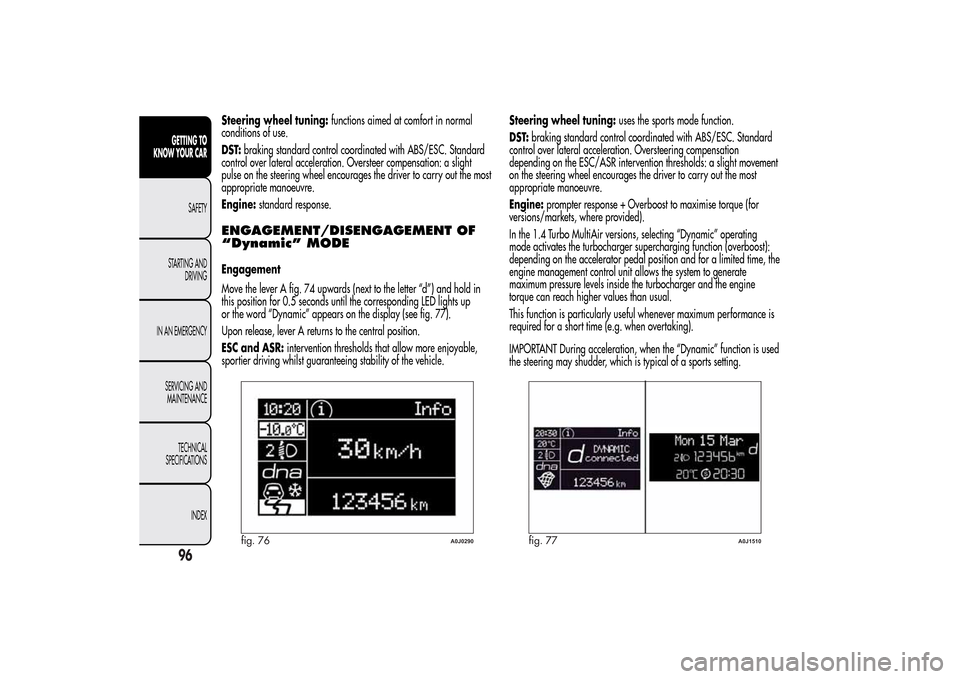
❒All Weather Modefig. 76
“Natural” mode
When “Natural” mode is selected, no messages or symbols are shown
on the display.
ESC and ASR systems:intervention thresholds aimed at comfort
and safety in normal grip and driving conditions.
fig. 74
A0J0090
fig. 75
A0J0227
95GETTING TO
KNOW YOUR CARSAFETY
STARTING AND
DRIVING
IN AN EMERGENCY
SERVICING AND
MAINTENANCE
TECHNICAL
SPECIFICATIONS
INDEX
Page 100 of 280
Steering wheel tuning:functions aimed at comfort in normal
conditions of use.
DST:braking standard control coordinated with ABS/ESC. Standard
control over lateral acceleration. Oversteer compensation: a slight
pulse on the steering wheel encourages the driver to carry out the most
appropriate manoeuvre.
Engine:standard response.ENGAGEMENT/DISENGAGEMENT OF
“Dynamic” MODEEngagement
Move the lever A fig. 74 upwards (next to the letter “d”) and hold in
this position for 0.5 seconds until the corresponding LED lights up
or the word “Dynamic” appears on the display (see fig. 77).
Upon release, lever A returns to the central position.
ESC and ASR:intervention thresholds that allow more enjoyable,
sportier driving whilst guaranteeing stability of the vehicle.Steering wheel tuning:uses the sports mode function.
DST:braking standard control coordinated with ABS/ESC. Standard
control over lateral acceleration. Oversteering compensation
depending on the ESC/ASR intervention thresholds: a slight movement
on the steering wheel encourages the driver to carry out the most
appropriate manoeuvre.
Engine:prompter response + Overboost to maximise torque (for
versions/markets, where provided).
In the 1.4 Turbo MultiAir versions, selecting “Dynamic” operating
mode activates the turbocharger supercharging function (overboost):
depending on the accelerator pedal position and for a limited time, the
engine management control unit allows the system to generate
maximum pressure levels inside the turbocharger and the engine
torque can reach higher values than usual.
This function is particularly useful whenever maximum performance is
required for a short time (e.g. when overtaking).
IMPORTANT During acceleration, when the “Dynamic” function is used
the steering may shudder, which is typical of a sports setting.
fig. 76
A0J0290
fig. 77
A0J1510
96GETTING TO
KNOW YOUR CAR
SAFETY
STARTING AND
DRIVING
IN AN EMERGENCY
SERVICING AND
MAINTENANCE
TECHNICAL
SPECIFICATIONS
INDEX
Page 101 of 280
Disengagement
To deactivate “Dynamic” mode and return to “Natural”, repeat the
same movement of the lever within the same times. In this case, the LED
corresponding to “Natural” mode will light up and the words “Natural
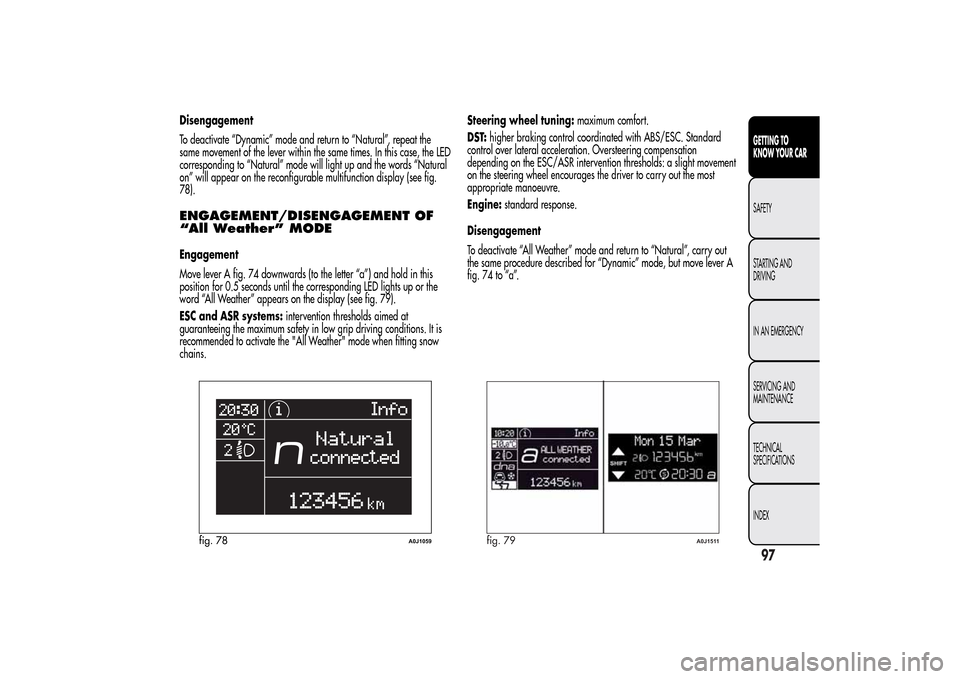
on” will appear on the reconfigurable multifunction display (see fig.
78).ENGAGEMENT/DISENGAGEMENT OF
“All Weather” MODEEngagement
Move lever A fig. 74 downwards (to the letter “a”) and hold in this
position for 0.5 seconds until the corresponding LED lights up or the
word “All Weather” appears on the display (see fig. 79).
ESC and ASR systems:intervention thresholds aimed at
guaranteeing the maximum safety in low grip driving conditions. It is
recommended to activate the "All Weather" mode when fitting snow
chains.Steering wheel tuning:maximum comfort.
DST:higher braking control coordinated with ABS/ESC. Standard
control over lateral acceleration. Oversteering compensation
depending on the ESC/ASR intervention thresholds: a slight movement
on the steering wheel encourages the driver to carry out the most
appropriate manoeuvre.
Engine:standard response.
Disengagement
To deactivate “All Weather” mode and return to “Natural”, carry out
the same procedure described for “Dynamic” mode, but move lever A
fig. 74 to “a”.
fig. 78
A0J1059
fig. 79
A0J1511
97GETTING TO
KNOW YOUR CARSAFETY
STARTING AND
DRIVING
IN AN EMERGENCY
SERVICING AND
MAINTENANCE
TECHNICAL
SPECIFICATIONS
INDEX
Page 253 of 280
Select the value “
0
” to set the same level for the front and
rear audio outputs.
LOUDNESS FUNCTIONThe Loudness function improves the volume of the sound whilst
listening at low volumes, increasing the bass and treble.
To activate/deactivate the function, select the Loudness setting of
the AUDIO menu using the
or
buttons.
The condition of the function (on or off) is shown on the display for
a few seconds by the wording “Loudness On” or “Loudness Off”.
PRESET/USER/CLASSIC/ROCK/JAZZ
FUNCTIONS(equaliser activation/deactivation)
The built-in equaliser can be activated/deactivated. When the
equaliser function is off, the audio settings can only be changed by
adjusting the “Bass” and “Treble” settings, whereas when the
function is on, the acoustic curves can be adjusted.
To deactivate the equaliser, select the “EQ Preset” function using the
buttons
or
.
To activate the equaliser, use the
or
buttons to select one of
the adjustments:
❒“FM/AM/CD...EQ User” (adjustment of 7 equaliser bands that
can be changed by the user);
❒“Classic” (equaliser preset for optimal classical music sound);
❒“Rock” (equaliser preset for optimal rock and pop music sound);
❒“Jazz” (equaliser preset for optimal jazz music sound).
When one of the equaliser settings is activated the letters “EQ”
light up.
USER EQ SETTINGS FUNCTION(equaliser settings only if the USER setting is selected)
To set a personalised equaliser adjustment, set to “User” using the
or
button and press the MENU button.
A 7-bar graph appears on the display, in which each bar
represents a frequency.
Select the bar to adjust using the
or
buttons; the selected bar
will start to flash and it can be adjusted using the
or
buttons.
To store the setting, press the AUDIO button again. The display will
show the active source at that time followed by the word “USER”. If
the mode is “FM”, for example, the display will show the text “FM
EQ User”.
MENUMENU button functions
Press the MENU button briefly to activate the Menu function. The
display will show the first menu item that can be adjusted (AF) (“AF
Switching On” on the display).
Use the
or
buttons to scroll through the menu functions. To
change the setting of the function selected use the
or
buttons.
The current status of the function selected will be shown on the
display.
The functions managed by the Menu are:
❒AF SWITCHING (ON/OFF);
❒TRAFFIC INFORMATION (ON/OFF);
❒REGIONAL MODE regional programmes (ON/OFF);
❒MP3 DISPLAY (CD MP3 display settings);
249SOUND-SYSTEM
Page 262 of 280
CD PLAYERINTRODUCTIONThis section describes the variants regarding the operation of the
CD player: as far as the operation of the radio is concerned, refer
to the description in the “Functions and Adjustments” chapter.SELECTING THE CD PLAYERTo activate the CD player built into the equipment, proceed as
follows:
❒insert a CD with the equipment switched on: the first track will
start to play;
or
❒if a CD has already been loaded, switch on the radio and then
briefly press the CD button to select the “CD” operating mode:
the last track listened to will start to play.
It is advisable to use original CDs to ensure optimum playback. If
CD-R/RWs are used, we recommend using good quality media
mastered at the slowest speed possible.LOADING/EJECTING A CDTo load the CD, insert it gently into the slot to activate the motorised
loading system, which will position it correctly.
The CD can be loaded with radio off and the ignition key turned to
MAR: in this case the radio will remain off. When the radio is
turned on, the last source listened to prior to switching off will be
activated.When a CD is inserted the display will show the symbol “CD-IN”
and the text “CD Reading”. They will remain displayed for the
entire time required for the radio to read the CD tracks. When this
time has elapsed the radio will automatically start to play the first
track.
Press the
button with the radio on to activate the motorised
ejection of the CD. After ejection, the last audio source listened to
before playing the CD will be heard.
If the CD is not removed from the radio, it will automatically be
reloaded about 20 seconds later and the Tuner mode will be
activated (Radio).
The CD cannot be ejected if the radio is off.
If the ejected CD is reloaded without having removed it completely
from the slot, the radio will not switch to the CD source.
Possible error messages
If the CD loaded cannot be read (e.g. a CD ROM has been
inserted or the CD is inserted upside down or there is reading
error) the display will show the text “CD Disc error”.
The CD will then be ejected and the audio source activated prior to
the CD mode selection will be heard.
With an external audio source activated (“TA”, “ALARM” or
“Phone”), the CD that cannot be read will not be ejected until these
functions have ended. At the end, with the CD mode activated, the
display will show the text “CD Disc error” for a few seconds and
then the CD will be ejected.
258
SOUND-SYSTEM