Page 329 of 518
uuAcuraLink®
*u
328Features
■Manual operator connection
If you need to talk to the AcuraLink operator
in an emergency situation, you can manually
connect to them by pressing the ASSIST
button with the power mode in ACCESSORY
or ON.
1.Open the cover attached to the ceiling
console.
2.Press the ASSIST button.
uYou are connected to the AcuraLink
operator.
1Manual operator connection
Do not press the button while driving. When you
need to contact the operator, park the vehicle in a
safe place.
If the unit fails to connect to the operator, it
automatically cancels the action after three minutes.
In an emergency, the cover can be broken through to
press the ASSIST button.
ASSIST
Button
Page 331 of 518
uuAcuraLink®
*u
330Features
Connect to the AcuraLink operator when trying to find a destination or for roadside
assistance.
1.Press the LINK button.
uConnection to the operator begins.
2.Talk to the operator.
uTo disconnect, press the selector knob,
select End Call on the On Demand
Multi-Use Display
TM, or press the Hang-
up button.
■
Operator Assistance
1Operator Assistance
Remain attentive to road conditions and driving
during operator assistance.
LINK ButtonAudio/information screen
when connected to the
AcuraLink operator.
Page 332 of 518

Continued
331
uuAcuraLink®
*u
Features
AcuraLink sends you messages on vehicle
features, safety and emissions recall
campaigns, maintenance reminders (U.S.
models only), and diagnostic information.
When you receive a new message, an icon
appears on the audio/information screen.
■Message category
There are six message categories.
•Feature Guide: Appears for the first 90 days of ownership, introducing vehicle
features each day.
•Quick Tips: Supplements your Owner’s Manual with updated vehicle
information.
•Diagnostic Info: Appears when a warning indicator or message comes on.
Rotate to select Check Later or Check Now.
uSelecting Check Now lets you know if you should see a dealer immediately or
later in accordance with the warning severity level.
•Scheduled Dealer Appointment (U.S. models only): An appointment made
through the Acura server or Acura Owners website can be rescheduled or
canceled from this option.
2 P. 333
•Maintenance Minder (U.S. models only): Lets you know which maintenance
item is due along with a reminder message.
•Recalls/Campaigns: Reminds you of a recall or important safety information.
You should also be notified by mail.■
AcuraLink Message
1AcuraLink Message
Messages may not appear immediately after your
vehicle purchase. It can take several days for your
dealer to register your vehicle’s ID.
If an icon includes an exclamation point, it indicates
that Acura gives high priority to this message
compared to the one without.•
: An unread message with high priority
•
: An unread message
Message Icon
1Message category
Message categories can be added, edited, or deleted
through broadcast messages from Acura.
You can call your dealer, find the nearest dealer, or
schedule appointments (U.S. models only) from the
message options in Maintenance Minder (U.S.
models only), Recalls/Campaigns, and Diagnostic
Info.
2Message Options P. 332
Page 333 of 518

uuAcuraLink®
*u
332Features
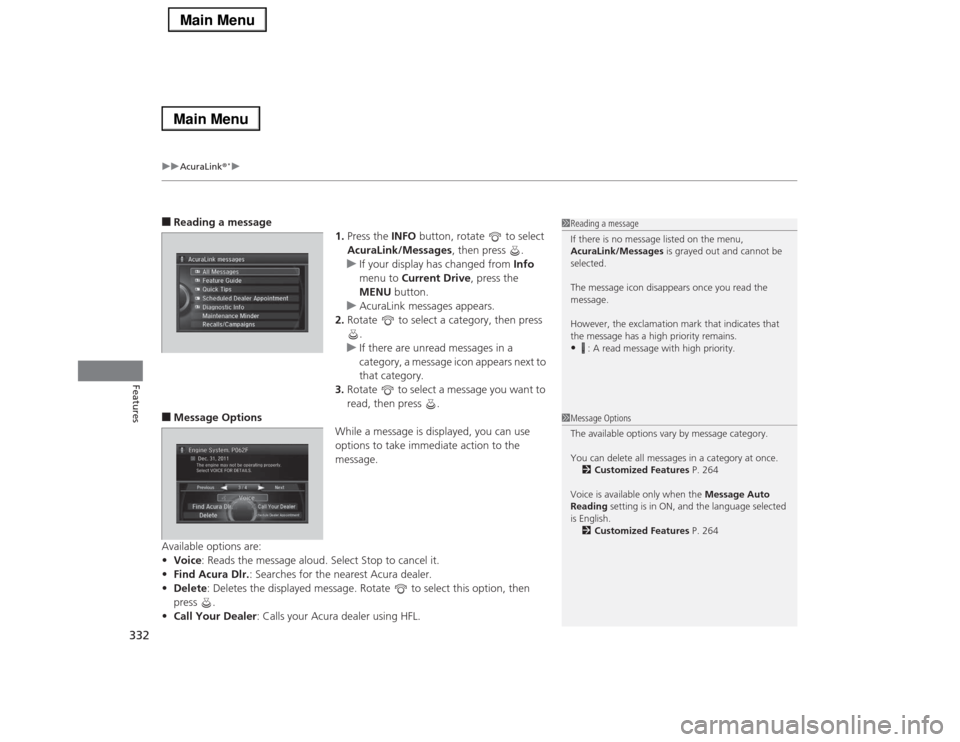
■Reading a message
1.Press the INFO button, rotate to select
AcuraLink/Messages, then press .
uIf your display has changed from Info
menu to Current Drive, press the
MENU button.
uAcuraLink messages appears.
2.Rotate to select a category, then press
.
uIf there are unread messages in a
category, a message icon appears next to
that category.
3.Rotate to select a message you want to
read, then press .■Message Options
While a message is displayed, you can use
options to take immediate action to the
message.
Available options are:
•Voice: Reads the message aloud. Select Stop to cancel it.
•Find Acura Dlr.: Searches for the nearest Acura dealer.
•Delete: Deletes the displayed message. Rotate to select this option, then
press .
•Call Your Dealer: Calls your Acura dealer using HFL.
1Reading a message
If there is no message listed on the menu,
AcuraLink/Messages is grayed out and cannot be
selected.
The message icon disappears once you read the
message.
However, the exclamation mark that indicates that
the message has a high priority remains.•
: A read message with high priority.
1Message Options
The available options vary by message category.
You can delete all messages in a category at once.
2Customized Features P. 264
Voice is available only when the Message Auto
Reading setting is in ON, and the language selected
is English.
2Customized Features P. 264
Dec. 31, 2011 The engine may not be operating properly.
Select VOICE FOR DETAILS. Engine System. P062F
Page 334 of 518

333
uuAcuraLink®
*u
Features
•Schedule Dealer Appointment (U.S. models only): Automatically sets an
appointment date at your dealer.
•Phone number: Dials a number displayed in the message via HFL.
•Diagnostic Info: Updates the current diagnostic message by connecting to the
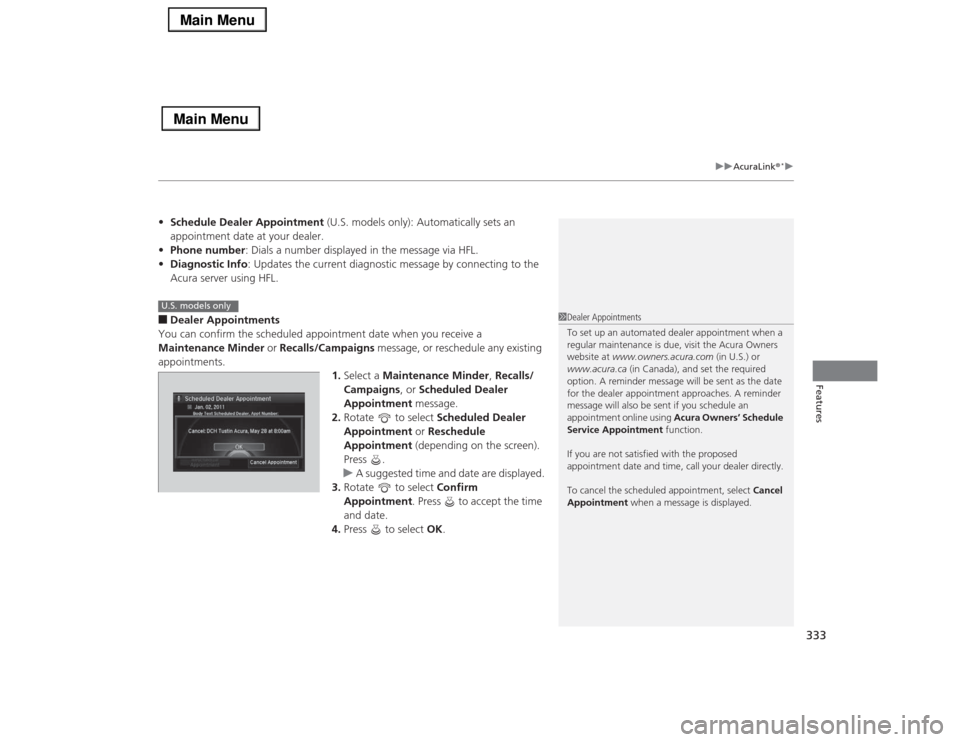
Acura server using HFL.■Dealer Appointments
You can confirm the scheduled appointment date when you receive a
Maintenance Minder or Recalls/Campaigns message, or reschedule any existing
appointments.
1.Select a Maintenance Minder, Recalls/
Campaigns, or Scheduled Dealer
Appointment message.
2.Rotate to select Scheduled Dealer
Appointment or Reschedule
Appointment (depending on the screen).
Press .
uA suggested time and date are displayed.
3.Rotate to select Confirm
Appointment. Press to accept the time
and date.
4.Press to select OK.
1Dealer Appointments
To set up an automated dealer appointment when a
regular maintenance is due, visit the Acura Owners
website at www.owners.acura.com (in U.S.) or
www.acura.ca (in Canada), and set the required
option. A reminder message will be sent as the date
for the dealer appointment approaches. A reminder
message will also be sent if you schedule an
appointment online using Acura Owners’ Schedule
Service Appointment function.
If you are not satisfied with the proposed
appointment date and time, call your dealer directly.
To cancel the scheduled appointment, select Cancel
Appointment when a message is displayed.
U.S. models only
Page 348 of 518
347
uuWhen DrivinguShifting
Continued
Driving
ShiftingChange the shift position in accordance with your driving needs.■Shift lever positions
1Shifting
You cannot change the power mode from ON to
VEHICLE OFF (LOCK) unless the shift lever is in
(P.
The vehicle may move forward very slightly even in
(N while the engine is cold.
Depress the brake pedal firmly and, when necessary,
apply the parking brake.
When shifting gears in extremely low temperatures
(-22°F/-30°C), there may be a short delay before the
shift is indicated in the display. Always confirm you
are in the correct gear before driving.
Park
Used when parking or starting the engine
Reverse
Used when reversing
Neutral
Used when idling
Drive
Used for:●Normal driving (gears change between 1st
and 6th automatically)●Temporarily driving in the sequential shift
mode●Driving in the sequential shift mode (when
driving in SPORT mode) Release Button
Page 350 of 518

349
uuWhen DrivinguShifting
Continued
Driving
Use the paddle shifters to change between 1st and 6th gears without removing your
hands from the steering wheel. The transmission will switch to the sequential shift
mode.■When the shift lever is in
(D
:
The vehicle will go into the sequential shift mode momentarily, and the gear position
indicator will come on.
Once you start traveling at a constant speed, the sequential shift mode will
automatically switch off, and the gear position indicator will go off.
Hold the
(+
paddle shifter for two seconds to return to normal drive.
■When the shift lever is in
(D
with SPORT mode:
The vehicle will go into the sequential shift mode, and the M (sequential shift)
indicator and gear position indicator will come on. At speeds of 6 mph (10 km/h) or
less, the vehicle automatically shifts down into 1st gear. If you do not operate the
paddle shifters while in 1st gear, the transmission automatically shifts up to 2nd
gear.
If the vehicle speed increases and the engine speed reaches near the tachometer’s
red zone, the transmission automatically shifts up to 6th.
You can cancel this mode by pressing SPORT button, or pulling the
(+
paddle
shifter for a few seconds. When the sequential shift mode is canceled, the sequential
shift mode indicator and shift indicator go off.
■
Sequential Shift Mode
Page 355 of 518

uuWhen DrivinguCruise Control
*
354Driving
Increase or decrease the vehicle speed using the RES/+/SET/– switch on the steering
wheel.
•Each time you press the switch up or down, the vehicle speed is increased or
decreased by about 1 mph (1.6 km/h).
•If you keep the switch pressed up or down, the vehicle speed increases or
decreases until you release it. This speed is then set.
To cancel cruise control, do any of the
following:
•Press the CANCEL button.
•Press the CRUISE button.
•Depress the brake pedal.
The CRUISE CONTROL indicator goes off.■
To Adjust the Vehicle Speed
1To Adjust the Vehicle Speed
You can set the vehicle speed pressing the RES/+/
SET/– switch down on the steering wheel when
adjusting the speed with the accelerator and brake
pedals.
■
To Cancel
To decrease speedTo increase speed
1To Cancel
Resuming the prior set speed:
After cruise control has been canceled, you can still
resume the prior set speed by pressing the RES/+/
SET/– switch up while driving at a speed of at least
25 mph (40 km/h) or more.
You cannot set or resume in the following situations:•When vehicle speed is less than 25 mph (40 km/h)•When the CRUISE button is turned off
At vehicle speeds of 22 mph (35 km/h) or less, cruise
control is canceled automatically.
CRUISE ButtonCANCEL Button