Page 196 of 500
195
uuClimate Control SystemuRear Climate Control System
Controls
Use the system when the engine is running
1.Press the AUTO button.
2.Adjust the interior temperature using the rear temperature control button.
3.To turn off the rear climate control system, press button.■Using the Rear Climate Control System From the Rear Panel
1Using the Rear Climate Control System From the Rear Panel
When the Rear Lock icon on the front control panel
is off, the temperature of the rear passenger
compartment can be controlled independently.
Rear floor
ventsRear console
vents and
floor ventsRear console
vents
/
(Fan Control)
Buttons
(On/Off) Button
Rear Temperature
Control ButtonsAUTO Button
Page 199 of 500
198Features
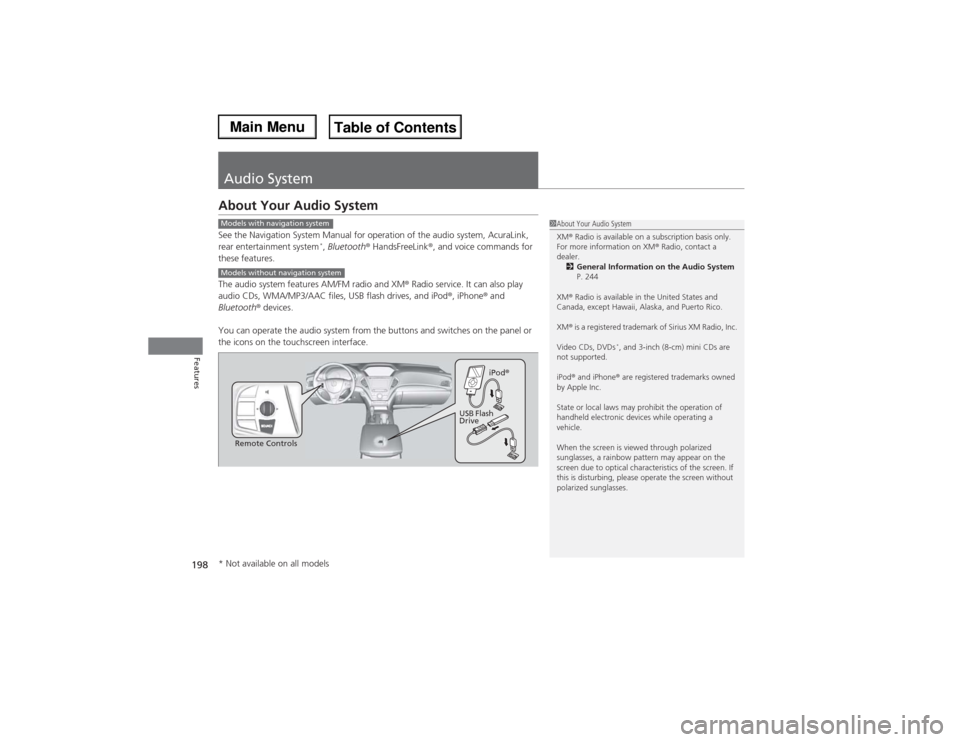
Audio SystemAbout Your Audio SystemSee the Navigation System Manual for operation of the audio system, AcuraLink,
rear entertainment system
*, Bluetooth® HandsFreeLink®, and voice commands for
these features.
The audio system features AM/FM radio and XM® Radio service. It can also play
audio CDs, WMA/MP3/AAC files, USB flash drives, and iPod®, iPhone® and
Bluetooth® devices.
You can operate the audio system from the buttons and switches on the panel or
the icons on the touchscreen interface.
1About Your Audio System
XM® Radio is available on a subscription basis only.
For more information on XM® Radio, contact a
dealer.
2General Information on the Audio System
P. 244
XM® Radio is available in the United States and
Canada, except Hawaii, Alaska, and Puerto Rico.
XM® is a registered trademark of Sirius XM Radio, Inc.
Video CDs, DVDs
*, and 3-inch (8-cm) mini CDs are
not supported.
iPod® and iPhone® are registered trademarks owned
by Apple Inc.
State or local laws may prohibit the operation of
handheld electronic devices while operating a
vehicle.
When the screen is viewed through polarized
sunglasses, a rainbow pattern may appear on the
screen due to optical characteristics of the screen. If
this is disturbing, please operate the screen without
polarized sunglasses.
Models with navigation systemModels without navigation system
Remote ControlsiPod®
USB Flash
Drive
* Not available on all models
Page 212 of 500
211
uuAudio System Basic OperationuAudio/Information Screen
Continued
Features
Audio/Information ScreenDisplays the audio status and wallpaper. From this screen, you can go to various
setup options.
Press the PHONE, INFO and AUDIO buttons to go to the corresponding display.■Switching the Display
Audio Info Phone
AUDIO Button
PHONE Button
INFO Button
Page 267 of 500
266Features
HomeLink® Universal TransceiverThe HomeLink® Universal Transceiver can be programmed to operate up to three
remote controlled devices around your home, such as garage doors, lighting, or
home security systems.
Refer to the safety information that comes with your garage door opener to test that
the safety features are functioning properly. If you do not have the safety
information, contact the manufacturer.
Before programming HomeLink, make sure that people and objects are out of the
way of the garage or gate to prevent potential injury or damage.
When programming a garage door opener, park just outside the garage door’s
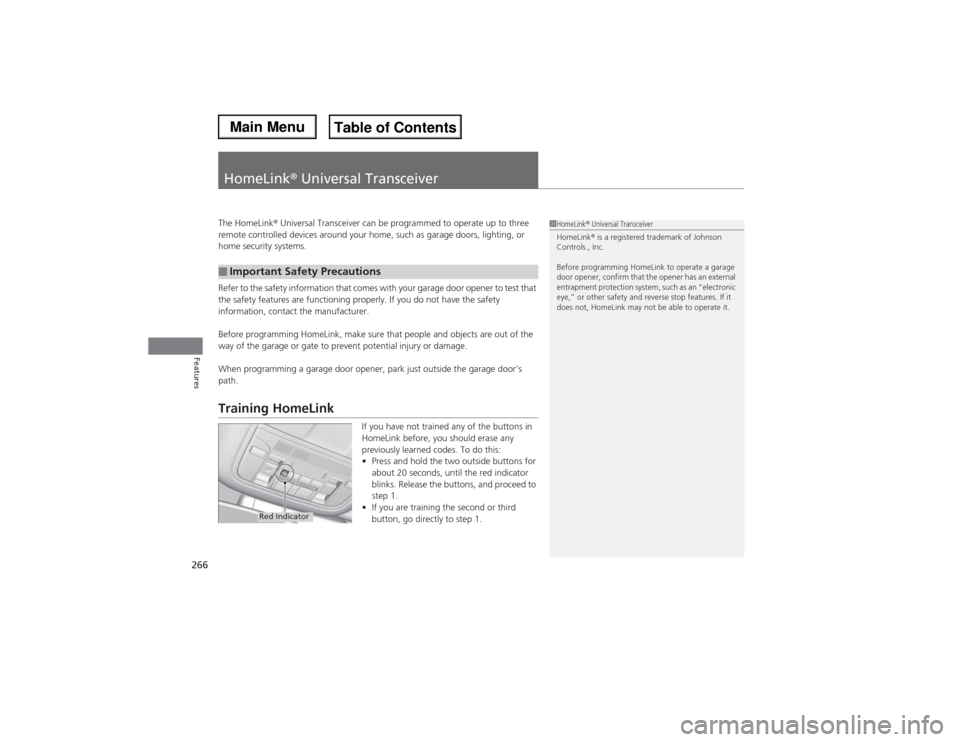
path.Training HomeLink
If you have not trained any of the buttons in
HomeLink before, you should erase any
previously learned codes. To do this:
•Press and hold the two outside buttons for
about 20 seconds, until the red indicator
blinks. Release the buttons, and proceed to
step 1.
•If you are training the second or third
button, go directly to step 1.
■Important Safety Precautions
1HomeLink® Universal Transceiver
HomeLink® is a registered trademark of Johnson
Controls., Inc.
Before programming HomeLink to operate a garage
door opener, confirm that the opener has an external
entrapment protection system, such as an “electronic
eye,” or other safety and reverse stop features. If it
does not, HomeLink may not be able to operate it.
Red Indicator
Page 268 of 500
267
uuHomeLink® Universal TransceiveruTraining HomeLink
Features
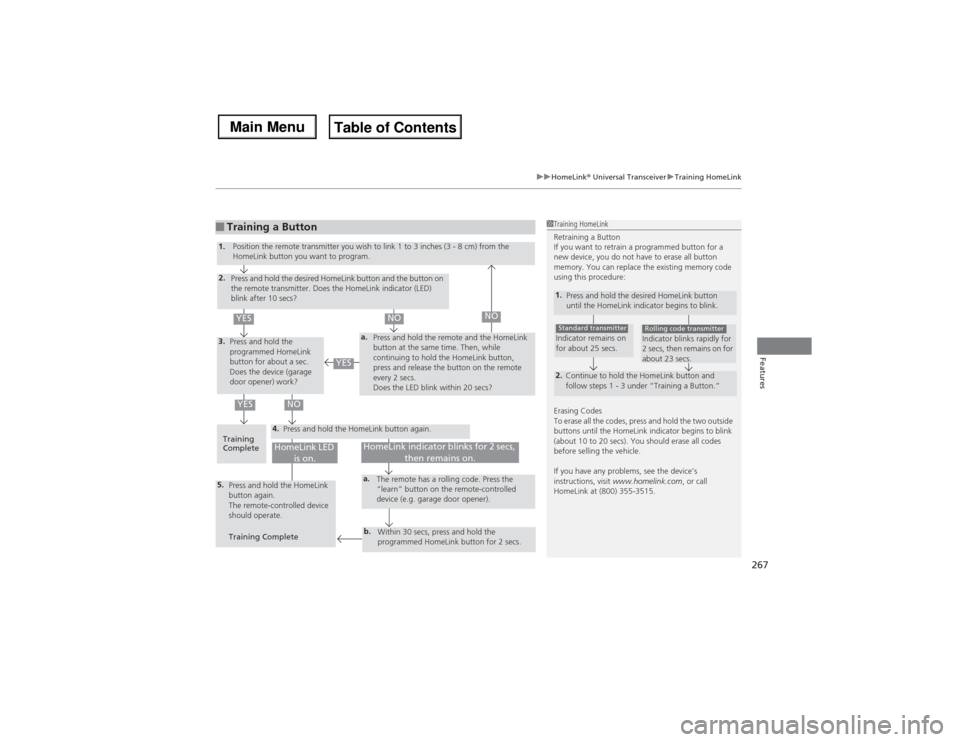
■Training a Button
1Training HomeLink
Retraining a Button
If you want to retrain a programmed button for a
new device, you do not have to erase all button
memory. You can replace the existing memory code
using this procedure:1.
Press and hold the desired HomeLink button
until the HomeLink indicator begins to blink.2.
Continue to hold the HomeLink button and
follow steps 1 - 3 under “Training a Button.”Indicator remains on
for about 25 secs.Standard transmitter
Indicator blinks rapidly for
2 secs, then remains on for
about 23 secs.Rolling code transmitter
Erasing Codes
To erase all the codes, press and hold the two outside
buttons until the HomeLink indicator begins to blink
(about 10 to 20 secs). You should erase all codes
before selling the vehicle.
If you have any problems, see the device’s
instructions, visit www.homelink.com, or call
HomeLink at (800) 355-3515.
4.
a.
3.2.5.
a.b.
1.
Position the remote transmitter you wish to link 1 to 3 inches (3 - 8 cm) from the
HomeLink button you want to program.
Press and hold the desired HomeLink button and the button on
the remote transmitter. Does the HomeLink indicator (LED)
blink after 10 secs?
Press and hold the
programmed HomeLink
button for about a sec.
Does the device (garage
door opener) work?Press and hold the remote and the HomeLink
button at the same time. Then, while
continuing to hold the HomeLink button,
press and release the button on the remote
every 2 secs.
Does the LED blink within 20 secs?
Training
CompletePress and hold the HomeLink button again.
Press and hold the HomeLink
button again.
The remote-controlled device
should operate.
Training CompleteThe remote has a rolling code. Press the
“learn” button on the remote-controlled
device (e.g. garage door opener).
Within 30 secs, press and hold the
programmed HomeLink button for 2 secs.
HomeLink indicator blinks for 2 secs,
then remains on.
HomeLink LED
is on.
YES
NO
YES
YES
NO
NO
Page 269 of 500
268Features
Bluetooth® HandsFreeLink®See Navigation System Manual for how to operate Bluetooth® HandsFreeLink®.
Bluetooth® HandsFreeLink® (HFL) allows you to place and receive phone calls using
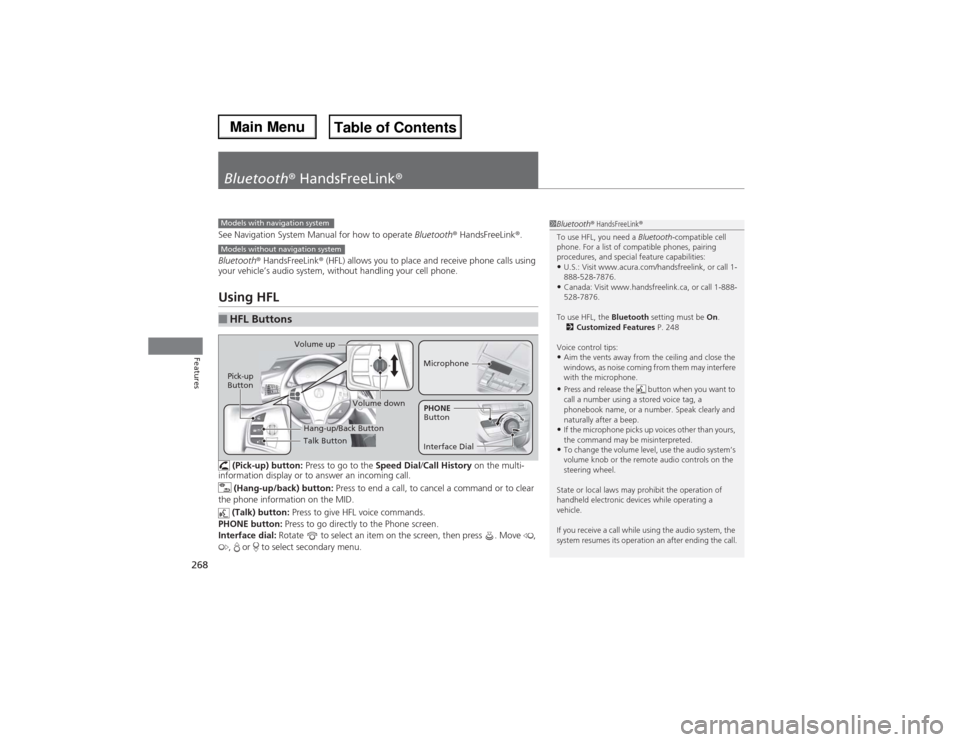
your vehicle’s audio system, without handling your cell phone.Using HFL (Pick-up) button: Press to go to the Speed Dial/Call History on the multi-
information display or to answer an incoming call.
(Hang-up/back) button: Press to end a call, to cancel a command or to clear
the phone information on the MID.
(Talk) button: Press to give HFL voice commands.
PHONE button: Press to go directly to the Phone screen.
Interface dial: Rotate to select an item on the screen, then press . Move ,
, or to select secondary menu.■HFL Buttons
1Bluetooth® HandsFreeLink®
To use HFL, you need a Bluetooth-compatible cell
phone. For a list of compatible phones, pairing
procedures, and special feature capabilities:•U.S.: Visit www.acura.com/handsfreelink, or call 1-
888-528-7876.•Canada: Visit www.handsfreelink.ca, or call 1-888-
528-7876.
To use HFL, the Bluetooth setting must be On.
2Customized Features P. 248
Voice control tips:•Aim the vents away from the ceiling and close the
windows, as noise coming from them may interfere
with the microphone.•Press and release the button when you want to
call a number using a stored voice tag, a
phonebook name, or a number. Speak clearly and
naturally after a beep.•If the microphone picks up voices other than yours,
the command may be misinterpreted.•To change the volume level, use the audio system’s
volume knob or the remote audio controls on the
steering wheel.
State or local laws may prohibit the operation of
handheld electronic devices while operating a
vehicle.
If you receive a call while using the audio system, the
system resumes its operation an after ending the call.
Models with navigation systemModels without navigation system
Talk Button Volume up
MicrophoneHang-up/Back Button
Pick-up
Button
Volume down
Interface DialPHONE
Button
Page 294 of 500
Continued
293
uuBluetooth® HandsFreeLink®uHFL Menus
Features
When there is an incoming call, an audible
notification sounds (if activated) and the
Incoming call screen appears.
Press the button to answer the call.
Press the button to decline or end the call.
■Receiving a Call
1Receiving a Call
Call Waiting
Press the button to put the current call on hold to
answer the incoming call.
Press the button again to return to the current
call.
Ignore the incoming call if you do not want to answer
it.
Press the button if you want to hang up the
current call.
You can select the icons on the On Demand Multi-
Use Display
TM instead of the and buttons.
Page 429 of 500
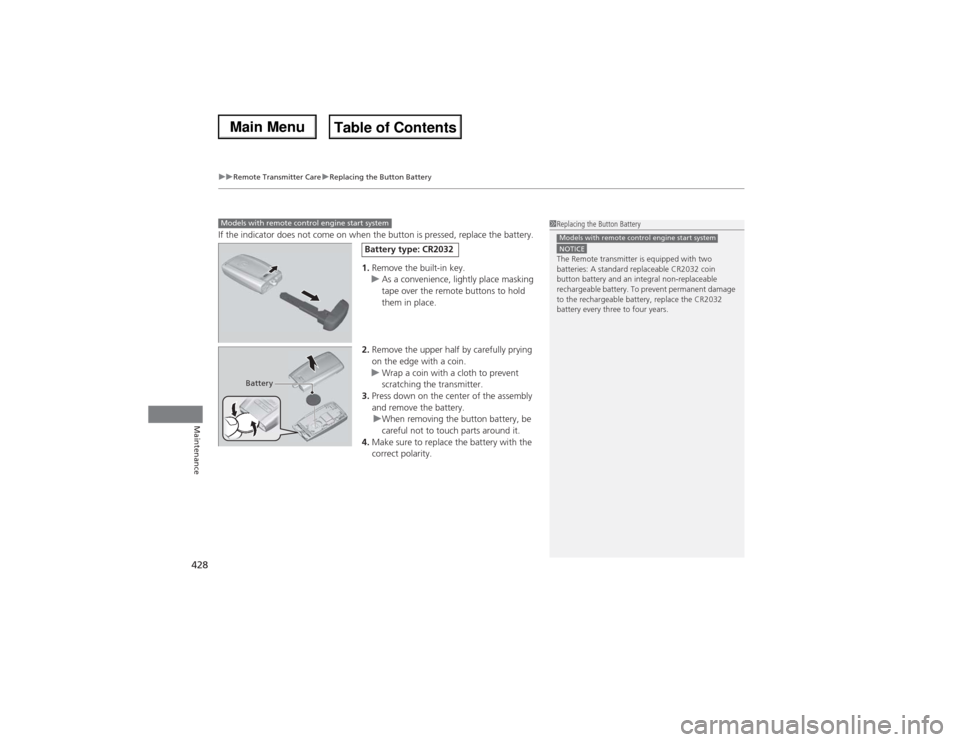
uuRemote Transmitter CareuReplacing the Button Battery
428Maintenance
If the indicator does not come on when the button is pressed, replace the battery.
1.Remove the built-in key.
uAs a convenience, lightly place masking
tape over the remote buttons to hold
them in place.
2.Remove the upper half by carefully prying
on the edge with a coin.
uWrap a coin with a cloth to prevent
scratching the transmitter.
3.Press down on the center of the assembly
and remove the battery.
uWhen removing the button battery, be
careful not to touch parts around it.
4.Make sure to replace the battery with the
correct polarity.Models with remote control engine start system
1Replacing the Button BatteryNOTICEThe Remote transmitter is equipped with two
batteries: A standard replaceable CR2032 coin
button battery and an integral non-replaceable
rechargeable battery. To prevent permanent damage
to the rechargeable battery, replace the CR2032
battery every three to four years.Models with remote control engine start system
Battery type: CR2032
Battery