Page 49 of 93

Bluetooth music49
turning the rotary knob and press
rotary knob or button ⊲ or ⊳ to display
the next menu.
Select Pair audio device by turning
and pressing the rotary knob, then, on the audio device, search for Bluetooth
equipment in the vicinity of the device.
Select My Radiosat (i.e. the name of
the system) from the list on the audio
device, then, if applicable, on the audio device keypad enter the pairing code shown on the Infotainment
system display screen.
Notice
If the audio device does not have a
screen, enter the default pairing
code on the device, then on the
Infotainment system. Refer to the
operating instructions for this default
audio device pairing code, usually
0000 . Depending on the device, the
pairing code may need to be entered in reverse order, i.e. on the
Infotainment system first.
If pairing fails, the message
Connection has failed. is displayed
and a tone sounds. Repeat procedure
if necessary.When pairing is completed, a
confirmation message followed by the
name of the paired audio device is
shown on the Infotainment system
display screen.
Notice
When a Bluetooth connection is
active, controlling the audio device
via the Infotainment system will
discharge the audio device battery more rapidly.
Connecting an audio device
To connect an audio device after it
has been paired, or to connect to a
different paired audio device than the
current one, press the 0 button and
select Bluetooth connection .
The device list shows the audio
devices already paired. Select the
desired device from the list. Select
Connect the device and confirm by
pressing the rotary knob. A display
message confirms connection.
Disconnecting an audio device
To disconnect an audio device from
the Infotainment system, select the
desired device from the Bluetoothconnection menu then select
Disconnect the device by turning and
pressing the rotary knob. A display
message confirms disconnection.
Switching off the audio device or
deactivating the Bluetooth function on
the audio device also disconnects the device from the Infotainment system.
Unpairing an auxiliary audio device
from the Infotainment system
If the list of paired audio devices is full,
a new device can only be paired if an
existing device is unpaired.
To unpair, i.e. to delete an audio
device from the system memory,
press the 0 button and select
Bluetooth connection . Select the
desired audio device from the list,
press the rotary knob or button ⊲ or ⊳ and select Delete this device .
Operation via Infotainment system When paired and connected
wirelessly, audio playback begins
automatically.
Page 50 of 93

50Bluetooth music
The audio device can then be
operated via the Infotainment system
function buttons, rotary knobs and
display menus.
The range of accessible functions
that can be operated via the
Infotainment system depends on the
type of audio player.
The operation of the audio device
when connected wirelessly is similar
to the operations for the CD player
3 37.
CD35 BT - Playing music via
Bluetooth
Bluetooth connection
A connection must be set up between
the audio device and the Infotainment system via Bluetooth, i.e. the device
must be paired to the vehicle before
using it.
■ A maximum of 5 audio devices can
be paired and saved in the device
list, but only one can be connected
at a time.■ If the device has both audio player and telephone functions, one or
both functions can be paired.
Pairing a mobile phone 3 75.
■ Phone functions will remain active while the audio player is in use, and
audio playback will be suspended
during phone use.
Pairing an auxiliary audio device to the Infotainment system
To pair the audio device, press the
SETUP / TEXT button and select
Bluetooth connection . Select an
empty slot by turning the central
rotary knob and press the knob to
display the next menu.
Select Pair device by turning and
pressing the rotary knob, then, on the
audio device, search for Bluetooth
equipment in the vicinity of the device.
Select My_Radio (i.e. the name of the
system) from the list on the audio
device, then, if applicable, on the
audio device keypad enter the pairing
code shown on the Infotainment
system display screen.Notice
If the audio device does not have a
screen, enter the default pairing
code on the device, then on the
Infotainment system. Refer to the
operating instructions for this default audio device pairing code, usually
0000 . Depending on the device, the
pairing code may need to be entered
in reverse order, i.e. on the
Infotainment system first.
If pairing fails, the message Pairing
failed is displayed. Repeat procedure
if necessary.
When pairing is completed, a
confirmation message followed by the
name of the paired audio device is
shown on the Infotainment system
display screen.
Notice
When a Bluetooth connection is active, controlling the audio device
via the Infotainment system will
discharge the audio device battery more rapidly.
Page 51 of 93

Bluetooth music51
Connecting an audio device
Audio devices are automatically
connected to the Infotainment system after the pairing procedure is
completed.
To connect any audio device that has
been paired, or to connect to a
different paired audio device than the
current one, press the
SETUP / TEXT button and select
Bluetooth connection (or press the
TEL button when no device is
connected). The device list shows the
audio devices already paired.
Select the desired device from the list
and confirm by pressing the central
rotary knob. A display message
confirms connection.
Disconnecting an audio device
To disconnect an audio device from
the Infotainment system, select the
desired device from the Bluetooth
connection menu then select
Disconnect the device by turning and
pressing the central rotary knob. A
display message confirms
disconnection.Switching off the audio device or
deactivating the Bluetooth function on the audio device also disconnects the
device from the Infotainment system.
Unpairing an auxiliary audio device
from the Infotainment system
If the list of paired audio devices is full,
a new device can only be paired if an
existing device is unpaired.
To unpair, i.e. to delete an audio
device from the system memory,
press the SETUP / TEXT button and
select Bluetooth connection . Select
the desired audio device from the list, press the central rotary knob and
select Delete.
Operation via Infotainment system
When paired and connected
wirelessly, audio playback begins
automatically.
The audio device can then be
operated via the Infotainment system
function buttons, rotary knobs and
display menus.The range of accessible functions
that can be operated via the
Infotainment system depends on the
type of audio player.
The operation of the audio device
when connected wirelessly is similar
to the operations for the CD player
3 37.
Page 52 of 93

52NavigationNavigationGeneral information.....................52
Usage .......................................... 55
Destination input ..........................61
Guidance ..................................... 64
Symbols overview ........................68General information9Warning
The navigation system is an aid to
your navigational abilities and
does not replace them. Drive with
due care and attention and adopt
a safe, vigilant attitude.
If a navigation system instruction
contradicts traffic regulations, the
traffic regulations always apply.
The Navigation system will reliably
guide you to your chosen destination
without the need for physical road
maps.
If the Traffic info service is available
in your country or region, the current
traffic situation is also considered in
route calculations. The system
receives traffic messages in the
current reception area.
To receive the most up-to-date, real-
time traffic information possible,
subscribe to the Live services facility
via the TomTom™ website.
Functioning of the Navigation
system
The position and movement of the
vehicle are detected by the
Navigation system using sensors.
The distance travelled is determined
by the vehicle's speedometer signal,
and turning movements on bends are
determined by a gyro sensor. The
position is determined by GPS
(Global Positioning System)
satellites.
By comparing these sensor signals
with the digital maps on the
Navigation system SD card, it is
possible to accurately determine the
position of the vehicle.
When using the vehicle for the first
time, or after a ferry trip, etc., the
system will self-calibrate. It is,
therefore, normal if it does not provide
an exact location until the vehicle has
travelled for some distance.
After the entry of the destination
address or point of interest (nearest
petrol station, hotel, etc.) the route is
calculated from the current location to the selected destination.
Page 53 of 93

Navigation53
Route guidance is provided by voice
output and the display screen.9 Warning
Areas such as one-way streets
and pedestrian zones are not
marked on the navigation system map. In such areas, the system
may issue a warning that must be
accepted. Therefore, pay
particular attention to one-way
streets and other roads and
entrances that must not be driven
into.
SD card
An SD card is supplied with the
Navigation system and contains,
among other things, a digital map of
the towns and roads in your country.
After delivery of a new vehicle, there
is a maximum of 60 days in which to
update the digital map for free. After
this time has elapsed, a fee is
charged for map updates.
TomTom HOME™ software
installation To update the digital maps and to
benefit from exclusive downloadable
services, including real-time safety
and traffic alerts, an account must be
created on the TomTom™ website
and the free TomTom HOME™
software must be installed.
Creating an account
Create your TomTom™ internet
account via the TomTom™ website.
Select e.g., the Create account option
on the web page and enter the
appropriate details.Installing the software
Insert the SD card in your computer's card reader (or an external card
reader) while connected to the
Internet. The software installation is
launched automatically.
Follow the on-screen instructions to
install the free TomTom HOME™
software.
Your SD card is automatically
recognised by the system after the
initial set-up.
Page 54 of 93

54Navigation
Updating the SD card and
Navigation system Updates are issued regularly, e.g. for
map and safety camera revisions.
These updates are only available via
the TomTom HOME software, which
is accessed via the SD card.
Using the TomTom HOME software,
it is possible to:
■ Update the Navigation system (maps, safety cameras etc.),
■ Subscribe to LIVE services,
■ Save the system data onto your computer,
■ Add or delete data,
■ Customise the system,
■ Share map corrections with the community ( Map Share™ ),
■ Download the full TomTom™ Navigation system user manual.
The TomTom HOME software menus
guide you through these operations.System update
To get the best from the Navigation
system, update it as often as
possible. Map Share™ map updates,
for example, can be shared with the
entire community of system users.
Main functions of
TomTom HOME applicationDownload new and extra maps
Select the Add Maps icon to access
the menu where maps can be
downloaded.Downloading voices, points of
interest, etc.
Select the Add Traffic, Voices, Safety Cameras, etc. icon to:
■ download voices to customise the system,
■ download points of interest, etc.
Notice
In certain countries it is illegal to
download and activate the camera
warning option and this could lead to
prosecution.Save the SD card and system data
System data can be saved on your
computer and also restored, if
necessary.
It is recommended that the system
data is saved on a regular basis.
Saving the data allows it to be
recovered if, for example, the SD card is lost or damaged.Download instructions
It is possible to access to the full
TomTom™ Navigation system user
manual for the system.Customise the system
It is also possible to customise the
system by installing new points of
interest and synthesised voices and
by changing the colour scheme.
Page 55 of 93

Press right: Ac")
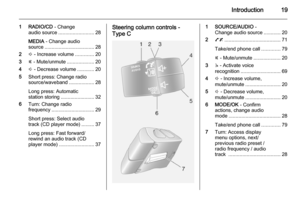
Navigation55UsageRemote control
1. Central button: Confirm, access the quick menu
Press up, down, right, left: Move
around menu or map
Press up/down: Adjust the map
scale (zoom in/out)
Press right: Access traffic
information
2. Soft buttons (⌞ and ⌟)
From menu: Select and confirm
actions
From map: Left button (⌞) - repeats a voice instruction;
Right button (⌟) - displays route
summary
3. MENU : Access the main menu
4. MAP 2D/3D
From menu: Displays map
From map: Switches map to 2D/
3D mode
5. BACK : Back to previous screen
The soft buttons (⌞ and ⌟) select or
confirm actions which appear at the
bottom of the screen.
The LED on the remote control
flashes once when the remote control is connected to the Navigation
system. To connect it more quickly,
press one of the remote control
buttons when the system starts,
before the legal notices appear.
If the LED flashes and a message
appears on the screen, the batteries
require replacing.
Battery replacement
Press down latch on the back of the
unit and lift out the keypad.
Page 56 of 93
 ensuring they are
installed correctly, then replace the
battery cover.
Activating the Navigation
system
Switching on
The Navigation syste")
56Navigation
Insert new batteries (Type: AAA /LR03 / UM4 1.5V) ensuring they are
installed correctly, then replace the
battery cover.
Activating the Navigation
system
Switching on
The Navigation system switches on
automatically when the ignition is
switched on. In other cases, press the
X knob.
With the ignition off, the Navigation
system can be used for approx.
20 minutes. Press the X knob to
switch on the Navigation system. The
system will automatically switch off
approx. 20 minutes after the last user
input.
Switching off
With the ignition off, the Navigation
system switches off automatically
when the driver's door is opened.
With the ignition on, press the X knob
to switch off the Navigation system.Switching between Navigation
system and Infotainment system
menus
With the Infotainment and Navigation
systems on, press the NAVI button
(on the steering column controls) to
switch between the Navigation
system and Infotainment system
screens.
When the Infotainment controls are
used to change, for example, the audio source, the Infotainment
system screen pops-up temporarily
over the Navigation system screen.
The display switches back after a
delay.
Clock The clock is displayed when switched
to the Infotainment system screen.
Inserting the SD card
Switch off the Navigation system and
insert the SD card in its slot. The SD
card is fragile; do not bend it.
Insert it the right way round, as shown in the illustration.
Removing the SD card
Select Remove SD card in the main
menu, then confirm using the right
soft button ⌟. A message is displayed
when it is safe to remove the SD card.
To remove the SD card from its slot,
press on the card then release it. The
card is released slightly to enable it to be withdrawn.
Only use an SD card which is
compatible with the system.