2014.5 PEUGEOT 4008 parking brake
[x] Cancel search: parking brakePage 4 of 389

Instrument panel 12
Warning and indicator lamps
1
3
Instrument panel screen
1
9
tr
ip computer
3
2
Distance recorder
3
2
tr
ip distance recorder
3
2
Service indicator
3
3
Adjusting vehicle settings
3
7
Audio- CD system screen
4
4
Audio- CD system touch screen
4
6
Audio-
te
lematic system touch
screen
48
Lighting dimmer
5
1
MonitoringOver view
Remote control key 5
2
"Keyless e
n
try and Starting"
system
5
6
Doors
62
Boot
6
3
Alarm
65
el
ectric windows
6
8
Panoramic sunroof
7
0
Access
Front seats 7 1
Rear seats
7
5
Mirrors
77
Steering wheel adjustment
7
9
Ventilation
80
Manual heating / air conditioning
8
2
Automatic air conditioning
8
4
Rear screen demist - defrost
8
9
Interior fittings
9
0
Boot fittings
9
6
Comfort
Starting - stopping the engine with the key 98
Starting - stopping the engine with
the Keyless
e
n
try and Starting system
9
9
Parking brake
1
02
Manual gearbox
1
03
ge
ar shift indicator
1
04
CV
t
gearbox
1
05
Hill start assist
1
10
Stop & Start (Auto Stop &
g
o
) function
1
11
Under-inflation detection
1
14
Four wheel drive system
1
18
Cruise control
1
20
Parking sensors
1
23
Reversing camera
1
26
Driving
Lighting controls 1 27
Daytime running lamps
1
30
Automatic illumination of headlamps
1
30
Manual guide-me-home lighting
1
31
Welcome lighting
1
32
Headlamp adjustment
1
33
Wiper controls
1
34
Automatic rain sensitive wipers
1
36
Courtesy lamps
1
38
Boot lamp
1
40
Panoramic roof lighting
1
40
Visibility
e
co-driving
Contents
Page 6 of 389

4
exterior
Lighting controls 127-131
Headlamp beam adjustment 1 33
Welcome lighting
1
32
Changing bulbs
1
82-185
-
f
ront lamps
-
foglamps
-
d
irection indicator repeaters
W iper c ontrols
13
4 -137
Changing a wiper blade
197
Door mirrors
7
7-78
Doors
6
2, 64
-
ope
ning / closing
-
c
entral locking
Child lock
1
70
el
ectric windows
6
8 - 69
Alarm
65-67
Panoramic sunroof
7
0
Roof bars
2
03
Accessories
20
4-205
Braking assistance
1
42-143
tra
jectory control
1
44-145
ty
re pressures
1
75, 235
un
der-inflation detection
1
14-117
Boot
63
- ope
ning / closing
- em
ergency release
te
mporary puncture
repair kit
1
71-174
Changing a wheel
1
75-180
-
tools
-
r
emoving / refitting
Snow chains
1
81
Changing bulbs
1
86-187
-
r
ear lamps
-
3
rd brake lamp
-
n
umber plate lamps
-
foglamp
Parking sensors
1
23-125
Reversing camera
1
26
to
wbar
20
1-202
to
w i n g
19 8 - 2 0 0
Fuel tank
2
10
Remote control key /
electronic key
5
2-61
-
ope
ning / closing
-
a
nti-theft protection
-
battery
Over view
Page 8 of 389

6
Instruments and controls
Hazad warning lamps 141
Door mirrors
7
7-78
el
ectric windows
6
8 - 69Rear view mirror
7
9
Courtesy lamps
1
38 -139
Panoramic sunroof
7
0
Dashboard fuses
1
88 -190, 193 Instrument panel
1
2
Warning lamps
1
3-18
Indicators
33-35
Audio- CD system screen
4
4
Setting the time
4
4- 45
Screen for touch screen Audio- CD system
4
6
Setting the time
4
6 - 47
Screen for the touch screen Audio-
te
lematic system
4
8
Setting the time
4
9 -50
Parking brake
1
02
5/6-speed manual gearbox
1
03
ge
ar shift indicator
1
04
CV
t g
earbox
10
5 -109
Hill start assist
1
10
4 wheel drive system
1
18 -119Audio- CD system
3
11-334
to
uch screen Audio- CD system
2
8 9 - 310
tou
ch screen Audio-
te
lematic
system
2
49 -288
Ventilation
8
0-81
Manual air conditioning
8
2-83, 88
Digital air conditioning
8
4-88
Front demisting
8
8
Demisting the rear screen
8
9
Opening the bonnet
2
07
Over view
Page 16 of 389

14
Warning lamps
When the engine is running or the vehicle is being driven, the
illumination of one of the following warning lamps indicates a
malfunction which requires action on the part of the driver.
th
e warning comes on in the instrument panel or appears in the
instrument panel screen.
Warning /indicator lampis on Cause Action / Observations
Parking brake
/
Brake fluid
level
/ Electronic
brake force
distribution fixed.
It comes on for a few seconds, then
goes off when the ignition is switched
to " O N ".
th
e parking brake is on or not fully
released. It is accompanied by a message. Release the parking brake
to make the warning lamp go off.
th
e brake fluid level is too low. It is accompanied by a message. t
o
p up with brake fluid and
contact a P
e
uge
Ot
dealer or a qualified workshop.
th
e electronic brake force distribution
(
eB
FD) is faulty.You must stop as soon as it is safe to do so.
Have it checked by a P
e
uge
Ot
dealer or a qualified
workshop.
Engine
autodiagnosis
system flashing.
the
engine management system has
a fault. Risk of destruction of the catalytic converter.
Have it checked by a P
e
uge
Ot
dealer or a qualified
workshop.
fixed.
th
e emission control system has a
fault.
th
e warning lamp should go off when the engine is started.
If it does not go off, contact a P
e
uge
Ot
dealer or qualified
workshop without delay.
Battery charge *fixed.
th
e battery charging circuit has a
fault (dirty or loose terminals, slack or
cut alternator belt, ...).
th
e warning lamp should go off when the engine is started.
If it does not go off, contact a P
e
uge
Ot
dealer or a
qualified workshop.th e illumination of a warning lamp may be accompanied by the display
of an additional message, to assist you in identifying the problem.
If you encounter any problems, you should contact a P
e
uge
Ot
dealer or a qualified workshop.
*
A
ccording to destination country.
Monitoring
Page 29 of 389

27
Screen 1 Screen 2Cause Solution - ActionObservations
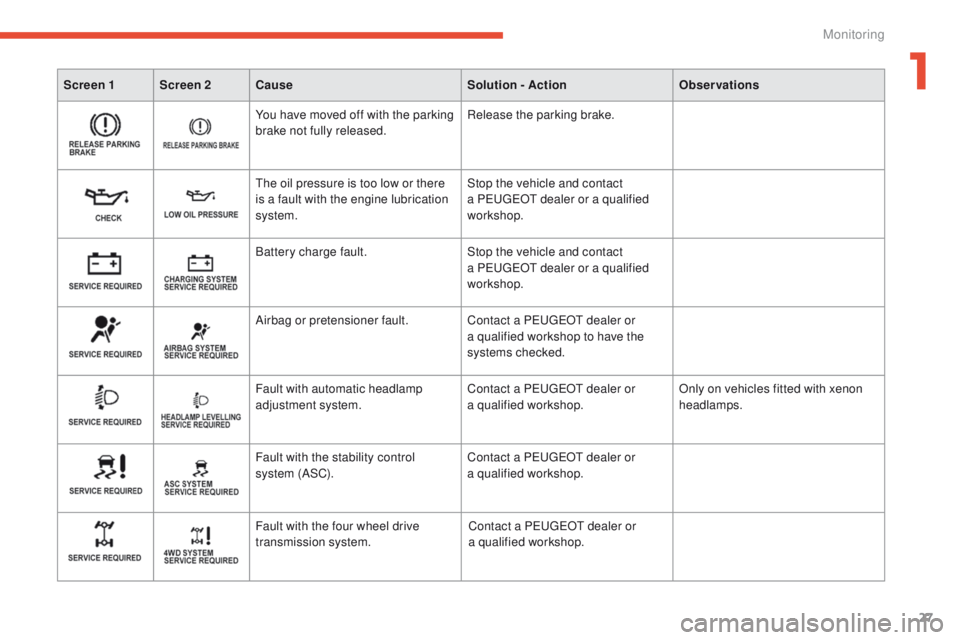
You have moved off with the parking
brake not fully released. Release the parking brake.
th
e oil pressure is too low or there
is a fault with the engine lubrication
system. Stop the vehicle and contact
a P
e
uge
Ot
dealer or a qualified
workshop.
Battery charge fault. Stop the vehicle and contact
a P
e
uge
Ot
dealer or a qualified
workshop.
Airbag or pretensioner fault. Contact a P
e
uge
Ot
dealer or
a qualified workshop to have the
systems checked.
Fault with automatic headlamp
adjustment system. Contact a P
e
uge
Ot
dealer or
a qualified workshop. Only on vehicles fitted with xenon
headlamps.
Fault with the stability control
system (ASC). Contact a P
e
uge
Ot
dealer or
a qualified workshop.
Fault with the four wheel drive
transmission system. Contact a P
e
uge
Ot
dealer or
a qualified workshop.
1
Monitoring
Page 39 of 389

37
Adjusting vehicle settings
When the vehicle is
stationary, this menu allows
the user to change the
following:
-
th
e reinitialisation
mode for average
fuel consumption and
average speed, F
P
ress and hold the INFO
button for a few
seconds to display the menu screen.
F
I
n the menu screen, press the INFO button
to select a function from the list:
-
t
he fuel consumption units,
-
t
he temperature display unit,
-
t
he display language,
-
a
ctivation/deactivation of the sound when
pressing the INFO button,
-
t
he break (rest) reminder display interval,
-
r
einitialise the under-inflation alert
threshold (see the "
un
der-inflation
detection" section),
-
c
hoose a set of tyres (see the "
un
der-
inflation detection" section),
-
r
estore the factory settings.
to c
hange the settings, you must stop
the vehicle and switch on the ignition.
Apply the parking brake and place the
gear lever in neutral.
With the ignition on
, press the INFO button
on the dashboard, to the right of the instrument
panel, several times until the "S
e
tt
I
N
gS
MeNu" s
creen is displayed.
Operation
MENU
1/3:
- 1 - 2 , A - M, A - P * (choice of the type of
reset of average fuel consumption and
average speed),
-
AV
G UN IT (choice of the fuel consumption
un i t s),
-
c
hoice of the temperature display unit ,
-
L
ANGUAGE (option of the display
language),
* Depending on the display language.
th
ere are some differences in the
content of the menus of the the type 1
and type 2 display screens.
For your safety, when the vehicle
is moving , the function settings are
not displayed when you press the
INFO
button.
1
Monitoring
Page 104 of 389

102
Anti-theft protection
Electronic engine immobiliser
the keys contain an electronic chip which has
a secret code. When the ignition is switched
on, this code must be recognised in order for
starting to be possible.
th
is electronic engine immobiliser locks the
engine management system a few minutes
after the ignition is switched off and prevents
starting of the engine by anyone who does not
have the key.
In the event of a malfunction, you are informed
by a message in the instrument panel screen.
In this case, your vehicle does not start; contact
a P
e
uge
Ot
dealer as soon as possible.
Applying
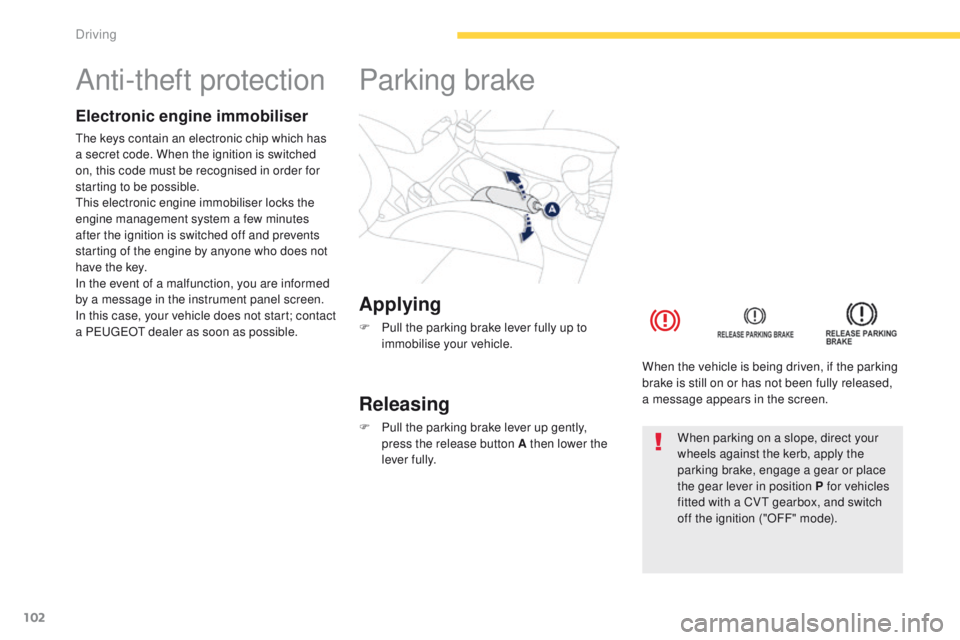
F Pull the parking brake lever fully up to immobilise your vehicle.
Parking brake
Releasing
F Pull the parking brake lever up gently, press the release button A then lower the
lever fully. When the vehicle is being driven, if the parking
brake is still on or has not been fully released,
a message appears in the screen.When parking on a slope, direct your
wheels against the kerb, apply the
parking brake, engage a gear or place
the gear lever in position P for vehicles
fitted with a CV
t
gearbox, and switch
off the ignition ("OFF" mode).
Driving
Page 108 of 389

106
Gear lever positions
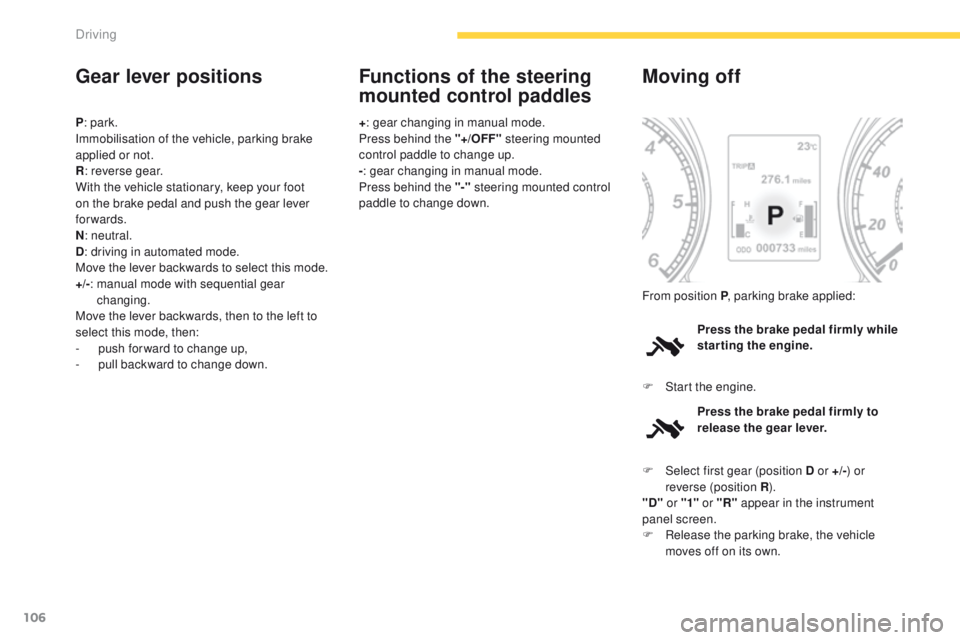
P: park.
Immobilisation of the vehicle, parking brake
applied or not.
R : reverse gear.
With the vehicle stationary, keep your foot
on the brake pedal and push the gear lever
forwards.
N : neutral.
D : driving in automated mode.
Move the lever backwards to select this mode.
+/- :
m
anual mode with sequential gear
changing.
Move the lever backwards, then to the left to
select this mode, then:
-
p
ush forward to change up,
-
p
ull backward to change down. +
: gear changing in manual mode.
Press behind the "+/OFF" steering mounted
control paddle to change up.
- : gear changing in manual mode.
Press behind the "-" steering mounted control
paddle to change down.
Functions of the steering
mounted control paddles
Press the brake pedal firmly while
starting the engine.
Moving off
F Start the engine. From position P , parking brake applied:
Press the brake pedal firmly to
release the gear lever.
F
Sel
ect first gear (position D or +/- ) or
reverse (position R ).
"D" or "1" or "R" appear in the instrument
panel screen.
F
R
elease the parking brake, the vehicle
moves off on its own.
Driving