Page 206 of 415
204
Seat belts
Front seat beltsRear seat belts
the rear seats are each fitted with a seat belt,
three-point anchorages with inertia reel and
force limiter (except for the centre rear seat).Fastening
F Pull the strap, then insert the tongue in the
buckle.
F
C
heck that the seat belt is fastened
correctly by pulling the strap.
Unfastening
F Press the red button on the buckle.
F gu ide the seat belt as it reels in.
th
e front seat belts are fitted with a
pretensioning and force limiting system.
th
is system improves safety in the front
seats in the event of a front or side impact.
Depending on the severity of the impact, the
pretensioning system instantly tightens the seat
belts against the body of the occupants.
the
pretensioning seat belts are active when
the ignition is on.
th
e force limiter reduces the pressure of the
seat belt on the chest of the occupant,
so improving their protection.
Safety
Page 207 of 415
205
From approximately 12 mph
(20 km/h), the warning lamp(s)
flash for two minutes accompanied
by an audible signal. Once these
two minutes have elapsed, the
warning lamp(s) remain on until the
driver or one or more passengers
fasten their seat belt.
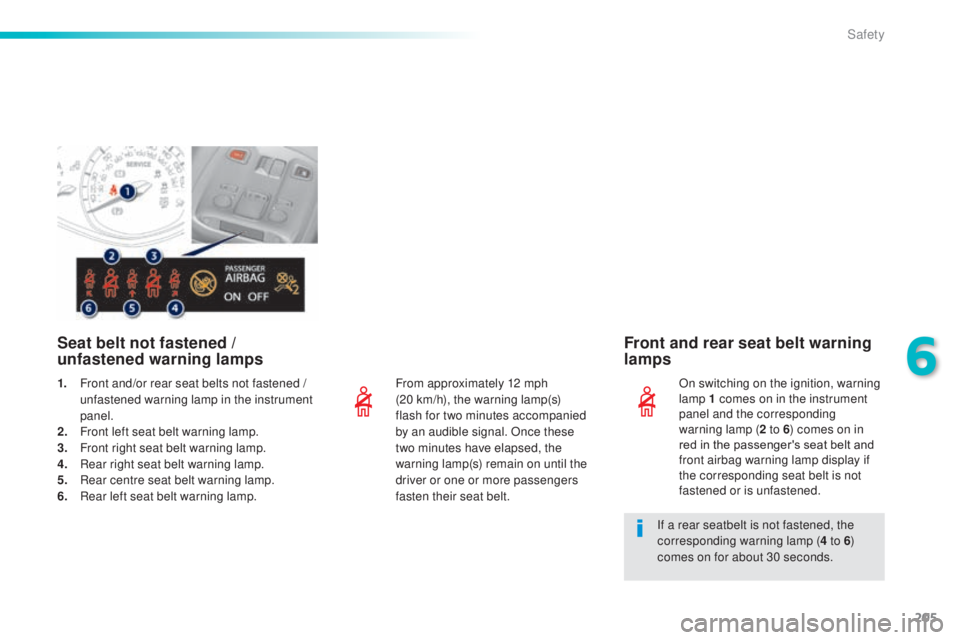
Seat belt not fastened /
u nfastened warning lamps Front and rear seat belt warning
lamps
On switching on the ignition, warning
lamp 1 comes on in the instrument
panel and the corresponding
warning lamp (
2 to 6) comes on in
red in the passenger's seat belt and
front airbag warning lamp display if
the corresponding seat belt is not
fastened or is unfastened.
1. F
ront and/or rear seat belts not fastened
/
unfastened warning lamp in the instrument
panel.
2.
F
ront left seat belt warning lamp.
3.
F
ront right seat belt warning lamp.
4.
R
ear right seat belt warning lamp.
5.
R
ear centre seat belt warning lamp.
6.
R
ear left seat belt warning lamp. If a rear seatbelt is not fastened, the
corresponding warning lamp (4 to 6)
comes on for about 30 seconds.
6
Safety
Page 209 of 415
207
Airbags
System designed to contribute towards
improving the safety of the occupants (with
the exception of the rear centre passenger)
in the event of violent collisions. t
h
e airbags
supplement the action of the force-limiting
seat belts (with the exception of the centre rear
passenger).
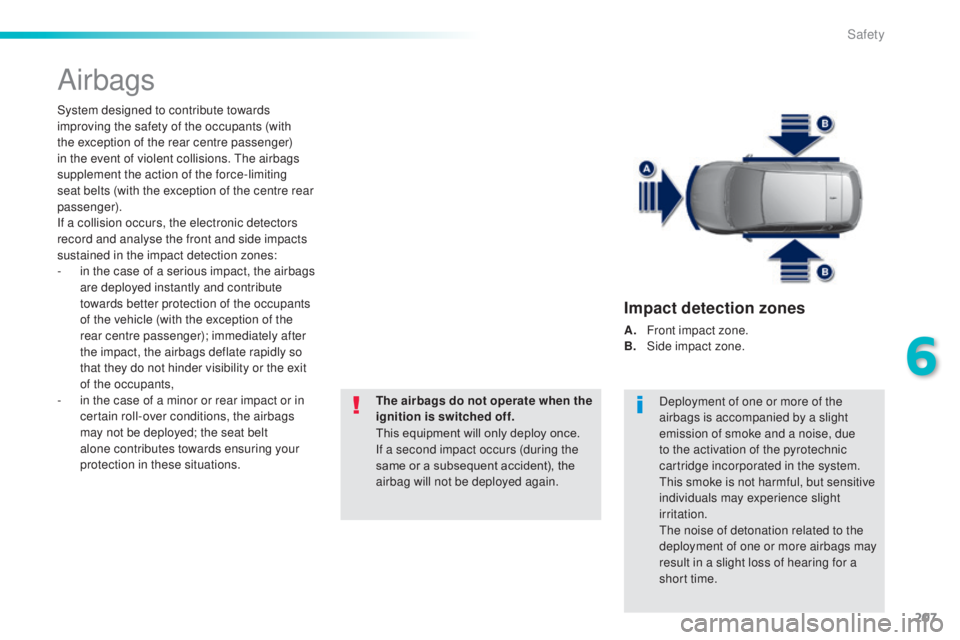
If a collision occurs, the electronic detectors
record and analyse the front and side impacts
sustained in the impact detection zones:
-
i
n the case of a serious impact, the airbags
are deployed instantly and contribute
towards better protection of the occupants
of the vehicle (with the exception of the
rear centre passenger); immediately after
the impact, the airbags deflate rapidly so
that they do not hinder visibility or the exit
of the occupants,
-
i
n the case of a minor or rear impact or in
certain roll-over conditions, the airbags
may not be deployed; the seat belt
alone contributes towards ensuring your
protection in these situations. The airbags do not operate when the
ignition is switched off.
This equipment will only deploy once.
If a second impact occurs (during the
same or a subsequent accident), the
airbag will not be deployed again.Deployment of one or more of the
airbags is accompanied by a slight
emission of smoke and a noise, due
to the activation of the pyrotechnic
cartridge incorporated in the system.
th
is smoke is not harmful, but sensitive
individuals may experience slight
irritation.
th
e noise of detonation related to the
deployment of one or more airbags may
result in a slight loss of hearing for a
short time.
Impact detection zones
A. Front impact zone.
B. S ide impact zone.
6
Safety
Page 210 of 415
208
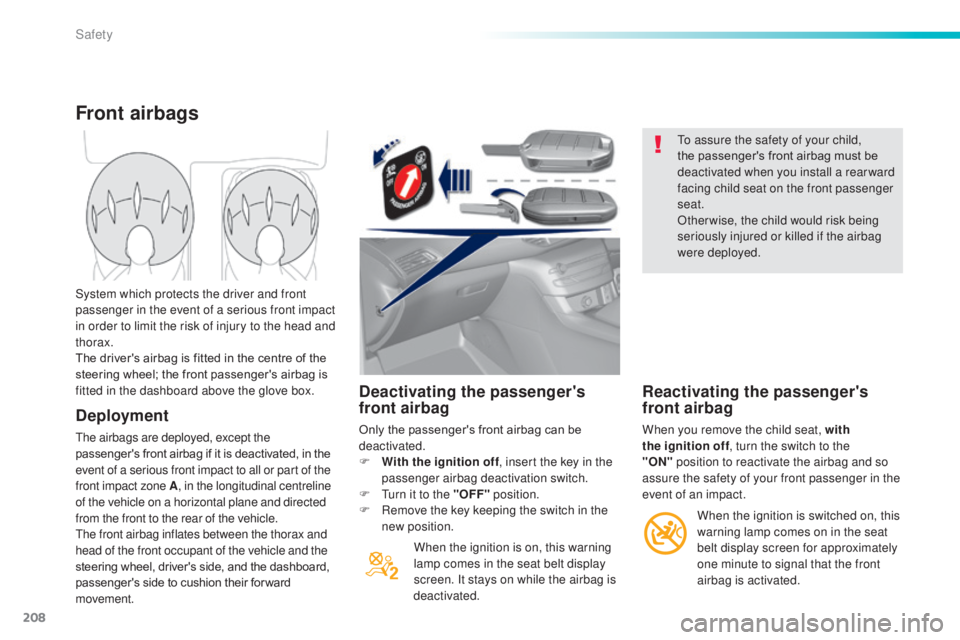
Deactivating the passenger's
front airbag
Only the passenger's front airbag can be
deactivated.
F
W
ith the ignition off , insert the key in the
passenger airbag deactivation switch.
F
t
u
rn it to the "OFF" position.
F
R
emove the key keeping the switch in the
new position.
When the ignition is on, this warning
lamp comes in the seat belt display
screen. It stays on while the airbag is
deactivated.
to a
ssure the safety of your child,
the passenger's front airbag must be
deactivated when you install a rear ward
facing child seat on the front passenger
seat.
Otherwise, the child would risk being
seriously injured or killed if the airbag
were deployed.
Reactivating the passenger's
front airbag
When you remove the child seat, with
the ignition off , turn the switch to the
"ON"
position to reactivate the airbag and so
assure the safety of your front passenger in the
event of an impact.
Front airbags
Deployment
the airbags are deployed, except the
passenger's front airbag if it is deactivated, in the
event of a serious front impact to all or part of the
front impact zone A , in the longitudinal centreline
of the vehicle on a horizontal plane and directed
from the front to the rear of the vehicle.
th
e front airbag inflates between the thorax and
head of the front occupant of the vehicle and the
steering wheel, driver's side, and the dashboard,
passenger's side to cushion their for ward
movement. System which protects the driver and front
passenger in the event of a serious front impact
in order to limit the risk of injury to the head and
thorax.
The driver's airbag is fitted in the centre of the
steering wheel; the front passenger's airbag is
fitted in the dashboard above the glove box.
When the ignition is switched on, this
warning lamp comes on in the seat
belt display screen for approximately
one minute to signal that the front
airbag is activated.
Safety
Page 230 of 415
228
Child lock
this mechanical system prevents opening of the rear door using its interior control.the control is located on the edge of each rear door and locking is independent for each door.
Locking
F using the integral ignition key, turn the control as far as it will go:
-
t
o the left on the left-hand rear door,
-
t
o the right on the right-hand rear door.
Unlocking
F using the integral ignition key, turn the control as far as it will go:
-
t
o the right on the left-hand rear door,
-
t
o the left on the right-hand rear door.
Safety
Page 233 of 415
231
Repair procedure
1. Sealing
F uncoil the white pipe G fully.
F un screw the cap from the white pipe.
F
C
onnect the white pipe to the valve of the
tyre to be repaired. F
C onnect the compressor's electric plug to
the vehicle's 12 V socket.
F
S
tart the vehicle and leave the engine
running.
ta
ke care, this product is harmful (e.g.
ethylene-glycol, colophony...) if swallowed
and causes irritation to the eyes.
Keep this product out of the reach of
children.
Avoid removing any foreign bodies
which have penetrated into the tyre.
Do not start the compressor before
connecting the white pipe to the tyre
valve: the sealant product would be
expelled through the pipe.
F
S
witch off the ignition.
F
t
u
rn the selector A to the "sealant"
position.
F
C
heck that the switch B is in
position "O" .
7
Practical information
Page 240 of 415
238
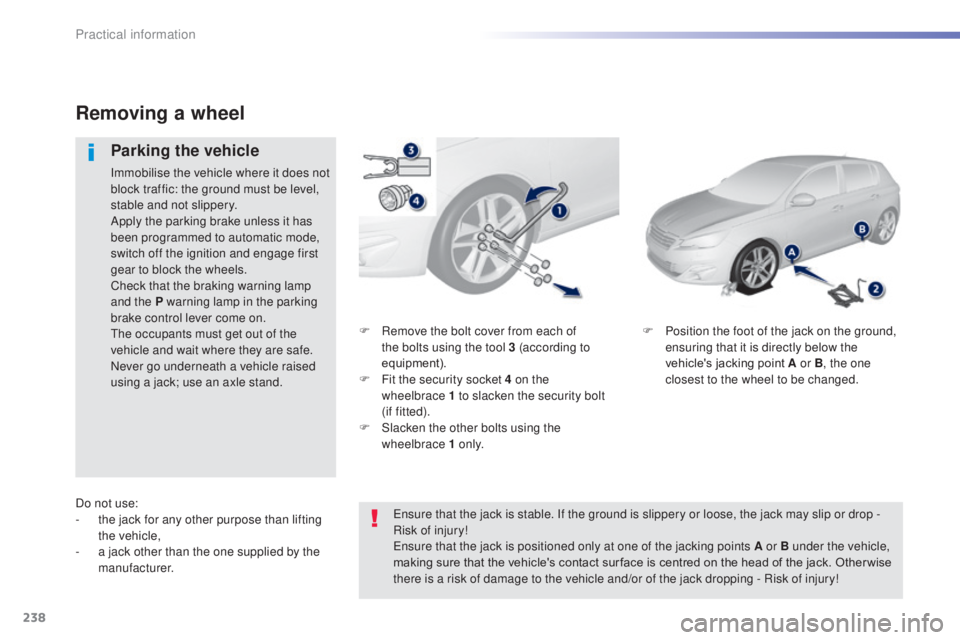
F Remove the bolt cover from each of the bolts using the tool 3 (according to
equipment).
F
F
it the security socket 4 on the
wheelbrace
1 to slacken the security bolt
(if
fitted).
F
S
lacken the other bolts using the
wheelbrace 1 o n l y. F
P osition the foot of the jack on the ground,
ensuring that it is directly below the
vehicle's jacking point A or B , the one
closest to the wheel to be changed.
Removing a wheel
Parking the vehicle
Immobilise the vehicle where it does not
block traffic: the ground must be level,
stable and not slippery.
Apply the parking brake unless it has
been programmed to automatic mode,
switch off the ignition and engage first
gear to block the wheels.
Check that the braking warning lamp
and the P warning lamp in the parking
brake control lever come on.
th
e occupants must get out of the
vehicle and wait where they are safe.
Never go underneath a vehicle raised
using a jack; use an axle stand.
Do not use:
-
t
he jack for any other purpose than lifting
the vehicle,
-
a j
ack other than the one supplied by the
manufacturer.
en
sure that the jack is stable. If the ground is slippery or loose, the jack may slip or drop -
Risk of injury!
en
sure that the jack is positioned only at one of the jacking points A or B under the vehicle,
making sure that the vehicle's contact sur face is centred on the head of the jack. Other wise
there is a risk of damage to the vehicle and/or of the jack dropping - Risk of injury!
Practical information
Page 255 of 415
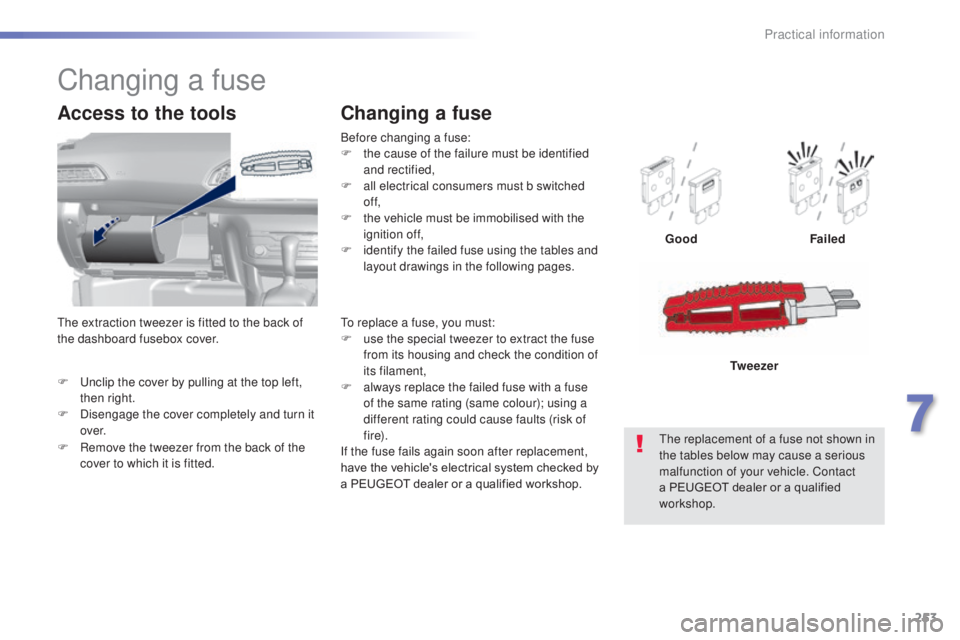
253
F unclip the cover by pulling at the top left, then right.
F
D
isengage the cover completely and turn it
ove r.
Access to the tools
Before changing a fuse:
F t he cause of the failure must be identified
and rectified,
F
a
ll electrical consumers must b switched
of f,
F
t
he vehicle must be immobilised with the
ignition off,
F
i
dentify the failed fuse using the tables and
layout drawings in the following pages.
Changing a fuse
Good Failed
th
e replacement of a fuse not shown in
the tables below may cause a serious
malfunction of your vehicle. Contact
a PEUGEOT dealer or a qualified
workshop. Tw e e z e r
Changing a fuse
to replace a fuse, you must:
F
u se the special tweezer to extract the fuse
from its housing and check the condition of
its filament,
F
a
lways replace the failed fuse with a fuse
of the same rating (same colour); using a
different rating could cause faults (risk of
f i r e).
If the fuse fails again soon after replacement,
have the vehicle's electrical system checked by
a PEUGEOT dealer or a qualified workshop.
F
R
emove the tweezer from the back of the
cover to which it is fitted.th
e extraction tweezer is fitted to the back of
the dashboard fusebox cover.
7
Practical information