2013 YAMAHA YZ125LC fuel pressure
[x] Cancel search: fuel pressurePage 16 of 168

1-6
CONSUMER INFORMATION
CONSUMER INFORMATION
There are two significant reasons for
knowing the serial number of your
machine:
1. When ordering parts, you can
give the number to your Yamaha
dealer for positive identification of
the model you own.
2. If your machine is stolen, the au-
thorities will need the number to
search for and identify your ma-
chine.
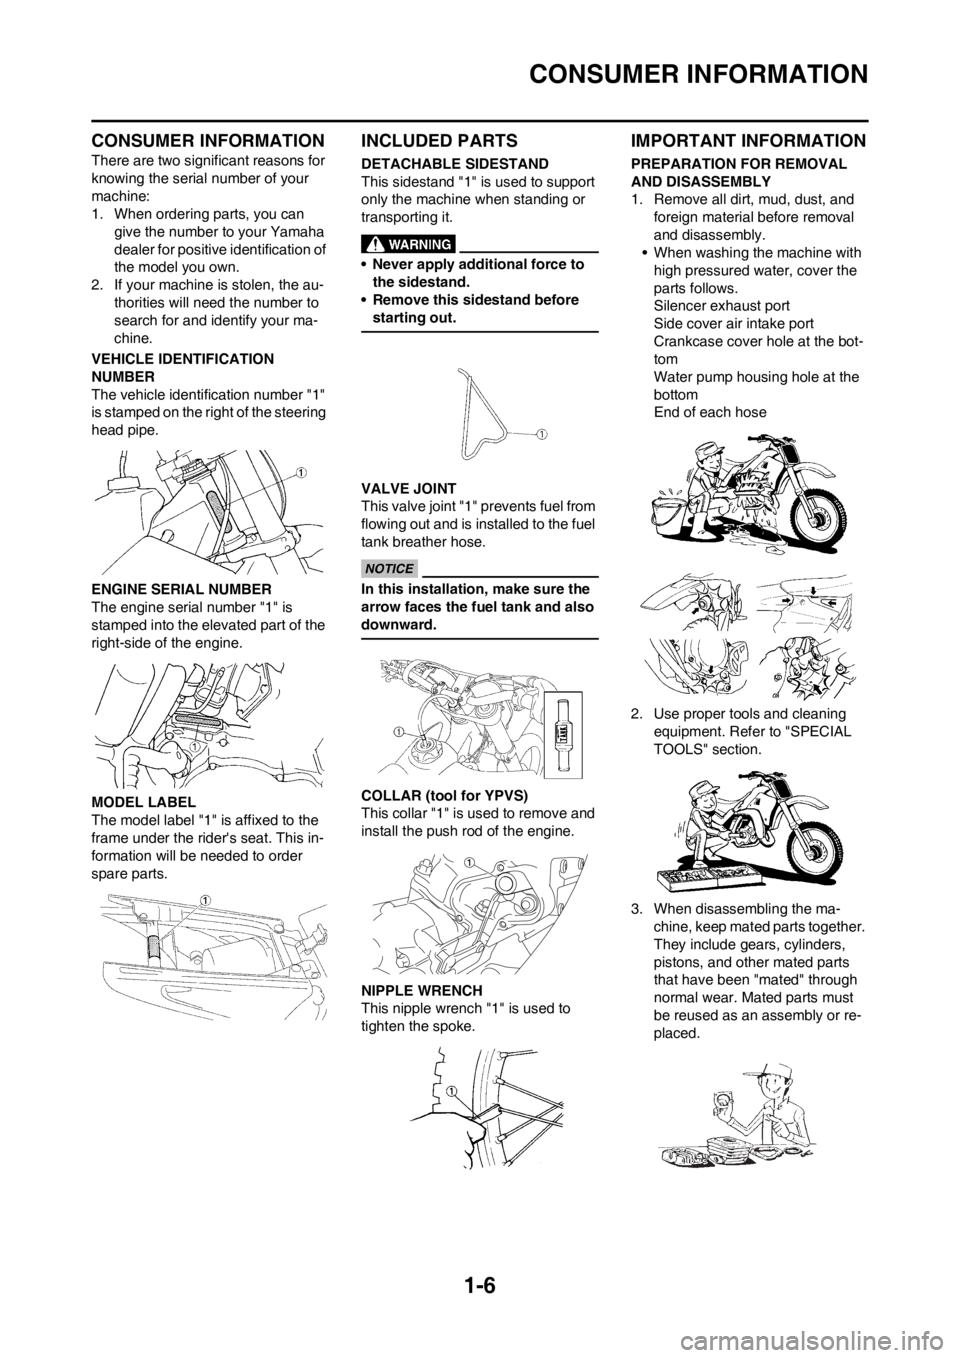
VEHICLE IDENTIFICATION
NUMBER
The vehicle identification number "1"
is stamped on the right of the steering
head pipe.
ENGINE SERIAL NUMBER
The engine serial number "1" is
stamped into the elevated part of the
right-side of the engine.
MODEL LABEL
The model label "1" is affixed to the
frame under the rider's seat. This in-
formation will be needed to order
spare parts.
INCLUDED PARTS
DETACHABLE SIDESTAND
This sidestand "1" is used to support
only the machine when standing or
transporting it.
• Never apply additional force to
the sidestand.
• Remove this sidestand before
starting out.
VALVE JOINT
This valve joint "1" prevents fuel from
flowing out and is installed to the fuel
tank breather hose.
In this installation, make sure the
arrow faces the fuel tank and also
downward.
COLLAR (tool for YPVS)
This collar "1" is used to remove and
install the push rod of the engine.
NIPPLE WRENCH
This nipple wrench "1" is used to
tighten the spoke.
IMPORTANT INFORMATION
PREPARATION FOR REMOVAL
AND DISASSEMBLY
1. Remove all dirt, mud, dust, and
foreign material before removal
and disassembly.
• When washing the machine with
high pressured water, cover the
parts follows.
Silencer exhaust port
Side cover air intake port
Crankcase cover hole at the bot-
tom
Water pump housing hole at the
bottom
End of each hose
2. Use proper tools and cleaning
equipment. Refer to "SPECIAL
TOOLS" section.
3. When disassembling the ma-
chine, keep mated parts together.
They include gears, cylinders,
pistons, and other mated parts
that have been "mated" through
normal wear. Mated parts must
be reused as an assembly or re-
placed.
Page 24 of 168

1-14
CLEANING AND STORAGE
CLEANING AND STORAGE
CLEANING
Frequent cleaning of your machine
will enhance its appearance, maintain
good overall performance, and ex-
tend the life of many components.
1. Before washing the machine,
block off the end of the exhaust
pipe to prevent water from enter-
ing. A plastic bag secured with a
rubber band may be used for this
purpose.
2. If the engine is excessively
greasy, apply some degreaser to
it with a paint brush. Do not apply
degreaser to the chain, sprockets,
or wheel axles.
3. Rinse the dirt and degreaser off
with a garden hose; use only
enough pressure to do the job.
Do not use high-pressure washers
or steam-jet cleaners since they
cause water seepage and deterio-
ration seals.
4. After the majority of the dirt has
been hosed off, wash all surfaces
with warm water and a mild deter-
gent. Use an old toothbrush to
clean hard-to-reach places.
5. Rinse the machine off immediate-
ly with clean water, and dry all
surfaces with a soft towel or cloth.
6. Immediately after washing, re-
move excess water from the
chain with a paper towel and lubri-
cate the chain to prevent rust.
7. Clean the seat with a vinyl uphol-
stery cleaner to keep the cover
pliable and glossy.
8. Automotive wax may be applied
to all painted or chromed surfac-
es. Avoid combination cleaner-
waxes, as they may contain abra-
sives.
9. After completing the above, start
the engine and allow it to idle for
several minutes.STORAGE
If your machine is to be stored for 60
days or more, some preventive mea-
sures must be taken to avoid deterio-
ration. After cleaning the machine
thoroughly, prepare it for storage as
follows:
1. Drain the fuel tank, fuel lines, and
the carburetor float bowl.
2. Remove the spark plug, pour a ta-
blespoon of SAE 10W-40 motor
oil in the spark plug hole, and re-
install the plug. With the engine
stop switch pushed in, kick the en-
gine over several times to coat the
cylinder walls with oil.
3. Remove the drive chain, clean it
thoroughly with solvent, and lubri-
cate it. Reinstall the chain or store
it in a plastic bag tied to the frame.
4. Lubricate all control cables.
5. Block the frame up to raise the
wheels off the ground.
6. Tie a plastic bag over the exhaust
pipe outlet to prevent moisture
from entering.
7. If the machine is to be stored in a
humid or salt-air environment,
coat all exposed metal surfaces
with a film of light oil. Do not apply
oil to rubber parts or the seat cov-
er.
Make any necessary repairs before
the machine is stored.
Page 48 of 168

3-5
PRE-OPERATION INSPECTION AND MAINTENANCE
PRE-OPERATION INSPECTION AND MAINTENANCE
Before riding for break-in operation, practice or a race, make sure the machine is in good operating condition.
Before using this machine, check the following points.
GENERAL INSPECTION AND MAINTENANCE
Item Routine Page
CoolantCheck that coolant is filled up to the radiator cap. Check the cool-
ing system for leakage.P.3-6 – 7
FuelCheck that a fresh mixture of oil and gasoline is filled in the fuel
tank. Check the fuel line for leakage.P.1-12
Transmission oilCheck that the oil level is correct. Check the crankcase for leak-
age.P.3-8 – 9
Gear shifter and clutchCheck that gears can be shifted correctly in order and that the
clutch operates smoothly.P.3-7
Throttle grip/HousingCheck that the throttle grip operation and free play are correctly
adjusted. Lubricate the throttle grip and housing, if necessary.P.3-7 – 8
Brakes Check the play of front brake and effect of front and rear brake. P.3-9 – 12
Drive chainCheck drive chain slack and alignment. Check that the drive chain
is lubricated properly.P.3-12 – 13
WheelsCheck for excessive wear and tire pressure. Check for loose
spokes and have no excessive play.P.3-16 – 17
SteeringCheck that the handlebar can be turned smoothly and have no ex-
cessive play.P.3-17
Front forks and rear shock
absorberCheck that they operate smoothly and there is no oil leakage.
P.3-13 – 16
Cables (wires)Check that the clutch and throttle cables move smoothly. Check
that they are not caught when the handlebars are turned or when
the front forks travel up and down.—
Muffler Check that the muffler is tightly mounted and has no cracks. P.4-3 – 4
Rear wheel sprocket Check that the rear wheel sprocket tightening bolt is not loose. P.3-12
Lubrication Check for smooth operation. Lubricate if necessary. P.3-18
Bolts and nuts Check the chassis and engine for loose bolts and nuts. P.1-13
Lead connectorsCheck that the CDI magneto, CDI unit, and ignition coil are con-
nected tightly.P.1-7
SettingsIs the machine set suitably for the condition of the racing course
and weather or by taking into account the results of test runs be-
fore racing? Are inspection and maintenance completely done?P.7-1 – 11
Page 156 of 168

7-1
ENGINE
TUNING
ENGINE
CARBURETOR SETTING
• The role of fuel is to cool the engine,
and in the case of a 2-stroke en-
gine, to lubricate the engine in addi-
tion to power generation.
Accordingly, if a mixture of air and
fuel is too lean, abnormal combus-
tion will occur, and engine seizure
may result. If the mixture is too rich,
spark plugs will get wet with oil, thus
making it impossible to bring the en-
gine into full play or if the worst
comes to the worst, the engine may
stall.
• The richness of the air-fuel mixture
required for the engine will vary with
atmospheric conditions of the day
and therefore, the settings of the
carburetor must be properly suited
to the atmospheric conditions (air
pressure, humidity and tempera-
ture).
• Finally, the rider himself must make
a test-run and check his machine
for conditions (pick-up of engine
speed, road surface conditions)
and for the discoloration of the
spark plug(s). After taking these
into consideration, he must select
the best possible carburetor set-
tings.
It is advisable to make a note of set-
tings, atmospheric conditions, road
surface condition, lap-time, etc. so
that the memorandum can be used
as a reference useful for future.
ATMOSPHERIC CONDITIONS AND
CARBURETOR SETTINGS
The reason for the above tendency is
that the richness or leanness of a fuel
mixture depends on the density of the
air (i.e. the concentration of oxygen in
it).
• Higher temperature expands the air
with its resultant reduced density.• Higher humidity reduces the
amount of oxygen in the air by so
much of the water vapor in the
same air.
• Lower atmospheric pressure (at a
high altitude) reduces the density of
the air.
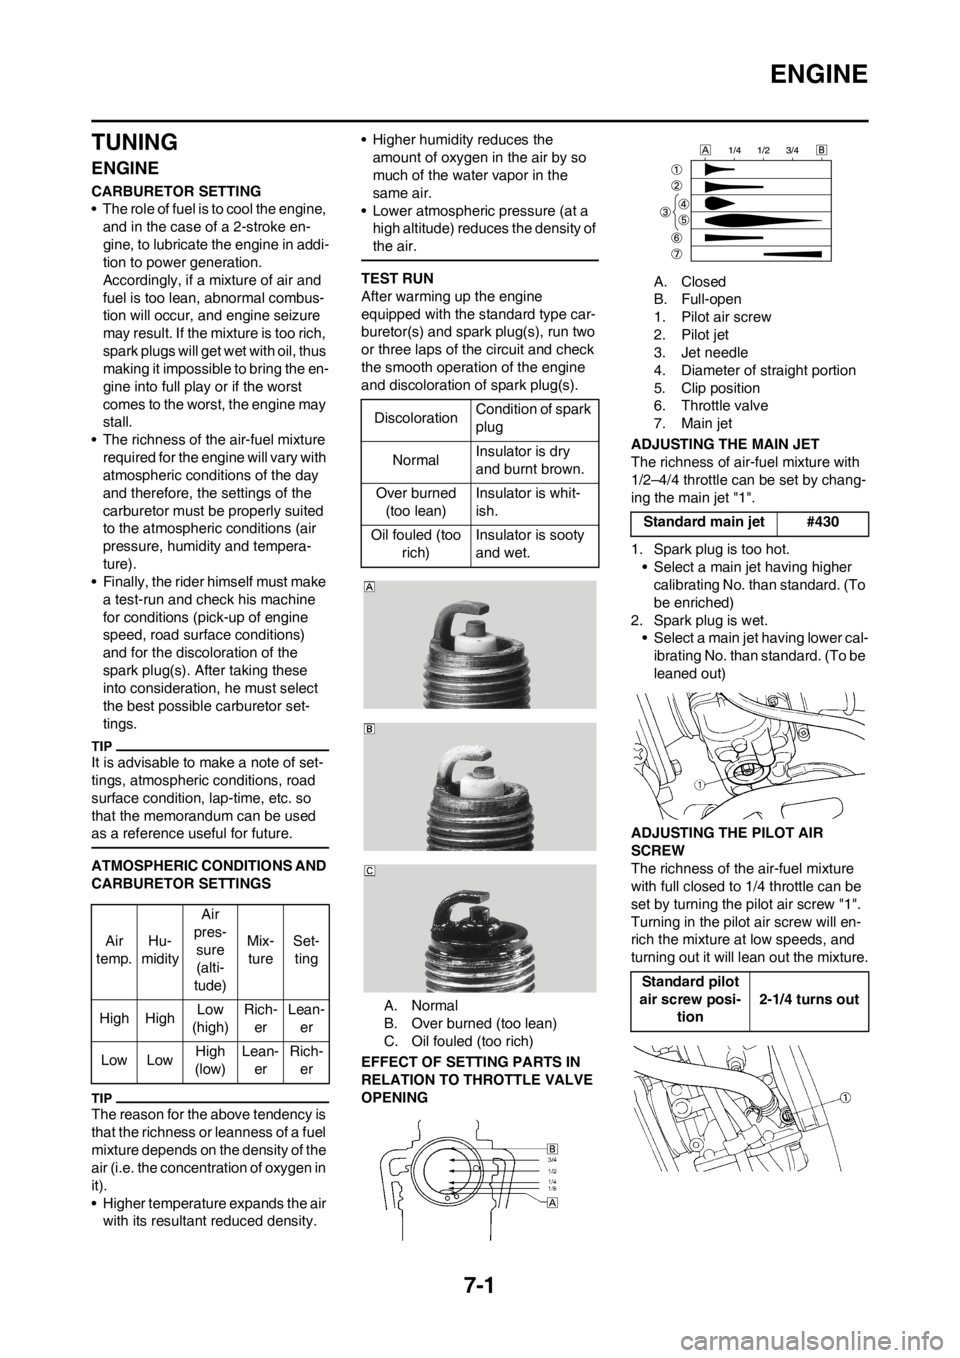
TEST RUN
After warming up the engine
equipped with the standard type car-
buretor(s) and spark plug(s), run two
or three laps of the circuit and check
the smooth operation of the engine
and discoloration of spark plug(s).
A. Normal
B. Over burned (too lean)
C. Oil fouled (too rich)
EFFECT OF SETTING PARTS IN
RELATION TO THROTTLE VALVE
OPENINGA. Closed
B. Full-open
1. Pilot air screw
2. Pilot jet
3. Jet needle
4. Diameter of straight portion
5. Clip position
6. Throttle valve
7. Main jet
ADJUSTING THE MAIN JET
The richness of air-fuel mixture with
1/2–4/4 throttle can be set by chang-
ing the main jet "1".
1. Spark plug is too hot.
• Select a main jet having higher
calibrating No. than standard. (To
be enriched)
2. Spark plug is wet.
• Select a main jet having lower cal-
ibrating No. than standard. (To be
leaned out)
ADJUSTING THE PILOT AIR
SCREW
The richness of the air-fuel mixture
with full closed to 1/4 throttle can be
set by turning the pilot air screw "1".
Turning in the pilot air screw will en-
rich the mixture at low speeds, and
turning out it will lean out the mixture. Air
temp.Hu-
midityAir
pres-
sure
(alti-
tude)Mix-
tureSet-
ting
High HighLow
(high)Rich-
erLean-
er
Low LowHigh
(low)Lean-
erRich-
er
DiscolorationCondition of spark
plug
NormalInsulator is dry
and burnt brown.
Over burned
(too lean)Insulator is whit-
ish.
Oil fouled (too
rich)Insulator is sooty
and wet.
Standard main jet #430
Standard pilot
air screw posi-
tion2-1/4 turns out