2013 VOLVO V60 window
[x] Cancel search: windowPage 5 of 422

Table of contents
* Option/accessory, for more information, see Introduction.3
03
03 Your driving environment
Instruments and controls.......................... 68
Volvo Sensus ........................................... 77
Key positions............................................ 78
Seats......................................................... 80
Steering wheel.......................................... 85
Lighting..................................................... 86
Wipers and washing.................................. 98
Windows, rearview and door mirrors...... 101
Compass*............................................... 106
Power sunroof*....................................... 107
Alcolock*................................................. 109
Starting the engine.................................. 113
Starting the engine – Flexifuel.................118
Starting the engine – external battery..... 120
Gearboxes............................................... 121
DRIVe Start/Stop*................................... 127
All-wheel drive – AWD*...........................134
Foot brake............................................... 135
Parking brake.......................................... 137
HomeLink
�Ÿ *............................................ 141
04
04 Driver support
DSTC – Stability and traction control sys-
tem.......................................................... 146
Road sign information - RSI*.................. 148
Speed limiter*.......................................... 150
Cruise control*........................................ 152
Adaptive cruise control*.......................... 154
Distance Warning*..................................165
City Safety™........................................... 168
Collision Warning with Auto Brake &
Pedestrian Protection*............................ 173
Driver Alert System*................................ 181
Driver Alert System - DAC*.....................182
Driver Alert System - LDW*..................... 185
Park assist syst*...................................... 188
Park assist camera*................................ 191
BLIS* – Blind Spot Information System. . 194
05
05 Comfort and driving pleasure
Menus and messages............................. 200
Menu source MY CAR............................202
Climate control........................................ 210
Fuel-driven engine block heater and pas-
senger compartment heater*.................. 220
Additional heater*.................................... 223
Trip computer......................................... 224
Adapting driving characteristics............. 226
Comfort inside the passenger compart-
ment........................................................ 227
ProCarManuals.com
Page 28 of 422

01 Safety
Inflatable Curtain (IC) 01
26
Properties
The inflatable curtain IC (Inflatable Curtain) is a
part of SIPS and the airbags. It is fitted in the
headlining along both sides of the roof and
protects the car's occupants sitting in the outer
seats. A sufficiently violent collision trips the
sensors and the inflatable curtain is inflated.
The inflatable curtain helps to prevent the
driver and passengers from striking their heads
on the inside of the car during a collision.
WARNING
Never hang or attach heavy items onto the
handles in the roof. The hook is only
designed for light clothing (not for solid
objects such as umbrellas for example).
Do not screw or install anything onto the
car's headlining, door pillars or side panels.
This could compromise the intended pro-
tection. Volvo recommends that you only
ever use Volvo genuine parts that are
approved for placement in these areas.
WARNING
Do not load the car higher than 50 mm under
the top edge of the door windows. Other-
wise, the intended protection of the inflat-
able curtain, which is concealed in the head-
lining, may be compromised.
WARNING
The inflatable curtain is a supplement to the
seatbelts.
Always use a seatbelt.
ProCarManuals.com
Page 40 of 422

01 Safety
Child safety 01
38
Press down with your hand in the centre of
the cushion in order to lock it.
WARNING
If the instructions regarding the two-stage
booster cushion are not followed then this
could cause serious injury to a child in the
event of an accident.
IMPORTANT
Check that there are no loose objects (e.g.
toys) left behind in the space under the
cushion before lowering.
NOTE
The booster cushion must be lowered first
when lowering the backrest.
Child safety locks, rear doors
The controls for operating the rear door power
windows and the rear door opening handles
can be blocked from opening from the inside.
For more information, see page 62.
ISOFIX fixture system for child seats
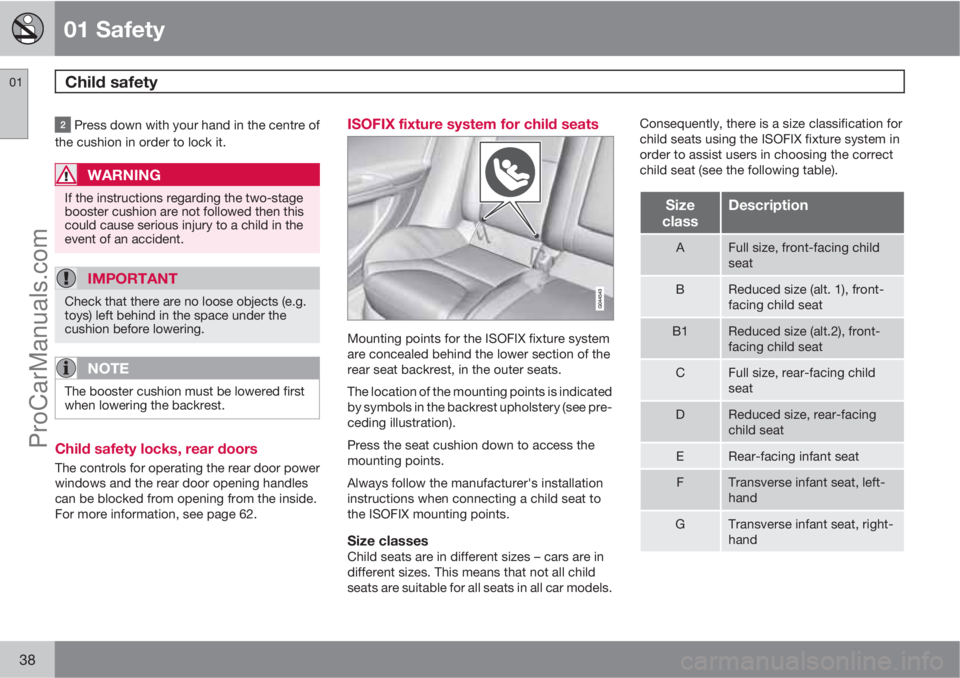
Mounting points for the ISOFIX fixture system
are concealed behind the lower section of the
rear seat backrest, in the outer seats.
The location of the mounting points is indicated
by symbols in the backrest upholstery (see pre-
ceding illustration).
Press the seat cushion down to access the
mounting points.
Always follow the manufacturer's installation
instructions when connecting a child seat to
the ISOFIX mounting points.
Size classesChild seats are in different sizes – cars are in
different sizes. This means that not all child
seats are suitable for all seats in all car models.Consequently, there is a size classification for
child seats using the ISOFIX fixture system in
order to assist users in choosing the correct
child seat (see the following table).
Size
classDescription
AFull size, front-facing child
seat
BReduced size (alt. 1), front-
facing child seat
B1Reduced size (alt.2), front-
facing child seat
CFull size, rear-facing child
seat
DReduced size, rear-facing
child seat
ERear-facing infant seat
FTransverse infant seat, left-
hand
GTransverse infant seat, right-
hand
ProCarManuals.com
Page 46 of 422

02 Locks and alarm
Remote control key/key blade
02
44
General
The car is supplied with 2 remote control keys
or PCCs (Personal Car Communicator). They
are used to start the car and for locking and
unlocking.
Additional remote control keys can be ordered
- up to 6 can be programmed and used for the
same car.
The remote control key contains a removable
key blade made of metal. The visible section is
available in two versions so that it is possible
to distinguish between the remote control
keys.
The PCC has increased functionality com-
pared with the remote control key. The contin-
uation of this chapter describes the functions
available in both the PCC and the remote con-
trol key.
WARNING
If there are children in the car:
Remember to switch off the supply to the
power windows and sunroof by removing
the remote control key if the driver leaves
the car.
Loss of a remote control keyIf you lose a remote control key then a new one
can be ordered at a workshop - an authorised
Volvo workshop is recommended. The remain-
ing remote control keys must then be taken to
the workshop. The code of the missing remote
control key must be erased from the system as
a theft prevention measure.
The current number of keys registered to the
car can be checked in the menu system MY
CAR under Information
Number of keys.
For a description of the menu system, see
page 202.
Key memory1 – door mirrors and driver's
seat
The settings are automatically connected to
each respective remote control key, see pages
81 and 103.
The function can be activated/deactivated in
the menu system MY CAR under Settings
Car settingsCar key memory.
For a description of the menu system, see
page 202.
For cars with the Keyless drive system, see
page 53.
Indicator for locking/unlockingWhen the car is locked or unlocked using the
remote control key, the direction indicators
confirm that locking/unlocking was correctly
performed.
•Locking - one flash and the door mirrors
are folded2 in.
•Unlocking - two flashes and the door mir-
rors are folded2 out.
After locking the indication is only given if all
locks have been activated once the doors have
been closed.
Selecting the functionDifferent options for indicating locking/unlock-
ing with light can be set in the car's menu sys-
tem, see page 202.
Search in the menu system MY CAR for
Settings
Car settingsLight settings
and select
Door lock confirmation light and/
or Unlock confirmation light.
1Only in combination with power driver's seat and power mirrors.2Only for cars with retractable power door mirrors.
ProCarManuals.com
Page 48 of 422

02 Locks and alarm
Remote control key/key blade
02
46* Option/accessory, for more information, see Introduction.
Remote control key with PCC* - Personal Car
Communicator.
Information
Function buttons
Locking – Locks the doors and tailgate
while the alarm is activated.
Press and hold (at least 2 seconds) to close all
the windows and sunroof* simultaneously.
WARNING
If the sunroof and windows are closed using
the remote control key, check that no one is
in danger of getting hands caught.
Unlocking – Unlocks the doors and tail-
gate while the alarm is deactivated.Press and hold (at least 4 seconds) to open all
windows simultaneously.
The function can be changed from unlocking
all doors simultaneously, to unlocking the driv-
er's door only with one press of the button and,
after a further press of the button - within 10
seconds - unlocking the remaining doors.
The function can be changed in the menu sys-
tem MY CAR under Settings
Car settings
Lock settingsDoors unlock with both
the alternatives
All doors and Driver door,
then all. For a description of the menu system,
see page 202.
Approach light duration – Used to switch
on the car's lighting at a distance. For more
information, see page 94.
Tailgate - Unlocks and disarms the alarm
for the tailgate only. For more information, see
page 60.
Panic function – Used to attract attention
in an emergency.
Press and hold the button for at least 3 sec-
onds or press it twice within 3 seconds to acti-
vate the direction indicators and the horn.
The function can be turned off with the same
button once it has been active for at least
5 seconds. Otherwise the function switches off
automatically after 2 minutes and 45 seconds.
RangeThe remote control key's functions have a
range of about 20 m from the car.
If the car does not verify a button being pressed
- move closer and try again.
NOTE
The remote control key functions can be
disrupted by surrounding radio waves,
buildings, topographical conditions etc. The
car can always be locked/unlocked using
the key blade, see page 48.
If the remote control key is removed from the
car when the engine is running or key position
I or II is active (see page 78) and if all doors
are closed, then a warning message is shown
in the information display and an audible
reminder signal sounds at the same time.
The warning message clears and the audio
reminder signal stops when the remote control
key is brought back to the car after:
•The remote control key has been inserted
in the ignition switch
•Speed exceeds 30 km/h
•the OK button has been pressed.
ProCarManuals.com
Page 60 of 422

02 Locks and alarm
Locking/unlocking
02
58* Option/accessory, for more information, see Introduction.
NOTE
•A door's knob control only locks that
particular door - not all doors simulta-
neously.
•A manually locked rear door with an
activated manual child safety lock can-
not be opened from either the outside
or the inside, see page 62. A rear door
that is locked in this way can only be
unlocked with the remote control key or
central locking button.
From the inside
Central locking
Central locking.
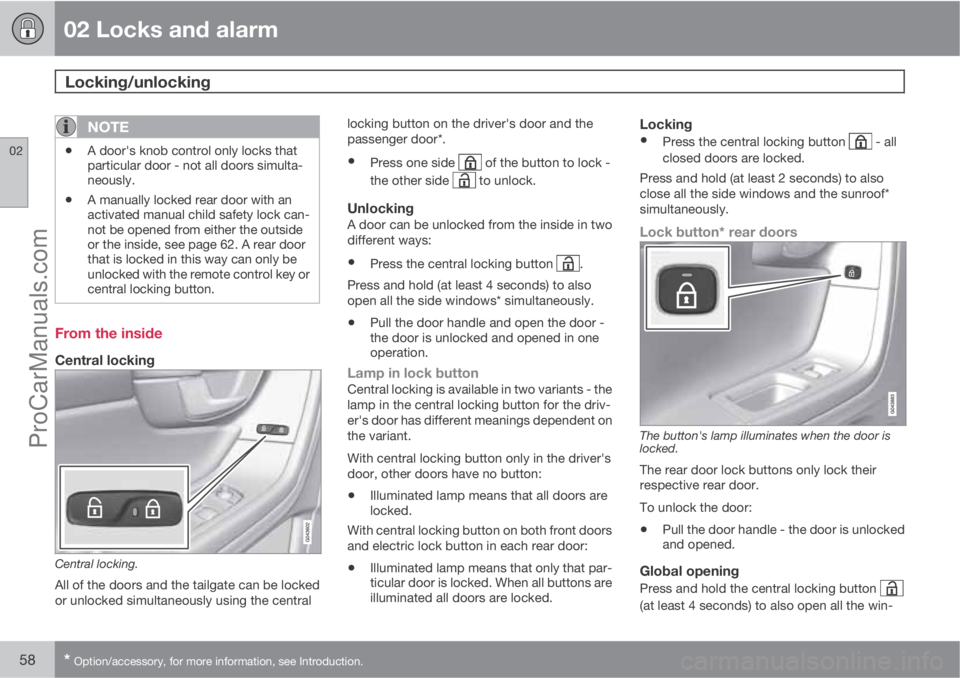
All of the doors and the tailgate can be locked
or unlocked simultaneously using the centrallocking button on the driver's door and the
passenger door*.
•Press one side of the button to lock -
the other side
to unlock.
UnlockingA door can be unlocked from the inside in two
different ways:
•Press the central locking button .
Press and hold (at least 4 seconds) to also
open all the side windows* simultaneously.
•Pull the door handle and open the door -
the door is unlocked and opened in one
operation.
Lamp in lock buttonCentral locking is available in two variants - the
lamp in the central locking button for the driv-
er's door has different meanings dependent on
the variant.
With central locking button only in the driver's
door, other doors have no button:
•Illuminated lamp means that all doors are
locked.
With central locking button on both front doors
and electric lock button in each rear door:
•Illuminated lamp means that only that par-
ticular door is locked. When all buttons are
illuminated all doors are locked.
Locking
•Press the central locking button - all
closed doors are locked.
Press and hold (at least 2 seconds) to also
close all the side windows and the sunroof*
simultaneously.
Lock button* rear doors
The button's lamp illuminates when the door is
locked.
The rear door lock buttons only lock their
respective rear door.
To unlock the door:
•Pull the door handle - the door is unlocked
and opened.
Global opening
Press and hold the central locking button
(at least 4 seconds) to also open all the win-
ProCarManuals.com
Page 64 of 422

02 Locks and alarm
Child safety locks
02
62* Option/accessory, for more information, see Introduction.
Manual blocking of the rear doors
The child safety locks prevent children from
opening a rear door from the inside.
With child safety locks. Not to be mixed up with
manual door locks, see page 57.
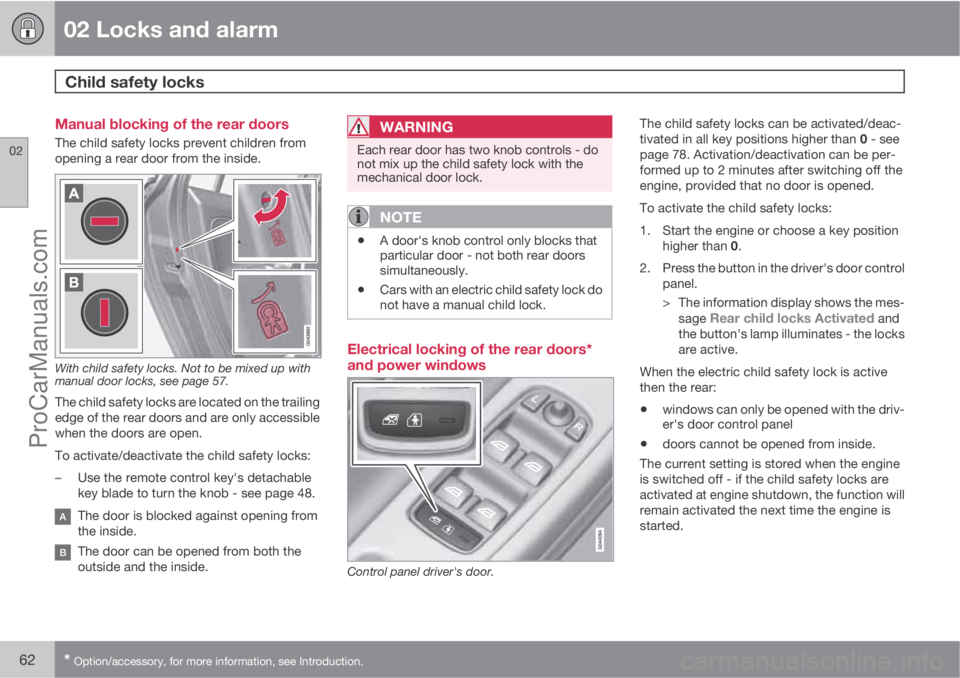
The child safety locks are located on the trailing
edge of the rear doors and are only accessible
when the doors are open.
To activate/deactivate the child safety locks:
–Use the remote control key's detachable
key blade to turn the knob - see page 48.
The door is blocked against opening from
the inside.
The door can be opened from both the
outside and the inside.
WARNING
Each rear door has two knob controls - do
not mix up the child safety lock with the
mechanical door lock.
NOTE
•A door's knob control only blocks that
particular door - not both rear doors
simultaneously.
•Cars with an electric child safety lock do
not have a manual child lock.
Electrical locking of the rear doors*
and power windows
Control panel driver's door.
The child safety locks can be activated/deac-
tivated in all key positions higher than 0 - see
page 78. Activation/deactivation can be per-
formed up to 2 minutes after switching off the
engine, provided that no door is opened.
To activate the child safety locks:
1. Start the engine or choose a key position
higher than 0.
2. Press the button in the driver's door control
panel.
> The information display shows the mes-
sage
Rear child locks Activated and
the button's lamp illuminates - the locks
are active.
When the electric child safety lock is active
then the rear:
•windows can only be opened with the driv-
er's door control panel
•doors cannot be opened from inside.
The current setting is stored when the engine
is switched off - if the child safety locks are
activated at engine shutdown, the function will
remain activated the next time the engine is
started.
ProCarManuals.com
Page 65 of 422

02 Locks and alarm
Alarm*
02
* Option/accessory, for more information, see Introduction.63 General
Activated alarm is triggered if:
•a door, the bonnet or the tailgate is opened
•a movement is detected in the passenger
compartment (if fitted with a movement
detector*)
•the car is raised or towed away (if fitted
with a tilt detector*)
•the battery's cable is disconnected
•the siren is disconnected.
If there is a fault in the alarm system, the infor-
mation display shows a message. In which
case, contact a workshop - an authorised
Volvo workshop is recommended.
NOTE
The movement sensors trigger an alarm in
the event of movement in the passenger
compartment - air currents are also regis-
tered. For this reason the alarm is triggered
if the car is left with a window or the sunroof
open or if the passenger compartment
heater is used.
To avoid this: Close the window/sunroof
when leaving the car. If the car's integrated
passenger compartment heater (or a porta-
ble electric heater) shall be used - direct the
airflow from the air vents so that they are not
pointing upwards in the passenger com-
partment.
NOTE
Do not attempt to repair or modify alarm
system components. All such attempts
could affect the terms of insurance.
Alarm indicator
Same LED as lock indicator, see page 45.
A red LED on the instrument panel indicates
the alarm system's status:
•LED not lit – Alarm not armed
•The LED flashes once every other second
– Alarm is armed
•The LED flashes rapidly after disarming the
alarm (and until the remote control key is
inserted in the ignition switch and key posi-
tion I is selected) – Alarm has been trig-
gered.
Arming the alarm–Press the remote control key lock button.
Deactivate the alarm–Press the remote control key unlock but-
ton.
ProCarManuals.com