Page 47 of 752

47
1-2. Opening, closing and locking the doors
1
Before driving
■
Wireless remote control battery depletion
The standard battery life is 1 to 2 years. (The battery becomes depleted
even if the wireless remote control is not used.) If the wireless remot\
e control
function does not operate, the battery may be depleted. Replace the battery
when necessary. ( P. 577)
■ If the wireless remote control does not operate
Locking and unlocking the doors: Use the key. ( P. 49)
■ Security feature
If a door is not opened within approximately 60 seconds after the vehicle is
unlocked, the security feature automatically locks the vehicle again.
■ Alarm (if equipped)
Using the wireless remote control to lock the door will set the alarm sy\
stem.
(P. 117)
■ Conditions affecting operation
The wireless remote control function may not operate normally in the follow-
ing situations.
●Near a TV tower, radio station, electr ic power plant, airport or other facil-
ity that generates strong radio waves
● When carrying a portable radio, cell ular phone or other wireless commu-
nication device
● When multiple wireless keys are in the vicinity
● When the wireless key has come into contact with, or is covered by a
metallic object
● When a wireless key (that emits radio waves) is being used nearby
● When the wireless key has been left near an electrical appliance such as
a personal computer
■ When riding in an aircraft
When bringing a wireless remote control onto an aircraft, make sure you do
not press any buttons on the wireless remote control while inside the aircraft
cabin. If you are carrying a wireless remote control in your bag etc, ensure
that the buttons are not likely to be pressed accidentally. Pressing a button
may cause the wireless remote control to emit radio waves that could inter-
fere with the operation of the aircraft.
Page 53 of 752

53
1-2. Opening, closing and locking the doors
1
Before driving
■
When locking the doors using the key (vehicles with power door lock
system)
The door cannot be locked if the key is in the engine switch.
■ Key reminder buzzer
A buzzer sounds if the driver’s door is opened, while the engine switch is in
the ACC or LOCK position to remind you to remove the key.
■ Customization that can be co nfigured at Toyota dealer
Settings (e.g. door lock) can be changed. (Customizable features P. 701)
CAUTION
■To prevent an accident
Observe the following precautions while driving the vehicle.
Failing to do so may result in a door opening and an occupant falling out,
resulting in death or serious injury.
●Always use a seat belt.
● Always lock the doors.
● Ensure that all doors are properly closed.
● Do not pull the inside handle of the doors while driving.
The doors may be opened and the passengers are thrown out of the vehi-
cle and it may result in serious injury or death.
Be especially careful for the front doors, as the doors may be opened even
if the inside lock buttons are in locked position.
● Double Cab and CrewMax models: Set the rear door child protector locks
when children are seated in the rear seats.
Page 71 of 752

71
1-3. Adjustable components (s
eats, mirrors, steering wheel)
1
Before driving
Linking driving position memory with door unlock operation
Memorized driving positions can be recalled when you unlock the
driver’s door using the wireless remote control and open the driver’s
door.
■ Setting the linked door unlock operation
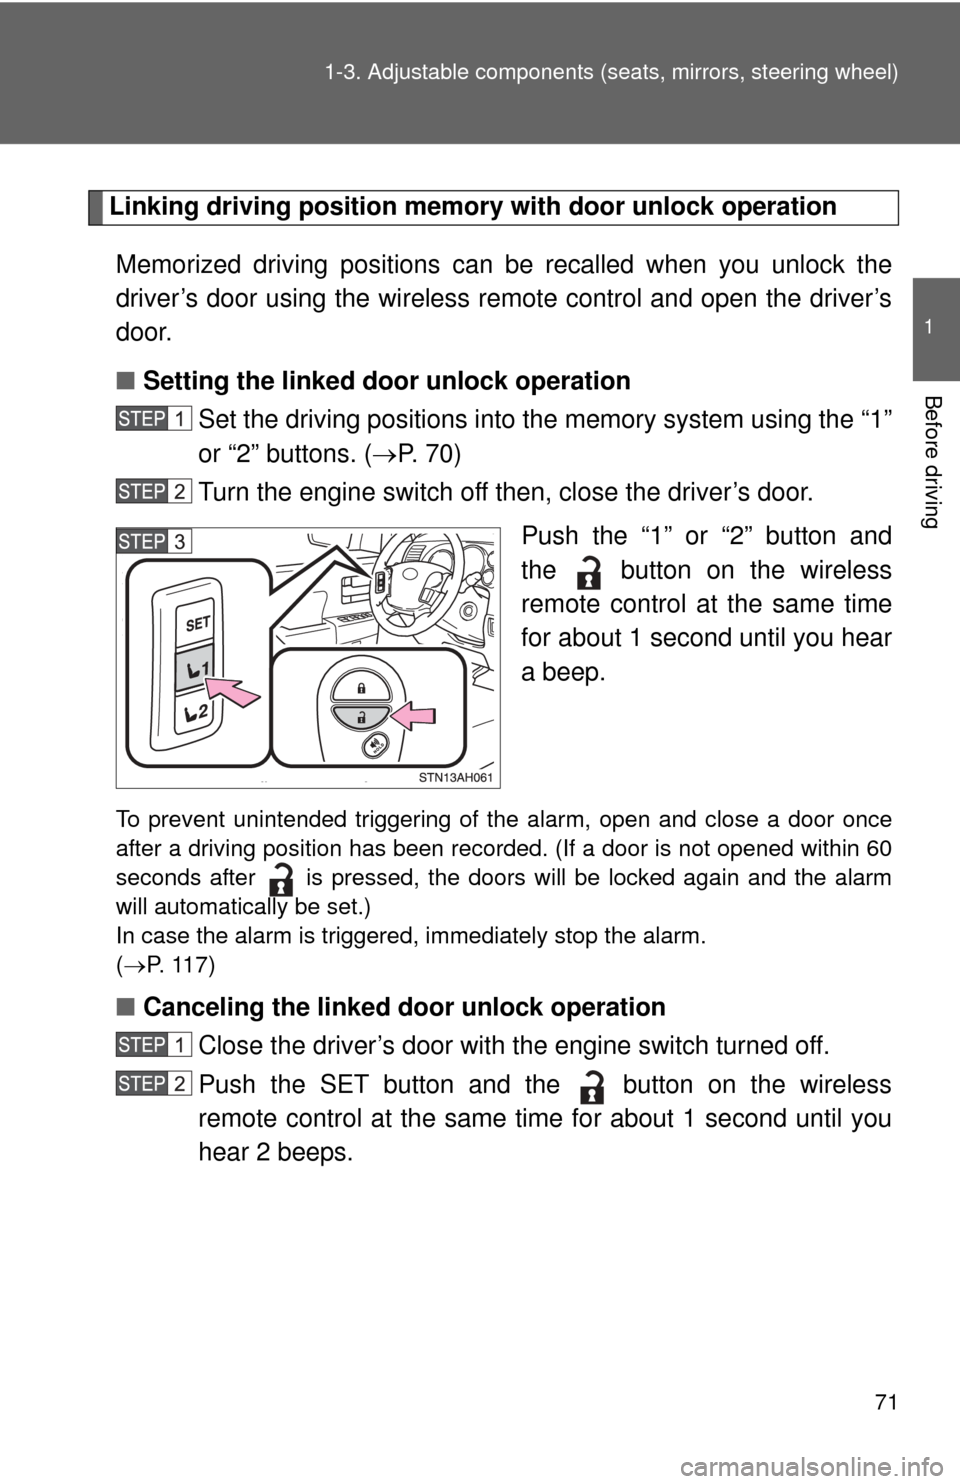
Set the driving positions into the memory system using the “1”
or “2” buttons. ( P. 7 0 )
Turn the engine switch off then, close the driver’s door.
Push the “1” or “2” button and
the button on the wireless
remote control at the same time
for about 1 second until you hear
a beep.
To prevent unintended triggering of the alarm, open and close a door once
after a driving position has been recorded. (If a door is not opened within 60
seconds after is pressed, the doors will be locked again and the alarm
will automatically be set.)
In case the alarm is triggered, immediately stop the alarm.
(P. 117)
■ Canceling the linked door unlock operation
Close the driver’s door with the engine switch turned off.
Push the SET button and the button on the wireless
remote control at the same time for about 1 second until you
hear 2 beeps.
Page 144 of 752
144
1-7. Safety information
Installing child restraints
Follow the child restraint system manufacturer’s instructions. Firmly
secure child restraints to the seat s using the LATCH anchors or a
seat belt. Attach the top tether stra p when installing a child restraint.
The lap/shoulder belt can be used if your child restraint system is
not compatible with the LATCH (Low er Anchors and Tethers for Chil-
dren) system.
Child restraint LATCH anchors
Double Cab models
LATCH anchors are pro-
vided for the outside rear
seats.
Buttons displaying the loca-
tion of the anchors are
attached to the seats.
CrewMax models
LATCH anchors are pro-
vided for the outside rear
seats.
Buttons displaying the loca-
tion of the anchors are
attached to the seats.
Seat belts equipped with a
child restraint locking mecha-
nism (ALR/ELR belts except
driver’s seat belt) ( P. 81)
Page 324 of 752
324
3-2. Using the audio system
Using the radio
Ty p e A
Type B and C
Vol u m eScanning for
receivable stations
Station selector
Seeking the
frequency
Adjusting the
frequency (AM, FM
mode) or channel
(SAT mode) AM
SAT/FM
mode buttonsPower
Displaying
radio text
messages
Changing
the channel
AM/FM/SAT
mode button
Station selector
Seeking the
frequency Adjusting the frequency
(AM, FM mode) or
channel (SAT mode)
Displaying radio
text messages
Changing
the channel
Scanning for
receivable stations
Vo l u m e
Power
Silencing
a sound
Selecting the
preset station pages
Page 332 of 752
332
3-2. Using the audio system
Using the CD player
Ty p e A
Type B and C
Random playbackRepeat play
Playback CD eject
Displaying text
messages
Selecting
a track
Fast-forward
Reverse
Searching playback
Vol u m e
Power
CD eject
Fast-forwarding
and reversing/
Selecting a track Searching
playbackCD load
(type B only)
Playback/pause
Displaying text
messages
Selector buttons
Playback
Vo l u m e
Power
Selecting a
track
Page 341 of 752
341
3-2. Using the audio system
3
Interior and exterior features
Playing MP3 and WMA discs
Ty p e A
Type B and C
Random playbackPlaybackCD eject
Displaying text
messages
Selecting
a file
Repeat play
Searching playback Selecting
a folder
Reversing
Fast-forwarding
Vol u m e
Power
CD eject
Searching playback Selecting a
folder
CD load
(type B only)
Playback/pause
Displaying text messages
Selecting a file
Selector buttons
Fast-forwarding
and reversing/
Selecting a file Playback
Vo l u m e
Power
Page 349 of 752
349
3-2. Using the audio system
3
Interior and exterior features
Operating an iPod
: If equipped
Connecting an iPod enables you to enjoy music from the vehicle
speakers.
■ Connecting an iPod
Open the cover and connect
an iPod using an iPod cable.
Turn on the power of the iPod if
it is not turned on.
Press .
■ Control panel
Playback/pause
Displaying text messages
Selector knob
Selector buttons
Fast-forwarding
and reversing/
Selecting a song Playback
Vo l u m e
Power