Page 17 of 28
OVERVIEW
FEATURES/OPERATIONS
SAFETY AND EMERGENCY FEATURES
15
“ ”
Use to search within the selected audio medium (radio, CD, iPod
®, etc.).
“MODE”
Push to turn audio ON and select an audio mode. Push and hold to turn the
audio system OFF. >>
Steering wheel switches (if equipped)
Volume control
USB/AUX port
By inserting a mini plug into the USB/AUX port, you can listen to music from a
portable audio device through the vehicle’s speaker system while in USB/AUX mode.
Refer to the “Display Audio System Owner’s Manual ” for instructions and more
information.
Refer to the “Display Audio System Owner’s Manual ” for instructions and more
information.
Turn to tune
radio stations
manually or
select tracks
or files
Push to pause
or resume
playing Access to
navigation
system
126906_GUTS.indd 157/20/12 10:50 PM
Page 18 of 28
16
FEATURES/OPERATIONS
Air Conditioning/Heating
Fan speed
Temperature selector
Airflow vent
In “
” or “” mode, use fresh air (“” indicator OFF) to reduce window
fogging.
Recirculate cabin air (fresh air when OFF)
Air Conditioning ON/OFF
Use fresh air to quickly cool interior, then change to recirculate for cooler air.
Power outlets
12V DC
120V AC (if equipped)
Green light
Yellow light
Key must be in the “ACC” or “ON” position to be used.
The engine must be running for use.
Yellow Light Only Max Capacity 120V AC/100W
Green & Yellow Lights Max Capacity 120V AC/400W
Refer to the Owner’s Manual for more details.
Clock
H- Hour set
M- Minute set
126906_GUTS.indd 167/20/12 10:50 PM
Page 19 of 28
OVERVIEW
FEATURES/OPERATIONS
SAFETY AND EMERGENCY FEATURES
17
Fan speed
Temperature selector
Airflow vent
In “
” or “” mode, use fresh air (“” indicator OFF) to reduce window
fogging.
Recirculate cabin air (fresh air when OFF)
Air Conditioning ON/OFF
Use fresh air to quickly cool interior, then change to recirculate for cooler air.
Power outlets
12V DC
120V AC (if equipped)
ON/OFF switch
Green light
Yellow light
Right side
of bed
Push
Key must be in the “ACC” or “ON” position to be used.
The engine must be running for use.
Yellow Light Only Max Capacity 120V AC/100W
Green & Yellow Lights Max Capacity 120V AC/400W
Refer to the Owner’s Manual for more details.
126906_GUTS.indd 177/20/12 10:50 PM
Page 20 of 28
18
FEATURES/OPERATIONSSAFETY AND EMERGENCY FEATURES
If belt is fully extended, then retracted even slightly, it cannot be re-extended
beyond that point, unless fully retracted again. This feature is used to help hold
child restraint systems securely.
To find more information about seat belts, and how to install a child restraint
system, refer to the Owner’s Manual.
Seat belts
Seat belts-Shoulder belt anchor
Push up, or squeeze lock
release to lower
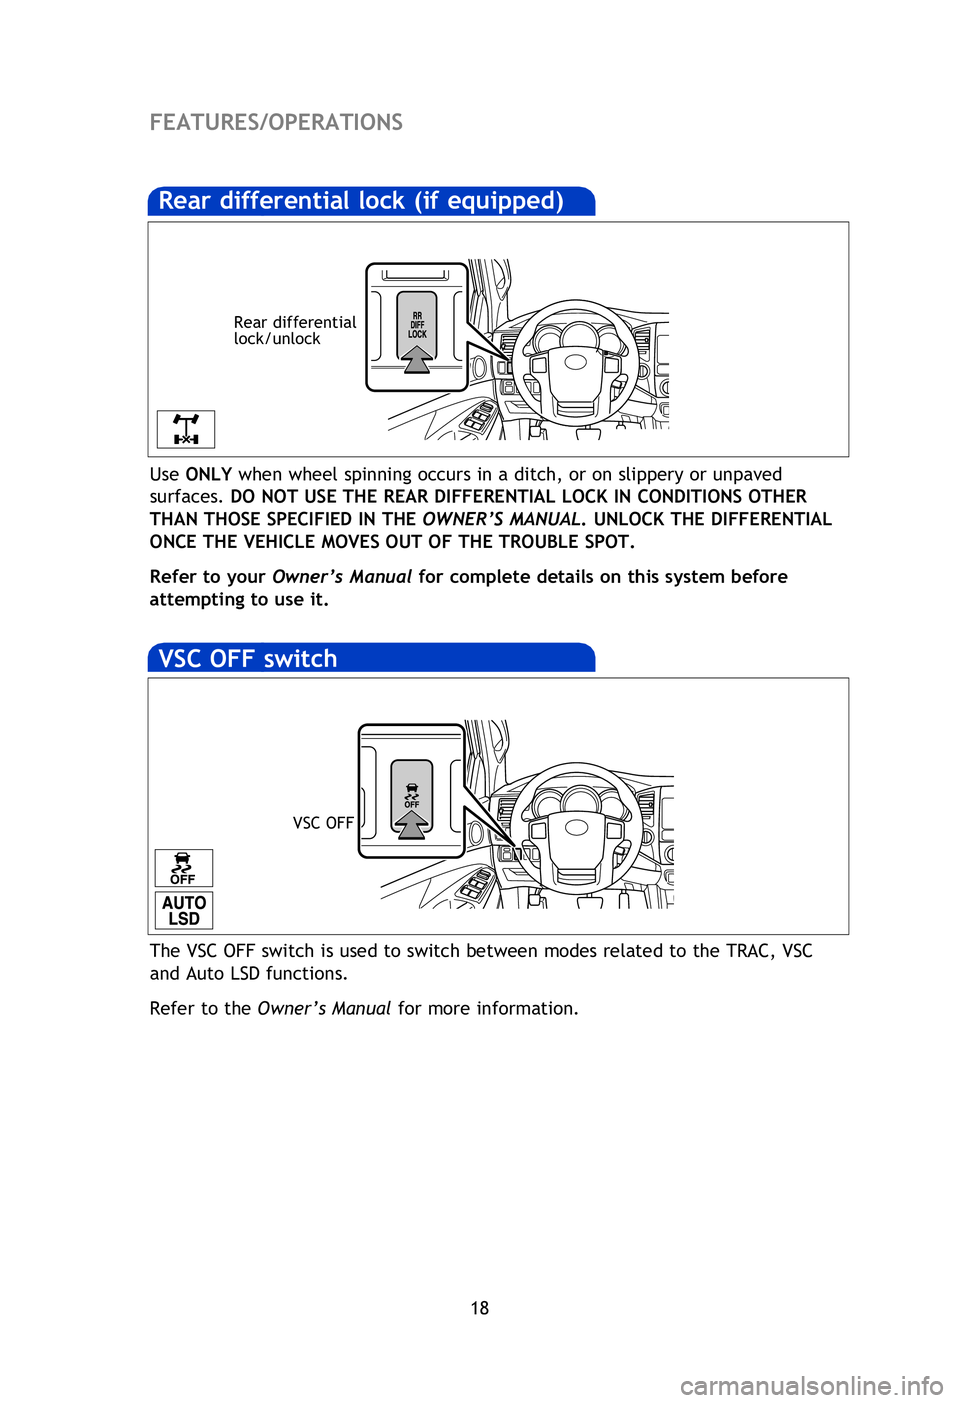
Door locks-Power (if equipped)The VSC OFF switch is used to switch between modes related to the TRAC, VSC
and Auto LSD functions.
Refer to the Owner’s Manual for more information.
VSC OFF switch
Use ONLY when wheel spinning occurs in a ditch, or on slippery or unpaved
surfaces. DO NOT USE THE REAR DIFFERENTIAL LOCK IN CONDITIONS OTHER
THAN THOSE SPECIFIED IN THE OWNER’S MANUAL. UNLOCK THE DIFFERENTIAL
ONCE THE VEHICLE MOVES OUT OF THE TROUBLE SPOT.
Refer to your Owner’s Manual for complete details on this system before
attempting to use it.
Rear differential lock (if equipped)
Rear differential
lock/u nlock
VSC OFF
126906_GUTS.indd 187/20/12 10:51 PM
Page 21 of 28
OVERVIEW
FEATURES/OPERATIONS
SAFETY AND EMERGENCY FEATURES
19
SAFETY AND EMERGENCY FEATURES
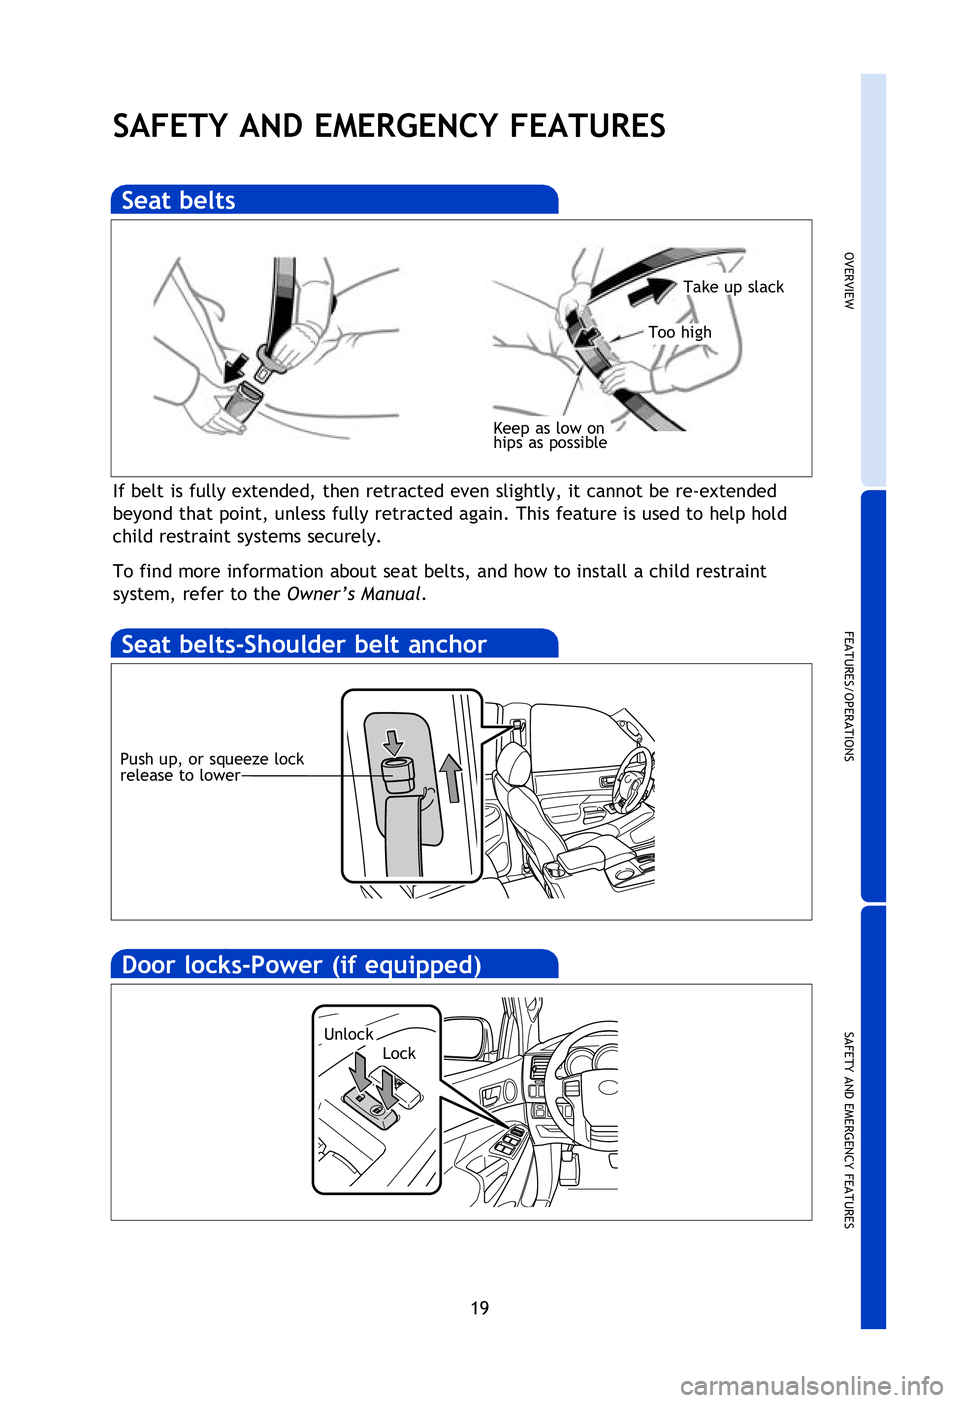
If belt is fully extended, then retracted even slightly, it cannot be re-extended
beyond that point, unless fully retracted again. This feature is used to help hold
child restraint systems securely.
To find more information about seat belts, and how to install a child restraint
system, refer to the Owner’s Manual.
Keep as low on
hips as possible
Take up slack
Too high
Seat belts
Seat belts-Shoulder belt anchor
Push up, or squeeze lock
release to lower
Door locks-Power (if equipped)
LockUnlock
The VSC OFF switch is used to switch between modes related to the TRAC, VSC
and Auto LSD functions.
Refer to the Owner’s Manual for more information.
Use ONLY when wheel spinning occurs in a ditch, or on slippery or unpaved
surfaces. DO NOT USE THE REAR DIFFERENTIAL LOCK IN CONDITIONS OTHER
THAN THOSE SPECIFIED IN THE OWNER’S MANUAL. UNLOCK THE DIFFERENTIAL
ONCE THE VEHICLE MOVES OUT OF THE TROUBLE SPOT.
Refer to your Owner’s Manual for complete details on this system before
attempting to use it.
126906_GUTS.indd 197/20/12 10:51 PM
Page 22 of 28
20
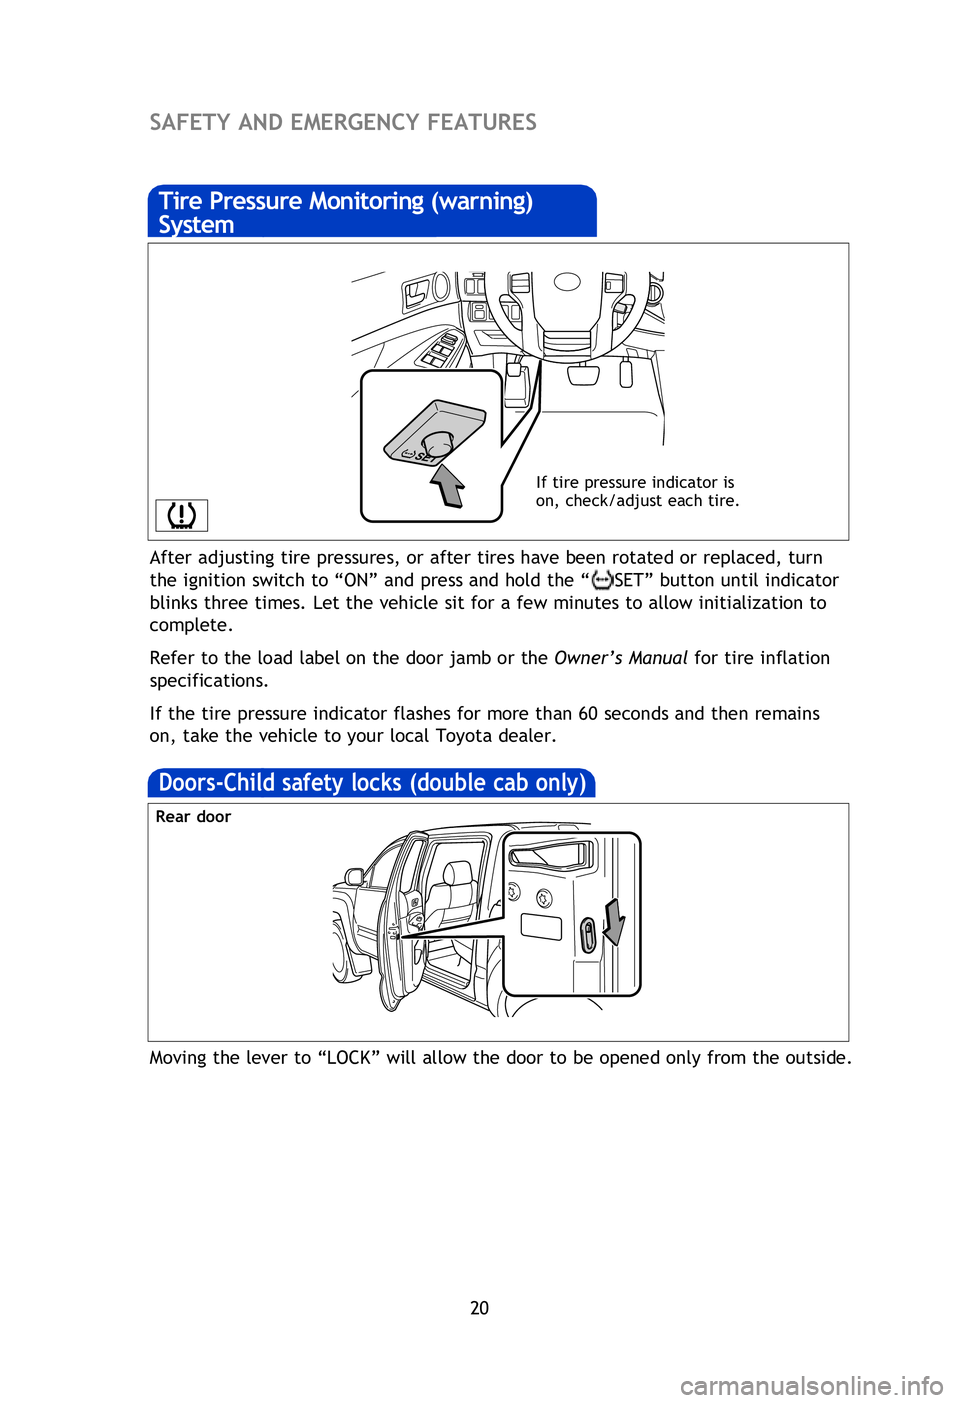
After adjusting tire pressures, or after tires have been rotated or replaced, turn
the ignition switch to “ON” and press and hold the “
SET” button until indicator
blinks three times. Let the vehicle sit for a few minutes to allow initialization to
complete.
Refer to the load label on the door jamb or the Owner’s Manual for tire inflation
specifications.
If the tire pressure indicator flashes for more than 60 seconds and then remains
on, take the vehicle to your local Toyota dealer.
Tire Pressure Monitoring (warning)
System
If tire pressure indicator is
on, check/adjust each tire.
Spare tire & tools
Tool location
Removing the spare tire
(1) Assemble the jack handle.
(2) Insert the jack handle end into the lowering screw.
(3) Turn the jack handle counterclockwise.
Refer to the Owner’s Manual for tire changing and jack positioning procedures.
Regular cab models
-behind the seatback
Moving the lever to “LOCK” will allow the door to be opened only from the outside.
Doors-Child safety locks (double cab only)
Rear door
SAFETY AND EMERGENCY FEATURES
(1)
126906_GUTS.indd 207/20/12 10:51 PM
Page 23 of 28
OVERVIEW
FEATURES/OPERATIONS
SAFETY AND EMERGENCY FEATURES
21
After adjusting tire pressures, or after tires have been rotated or replaced, turn
the ignition switch to “ON” and press and hold the “SET” button until indicator
blinks three times. Let the vehicle sit for a few minutes to allow initialization to
complete.
Refer to the load label on the door jamb or the Owner’s Manual for tire inflation
specifications.
If the tire pressure indicator flashes for more than 60 seconds and then remains
on, take the vehicle to your local Toyota dealer.
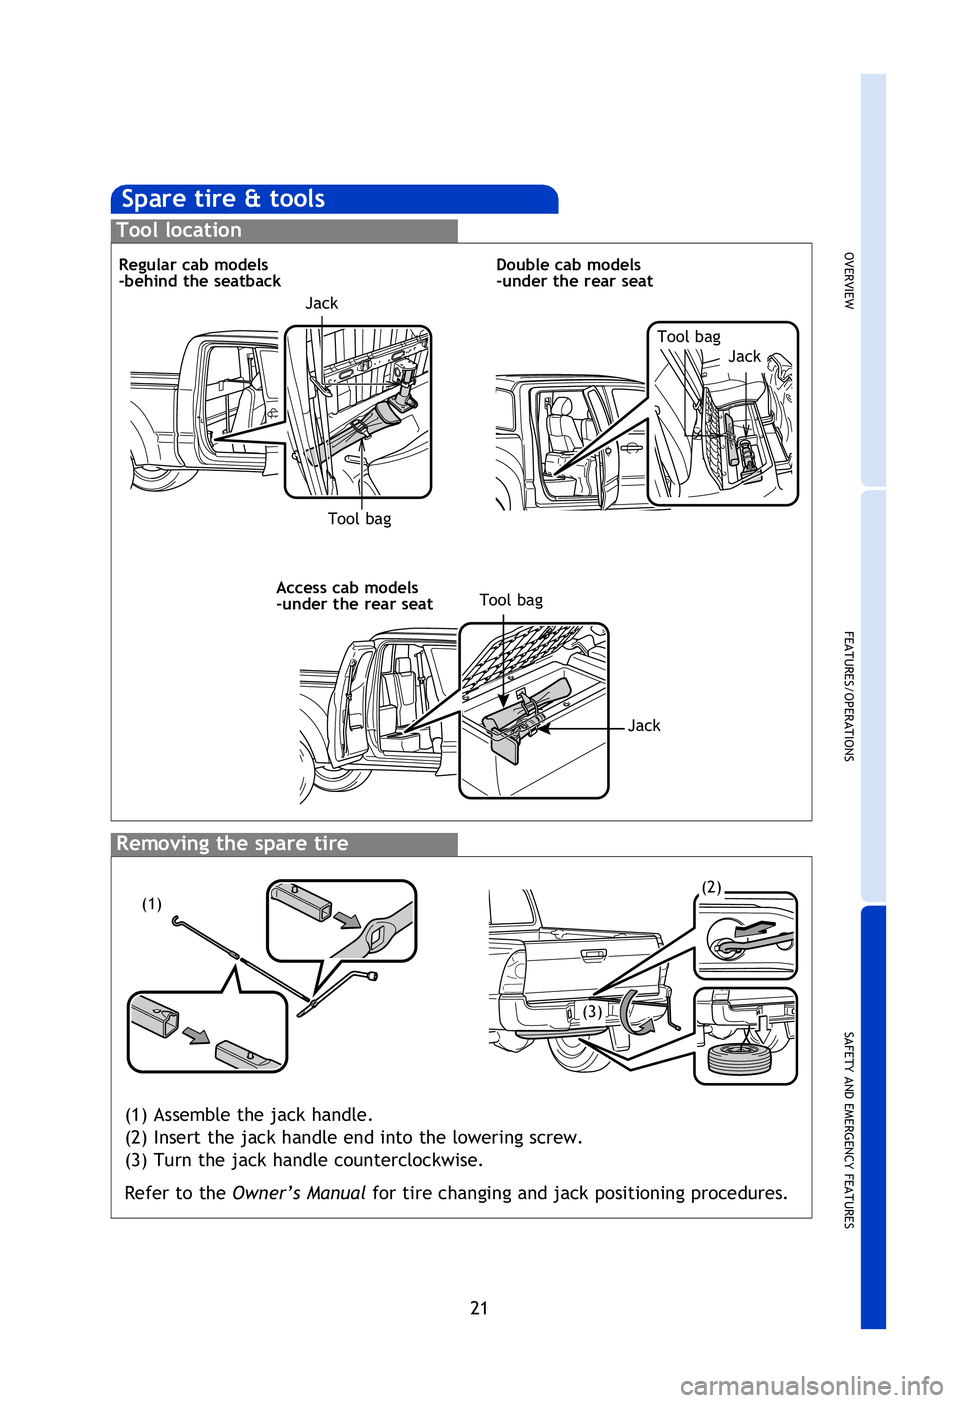
Spare tire & tools
Tool location
Removing the spare tire
(1) Assemble the jack handle.
(2) Insert the jack handle end into the lowering screw.
(3) Turn the jack handle counterclockwise.
Refer to the Owner’s Manual for tire changing and jack positioning procedures.
Regular cab models
-behind the seatback Double cab models
-under the rear seat
Access cab models
-under the rear seatTool bag
Jack
Tool bagJack
Tool bag
Jack
Moving the lever to “LOCK” will allow the door to be opened only from the outside.
(1)
(3)
(2)
126906_GUTS.indd 217/20/12 10:51 PM
Page 24 of 28
22
There are two types of Toyota floor mats: carpeted and all-weather. Each vehicle
has model-specific floor mats. Installation is easy.
To keep your floor mat properly positioned, follow these steps:
• Only use floor mats designed for your specific model.
• Use only one floor mat at a time, using the retaining hooks to keep the mat in
place.
• Install floor mats right side up.
Floor mat installation
SAFETY AND EMERGENCY FEATURES
Smart Stop Technology automatically reduces engine power when the accelerator
and brake pedals are pressed simultaneously under certain conditions.
SST engages when the accelerator is depressed first and the brakes are applied
firmly for longer than one-half second at speeds greater than five miles per hour.
SST doesn’t engage if the brake pedal is depressed before the accelerator pedal,
allowing vehicles to start on a steep hill and safely accelerate without rolling
backward.
Smart Stop Technology (SST)Star Safety SystemTM
VSC helps prevent loss of traction during cornering by reducing engine power and
applying brake force to selected wheels.
Toyota’s VSC monitors steering angle and the direction your vehicle is traveling.
When it senses that the front or rear wheels begin to lose traction, VSC reduces
engine power and applies braking to selected wheels. This helps restore traction
and vehicle control.
Vehicle Stability Control (VSC)
Anti-Lock Brake System (ABS)
ABS helps prevent brakes from locking up by “pulsing” brake pressure to each
wheel. This limits brake lockup and helps provide directional control for the
current road conditions.
Toyota’s ABS sensors detect which wheels are locking up and limits wheel lockup
by “pulsing” each wheel’s brakes independently. Pulsing releases brake pressure
repeatedly for fractions of a second. This helps the tires attain the traction that
current road conditions will allow, helping you to stay in directional control.
Brake Assist (BA)
Brake Assist is designed to detect sudden or “panic” braking, and then add braking
pressure to help decrease the vehicle’s stopping distance. When there’s only a
split second to react, Brake Assist can add additional brake pressure more quickly
than just the driver alone can. VSC helps prevent loss of traction during cornering by reducing engine power, and
Traction Control helps maintain traction on loose gravel and wet, icy, or uneven
surfaces by applying brake force to the spinning wheel(s).
Toyota’s TRAC sensors are activated when one of the drive wheels starts to slip.
TRAC limits engine output and applies the brakes to the spinning wheel. This
transfers power to the wheels that still have traction to help keep you on track.
Traction Control (TRAC)
Electronic Brake Force Distribution (EBD)
Toyota’s ABS technology has Electronic Brake-force Distribution (EBD) to help
maintain control and balance when braking. Abrupt stops can cause a vehicle
to tilt forward, reducing the braking power of the rear wheels. EBD responds to
sudden stops by redistributing brake force to enhance the braking effectiveness of
all four wheels. All new Toyota vehicles come standard with the Star Safety System
TM, which
combines Vehicle Stability Control (VSC), Traction Control (TRAC), Anti-lock
Braking System (ABS), Electronic Brake-force Distribution (EBD), Brake Assist (BA)
and Smart Stop Technology (SST).
126906_GUTS.indd 227/20/12 10:51 PM