2013 TOYOTA SEQUOIA display
[x] Cancel search: displayPage 196 of 328

196
1. AUDIO/VIDEO SYSTEM OPERATION
1Select the menu item using ,, and and touch
“Enter”. The player starts playing the
disc from the start of the selected item.
When is touched, the previous
screen is displayed.
1Press the “MEDIA” button.
2Touch the “DISC” tab or press the
“MEDIA” button repeatedly until the
“DISC” tab is selected.
3Touch “Options”.
4The “DVD Options” screen will appear.SELECTING A MENU ITEM
INFORMATION
●According to the DVD disc, some menu
items can be selected by touching them
directly. (For details, see the manual that
comes with the DVD disc provided sepa-
rately.)
DVD OPTIONS
Screen
buttonFunctionPage
“Search”Touch to display the
title search screen.197
“Return”
Touch to display the
predetermined scene
on the screen and
start playing.
-
“Audio”Touch to display the
audio editing screen.197
“Subtitle”
Touch to display the
subtitle selection
screen.
197
“Angle”
Touch to display the
angle selection
screen.
197
“Wide”Touch to display the
screen mode screen.173
“Display”Touch to display the
image quality adjust-
ment screen.198
“DVD
Settings”Touch to display the
initial set up screen.198
Page 197 of 328

197
1. AUDIO/VIDEO SYSTEM OPERATION
5
AUDIO/VIDEO SYSTEM
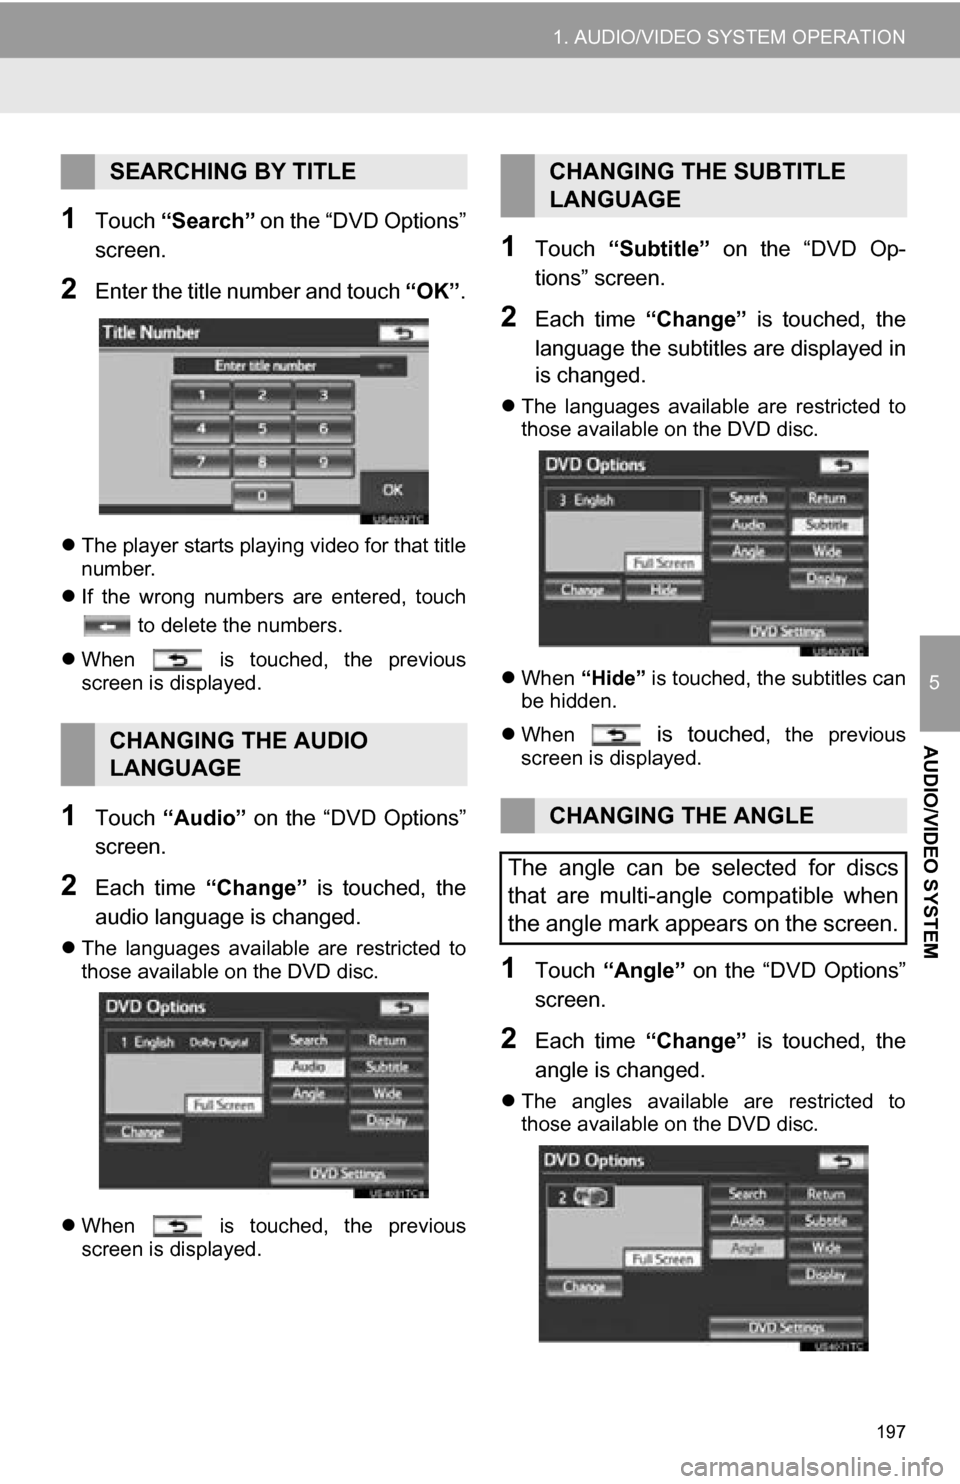
1Touch “Search” on the “DVD Options”
screen.
2Enter the title number and touch “OK”.
The player starts playing video for that title
number.
If the wrong numbers are entered, touch
to delete the numbers.
When is touched, the previous
screen is displayed.
1Touch “Audio” on the “DVD Options”
screen.
2Each time “Change” is touched, the
audio language is changed.
The languages available are restricted to
those available on the DVD disc.
When is touched, the previous
screen is displayed.
1Touch “Subtitle” on the “DVD Op-
tions” screen.
2Each time “Change” is touched, the
language the subtitles are displayed in
is changed.
The languages available are restricted to
those available on the DVD disc.
When “Hide” is touched, the subtitles can
be hidden.
When
is touched, the previous
screen is displayed.
1Touch “Angle” on the “DVD Options”
screen.
2Each time “Change” is touched, the
angle is changed.
The angles available are restricted to
those available on the DVD disc.
SEARCHING BY TITLE
CHANGING THE AUDIO
LANGUAGE
CHANGING THE SUBTITLE
LANGUAGE
CHANGING THE ANGLE
The angle can be selected for discs
that are multi-angle compatible when
the angle mark appears on the screen.
Page 198 of 328

198
1. AUDIO/VIDEO SYSTEM OPERATION
When is touched, the previous
screen is displayed.
■CONTRAST, BRIGHTNESS, COLOR
AND TONE ADJUSTMENT
1Touch “Display” on the “DVD Op-
tions” screen.
2Touch “” or “” to display the de-
sired item to be adjusted.
3After adjusting the screen, touch
“OK” .
The screen goes off when “Screen Off” is
touched. To turn the screen back on,
press any button. The selected screen
appears.
1Touch “DVD Settings” on the “DVD
Options” screen.
2Touch the items to be set.
3After the initial setting has been
changed, touch “ Save”.
The initial screen will close, and the sys-
tem will return to the previous screen.
When “Default” is touched, all menus are
initialized.
AUDIO SCREEN ADJUSTMENT
The brightness, contrast, color and
tone of the screen can be adjusted. In
addition, the display can be turned off
and the screen can be changed to ei-
ther day or night mode.
Screen buttonFunction
“Contrast” “+”Touch to strengthen the
contrast of the screen.
“Contrast” “-”Touch to weaken the
contrast of the screen.
“Brightness” “+”Touch to brighten the
screen.
“Brightness” “-”Touch to darken the
screen.
“Color” “R”Touch to strengthen the
red color of the screen.
“Color” “G”
Touch to strengthen the
green color of the
screen.
“Tone” “+”Touch to strengthen the
tone of the screen.
“Tone” “-”Touch to weaken the
tone of the screen.
DVD SETTINGS
Screen buttonFunction
Page 203 of 328

203
1. AUDIO/VIDEO SYSTEM OPERATION
5
AUDIO/VIDEO SYSTEM
If “Check DISC” appears on the screen:
It indicates that the disc is dirty, damaged,
or it was inserted upside down. Clean the
disc or insert it correctly. If a disc which is
not playable is inserted, “Check DISC” will
also appear on the screen. For appropriate
discs for this player, see “AUDIO/VIDEO
SYSTEM OPERATING HINTS” on page
225.
If “Region code error” appears on the
screen: It indicates that the DVD region
code is not set properly.
If the malfunction is not rectified: Take
your vehicle to your Toyota dealer.
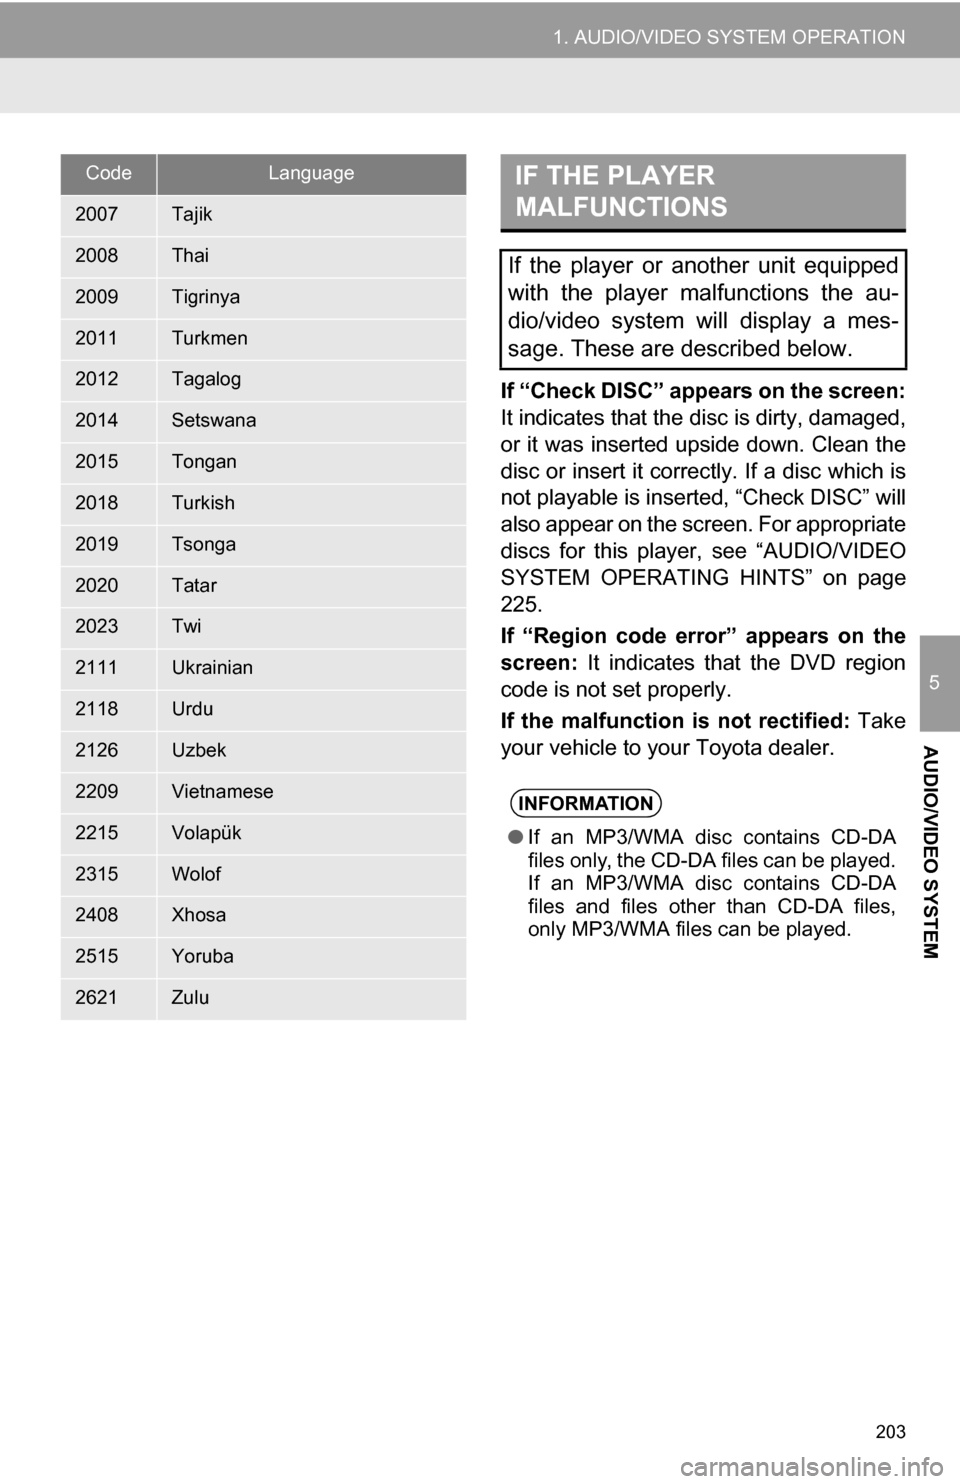
2007Tajik
2008Thai
2009Tigrinya
2011Turkmen
2012Tagalog
2014Setswana
2015Tongan
2018Turkish
2019Tsonga
2020Tatar
2023Twi
2111Ukrainian
2118Urdu
2126Uzbek
2209Vietnamese
2215Volapük
2315Wolof
2408Xhosa
2515Yoruba
2621Zulu
CodeLanguageIF THE PLAYER
MALFUNCTIONS
If the player or another unit equipped
with the player malfunctions the au-
dio/video system will display a mes-
sage. These are described below.
INFORMATION
● If an MP3/WMA disc contains CD-DA
files only, the CD-DA files can be played.
If an MP3/WMA disc contains CD-DA
files and files other than CD-DA files,
only MP3/WMA files can be played.
Page 207 of 328

207
1. AUDIO/VIDEO SYSTEM OPERATION
5
AUDIO/VIDEO SYSTEM
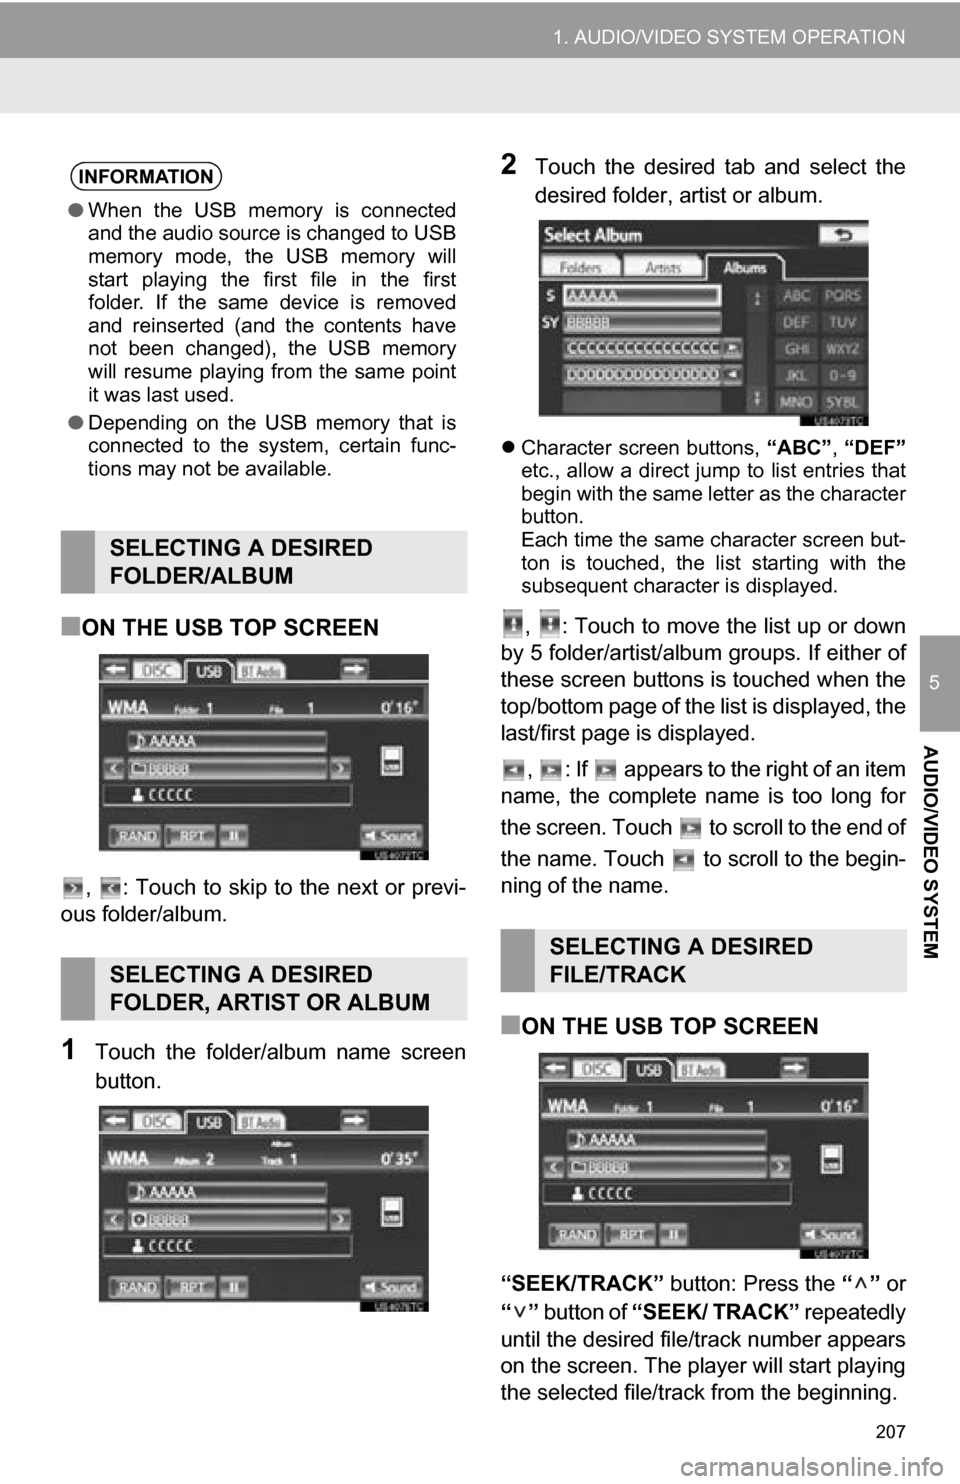
■ON THE USB TOP SCREEN
, : Touch to skip to the next or previ-
ous folder/album.
1Touch the folder/album name screen
button.
2Touch the desired tab and select the
desired folder, artist or album.
Character screen buttons, “ABC”, “DEF”
etc., allow a direct jump to list entries that
begin with the same letter as the character
button.
Each time the same character screen but-
ton is touched, the list starting with the
subsequent character is displayed.
, : Touch to move the list up or down
by 5 folder/artist/album groups. If either of
these screen buttons is touched when the
top/bottom page of the lis t is displayed, the
last/first page is displayed.
, : If appears to the right of an item
name, the complete name is too long for
the screen. Touch to scroll to the end of
the name. Touch to scroll to the begin-
ning of the name.
■ON THE USB TOP SCREEN
“SEEK/TRACK” button: Press the “” or
“” button of “SEEK/ TRACK” repeatedly
until the desired file/track number appears
on the screen. The player will start playing
the selected file/track from the beginning.
INFORMATION
● When the USB memory is connected
and the audio source is changed to USB
memory mode, the USB memory will
start playing the first file in the first
folder. If the same device is removed
and reinserted (and the contents have
not been changed), the USB memory
will resume playing from the same point
it was last used.
● Depending on the USB memory that is
connected to the system, certain func-
tions may not be available.
SELECTING A DESIRED
FOLDER/ALBUM
SELECTING A DESIRED
FOLDER, ARTIST OR ALBUM
SELECTING A DESIRED
FILE/TRACK
Page 208 of 328

208
1. AUDIO/VIDEO SYSTEM OPERATION
“TUNE·SCROLL” knob: Turn the knob
clockwise or counterclockwise to skip to
the desired file/track.
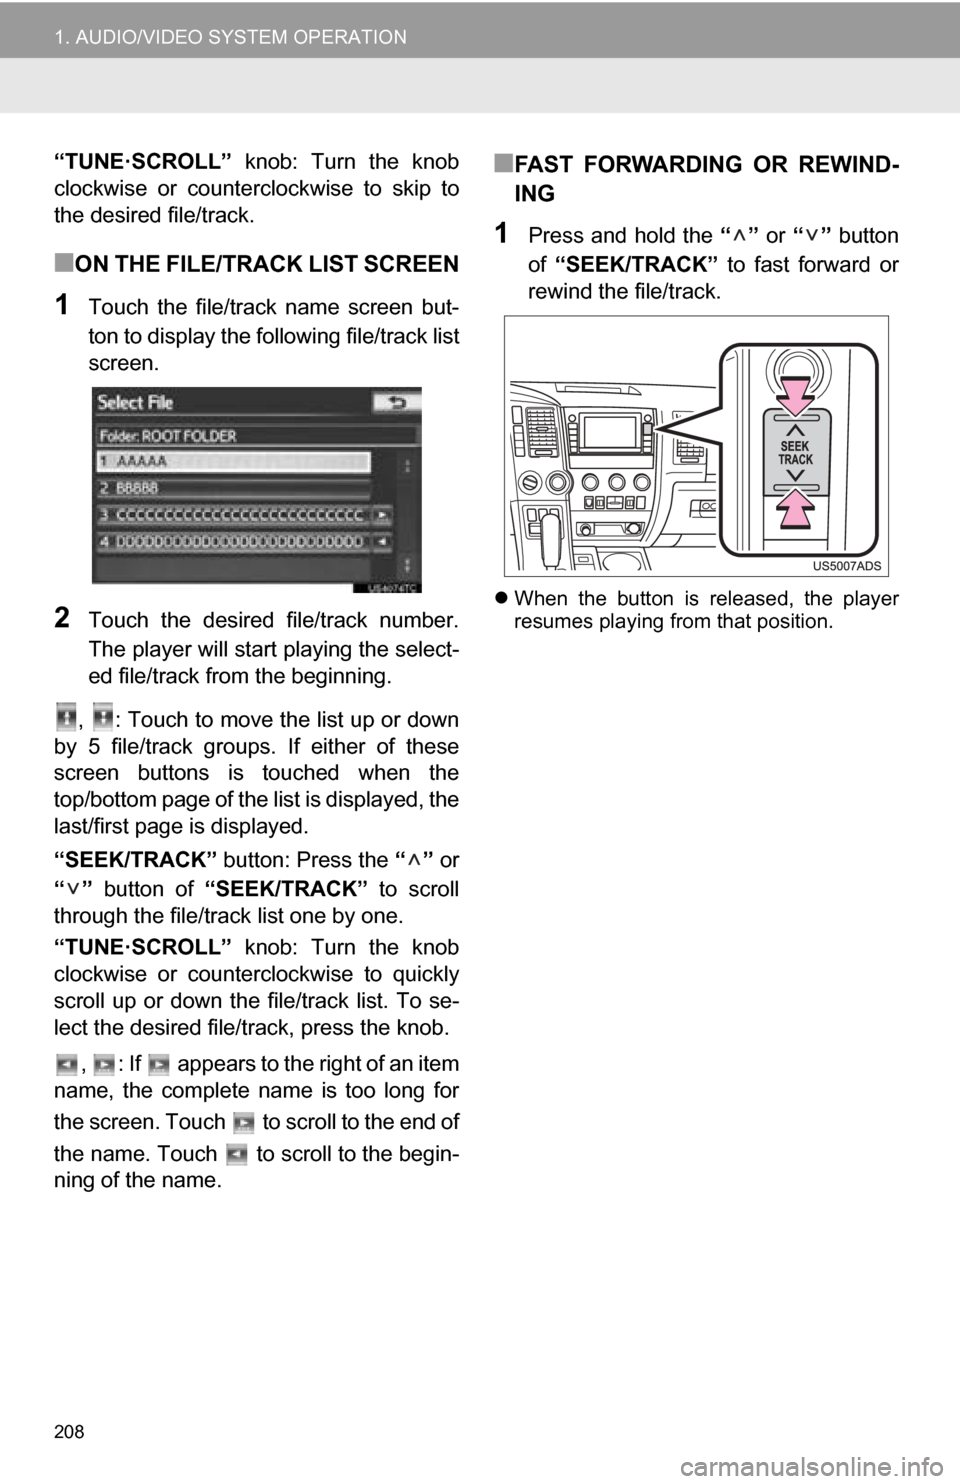
■ON THE FILE/TRACK LIST SCREEN
1Touch the file/track name screen but-
ton to display the foll owing file/track list
screen.
2Touch the desired file/track number.
The player will start playing the select-
ed file/track from the beginning.
, : Touch to move the list up or down
by 5 file/track groups. If either of these
screen buttons is touched when the
top/bottom page of the lis t is displayed, the
last/first page is displayed.
“SEEK/TRACK” button: Press the “” or
“” button of “SEEK/TRACK” to scroll
through the file/track list one by one.
“TUNE·SCROLL” knob: Turn the knob
clockwise or counterclockwise to quickly
scroll up or down the file/track list. To se-
lect the desired file/track, press the knob.
, : If appears to the right of an item
name, the complete name is too long for
the screen. Touch to scroll to the end of
the name. Touch to scroll to the begin-
ning of the name.
■FAST FORWARDING OR REWIND-
ING
1Press and hold the “” or “” button
of “SEEK/TRACK” to fast forward or
rewind the file/track.
When the button is released, the player
resumes playing from that position.
Page 210 of 328

210
1. AUDIO/VIDEO SYSTEM OPERATION
9. iPod OPERATION
1Open the cover and connect iPod us-
ing an iPod cable.
Turn on the power of the iPod if it is not
turned on.
2Press the “MEDIA” button.
1If an iPod has already been connected,
touch the “iPod” tab to display the
screen. Pressing the “MEDIA” button
repeatedly can also select the tab.
: Touch to start playing the music.
: Touch to pause the music.
: Touch to start playing the music again.
Connecting an iPod enables users to
enjoy music from the vehicle speakers.
CAUTION
● Do not operate the player’s controls or
connect the iPod while driving.
NOTICE
●Do not leave your portable player in the
car. In particular, high temperatures
inside the vehicle may damage the por-
table player.
● Do not push down on or apply unneces-
sary pressure to the portable player
while it is connected as this may dam-
age the portable player or its terminal.
● Do not insert foreign objects into the port
as this may damage the portable player
or its terminal.
INFORMATION
●When an iPod is connected using a gen-
uine iPod cable, the iPod starts charging
its battery.
CONNECTING iPod
PLAYING iPod
PLAYING AND PAUSING iPod
INFORMATION
●When the iPod connected to the system
includes iPod video, the system can only
output the sound by touching “Video”
on the “iPod” screen.
● Depending on the iPod, the video sound
may not be able to be heard.
● Depending on the iPod and the songs in
the iPod, iPod cover art may be dis-
played. This function can be changed to
“On” or “Off”. Se e “iPod SETTINGS” on
page 235. It may take time to display
iPod cover art, and the iPod may not be
operated while the cover art display is in
process. Only the iPod cover art that is
saved in JPEG format can be displayed.
● When an iPod is connected and the
audio source is changed to iPod mode,
the iPod will resume playing from the
same point it was last used.
● Depending on the iPod that is connected
to the system, certain functions may not
be available.
Page 211 of 328

211
1. AUDIO/VIDEO SYSTEM OPERATION
5
AUDIO/VIDEO SYSTEM
1Touch “Browse” .
2Select the desired play mode.
■ON THE iPod TOP SCREEN
“SEEK/TRACK” button: Press the “” or
“” button of “SEEK/TRACK” repeatedly
until the desired track number appears on
the screen. The player will start playing the
selected track from the beginning.
“TUNE·SCROLL” knob: Turn the knob
clockwise or counterclockwise to skip to
the desired track.
■ON THE TRACK LIST SCREEN
1Touch the track name screen button to
display the following track list screen.
2Touch the desired track number. The
player will start playing the selected
track from the beginning.
, : Touch to move the list up or down
by 5 track groups. If either of these screen
buttons is touched when the top/bottom
page of the list is displayed, the last/first
page is displayed.
“SEEK/TRACK” button: Press the “” or
“” button of “SEEK/TRACK” to scroll
through the track list one by one.
“TUNE·SCROLL” knob: Turn the knob
clockwise or counterclockwise to quickly
scroll up or down the track list. To select
the desired track, press the knob.
, : If appears to the right of an item
name, the complete name is too long for
the screen. Touch to scroll to the end of
the name. Touch to scroll to the begin-
ning of the name.
SELECTING A PLAY MODE
SELECTING A DESIRED
TRACK