Page 1 of 36
TABLE OF CONTENTS
1
PRIUS PHV_QG_OM47788U_(U)
Page
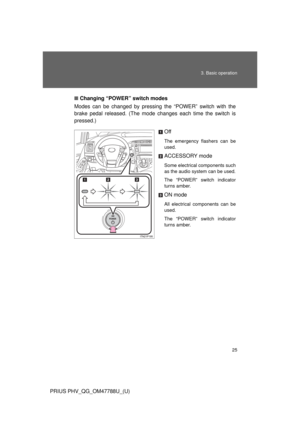
1Charging
operation2Charging procedures
2Plug-in Hybrid
Applications19A service for plug-in hybrid vehicles
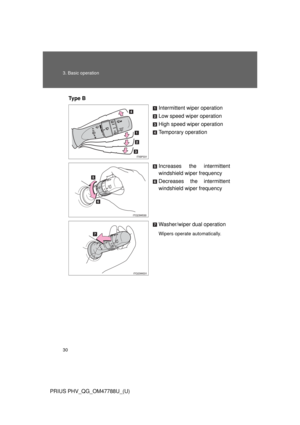
3Basic
operation20Basic operating procedures
4Things you
must know34Things you need to know about the plug-in
hybrid system
The quick guide is not intended as a substitute for your
“Owner’s Manual”. We strongly encourage you to review
the “Owner’s Manual” and supplementary manuals so you
will have a better understanding of your vehicle’s capabil-
ities and limitations.
Depending on specifications, the vehicle shown in the il-
lustration may differ from your vehicle in terms of equip-
ment.
Page 2 of 36
2
PRIUS PHV_QG_OM47788U_(U)
1. Charging operation
How to charge
■Charging equipment and names
Charging indicator
Charging inlet
Charging port lidCharging port
Charging cable
Page 3 of 36
3 1. Charging operation
PRIUS PHV_QG_OM47788U_(U)■The names of each part of the charging cable
*: The shape of the plug differs in accordance with the voltage and the target
region.
Charging connector
Latch release button
CCID (Charging Circuit Inter-
rupting Device)
Plug
*
Power indicator
Error warning indicator
Test button
Reset button
Page 4 of 36
4 1. Charging operation
PRIUS PHV_QG_OM47788U_(U)■Confirm the following before charging
●The parking brake is applied.
●Lights such as the headlights, emergency flashers and interior
lights etc. are switched off.
If these light switches are turned ON, then these features will consume
electricity, and charging time will increase.
●The “POWER” switch is OFF.
■How to charge
Prepare the charging cable.
Insert the charging cable into the
outlet of the external power
source.
Make sure to hold the body of the
plug and insert it firmly into the
outlet.
Check that the power indicator of
the CCID (Charging Circuit Inter-
rupting Device) is illuminated.
In order to lessen the load on the
outlet and plug, hang the CCID
(Charging Circuit Interrupting
Device) on a hook etc. while the
plug is inserted.
STEP1
STEP2
Page 5 of 36
5 1. Charging operation
PRIUS PHV_QG_OM47788U_(U)Press the test button on the
CCID (Charging Circuit Interrupt-
ing Device) to check that the
electrical leakage detection func-
tion operates properly.
If the error warning indicator illu-
minates when the test button is
pressed, the function is operating
correctly.
After the test has been com-
pleted, press the reset button to
turn off the error warning indica-
tor. Charging cannot be carried
out while the error warning indica-
tor is illuminated.
If the error warning indicator does
not come on even if the test but-
ton is pressed, it is likely that the
function is not operating correctly.
Stop charging immediately and
contact your Toyota dealer.
STEP3
Page 6 of 36
6 1. Charging operation
PRIUS PHV_QG_OM47788U_(U)Press the charging port lid to
open.
The charging inlet light will illumi-
nate.
Remove the charging connector
cap.
Affix the cap to the cable.
Insert the charging connector
into the charging inlet.
When inserting, make sure not to
press the latch release button.
Align with the guide position
shown on the underside of the
charging connector, and push in
until a click is heard.
STEP4
STEP5
STEP6
Page 7 of 36
7 1. Charging operation
PRIUS PHV_QG_OM47788U_(U)Confirm that the charging indica-
tor is illuminated. (When the
charging timer function is in use,
the light will turn off several sec-
onds after illuminating.)
Charging will not start if the
charging indicator does not illumi-
nate when the charging connec-
tor is inserted.
The amount of time until charging
is completed can be checked on
the energy monitor by turning the
“POWER” switch to ON mode.
The charging indicator will turn off
when charging is completed.
STEP7
Page 8 of 36
8 1. Charging operation
PRIUS PHV_QG_OM47788U_(U)■After charging
Pull the charging connector
towards you while pressing the
latch release button.
If the charging connector is dis-
connected during charging (while
the charging indicator is on),
charging will be interrupted.
Attach the charging connector cap.
Close the charging port lid.
Remove the plug from the outlet when the charging equip-
ment will not be used for a prolonged period of time.
Hold the body of the plug when removing.
Make sure to put the cable away immediately after disconnecting.
When leaving the plug inserted, inspect the plug and connector once
a month to check if dirt or dust has accumulated.
STEP1
STEP2
STEP3
STEP4


Page
1Charging
operation2Charging procedures
2Plug-in Hybrid
Applications19A service for plug-in hybrid vehicles
3Basic
operation20Basic operating proc")

1. Charging operation
How to charge
■Charging equipment and names
Charging indicator
Charging inlet
Charging port lidCharging port
Charging cable")
■The names of each part of the charging cable
*: The shape of the plug differs in accordance with the voltage and the target
region.
Charging connect")
■Confirm the following before charging
●The parking brake is applied.
●Lights such as the headlights, emergency flashers and interior
lights etc.")
Press the test button on the
CCID (Charging Circuit Interrupt-
ing Device) to check that the
electrical leakage detection func-
tion operates properly.")
Press the charging port lid to
open.
The charging inlet light will illumi-
nate.
Remove the charging connector
cap.
Affix the cap to the cable.
Insert")
Confirm that the charging indica-
tor is illuminated. (When the
charging timer function is in use,
the light will turn off several sec-
onds after illu")
■After charging
Pull the charging connector
towards you while pressing the
latch release button.
If the charging connector is dis-
connected during c")