Page 195 of 532

195
2-5. Driving information
2
When driving
■
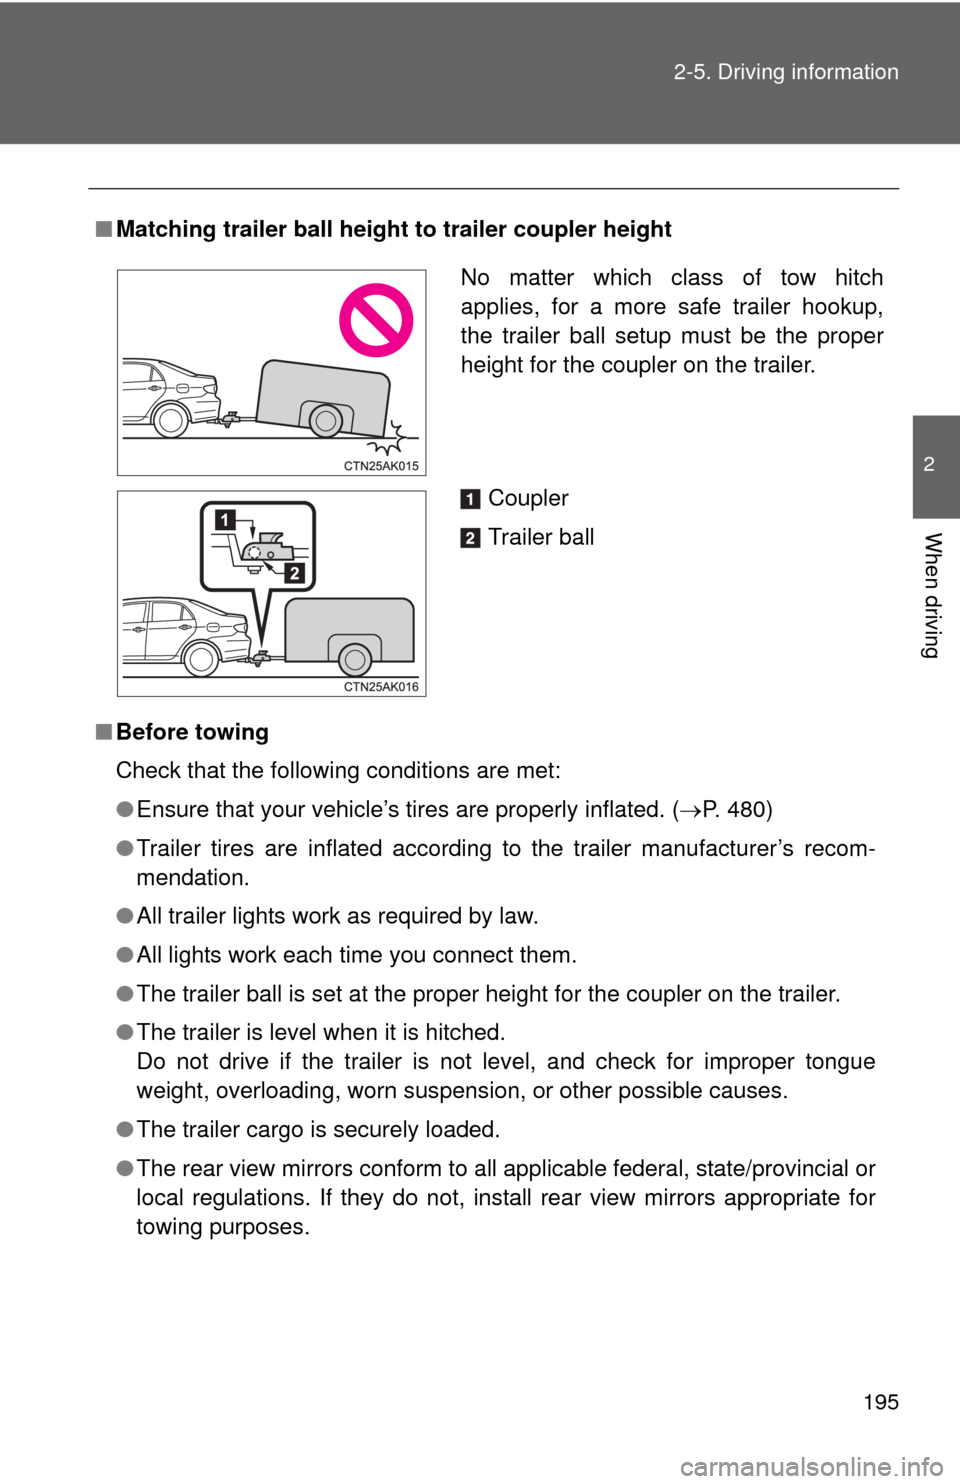
Matching trailer ball height to trailer coupler height
■ Before towing
Check that the following conditions are met:
●Ensure that your vehicle’s tires are properly inflated. ( P. 480)
● Trailer tires are inflated according to the trailer manufacturer’s recom-
mendation.
● All trailer lights work as required by law.
● All lights work each time you connect them.
● The trailer ball is set at the proper height for the coupler on the trai\
ler.
● The trailer is level when it is hitched.
Do not drive if the trailer is not level, and check for improper tongue
weight, overloading, worn suspension, or other possible causes.
● The trailer cargo is securely loaded.
● The rear view mirrors conform to all applicable federal, state/provincial or
local regulations. If they do not, instal l rear view mirrors appropriate for
towing purposes.
No matter which class of tow hitch
applies, for a more safe trailer hookup,
the trailer ball setup must be the proper
height for the coupler on the trailer.
Coupler
Trailer ball
Page 199 of 532

199
2-5. Driving information
2
When driving
CAUTION
■
Hitch
Trailer hitch assemblies have different weight capacities established by the
hitch manufacturer. Even though the vehicle may be physically capable of
towing a higher weight, the operator must determine the maximum weight
rating of the particular hitch assembly and never exceed the maximum
weight rating specified for the trailer-hitch. Exceeding the maximum weight
rating set by the trailer-hitch manufacturer can cause an accident resulting in
death or serious personal injuries.
■ When towing a trailer
Toyota recommends trailers with brakes that conform to any applicable fed-
eral and state/provincial regulations.
● If the gross trailer weight exceeds unbraked TWR, trailer brakes are
required. Toyota recommends trailers wi th brakes that conform to all appli-
cable federal and state/provincial regulations.
● Never tap into your vehicle’s hydraulic system, as this will lower the vehi-
cle’s braking effectiveness.
● Never tow a trailer without using a safety chain securely attached to both
the trailer and the vehicle. If damage occurs to the coupling unit or hitch
ball, there is danger of the trailer wandering into another lane.
NOTICE
■When installing a trailer hitch
Use only the position recommended by your Toyota dealer. Do not install the
trailer hitch on the bumper; this may cause body damage.
■ Do not directly splice trailer lights
Do not directly splice trailer lights. Directly splicing trailer lights may damage
your vehicle’s electrical system and cause a malfunction.
Page 285 of 532

285
3-3. Using the Bluetooth
® audio system
3
Interior features
Using the Bluetooth® audio/phone for the first time
Before using the Bluetooth
® audio/phone, it is necessary to register a
Bluetooth® device in the system. Follow the procedure below to reg-
ister (pair) a device:
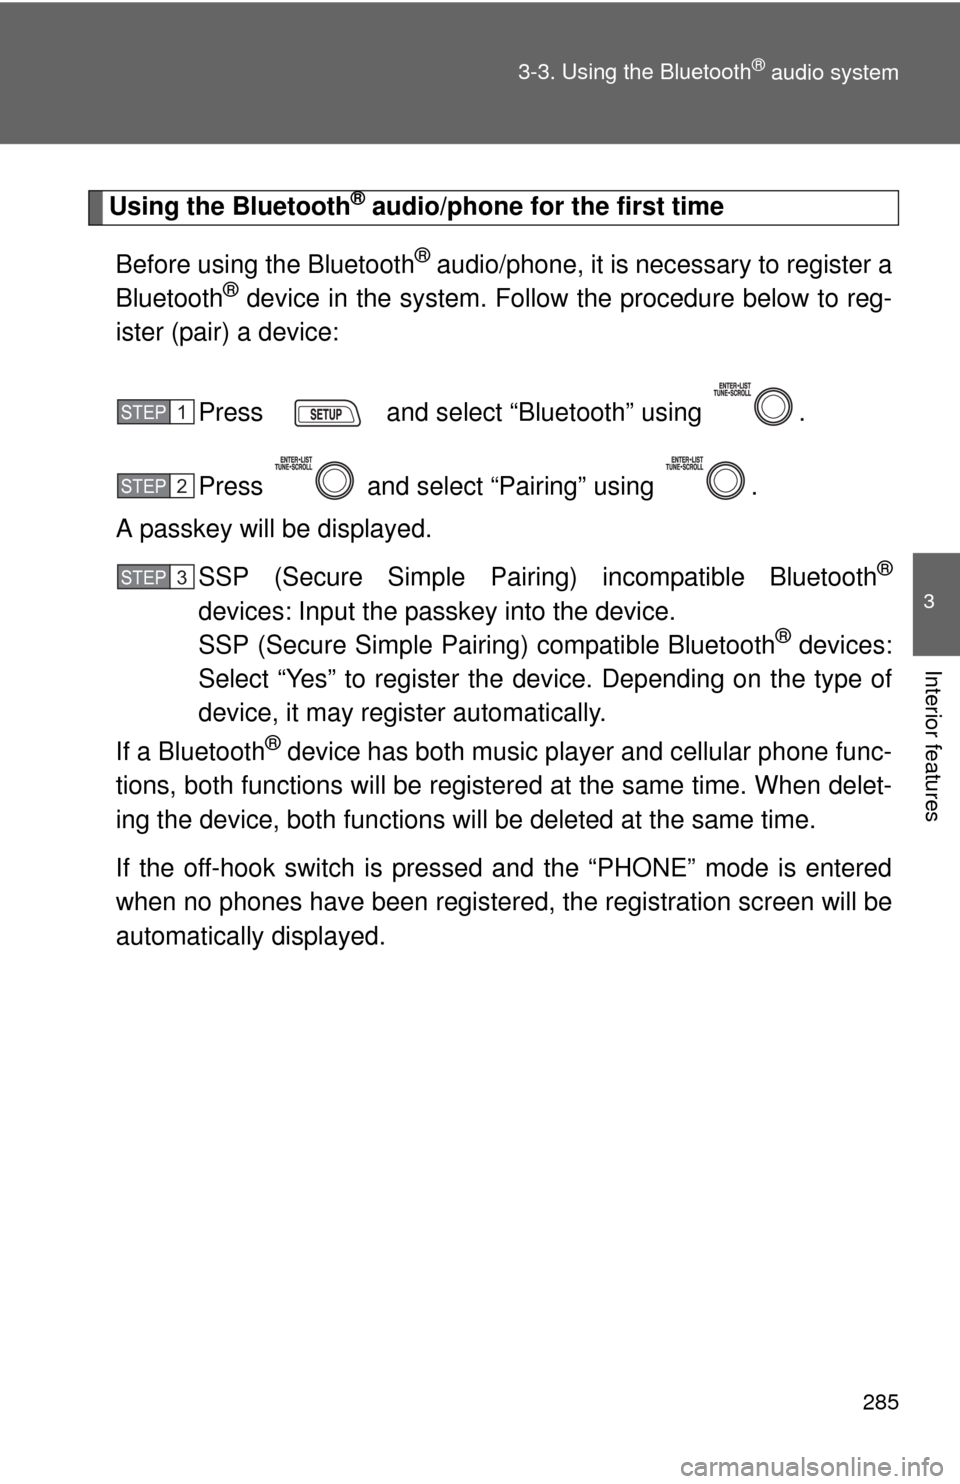
Press and select “Bluetooth” using .
Press and select “Pairing” using .
A passkey will be displayed.
SSP (Secure Simple Pairin g) incompatible Bluetooth
®
devices: Input the passkey into the device.
SSP (Secure Simple Pairing) compatible Bluetooth® devices:
Select “Yes” to register the device. Depending on the type of
device, it may register automatically.
If a Bluetooth
® device has both music player and cellular phone func-
tions, both functions will be regist ered at the same time. When delet-
ing the device, both f unctions will be deleted at the same time.
If the off-hook switch is pressed and the “PHONE” mode is entered
when no phones have been registered, the re gistration screen will be
automatically displayed.
STEP 1
STEP 2
STEP 3
Page 330 of 532

330
3-7. Other interior features
Floor mat
CAUTION
Observe the following precautions.
Failure to do so may cause the driver's floor mat to slip, possibly interfering
with the pedals while driving. An unexpectedly high speed may result or it may
become difficult to stop the vehicle, leading to a serious accident.
■When installing the driver's floor mat
●Do not use floor mats designed for other models or different model year
vehicles, even if they are Toyota Genuine floor mats.
● Only use floor mats designed for the driver's seat.
● Always install the floor mat securely using the retaining hooks (clips) pro-
vided.
● Do not use two or more floor mats on top of each other.
● Do not place the floor mat bottom-side up or upside-down.
■ Before driving
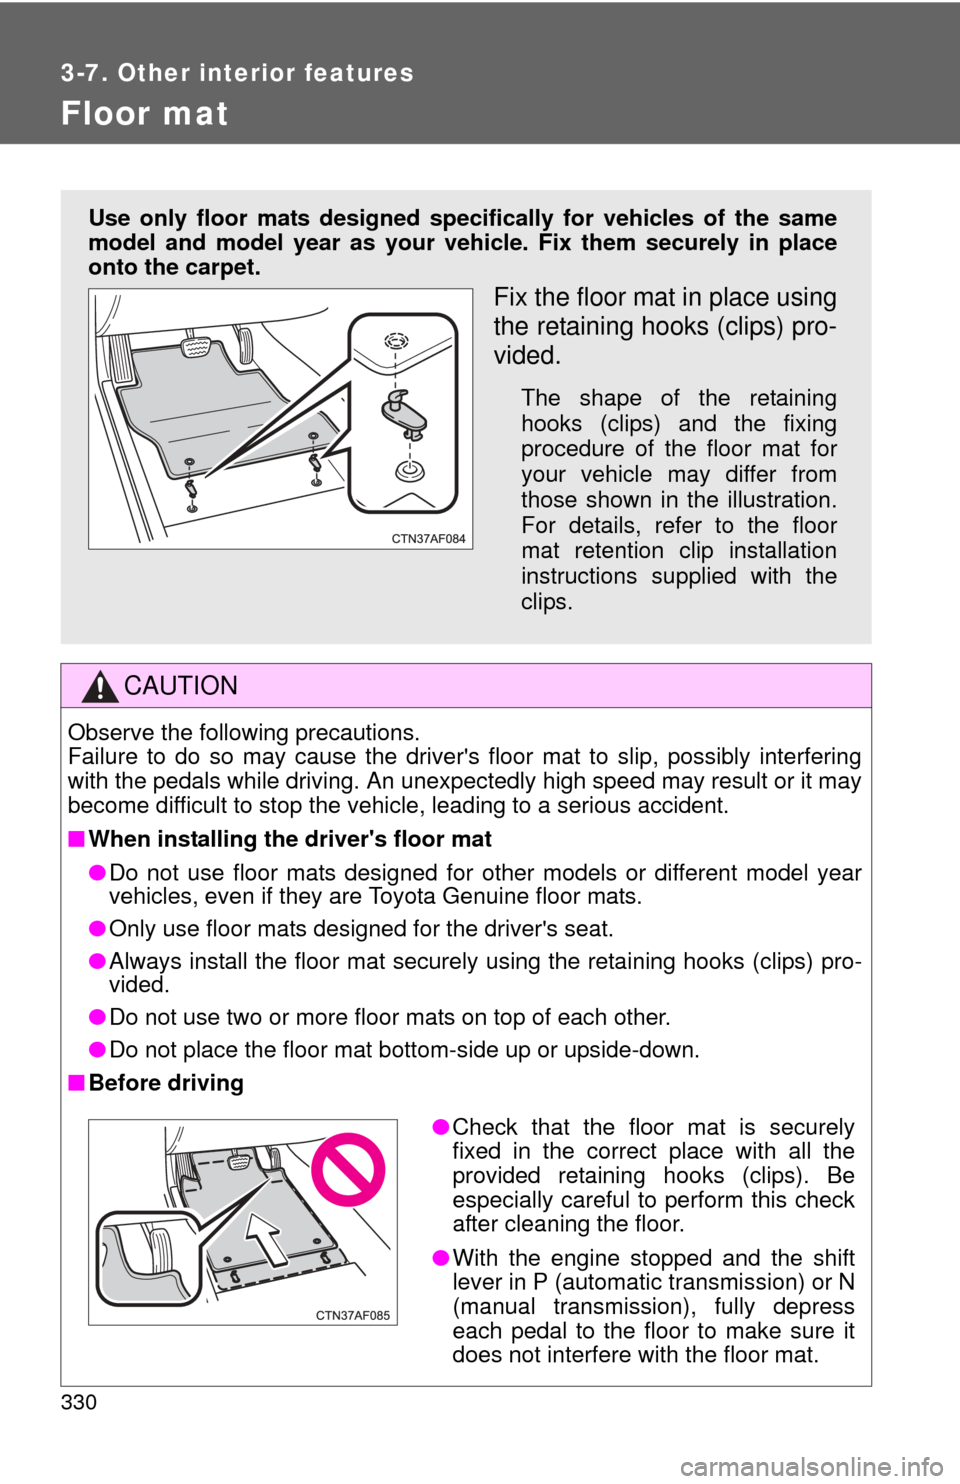
Use only floor mats designed specifically for vehicles of the same
model and model year as your vehic le. Fix them securely in place
onto the carpet.
Fix the floor mat in place using
the retaining hooks (clips) pro-
vided.
The shape of the retaining
hooks (clips) and the fixing
procedure of the floor mat for
your vehicle may differ from
those shown in the illustration.
For details, refer to the floor
mat retention clip installation
instructions supplied with the
clips.
● Check that the floor mat is securely
fixed in the correct place with all the
provided retaining hooks (clips). Be
especially careful to perform this check
after cleaning the floor.
● With the engine stopped and the shift
lever in P (automatic transmission) or N
(manual transmission), fully depress
each pedal to the floor to make sure it
does not interfere with the floor mat.
Page 334 of 532
334 3-7. Other interior features
CAUTION
■While driving the vehicle
Do not adjust the display. Be sure to adjust the display only when the vehicle
is stopped.
■ When doing the circling calibration
Be sure to secure a wide space, and watch out for people and vehicles in the
neighborhood. Do not violate any local traffic rules while performing circling
calibration.
NOTICE
■To avoid compass malfunctions
Do not place magnets or any metal objects near the anti-glare inside rear
view mirror.
Doing this may cause a malfunction of the compass sensor.
■ To ensure normal operation of the compass
●Do not perform circling calibration of the compass in a place where the
earth's magnetic field is subject to interference by artificial magnetic fields.
● During calibration, do not operate electric systems (moon roof, power win-
dows, etc.) as they may interfere with the calibration.
Page 344 of 532
344 4-2. Maintenance
Vehicle interior
ItemsCheck points
Accelerator pedal • Moves smoothly (without uneven
pedal effort or catching)?
Automatic transmission “Park”
mechanism • Can the vehicle be held securely
on an incline with the shift lever in
P?
Brake pedal • Moves smoothly?
• Does it have appropriate clear-
ance and correct amount of free
play?
Brakes • Not pull to one side when
applied?
• Loss of brake effectiveness?
• Spongy feeling brake pedal?
• Pedal almost touches floor?
Clutch pedal • Moves smoothly?
Head restraints • Move smoothly and lock
securely?
Indicators/buzzers • Function properly?
Lights • Do all the lights come on?
Parking brake • Moves smoothly?
• Can hold the vehicle securely on
an incline?
Seat belts • Does the seat belt system oper-
ate smoothly?
• Are the belts undamaged?
Seats • Do the seat controls operate
properly?
Steering wheel • Moves smoothly?
• Has correct free play?
• No strange noises?
Page 352 of 532
352 4-3. Do-it-yourself maintenance
CAUTION
■Pre-driving check
Check that the hood is fully closed and locked.
If the hood is not locked properly, it may open while the vehicle is in motion
and cause an accident, which may result in death or serious injury.
■ After installing the support rod into the slot
Make sure the rod supports the hood securely from falling down on to your
head or body.
NOTICE
■When closing the hood
Be sure to return the support rod to its clip before closing the hood. Closing
the hood with the support rod up could cause the hood to bend.
Page 354 of 532
354 4-3. Do-it-yourself maintenance
Set the jack attachment on the
floor jack with the “FOR-
WARD” facing towards the
front of the vehicle, and place
the jack.
Before raising the vehicle,
make sure that the floor jack is
positioned so that the jack
point fits securely inside the
groove on the jack attach-
ment. STEP 2
Front of vehicle
STEP 3