Page 194 of 532
![TOYOTA COROLLA 2013 11.G Owners Manual 194 2-5. Driving information
●Due to the added load of the trailer, your vehicle’s engine may
overheat on hot days (at temper atures over 85°F [30°C]) when
driving up a long or steep grade. If t TOYOTA COROLLA 2013 11.G Owners Manual 194 2-5. Driving information
●Due to the added load of the trailer, your vehicle’s engine may
overheat on hot days (at temper atures over 85°F [30°C]) when
driving up a long or steep grade. If t](/manual-img/14/6332/w960_6332-193.png)
194 2-5. Driving information
●Due to the added load of the trailer, your vehicle’s engine may
overheat on hot days (at temper atures over 85°F [30°C]) when
driving up a long or steep grade. If the engine coolant temperature
gauge indicates overheating, immediately turn off the air condition-
ing (if in use), pull your vehicle off the road and stop in a safe spot.
( P. 461)
● Always place wheel blocks under both the vehicle’s and the
trailer’s wheels when parking. Ap ply the parking brake firmly, and
put the transmission in P (automatic transmission) or in 1 or R
(manual transmission). Avoid park ing on a slope, but if unavoid-
able, do so only after performing the following:
Apply the brakes and keep them applied.
Have someone place wheel blo cks under both the vehicle’s
and trailer’s wheels.
When the wheel blocks are in place, release the brakes slowly
until the blocks absorb the load.
Apply the parking brake firmly.
Shift into 1 or R (manual transmission) or P (automatic trans-
mission) and turn off the engine.
● When restarting after parking on a slope:
With the transmission in P (automatic transmission) or the
clutch pedal (manual transmission) depressed, start the
engine. On vehicles with an au tomatic transmission, be sure
to keep the brake pedal depressed.
Shift into a forward gear. If reversing, shift into R.
Release the parking brake (and also the brake pedal on vehi-
cles with an automatic transmission), and slowly pull or back
away from the wheel blocks. Stop and apply the brakes.
Have someone retrieve the blocks.
STEP 1
STEP 2
STEP 3
STEP 4
STEP 5
STEP 1
STEP 2
STEP 3
STEP 4
Page 196 of 532
196 2-5. Driving information
■Break-in schedule
If your vehicle is new or equipped with any new power train components
(such as an engine, transmission, differential or wheel bearing), Toyota rec-
ommends that you do not tow a trailer until the vehicle has been driven \
for
over 500 miles (800 km).
After the vehicle has been driven for over 500 miles (800 km), you can s\
tart
towing. However, for the next 500 miles (800 km), drive the vehicle at a
speed of less than 50 mph (80 km/h) when towing a trailer, and avoid full
throttle acceleration.
■ Maintenance
●If you tow a trailer, your vehicle will require more frequent maintenance
due to the additional load. (See “Scheduled Maintenance Guide” or
“Owner’s Manual Supplement”.)
● Retighten the fixing bolts of the towing ball and bracket after approxi-
mately 600 miles (1000 km) of trailer towing.
Page 202 of 532
202
2-5. Driving information
Dinghy towing (manual transmission)
Towing your vehicle with 4 wheels on the groundTo prevent damage to your vehicle, perform the following procedures
before towing. Shift the shift lever to N.
Switch to the “ACC” position. ( P. 135)
Ensure that the audio system and other powered devices have been
turned off.
Release the parking brake.
After towing, leave the engine in idle for at least 3 minutes before
driving the vehicle.
■Necessary equipment and accessories
Specialized equipment and accessories are required for dinghy towing. Con-
tact the service branch of the motor home manufacturer regarding recom-
mended equipment.
Your vehicle can be dinghy towed in a forward direction (with 4
wheels on the ground) behind a motor home.
STEP 1
STEP 2
STEP 3
Page 330 of 532

330
3-7. Other interior features
Floor mat
CAUTION
Observe the following precautions.
Failure to do so may cause the driver's floor mat to slip, possibly interfering
with the pedals while driving. An unexpectedly high speed may result or it may
become difficult to stop the vehicle, leading to a serious accident.
■When installing the driver's floor mat
●Do not use floor mats designed for other models or different model year
vehicles, even if they are Toyota Genuine floor mats.
● Only use floor mats designed for the driver's seat.
● Always install the floor mat securely using the retaining hooks (clips) pro-
vided.
● Do not use two or more floor mats on top of each other.
● Do not place the floor mat bottom-side up or upside-down.
■ Before driving
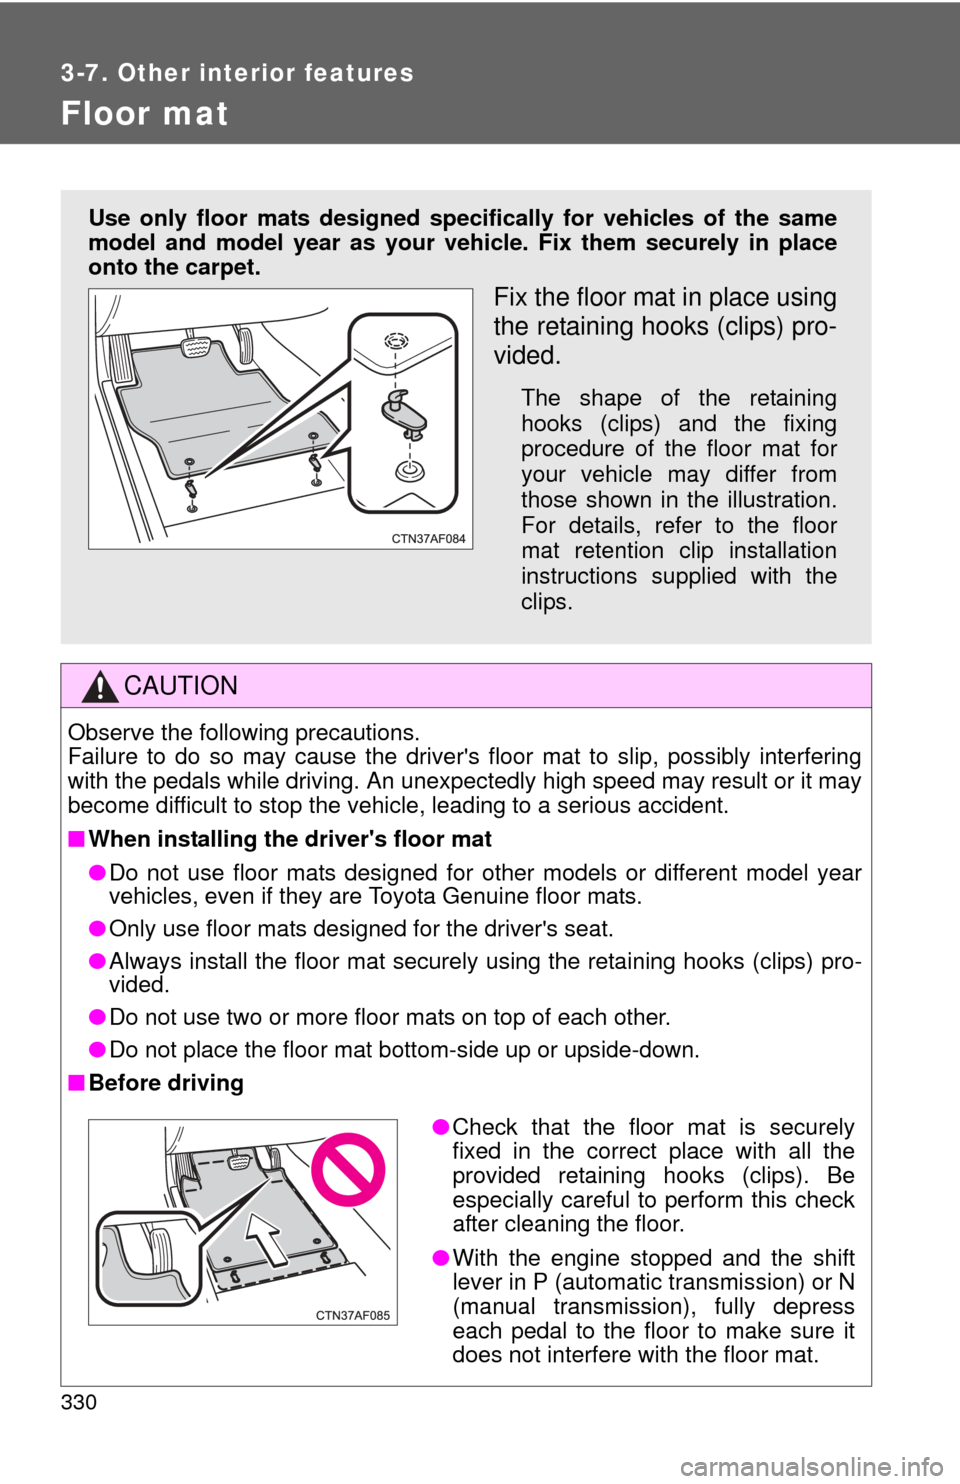
Use only floor mats designed specifically for vehicles of the same
model and model year as your vehic le. Fix them securely in place
onto the carpet.
Fix the floor mat in place using
the retaining hooks (clips) pro-
vided.
The shape of the retaining
hooks (clips) and the fixing
procedure of the floor mat for
your vehicle may differ from
those shown in the illustration.
For details, refer to the floor
mat retention clip installation
instructions supplied with the
clips.
● Check that the floor mat is securely
fixed in the correct place with all the
provided retaining hooks (clips). Be
especially careful to perform this check
after cleaning the floor.
● With the engine stopped and the shift
lever in P (automatic transmission) or N
(manual transmission), fully depress
each pedal to the floor to make sure it
does not interfere with the floor mat.
Page 355 of 532

355
4-3. Do-it-yourself maintenance
4
Maintenance and care
CAUTION
■
When raising your vehicle
Make sure to observe the following to reduce the possibility of death or\
seri-
ous injury.
●When using a floor jack, follow the instructions of the manual provided with
the jack.
● Do not use the jack that was supplied with your vehicle.
● Do not put any part of your body or get underneath the vehicle supported
only by the floor jack.
● Always use floor jack and/or automotive jack stands on a solid, flat, level
surface.
● Do not start the engine while the vehicle is supported by the floor jack.
● Stop the vehicle on level firm ground, firmly set the parking brake and put
the shift lever in P (automatic transmission) or R (manual transmission).
● Do not raise the vehicle while someone is in the vehicle.
● When raising the vehicle, do not place any objects on top of or underneath
the floor jack other than the jack attachment.
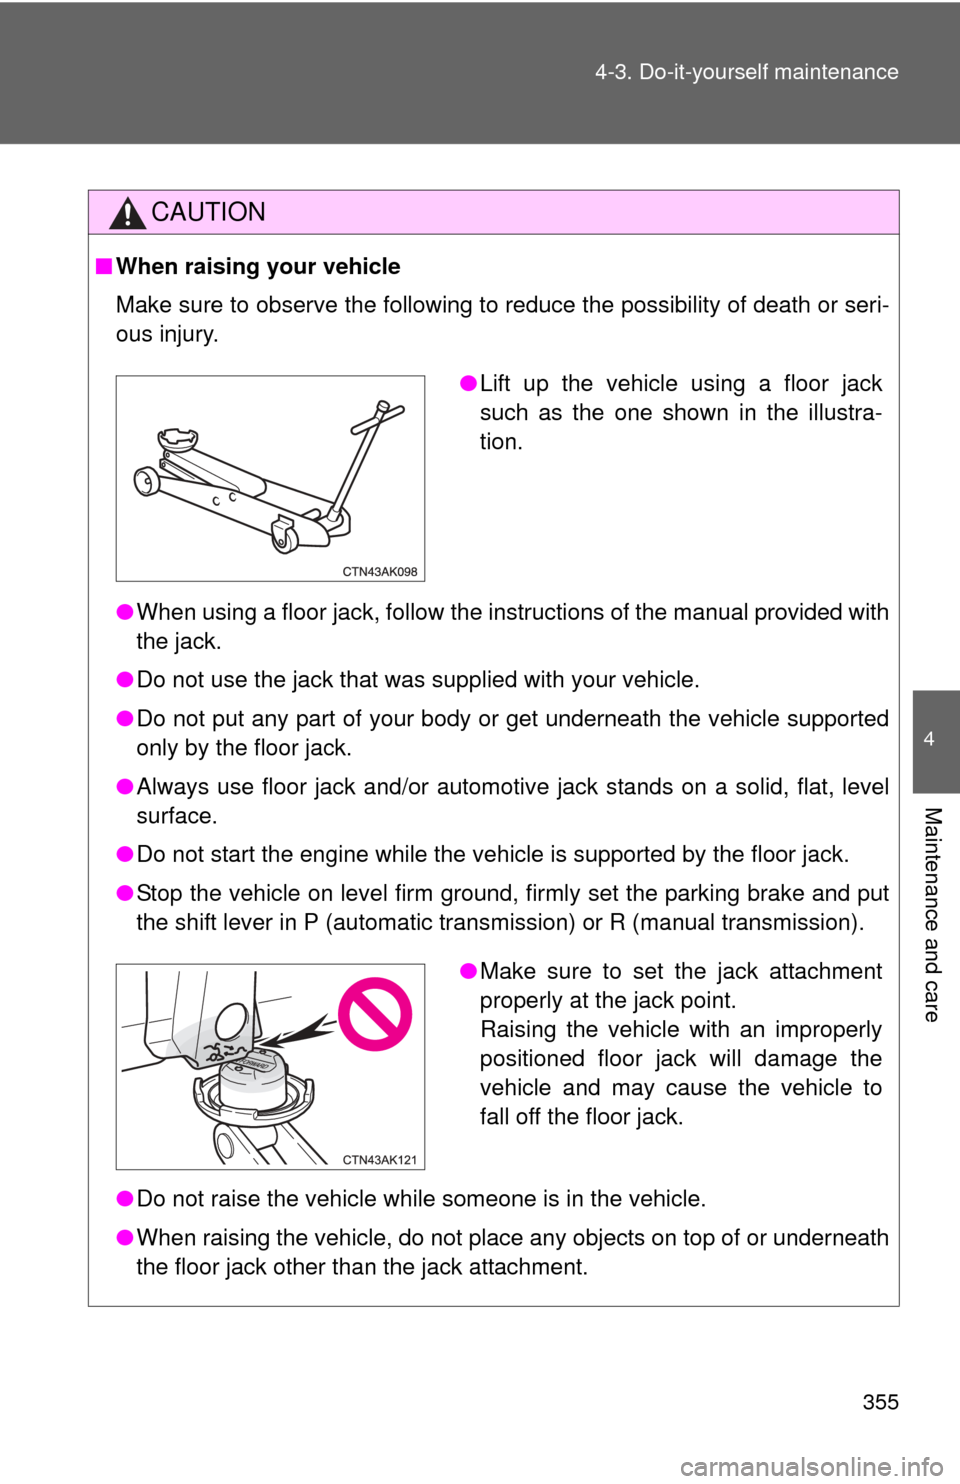
●Lift up the vehicle using a floor jack
such as the one shown in the illustra-
tion.
●Make sure to set the jack attachment
properly at the jack point.
Raising the vehicle with an improperly
positioned floor jack will damage the
vehicle and may cause the vehicle to
fall off the floor jack.
Page 421 of 532
5
When trouble arises
421
5-1. Essential information
Towing with a wheel-lift type truck from the rear
Automatic transmission: Use a
towing dolly under the front
wheels.
Manual transmission: We recom-
mend to use a towing dolly under
the front wheels.
When not using a towing dolly,
turn the engine switch to the
“ACC” position and shift the shift
lever to N.
Using a flat bed truckIf you use chains or cables to tie
down your vehicle, the angles
shaded in black must be 45.
Do not overly tighten the tie
downs or the vehicle may be
damaged.
NOTICE
■ To prevent causing serious dama ge to the transmission
(automatic transmission)
Never tow this vehicle from the rear with the front wheels on the ground.
■ To prevent damaging the vehicle (manual transmission)
Do not tow the vehicle when the engine switch is in “LOCK” position or key
removed.
The steering lock mechanism is not strong enough to hold the front wheels
straight.
Page 436 of 532
436
5-2. Steps to take in an emergency
If you have a flat tire
Remove the flat tire and replace it with the spare provided.
■Before jacking up the vehicle
●Stop the vehicle on a hard, flat surface.
● Set the parking brake.
● Shift the shift lever to P (automatic transmission) or R (manual
transmission).
● Stop the engine.
● Turn on the emergency flashers.
■ Location of the spare tire, jack and tools
*: The jack attachment is used w hen raising your vehicle with a
floor jack. ( P. 353)
Spare tire Jack
Wheel nut
wrenchJack handleJack
attachment*
Page 454 of 532
454 5-2. Steps to take in an emergency
■Stopping the engine
Shift the shift lever to P and press the “ENGINE START STOP” switch as
you normally do when stopping the engine.
■ Replacing the key battery
As the above procedure is a temporary measure, it is recommended that the
electronic key battery be replaced immediately when the battery is depleted.
(P. 388)
■ Changing “ENGINE START STOP” switch modes
Automatic transmission
Within 5 seconds of the buzzer sounding, release the brake pedal and press
the “ENGINE START STOP” switch.
The engine does not start and modes will be changed each time the switch
is pressed. ( P. 132)
Manual transmission
Within 5 seconds of the buzzer sounding, release the clutch pedal and press
the “ENGINE START STOP” switch.
The engine does not start and modes will be changed each time the switch
is pressed. ( P. 132)